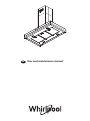
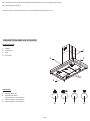
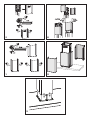
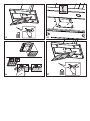
Whirlpool WIB93LMX is a cooker hood designed to effectively remove smoke, odors, and grease from your kitchen. It features three fan speeds, so you can adjust the suction power to your cooking needs. The hood also has two LED lights to illuminate your cooking area. Additionally, the grease filter is removable and dishwasher-safe for easy cleaning.
Whirlpool WIB93LMX is a cooker hood designed to effectively remove smoke, odors, and grease from your kitchen. It features three fan speeds, so you can adjust the suction power to your cooking needs. The hood also has two LED lights to illuminate your cooking area. Additionally, the grease filter is removable and dishwasher-safe for easy cleaning.


-
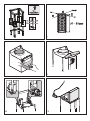
 1
1
-
 2
2
-
 3
3
-
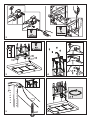
 4
4
-
 5
5
-
 6
6
-
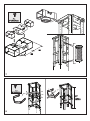
 7
7
-
 8
8
-
 9
9
-
 10
10
-
 11
11
-
 12
12
-
 13
13
-
 14
14
-
 15
15
-
 16
16
-
 17
17
-
 18
18
-
 19
19
-
 20
20


Whirlpool WIB93LMX is a cooker hood designed to effectively remove smoke, odors, and grease from your kitchen. It features three fan speeds, so you can adjust the suction power to your cooking needs. The hood also has two LED lights to illuminate your cooking area. Additionally, the grease filter is removable and dishwasher-safe for easy cleaning.
Ask a question and I''ll find the answer in the document
Finding information in a document is now easier with AI
Related papers
-
Whirlpool AKR 504 IX Owner's manual
-
Whirlpool AKR 810 IX User guide
-
Whirlpool AKR 951/1 IX User guide
-
Whirlpool DWGR 9780 ES User guide
-
-
Whirlpool DKEL 5760 IN BK User guide
-
-
Whirlpool DKR 5890/02 IN User guide
-
Whirlpool AKR 995/1 IX User guide
-
Whirlpool AKR 689 WH User guide
Other documents
-
 Oregon Scientific IAD80014-FIL User manual
-
KitchenAid KEIPP12020 User manual
-
-
KitchenAid KEWTP 90010 Owner's manual
-
-
Bauknecht DBHVP 83 LT K User guide
-
Bauknecht DBBR 9190 IN User guide
-
Bauknecht DDTI 5950 IN COOKERHO Program Chart
-
AEG DI 8610 User manual
-
Bauknecht DBRI 6910/IN Program Chart
