
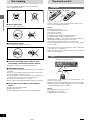
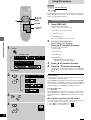
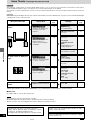
DVD/VIDEO CD/CD PLAYER
Operating Instructions
Model No. DVD-RV41
DVD-RV31
Only for the United Kingdom
Note:
“EB” on the packaging indicates the United
Kingdom.
Before connecting, operating or adjusting this prod-
uct, please read these instructions completely.
Please keep this manual for future reference.
RQT5869-B
The illustration shows DVD-RV31 for the United Kingdom and Continental
Europe.
EB E A EN

Getting started
RQT5869
2
Dear customer
Thank you for purchasing this product.
For optimum performance and safety, please read these instructions
carefully.
These operating instructions are applicable to models
DVD-RV41 and DVD-RV31.
Operations in these instructions are described mainly
with the remote control, but you can do the operations on
the main unit if the controls are the same.
[DVD-RV41]: indicates features applicable to DVD-RV41 only.
[DVD-RV31]: DVD-RV31 only.
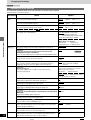
Table of contents
Getting started
Accessories . . . . . . . . . . . . . . . . . . . . . . . . . . . . . . 2
SAFETY PRECAUTIONS . . . . . . . . . . . . . . . . . . . . 3
Caution for AC Mains Lead. . . . . . . . . . . . . . . . . . 4
Disc information . . . . . . . . . . . . . . . . . . . . . . . . . . 5
Disc handling . . . . . . . . . . . . . . . . . . . . . . . . . . . . . 6
The remote control . . . . . . . . . . . . . . . . . . . . . . . . 6
Control reference guide . . . . . . . . . . . . . . . . . . . . 7
Connection to a television . . . . . . . . . . . . . . . . . . 8
Selecting TV screen type . . . . . . . . . . . . . . . . . . . 9
Basic operations
Basic play . . . . . . . . . . . . . . . . . . . . . . . . . . . . . . 10
Resume function . . . . . . . . . . . . . . . . . . . . . . . . . . . . . . . . . . . . 11
Starting play from a selected title or track . . . . . . . . . . . . . . . . . 11
Skipping chapters or tracks . . . . . . . . . . . . . . . . . . . . . . . . . . . . 12
Frame-by-frame viewing . . . . . . . . . . . . . . . . . . . . . . . . . . . . . . 12
Fast forward and rewind–SEARCH . . . . . . . . . . . . . . . . . . . . . 12
Slow-motion play . . . . . . . . . . . . . . . . . . . . . . . . . . . . . . . . . . . . 12
Advanced operations
Changing soundtracks, subtitle languages and
angles . . . . . . . . . . . . . . . . . . . . . . . . . . . . . . . . 13
Increasing your enjoyment of movies . . . . . . . . 14
ADVANCED SURROUND (V.S.S.) . . . . . . . . . . . . . . . . . . . . . . 14
BASS PLUS . . . . . . . . . . . . . . . . . . . . . . . . . . . . . . . . . . . . . . . 14
DIALOGUE ENHANCER . . . . . . . . . . . . . . . . . . . . . . . . . . . . . 15
CINEMA . . . . . . . . . . . . . . . . . . . . . . . . . . . . . . . . . . . . . . . . . . 15
ONE TOUCH CINEMA MEMORY . . . . . . . . . . . . . . . . . . . . . . 15
Repeat play . . . . . . . . . . . . . . . . . . . . . . . . . . . . . 16
Repeat play . . . . . . . . . . . . . . . . . . . . . . . . . . . . . . . . . . . . . . . . 16
A-B repeat play . . . . . . . . . . . . . . . . . . . . . . . . . . . . . . . . . . . . . 16
Changing the play sequence . . . . . . . . . . . . . . . 17
Program play/Random play . . . . . . . . . . . . . . . . . . . . . . . . . . . . 17
Using GUI screens . . . . . . . . . . . . . . . . . . . . . . . 18
Common procedures . . . . . . . . . . . . . . . . . . . . . . . . . . . . . . . . . 18
Screen for disc information . . . . . . . . . . . . . . . . . . . . . . . . . . . . 19
Shuttle screen . . . . . . . . . . . . . . . . . . . . . . . . . . . . . . . . . . . . . . 19
Screen for unit information . . . . . . . . . . . . . . . . . . . . . . . . . . . . 20
Changing initial settings. . . . . . . . . . . . . . . . . . . 21
Common procedures . . . . . . . . . . . . . . . . . . . . . . . . . . . . . . . . . 21
Summary of initial settings . . . . . . . . . . . . . . . . . . . . . . . . . . . . 22
Speaker setting . . . . . . . . . . . . . . . . . . . . . . . . . . . . . . . . . . . . . 24
Digital output . . . . . . . . . . . . . . . . . . . . . . . . . . . . . . . . . . . . . . . 25
Entering a password . . . . . . . . . . . . . . . . . . . . . . . . . . . . . . . . . 25
Home Theater
Home Theater . . . . . . . . . . . . . . . . . . . . . . . . . . . 26
Connecting an amplifier with 5.1-channel
audio input terminals . . . . . . . . . . . . . . . . . . . . . . . . . . . . . . . . 27
Connecting an amplifier with a built-in decoder or a decoder-
amplifier combination. . . . . . . . . . . . . . . . . . . . . . . . . . . . . . . . 27
Connecting an analog amplifier or system component . . . . . . . 28
Connecting a digital amplifier or system component. . . . . . . . . 28
Connecting an active subwoofer (optional) . . . . . . . . . . . . . . . . 28
Recording to MDs or cassette tapes . . . . . . . . . . . . . . . . . . . . . 28
Reference
Glossary . . . . . . . . . . . . . . . . . . . . . . . . . . . . . . . . 29
Troubleshooting guide . . . . . . . . . . . . . . . . . . . . 30
Maintenance. . . . . . . . . . . . . . . . . . . . . . . . . . . . . 31
Specifications . . . . . . . . . . . . . . . . . . . . Back cover
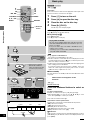
Accessories
Please check and identify the supplied accesso-
ries. Use numbers indicated in parentheses
when asking for replacement parts.
¸ Remote control . . . . . . . . . . . . . . . . . . . . . . . . . . . . . . . . . 1
(VEQ2380)
¸ Batteries . . . . . . . . . . . . . . . . . . . . . . . . . . . . . . . . . . . . . . . 2
for remote control
¸ AC mains lead . . . . . . . . . . . . . . . . . . . . . . . . . . . . . . . . . . 1
[For\the\United\Kingdom]
(RJA0053-2X)
[For\others]
(RJA0019-1X)
¸ Audio/video cable . . . . . . . . . . . . . . . . . . . . . . . . . . . . . . . 1
(VJA0788-D)
Note
The included AC mains lead is for use with this unit only. Do not
use it with other equipment.
[For\Australia\and\N.Z.]
(RJA0035-X)

3
Getting started
RQT5869
SAFETY PRECAUTIONS
Placement
Set the unit up on an even surface away from direct sunlight, high
temperatures, high humidity, and excessive vibration. These condi-
tions can damage the cabinet and other components, thereby short-
ening the unit’s service life.
Place it at least 15 cm away from wall surfaces to avoid distortion
and unwanted acoustical effects.
Do not place heavy items on the unit.
Voltage
Do not use high voltage power sources. This can overload the unit
and cause a fire.
Do not use a DC power source. Check the source carefully when
setting the unit up on a ship or other place where DC is used.
AC mains lead protection
Ensure the AC mains lead is connected correctly and not dam-
aged. Poor connection and lead damage can cause fire or electric
shock. Do not pull, bend, or place heavy items on the lead.
Grasp the plug firmly when unplugging the lead. Pulling the AC
mains lead can cause electric shock.
Do not handle the plug with wet hands. This can cause electric
shock.
Foreign matter
Do not let metal objects fall inside the unit. This can cause electric
shock or malfunction.
Do not let liquids get into the unit. This can cause electric shock or
malfunction. If this occurs, immediately disconnect the unit from the
power supply and contact your dealer.
Do not spray insecticides onto or into the unit. They contain flam-
mable gases which can ignite if sprayed into the unit.
Service
Do not attempt to repair this unit by yourself. If sound is interrupted,
indicators fail to light, smoke appears, or any other problem that is not
covered in these instructions occurs, disconnect the AC mains lead
and contact your dealer or an authorized service center. Electric
shock or damage to the unit can occur if the unit is repaired, disas-
sembled or reconstructed by unqualified persons.
Extend operating life by disconnecting the unit from the power
source if it is not to be used for a long time.
CAUTION!
THIS PRODUCT UTILIZES A LASER.
USE OF CONTROLS OR ADJUSTMENTS OR PERFORM-
ANCE OF PROCEDURES OTHER THAN THOSE SPECI-
FIED HEREIN MAY RESULT IN HAZARDOUS RADIATION
EXPOSURE.
DO NOT OPEN COVERS AND DO NOT REPAIR
YOURSELF. REFER SERVICING TO QUALIFIED
PERSONNEL.
WARNING:
TO REDUCE THE RISK OF FIRE, ELECTRIC SHOCK OR
PRODUCT DAMAGE, DO NOT EXPOSE THIS APPLIANCE
TO RAIN, SPLASHING, DRIPPING OR MOISTURE.
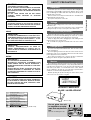
Do not place the unit
on amplifiers or equip-
ment that may become
hot.
The heat can damage the unit.
(Back of unit)
LUOKAN 1 LASERLAITE
KLASS 1 LASER APPARAT
CLASS 1
LASER PRODUCT
SUOMI
VAROITUS!
LAITTEEN KÄYTTÄMINEN MUULLA KUIN TÄSSÄ KÄYT-
TÖOHJEESSA MAINITULLA TAVALLA SAATTAA ALTIS-
TAA KÄYTTÄJÄN TURVALLISUUSLUOKAN 1 YLITTÄ-
VÄLLE NÄKYMÄTTÖMÄLLE LASERSÄTEILYLLE.
NORSK
ADVARSEL!
DETTE PRODUKTET ANVENDER EN LASER.
BETJENING AV KONTROLLER, JUSTERINGER ELLER
ANDRE INNGREP ENN DE SOM ER BESKREVENT I
DENNE BRUKSANVISNING, KAN FØRE TIL FARLIG BE-
STRÅLING.
DEKSLER MÅ IKKE ÅPNES, OG FORSØK ALDRI Å RE-
PARERE APPARATET PÅ EGENHÅND. ALT SERVICE
OG REPARASJONSARBEID MÅ UTFØRES AV KVALIFI-
SERT PERSONELL.
VAROITUS:
TULIPALO-, SÄHKÖISKUVAARAN TAI MUUN VA-
HINGON VÄHENTÄMISEKSI EI LAITETTA SAA AL-
TISTAA SATEELLE, ROISKEELLE, VESIPISAROILLE TAI
KOSTEUDELLE.
ADVARSEL:
FOR Å REDUSERE FAREN FOR BRANN, STRØMSJOKK
ELLER SKADER PÅ PRODUKTET, MÅ DETTE APPARA-
TET IKKE UTSETTES FOR REGN, VANNSPRUT, VANN-
DRÅPER ELLER FUKTIGHET.
(Inside of unit)
RQLS0233
-
-
-
-
-
-
-
-
-
-
VISIBLE AND INVISIBLE LASER RADIATION WHEN OPEN.
AVOID DIRECT EXPOSURE TO BEAM.
DANGER
(FDA 21 CFR)
(IEC60825-1)
VISIBLE AND INVISIBLE LASER RADIATION WHEN OPEN.
AVOID EXPOSURE TO BEAM.
CAUTION
RAYONNEMENT LASER VISIBLE ET INVISIBLE EN CAS D’OUVERTURE.
EXPOSITION DANGEREUSE AU FAISCEAU.
ATTENTION
SYNLIG OG USYNLIG LASERSTRÅLING VED ÅBNING.
UNDGÅ UDSÆTTELSE FOR STRÅLING.
ADVARSEL
AVATTAESSA OLET ALTTIINA NÄKYVÄÄ JA NÄKYMÄTÖN
LASERSÄTEILYLLE. ÄLÄ KATSO SÄTEESEEN.
VARO!
SYNLIG OCH OSYNLIG LASERSTRÅLNING NÄR DENNA DEL
ÄR ÖPPNAD. BETRAKTA EJ STRÅLEN.
VARNING
SYNLIG OG USYNLIG LASERSTRÅLING NÅR DEKSEL ÅPNES.
UNNGÅ EKSPONERING FOR STRÅLEN.
ADVARSEL
SICHTBARE UND UNSICHTBARE LASERSTRAHLUNG, WENN ABDECKUNG
GEÖFFNET. NICHT DEM STRAHL AUSSETZEN.
VORSICHT

Getting started
RQT5869
4
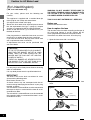
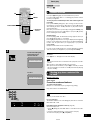
Caution for AC Mains Lead
(For United Kingdom)
(“EB” area code model only)
For your safety, please read the following text
carefully.
This appliance is supplied with a moulded three pin
mains plug for your safety and convenience.
A 5-ampere fuse is fitted in this plug.
Should the fuse need to be replaced please ensure
that the replacement fuse has a rating of 5-ampere
and that it is approved by ASTA or BSI to BS1362.
Check for the ASTA mark ì or the BSI mark í on
the body of the fuse.
If the plug contains a removable fuse cover you must
ensure that it is refitted when the fuse is replaced.
If you lose the fuse cover the plug must not be used
until a replacement cover is obtained.
A replacement fuse cover can be purchased from
your local dealer.
If a new plug is to be fitted please observe the wiring
code as stated below.
If in any doubt please consult a qualified electrician.
IMPORTANT
The wires in this mains lead are coloured in accor-
dance with the following code:
Blue: Neutral, Brown: Live.
As these colours may not correspond with the col-
oured markings identifying the terminals in your plug,
proceed as follows:
The wire which is coloured Blue must be connected to
the terminal which is marked with the letter N or col-
oured Black or Blue.
The wire which is coloured Brown must be connected
to the terminal which is marked with the letter L or col-
oured Brown or Red.
WARNING: DO NOT CONNECT EITHER WIRE TO
THE EARTH TERMINAL WHICH IS MARKED WITH
THE LETTER E, BY THE EARTH SYMBOL î OR
COLOURED GREEN OR GREEN/YELLOW.
THIS PLUG IS NOT WATERPROOF—KEEP DRY.
Before use
Remove the connector cover.
How to replace the fuse
The location of the fuse differ according to the type of
AC mains plug (figures A and B). Confirm the AC
mains plug fitted and follow the instructions below.
Illustrations may differ from actual AC mains plug.
1. Open the fuse cover with a screwdriver.
2. Replace the fuse and close or attach the fuse
cover.
Fuse cover
Figure A
Figure B
Fuse
(5 ampere)
Fuse
(5 ampere)
Figure A
Figure B
CAUTION!
IF THE FITTED MOULDED PLUG IS UNSUIT-
ABLE FOR THE SOCKET OUTLET IN YOUR
HOME THEN THE FUSE SHOULD BE RE-
MOVED AND THE PLUG CUT OFF AND DIS-
POSED OF SAFELY.
THERE IS A DANGER OF SEVERE ELECTRI-
CAL SHOCK IF THE CUT OFF PLUG IS IN-
SERTED INTO ANY 13-AMPERE SOCKET.

5
Getting started
RQT5869
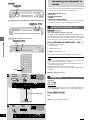
A
B
C
g
a
b
f
2
2
ALL
3
4
2
e
d
c
3
4
3
4
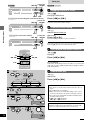
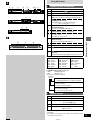
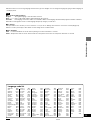
Disc information
º Discs that can be played [A]
º Region Management Information (DVD only) [B]
Region numbers are allocated to DVD players and software accord-
ing to where they are sold.
³For the United Kingdom and Continental Europe : “2”
³For Australia and N.Z. : “4”
³For Asia : “3”
DVDs can be played on this unit if their region number is the same or
includes the same number, or if the DVD is marked “ALL”.
Confirm the region number for this unit before choosing discs. The
number for this unit is indicated on the rear panel of the unit.
d (Back of the unit) e Disc
º Discs that cannot be played
DVD-Audio, DVD-ROM, DVD-R/DVD-RAM, CD-ROM, VSD, CDV,
CD-G, +RW, DVD-RW, CVD, SVCD, SACD, Divx Video Discs and
Photo CD.
º DVDs that can be played [C]
f This unit has a Dolby Digital decoder so you can play DVDs with
this mark.
g This unit does not have a DTS decoder. Connect this unit to
equipment that has a DTS decoder to enjoy DVDs with this mark.
º Type of disc for the type of connected TV
DVDs and Video CDs are recorded using either PAL or NTSC.
Refer to this table when selecting discs.
¤1
If you select “NTSC” in “NTSC Disc Output” (á page 22), the
picture may be clearer.
¤2
The factory preset for “NTSC Disc Output” is “PAL60”, so no
changes to the initial settings are necessary.
(If your television is not equipped to handle PAL 525/60 signals the
picture will not be shown correctly.)
¤3
The factory preset for “NTSC Disc Output” is “NTSC”, so no
changes to the initial settings are necessary.
¤4
Select “PAL60” in “NTSC Disc Output” (á page 22).
(If your television is not equipped to handle PAL 525/60 signals the
picture will not be shown correctly.)
Note
When a disc which does not comply with Video CD standard is
played, the bottom part of the picture may disappear.
º Playing DVDs and Video CDs
The producer of the material can control how these discs are played.
This means that you may not be able to control play of a disc with
some operations described in these operating instructions. Read the
disc’s instructions carefully.
TV type
Multi-
system TV
NTSC TV
PAL TV
For the United Kingdom,
Continental Europe,
Australia and N.Z.
Y
Y
¤1
t
t
Y
Y
¤2
For Asia
Y
Y
t
Y
¤3
Y
Y
¤4
Disc
PAL
NTSC
PAL
NTSC
PAL
NTSC
TV Monitor
Logo
a
b
c
Disc type
DVD-Video
Video CD
Audio CD
Video
system
PAL/NTSC
PAL/NTSC
–
Indication
used in
instructions
[DVD]
[VCD]
[CD]
Region
number
See below
for details.
–
–

Getting started
RQT5869
6
30°
30°
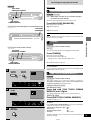
The remote control
Batteries
³Insert so the poles (i and j) match those in the remote control.
³Do not use rechargeable type batteries.
Do not;
³mix old and new batteries.
³use different types at the same time.
³heat or expose to flame.
³take apart or short circuit.
³attempt to recharge alkaline or manganese batteries.
³use batteries if the covering has been peeled off.
Mishandling of batteries can cause electrolyte leakage which can
damage items the fluid contacts and may cause a fire.
If electrolyte leaks from the batteries, consult your dealer.
Wash thoroughly with water if electrolyte comes in contact with any
part of your body.
Remove if the remote control is not going to be used for a long period
of time. Store in a cool, dark place.
Replace if the unit does not respond to the remote control even when
held close to the front panel.
Use
Aim at the sensor, avoiding obstacles, at a maximum range of 7 m
directly in front of the unit.
³Keep the transmission window and the unit’s sensor free from dust.
³Operation can be affected by strong light sources, such as direct
sunlight, and the glass doors on cabinets.
Do not;
³put heavy objects on the remote control.
³take the remote control apart.
³spill liquids onto the remote control.
a Remote control signal sensor
R6, AA, UM-3
1
2
Disc handling
Do not use irregularly shaped discs, such as heart-shaped.
(These can damage the unit.)
º How to hold a disc
Do not touch the recorded surface.
º If the surface is dirty
Wipe it with a damp cloth and then wipe dry.
º If the disc is brought from a cold to a warm
environment, moisture may form on the disc
Wipe with a soft, dry, lint-free cloth before using the disc.
º Handling precautions
³Do not write on the label side with a ball-point pen or other writing
instrument.
³Do not use record cleaning sprays, benzine, thinner, static electric-
ity prevention liquids or any other solvent.
³Do not attach labels or stickers to discs. (Do not use discs with ex-
posed adhesive from tape or left over peeled-off stickers.)
³Do not use scratch-proof protectors or covers.
³Do not use discs printed with label printers available on the market.
º Do not place or store discs in the following
places
³Locations exposed to direct sunlight
³Humid or dusty locations
³Locations directly exposed to a heat vent or heating appliance
7 m

7
Getting started
RQT5869
OPEN/CLOSE TOP MENU MENU DISPLAY
ENTER
ONE TOUCH
CINEMA MEMORY
V.S.S.
DOLBY DIGITAL
DECODER
DIALOGUE
ENHANCER
ADVANCED
SURROUND
CINEMA
OPEN/CLOSE
BASS
PLUS
DIALOGUE
ENHANCER
V.S.S.
ADVANCED
SURROUND
OPEN/CLOSE
RANDOM
A-B
REPEAT
REPEAT
MODE
ONE TOUCH
CINEMA MEMORY
BASS
PLUS
V.S.S.
DIALOGUE
ENHANCER
CINEMA
ADVANCED
SURROUND
STOP
PAUSE
PLAY
OPEN/CLOSE
SKIP
TOP MENU
MENU
DISPLAY
PLAY MODE SUBTITLE
AUDIO ANGLE
ENTER
RETURN
123
A-B REPEAT
456
789
SETUP CANCEL
0
S
10
6:9 5
∫; 1
SLOW / SEARCH
V.S.S.
<
REPEAT MODE
Í
1
9
C
L
<
M
O
P
Q
N
A
:
;
=
F
G
3
K
H
B
I
J
1 2 3 5 6 9 = >: <
DCBA?
?
?
@
7
9 5 >4:1
CBA
1 2 3 5 64 9 GF:
CBA
8
@
>
@
8
3
E
8 ;
Control reference guide
Page
@ Standby indicator (ê)
When the unit is connected to the AC mains supply, this indicator
lights up in standby mode and goes out when the unit is turned on.
A Stop button (º) . . . . . . . . . . . . . . . . . . . . . . . . . . . . . . . . . . . 10
B Pause button (;) . . . . . . . . . . . . . . . . . . . . . . . . . . . . . . . . . . 10
C Play button (1) . . . . . . . . . . . . . . . . . . . . . . . . . . . . . . . . . . . 10
D
[DVD-RV41]
Joystick (3, 4, 2, 1)/Enter button (ENTER) . . . . . . . . . . 10
E
[DVD-RV31] (For Australia, N.Z. and Asia)
Random play button (RANDOM) . . . . . . . . . . . . . . . . . . . . . 17
F
[DVD-RV31] (For Australia, N.Z. and Asia)
Repeat button (REPEAT MODE) . . . . . . . . . . . . . . . . . . . . . 16
G
[DVD-RV31] (For Australia, N.Z. and Asia)
A-B repeat button (A-B REPEAT) . . . . . . . . . . . . . . . . . . . . 16
Remote control
Buttons such as function the same as the controls on the unit.
H Cursor buttons (3, 4, 2, 1)/Enter button (ENTER) . . . . 10
I Subtitle button (SUBTITLE) . . . . . . . . . . . . . . . . . . . . . . . . . 13
J Play mode button (PLAY MODE) . . . . . . . . . . . . . . . . . . . . . 17
K Setup button (SETUP) . . . . . . . . . . . . . . . . . . . . . . . . . . . . 9, 21
L Slow/Search buttons (6, 5 SLOW/SEARCH) . . . . . . . 12
M Return button (RETURN) . . . . . . . . . . . . . . . . . . . . . . . . . . . 10
N Audio button (AUDIO) . . . . . . . . . . . . . . . . . . . . . . . . . . . . . . 13
O Angle button (ANGLE) . . . . . . . . . . . . . . . . . . . . . . . . . . . . . 13
P Numbered buttons (1–9, 0, S10) . . . . . . . . . . . . . . . . . . . . . 10
Q Cancel button (CANCEL) . . . . . . . . . . . . . . . . . . . . . . . . . . . 17
[DVD-RV41]
[DVD-RV31]
(For the United Kingdom and Continental Europe)
[DVD-RV31] (For Australia, N.Z. and Asia)
Main unit
Page
1 Standby/on switch (ê/I) . . . . . . . . . . . . . . . . . . . . . . . . . . . . . 9
Press to switch the unit from on to standby mode or vice versa.
In standby mode, the unit is still consuming a small amount of
power.
2
[DVD-RV41]
[DVD-RV31]
(For Australia, N.Z. and Asia)
One touch cinema memory button/indicator
(ONE TOUCH CINEMA MEMORY) . . . . . . . . . . . . . . . . . . . . 15
3 Advanced Surround (V.S.S.) button
(ADVANCED SURROUND, (V.S.S.)) . . . . . . . . . . . . . . . . . . . 14
4
[DVD-RV31]
Bass plus button (BASS PLUS) . . . . . . . . . . . . . . . . . . . . . . 14
5 Dialogue Enhancer button (DIALOGUE ENHANCER) . . . . 15
6
[DVD-RV41]
[DVD-RV31]
(For Australia, N.Z. and Asia)
Cinema button (CINEMA) . . . . . . . . . . . . . . . . . . . . . . . . . . . 15
7
[DVD-RV41]
DOLBY DIGITAL indicator (DOLBY DIGITAL, DECODER)
Goes out when playing a disc without Dolby Digital.
8 Disc tray . . . . . . . . . . . . . . . . . . . . . . . . . . . . . . . . . . . . . . . . . 10
9 Disc tray open/close button (<, OPEN/CLOSE) . . . . . . . . 10
: Skip buttons (:, 9) . . . . . . . . . . . . . . . . . . . . . . . . . . . 12
;
[DVD-RV41]
Top menu button (TOP MENU) . . . . . . . . . . . . . . . . . . . . . . 10
<
[DVD-RV41]
Menu button (MENU) . . . . . . . . . . . . . . . . . . . . . . . . . . . . . . . 10
=
[DVD-RV41]
Display button (DISPLAY) . . . . . . . . . . . . . . . . . . . . . . . . . . 18
> Shuttle dial (6, 5) . . . . . . . . . . . . . . . . . . . . . . . . . . . . . 12
? Display

Getting started
RQT5869
8
VCR
AV1
AV2
VCR
AV1
AV2
VCR
TV
L
R
SUB-
WOOFER
AUDIO OUT
VIDEO
OUT
S VIDEO
OUT
AV
AV1
AV2
OPTICAL
L
R
SUB-
WOOFER
AUDIO OUT
VIDEO
OUT
S VIDEO
OUT
DIGITAL AUDIO OUT
(PCM/BITSTREAM)
AC IN
AV
AUDIO
IN
L
R
VIDEO
IN
L
P
B
P
R
Y
L
R
SUB-
WOOFER
COMPONENT
VIDEO OUT
AUDIO OUT
VIDEO
OUT
S VIDEO
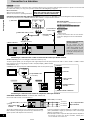
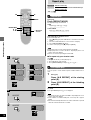
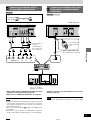
OUT
e To household
mains socket
f AC mains lead
(included)
p TV’s S
video input
terminal
h 21-pin SCART cable
(not included)
gSCART
terminal
j Television
k This unit
l Video cassette
recorder
m Satellite receiver or
decoder
n SCART terminal of television
b Audio/video cable (included)
(Red)(White)(Yellow)
c(Red)(White)(Yellow)
a Television
d Back of the unit
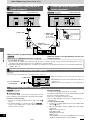
The S-video terminal achieves a more vivid picture than the VIDEO
OUT terminal by separating the chrominance (C) and luminance (Y)
signals. (Actual results depend on the television.)
Connection using these terminals outputs the color difference signals
(P
B/PR) and luminance signal (Y) separately in order to achieve high
fidelity in reproducing colors.
³The description of the component video input terminals depends on
the television or monitor (e.g. Y/P
B/PR, Y/B-Y/R-Y, Y/CB/CR). Con-
nect to terminals of the same color.
o S video cable (not included)
Video cable (not included)
TV’s component video
input terminals
Y terminal
P
B terminal
P
R terminal
Connecting to a television with S video or component video input terminals
COMPONENT VIDEO OUT terminals: for Australia, N.Z. and Asia only
Connect the audio terminals as described above.
i Example
[DVD-RV41][DVD-RV31]
Connect Your Unit Directly
To Your Television.
Do not connect the unit
through your video cassette re-
corder when setting up your
home entertainment system,
because the picture may not
be played correctly due to the
copy guard.
Connection to a television
[DVD-RV41] [DVD-RV31]
These pages explain how to connect the unit to a television and set it up so you hear the audio through the television’s speakers. Connections and
procedures that enable you to enjoy more powerful sounds are described beginning on page 26.
Before connection
³Disconnect the AC mains lead.
³Refer to the television’s operating instructions.
Connecting to a television with video input terminal (The illustration shows DVD-RV31 for the United Kingdom and Continental Europe.)
See below if your television has a SCART terminal, S video terminal, or component video terminals.
Connecting to a television and a video cassette recorder with 21-pin SCART terminal
SCART terminal(s): for the United Kingdom and Continental Europe only
To improve picture quality, you can change the video signal output from the AV (AV1) terminal from “Video” to either “S-Video” or “RGB” to suit the
type of television you are using [á page 22, Video–AV (AV1) Output]. (“RGB” available
with DVD-RV41 only.)
S-VIDEO provides better quality than VIDEO and RGB provides the best picture quality.
FOR UNITED KINGDOM ONLY
READ THE CAUTION FOR THE AC MAINS
LEAD ON PAGE 4 BEFORE CONNECTION.
Conserving power
This unit consumes a small amount of power,
even when it is turned off.
[For\the\United\Kingdom\and\Continental\Europe]
approx. 4 W
[For\Australia\and\N.Z.]
approx. 3 W
[For\Asia]
approx. 3.5 W
To save power when the unit is not to be used for
a long time, unplug it from the household mains
socket.

9
Getting started
RQT5869
1
1
2·6
3·4·5
4·5
2
3
6
ENTER
RETURN
Disc
SETUP
SELECT
Audio
Subtitle
Menus
Ratings
English
English
Automatic
SETUP
AV Output
Still Mode
Video
Automatic
4:3 Pan&ScanTV Aspect
Video
NTSC Disc Output
PAL60
SETUP
TV Aspect
4:3 Letterbox
16:9
4:3 Pan&Scan
a
b
STOP
PAUSE
PLAY
SKIP
TOP MENU
MENU
DISPLAY
PLAY MODE SUBTITLE
AUDIO ANGLE
ENTER
RETURN
123
A-B REPEAT
456
789
SETUP CANCEL
0
S
10
6:9 5
∫; 1
SLOW / SEARCH
V.S.S.
<
Í
REPEAT MODE
OPEN/CLOSE
Í
SETUP
SETUP
Level 8
ENTER RETURN
ENTER RETURN
ENTER RETURN
SELECT
SELECT
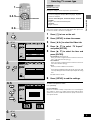
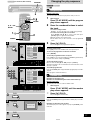
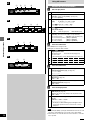
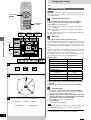
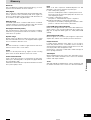
Selecting TV screen type
[DVD-RV41] [DVD-RV31]
Remote control only
Change the setting to suit the aspect ratio of your television.
Preparation
Turn on the television and select the appropriate video input on the
television to suit the connections for the player.
1 Press [ê] to turn on the unit.
2 Press [SETUP] to show the menus.
3 Press [2, 1] to select the Video tab.
4 Press [3, 4] to select “TV Aspect”
and press [ENTER].
5 Press [3, 4] to select the item and
press [ENTER].
³4:3 Pan&Scan (Factory preset)
Select if you have a regular television and to view 16:9 soft-
ware
¤
in the pan and scan style (a).
³4:3 Letterbox
Select if you have a regular television and to view 16:9 soft-
ware in the letterbox style (b).
³16:9
Select if you have a widescreen television.
¤
16:9 software prohibited from being shown in the pan and
scan style will appear in the letterbox style despite the setting
here.
The Video menu is shown.
6 Press [SETUP] to end the settings.
To return to the previous screen
Press [RETURN].
For your reference
DVDs are recorded in a variety of aspect ratios. You can change the
way software is shown on a regular television (4:3) with the above
operation. If you have a widescreen television (16:9), use the televi-
sion’s picture modes.
The menu language is set to English, but you can change it
as follows (á page 22, Display–Menu Language). English is
used in the examples.
(For the United Kingdom, Continental Europe, Australia
and N.Z.)
English>French/German/Italian/Spanish
(For Asia)
English>Chinese

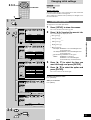
Basic operations
RQT5869
10
1
2
3
4
Reading
Close
A
PLAY
OPEN/CLOSE
1
<
PAUSE
;
B
TOP MENU
MENU
Open
Í
STOP
PAUSE
PLAY
SKIP
TOP MENU
MENU
DISPLAY
PLAY MODE SUBTITLE
AUDIO ANGLE
ENTER
RETURN
123
A-B REPEAT
456
789
SETUP CANCEL
0
S
10
6:9 5
∫; 1
SLOW / SEARCH
V.S.S.
<
Í
REPEAT MODE
OPEN/CLOSE
1
2
4
TOP MENU
MENU
RETURN
:, 9
∫
;
PGMRND
DVD VCD
A-B
TITLE TRACK CHAP V.S.S. BASS
CINEMA
VIDEO
PGMRND
DVD VCD
A-B
TITLE TRACK CHAP
VIDEO
3, 4, 2, 1
ENTER
=Numbered
buttons
Basic play
[DVD-RV41] [DVD-RV31]
[DVD] [VCD] [CD]
Preparation
Turn on the television and select the appropriate video input on the
television to suit the connections for the player.
1 Press [ê] to turn on the unit.
2 Press [<] to open the disc tray.
3 Place the disc on the disc tray.
4 Press [1] (PLAY).
The disc tray closes and play begins.
º To stop play
Press [º] (á page 11, Resume function).
º To pause play [A]
Press [;] during play.
Press [1] (PLAY) to restart play.
Note
³If “” appears on the television
The operation is prohibited by the unit or disc.
³The disc continues to rotate while the menu is displayed even after
you finish playing an item. Press [º] when you finish to preserve the
unit’s motor and your television screen.
³Volume may be lower when playing DVDs than when playing other
discs or during television broadcasts.
If you turn the volume up on the television or amplifier, ensure you
reduce the volume again before playing other sources so that a
sudden increase in output does not occur.
º Auto standby
The unit switches to the standby mode after about 30 minutes in the
stop mode.
When a menu screen appears on the
television
[DVD] [VCD]
Remote control only
Press the numbered buttons to select an
item.
To select a 2-digit number
Example: To select item 23, press [S10], then [2] and [3].
³When playing DVDs, you can also use [3, 4, 2, 1] to select
items. Press [ENTER] to confirm your selection.
Play of the selected item now begins.
Other buttons used to operate menus
Read the disc’s instructions for further details about operation.
[9]: Shows the next menu.
[:]: Shows the previous menu.
[RETURN]: Shows the menu screen.
[TOP MENU]: Shows the first menu screen. [DVD]
[MENU]: Shows the menu screen. [DVD]
]B\ DVD menus
DVDs can have several menus. The menu displayed when you press
[TOP MENU] may be different from the menu displayed when you
press [MENU].
>Label must face upward.
(With double-sided discs,
load so the label for the side
you want to play is facing
up.)
?Unit’s display
(e.g. DVD is loaded)
@Title
Title
Title
MenuBMenu
AThe disc’s
top menu
Menu
Playing CD-R and CD-RW
This unit can play CD-DA (digital audio) and video CD format
audio CD-R and CD-RW that have been finalized
¤
upon com-
pletion of recording.
It may not be able to play some CD-R or CD-RW due to the
condition of the recording.
¤
Finalizing is a process that enables CD-R/CD-RW players to
play audio CD-R and CD-RW.

11
Basic operations
RQT5869
B
A
123
456
789
0
S
10
PGMRND
DVD VCD
A-B
VIDEO
STOP
PAUSE
PLAY
OPEN/CLOSE
SKIP
TOP MENU
MENU
DISPLAY
PLAY MODE SUBTITLE
AUDIO ANGLE
ENTER
RETURN
123
A-B REPEAT
456
789
SETUP CANCEL
0
S
10
6:9 5
∫ ; 1
SLOW / SEARCH
V.S.S.
<
REPEAT MODE
Í
∫
MENU
1
PGMRND
DVD VCD
A-B
TITLE TRACK CHAP V.S.S. BASS
CINEMA
VIDEO
PLAY MODE
Press PLAY to Chapter Review
Press PLAY to Preview Chapters
Basic play
[DVD-RV41] [DVD-RV31]
[DVD] [VCD] [CD]
»
A
Resume function
If you press [º] during play, the unit remembers the position.
If you press [1] (PLAY) while “!” is flashing, play restarts from the
position you stopped it.
To start play from a memorized position after switching the unit
to standby
Press [PLAY MODE] during play. (The message “Position memo-
rized” appears on the television.) Now when you press [1] (PLAY)
after switching the unit to standby and back on, play starts from the
memorized position.
Even after you memorize a position by pressing [PLAY MODE], play
will start from the point you stopped play if you press [1] (PLAY)
before switching the unit to standby.
Chapter Review
If you are playing DVD, the illustrated message appears when you
pressed [1] (PLAY) while “!” is flashing.
Pressing [1] (PLAY) while the message is displayed, the beginning
portions of each chapter up to the current one are played and full play
resumes from the point where you stopped play or you pressed
[PLAY MODE].
(Chapter Review feature works only within a title.)
If you do not press [1] (PLAY), the message disappears and play
starts from where you stopped it or you pressed [PLAY MODE].
To cancel
Press [º] until “!” disappears from the unit’s display.
Note
³The resume function does not work if the disc’s play time is not dis-
played.
³The position is cleared when the disc tray is opened.
³The position memorized when you press [º] is cleared if you switch
the unit to standby or it switches to standby automatically (á page
10, Auto standby).
»
B
Starting play from a selected title
or track
Remote control only
While stopped
Press the numbered buttons.
To select a 2-digit number
Example: To select track 23, press [S10], then [2] and [3].
Play starts from the selected title/track.
Note
This may not work with some discs.
For your reference
The numbered buttons also work during play if the disc is a Karaoke
DVD, Video CD, or CD.
If the Video CD has playback control (á page 29)
Cancel menu play first.
1. Press [º] during play until “PBC PLAY” is cleared from the unit’s
display.
2. Press the numbered buttons to select a track to start play.
To return to menu play, press [º] and [MENU].
=Numbered
buttons
For the United Kingdom,
Continental Europe,
Australia and N.Z.
For Asia

Basic operations
RQT5869
12
A
B
C
D
65
SLOW / SEARCH
[
:
][
9
]
SKIP
:9
ENTER
65
SLOW / SEARCH
ENTER
STOP
PAUSE
PLAY
OPEN/CLOSE
SKIP
TOP MENU
MENU
DISPLAY
PLAY MODE SUBTITLE
AUDIO ANGLE
ENTER
RETURN
6:9 5
∫ ;1
<
SLOW / SEARCH
Í
; 1
:, 96, 5
2, 1
OPEN/CLOSE
BASS
PLUS
DIALOGUE
ENHANCER
V.S.S.
ADVANCED
SURROUND
;
:, 9
1
6, 5
OPEN/CLOSE TOP MENU MENU DISPLAY
ENTER
ONE TOUCH
CINEMA MEMORY
V.S.S.
DOLBY DIGITAL
DECODER
DIALOGUE
ENHANCER
VIRTUAL
SURROUND
CINEMA
OPEN/CLOSE TOP MENU MENU DISPLAY
ENTER
ONE TOUCH
CINEMA MEMORY
V.S.S.
DOLBY DIGITAL
DECODER
DIALOGUE
ENHANCER
VIRTUAL
SURROUND
CINEMA
OPEN/CLOSE TOP MENU MENU DISPLAY
ENTER
ONE TOUCH
CINEMA MEMORY
V.S.S.
DOLBY DIGITAL
DECODER
DIALOGUE
ENHANCER
ADVANCED
SURROUND
CINEMA
;
:, 9
1
6, 5
OPEN/CLOSE
RANDOM
A-B
REPEAT
REPEAT
MODE
ONE TOUCH
CINEMA MEMORY
BASS
PLUS
V.S.S.
DIALOGUE
ENHANCER
CINEMA
ADVANCED
SURROUND
;
:, 9
1
6, 5
2, 1
Basic play
[DVD-RV41] [DVD-RV31]
»
A
Skipping chapters or tracks
[DVD] [VCD] [CD]
During play or while paused
Press [:] or [9].
Each press increases the number of skips.
»
B
Frame-by-frame viewing
[DVD] [VCD]
DVD-RV31:
Remote control only
While paused
Press [2] or [1].
The frame changes each time you press the buttons.
³The frames change in succession if you press and hold the button.
³Pressing [;] also activates forward frame-by-frame.
»
C
Fast forward and rewind–SEARCH
[DVD] [VCD] [CD]
During play
Press [6] or [5].
For your reference
Audio will be heard during search for most discs. You can turn this
audio off if you want to (DVD and Video CD only á page 22, Audio–
Audio during Search).
»
D
Slow-motion play
[DVD] [VCD]
While paused
Press [6] or [5].
? twice @ once
A Chapter/track
once
twice
> Play position
When playing Video CDs with playback control
Turning the shuttle dial or pressing buttons to perform skip,
search or slow-motion may take you to a menu screen.
or
=Shuttle dial
Chapter/track Chapter/track
or
[DVD-RV31]
(For the United Kingdom and Continental Europe)
[DVD-RV41]
[DVD-RV31]
(For Australia, N.Z. and Asia)
=Shuttle dial
or
or
=Shuttle dial
or
Notes
³The speed of search and slow-motion increases up to 5
steps.
³Press [1] (PLAY) to restart play.
³When you release the shuttle dial during search or slow-
motion, the unit returns to the previous state (play or pause).
³You cannot move backwards with Video CD during frame-
by-frame and slow-motion.
³[:], [2] or [6]: Backward
[9], [1] or [5]: Forward

13
Advanced operations
RQT5869
A
AUDIO
Í
STOP
PAUSE
PLAY
OPEN/CLOSE
SKIP
TOP MENU
MENU
DISPLAY
PLAY MODE SUBTITLE
AUDIO ANGLE
ENTER
RETURN
123
A-B REPEAT
456
789
SETUP CANCEL
0
S
10
6:9 5
∫; 1
SLOW / SEARCH
V.S.S.
<
REPEAT MODE
Í
SUBTITLE
AUDIO
ANGLE
3, 4, 2, 1
C
ANGLE
1
2
I love you
SUBTITLE
B
Je t’aime
ENG
ON
FRA
ON
1
2
Hello
1 ENG 3/2.1 ch
Digital
Î
2 FRA 3/2.1 ch
Digital
Î
Bonjour
PGMRND
DVD VCD
A-B
GROUP TITLE TRACK CHAP D.N.R. D.MIX P.PCM V.S.S. BASS
CINEMA
MLT.CH
VIDEO MP
3
AUDIO
Changing soundtracks,
subtitle languages and
angles
[DVD-RV41] [DVD-RV31]
[DVD]
Remote control only
Some DVDs have multiple soundtracks, subtitle languages and cam-
era angles, and you can change these during play.
»
A
Soundtracks
During play
Press [AUDIO].
The number changes each time you press the button.
³You can also use this button to turn the vocals on and off on kara-
oke discs. Read the disc’s instructions for details.
»
B
Subtitles
During play
Press [SUBTITLE].
The number changes each time you press the button.
To clear/display the subtitles
1. Press [SUBTITLE].
2. Press [1].
3. Press [3, 4] to select “ON” or “OFF”.
»
C
Angles
During play
Press [ANGLE].
The number changes each time you press the button.
BAngle number
ASubtitle language number
>Soundtrack language number
=Numbered
buttons
?Indicates that a multi-channel
soundtrack can be down-mixed.
@Lights when a multi-channel
soundtrack is playing.
Notes regarding soundtracks, subtitle languages
and angles
³You can also use [3, 4] or the numbered buttons to change
the soundtracks, subtitle languages and angles.
³Some discs allow changes to soundtracks, subtitle languages
and angles only by using the disc’s menus.
³Soundtrack and subtitle languages can be set before play
with the initial settings (á page 22, Disc–Audio and Subtitle).
³“–” or “––” is displayed instead of the language number in
circumstances such as when no language is recorded on the
disc.
³Some discs allow you to set angles before multi-angle
scenes are played. Read the instructions that come with the
DVD.
³In some cases, the subtitle language is not changed to the
selected one immediately.

Advanced operations
RQT5869
14
A
a
B
A
V.S.S.
ADVANCED
SURROUND
BASS
PLUS
PGMRND
DVD VCD
A-B
TITLE TRACK CHAP V.S.S. BASS
CINEMA
VIDEO
PGMRND
DVD VCD
A-B
TITLE TRACK CHAP V.S.S. BASS
CINEMA
VIDEO
OPEN/CLOSE
BASS
PLUS
DIALOGUE
ENHANCER
V.S.S.
ADVANCED
SURROUND
BASS
PLUS
ADVANCED
SURROUND
(V.S.S.)
OPEN/CLOSE TOP MENU MENU DISPLAY
ENTER
ONE TOUCH
CINEMA MEMORY
V.S.S.
DOLBY DIGITAL
DECODER
DIALOGUE
ENHANCER
VIRTUAL
SURROUND
CINEMA
OPEN/CLOSE TOP MENU MENU DISPLAY
ENTER
ONE TOUCH
CINEMA MEMORY
V.S.S.
DOLBY DIGITAL
DECODER
DIALOGUE
ENHANCER
VIRTUAL
SURROUND
CINEMA
OPEN/CLOSE TOP MENU MENU DISPLAY
ENTER
ONE TOUCH
CINEMA MEMORY
V.S.S.
DOLBY DIGITAL
DECODER
DIALOGUE
ENHANCER
ADVANCED
SURROUND
CINEMA
ADVANCED
SURROUND
(V.S.S.)
OPEN/CLOSE
RANDOM
A-B
REPEAT
REPEAT
MODE
ONE TOUCH
CINEMA MEMORY
BASS
PLUS
V.S.S.
DIALOGUE
ENHANCER
CINEMA
ADVANCED
SURROUND
BASS
PLUS
ADVANCED
SURROUND
(V.S.S.)
V.S.S.
ADVANCED
SURROUND
BASS
PLUS
1
OFF
TOP MENU
MENU
DISPLAY
PLAY MODE SUBTITLE
AUDIO ANGLE
ENTER
RETURN
123
A-B REPEAT
456
789
SETUP CANCEL
0
S
10
V.S.S.
REPEAT MODE
V.S.S.
> Speaker
@ Seating position
? 3 to 4 times distance A
Increasing your enjoyment of
movies
You can easily control the following features, used for increasing your
enjoyment of movies, with the buttons on the main unit.
³ADVANCED SURROUND (V.S.S.)
³BASS PLUS
³DIALOGUE ENHANCER
³CINEMA
³ONE TOUCH CINEMA MEMORY
The one touch cinema memory allows you to reselect the settings
you made for the above features with a single button press.
»
A
ADVANCED SURROUND (V.S.S.)
[DVD-RV41] [DVD-RV31]
[DVD] (Dolby Digital, 2-channel or over only)
Use Advanced Surround (V.S.S.) (Virtual Surround Sound) to enjoy a
surround-like effect if you are using 2 front speakers. If you are play-
ing a disc with surround effects recorded on it, the effect is broadened
and sound seems to come from virtual speakers on either side.
Press [ADVANCED SURROUND (V.S.S.)].
Each time you press the button:
[>1: Natural effect
l;
l 2: Emphasized effect
l;
{---- OFF: Cancel (Factory preset)
³The V.S.S. indicator lights up when Advanced Surround is on.
Note
³Advanced Surround will not work or will have less effect with some
discs, even if you select “VSS 1” or “VSS 2”.
³Turn off the surround sound effects on the equipment you have con-
nected when using this effect.
³Turn Advanced Surround off if it causes distortion.
³Sound will only come from the two front speakers if Advanced Sur-
round is on.
Optimum seating position (=)
»
B
BASS PLUS
[DVD-RV31]
[DVD] [VCD] [CD]
Main unit only
Turn BASS PLUS on when you have connected an active subwoofer
to the SUBWOOFER terminal on the rear of the unit (á page 28).
Press [BASS PLUS].
Each time you press the button:
OFF
f
v
ON (Factory preset): Indicator lights up.
> Speaker
[DVD-RV31]
(For the United Kingdom and Continental Europe)
[DVD-RV41]
[DVD-RV31]
(For Australia, N.Z. and Asia)
or
or

15
Advanced operations
RQT5869
A
B
C
CINEMA
ONE TOUCH
CINEMA MEMORY
DIALOGUE
ENHANCER
OPEN/CLOSE TOP MENU MENU DISPLAY
ENTER
ONE TOUCH
CINEMA MEMORY
V.S.S.
DOLBY DIGITAL
DECODER
5.1ch OUT PUT
DIALOGUE
ENHANCER
VIRTUAL
SURROUND
CINEMA
DIALOGUE
ENHANCER
CINEMA
ONE TOUCH
CINEMA MEMORY
PGMRND
DVD VCD
A-B
TITLE TRACK CHAP V.S.S. BASS
CINEMA
VIDEO
PGMRND
DVD VCD
A-B
TITLE TRACK CHAP V.S.S. BASS
CINEMA
VIDEO
OPEN/CLOSE
BASS
PLUS
DIALOGUE
ENHANCER
V.S.S.
ADVANCED
SURROUND
DIALOGUE
ENHANCER
OPEN/CLOSE
RANDOM
A-B
REPEAT
REPEAT
MODE
ONE TOUCH
CINEMA MEMORY
BASS
PLUS
V.S.S.
DIALOGUE
ENHANCER
CINEMA
ADVANCED
SURROUND
DIALOGUE
ENHANCER
CINEMA
ONE TOUCH
CINEMA MEMORY
DIALOGUE
ENHANCER
ON
C
Increasing your enjoyment of movies
Main unit only
»
A
DIALOGUE ENHANCER
[DVD-RV41] [DVD-RV31]
[DVD] (Dolby Digital, 3-channel or over, where the dialogue is
recorded in the center channel)
This mode makes the dialogue in movies easier to hear.
Press [DIALOGUE ENHANCER].
Each time you press the button:
ON: Indicator lights up.
f
v
OFF (Factory preset)
Note
Dialogue Enhancer will not work or will have less effect with some
discs, even if you select “ON”.
»
B
CINEMA
[DVD-RV41]
[DVD-RV31]
(For Australia, N.Z. and Asia)
[DVD] [VCD]
You can enjoy better pictures by changing the picture quality.
Press [CINEMA].
Each time you press the button:
C: Cinema mode: Indicator lights up.
Mellows movies, enhances detail in dark scenes.
:
;
N: Normal mode (Factory preset)
For your reference
You can make finer adjustments to the picture if desired (á page 20,
Digital picture mode–User mode).
»
C
ONE TOUCH CINEMA MEMORY
[DVD-RV41]
[DVD-RV31]
(For Australia, N.Z. and Asia)
This feature allows you to reselect the settings you made for
ADVANCED SURROUND (V.S.S.), BASS PLUS, DIALOGUE EN-
HANCER and CINEMA with one button press.
[Putting\the\settings\into\memory]
After making the settings
Press and hold [ONE TOUCH CINEMA
MEMORY] until it lights.
The settings remain in the memory even if you turn the unit off.
[Recalling\the\settings]
Press [ONE TOUCH CINEMA MEMORY].
The button’s light comes on.
To cancel
Press [ONE TOUCH CINEMA MEMORY] to turn it off and return the
settings for the features to the factory preset.
³ADVANCED SURROUND (V.S.S.): OFF
³BASS PLUS: ON
³DIALOGUE ENHANCER: OFF
³CINEMA: OFF (normal)
The button’s light also turns off if you press any of the other buttons to
change the settings.
[DVD-RV31]
(For the United Kingdom and Continental Europe)
[DVD-RV41]
[DVD-RV31]
(For Australia, N.Z. and Asia)
or

Advanced operations
RQT5869
16
A
2
REPEAT MODE
1
A-B REPEAT
A-B REPEAT
PGMRND
DVD VCD
A-B
V.S.S. BASS
VIDEO
PGMRND
DVD VCD
A-B
V.S.S. BASS
VIDEO
B
1
STOP
PAUSE
PLAY
OPEN/CLOSE
SKIP
TOP MENU
MENU
DISPLAY
PLAY MODE
SUBTITLEAUDIO ANGLE
ENTER
RETURN
123
A-B REPEAT
456
789
SETUP CANCEL
0
S
10
6:9 5
∫ ; 1
SLOW / SEARCH
V.S.S.
<
REPEAT MODE
Í
REPEAT MODE
∫
1·2
b
c
d
C
T
OFF
e
f
g
T
A
OFF
A
A B
MENU
Repeat play
[DVD-RV41] : Remote control only
[DVD-RV31] For the United Kingdom and Continental Europe:
Remote control only
[DVD] [VCD] [CD]
»
A
Repeat play
During play
Press [REPEAT MODE].
The display changes as illustrated.
³DVD
Chapter (>)>Title (?)>off (@)
^------------------------------------------}
³Video CD/CD
Track (A)>Entire disc (B)>off (C)
^--------------------------------------------------}
If the Video CD has playback control
Cancel menu play first.
1. Press [º] during play until “PBC PLAY” is cleared from the unit’s
display.
2. Press the numbered buttons to select a track to start play.
3. Press [REPEAT MODE] (á above).
To return to menu play, press [º] and press [MENU].
Note
³Repeat play may not work as desired with some DVDs.
³Repeat play does not work if the disc’s elapsed play time is not
shown on the unit’s display.
³There is no mode for repeating the whole DVD.
º To repeat only your favorite tracks
[VCD] [CD]
1. Program the tracks you want (á page 17).
2. Press [1] (PLAY). Play will start.
3. Press [REPEAT MODE] to display “T” or “A” .
»
B
A-B repeat play
You can repeat a section between points A and B within a title or
track.
1 During play
Press [A-B REPEAT] at the starting
point (A).
2 Press [A-B REPEAT] at the finishing
point (B).
To cancel
Press [A-B REPEAT] until “” is displayed.
Note
³A-B repeat play does not work if the DVD’s elapsed play time is not
shown on the unit’s display.
³Some subtitles recorded around point A or B may fail to appear
(DVD).
³The unit automatically determines the end of a title/track as point B
when the end of the title/track is reached.
=Numbered
buttons

17
Advanced operations
RQT5869
A
B
2
2
3
1
1
123
456
789
0
S
10
PLAY
1
PLAY
1
PLAY MODE
PLAY MODE
RANDOM
STOP
PAUSE
PLAY
OPEN/CLOSE
SKIP
TOP MENU
MENU
DISPLAY
PLAY MODE SUBTITLE
AUDIO ANGLE
ENTER
RETURN
123
A-B REPEAT
456
789
CANCEL
0
S
10
6:9 5
∫; 1
V.S.S.
<
REPEAT MODE
SLOW / SEARCH
1·1
3·2
2
CANCEL
6, 5
PGMRND
DVD V CD
A-B
VIDEO
OPEN/CLOSE
RANDOM
A-B
REPEAT
REPEAT
MODE
ONE TOUCH
CINEMA MEMORY
BASS
PLUS
V.S.S.
DIALOGUE
ENHANCER
CINEMA
VIRTUAL
SURROUND
Í
SETUP
PGMRND
DVD V CD
A-B
TITLE TRACK CHAP V.S.S. BASS
CINEMA
VIDEO
PGMRND
DVD V CD
A-B
TITLE TRACK CHAP V.S.S. BASS
CINEMA
VIDEO
Random Playback
Press PLAY to start
3, 4, 2, 1
ENTER
1
PLAY MODE
6 ∫ 1
5
Choose a track, then press ENTER.
No Time
Track
Total Time
0 Press PLAY to start
Play
Clear
Clear all
0:00
SELECT
ENTER RETURN
1
PLAY MODE
6 ∫ 1
5
Choose a track, then press ENTER.
No Time
Track
Total Time
0 Press PLAY to start
Play
Clear
Clear all
1
5
2
2:02
2:02
SELECT
ENTER RETURN
Changing the play sequence
[DVD-RV41] [DVD-RV31]
[VCD] [CD]
»
A
Program play
Remote control only
You can select up to 32 tracks to play in the order you choose.
1 While stopped
Press [PLAY MODE] until the program
play screen appears.
2 Press the numbered buttons to select
the track.
³To select a 2-digit number
Example: To select track 23, press [S10], then [2] and [3].
³To select a track using the cursor buttons
Press [ENTER] and [3, 4] to select a track, then press
[ENTER] again to register the track number.
³Repeat step 2 to select another track.
³“Total Time” tells you the total time of the programmed
tracks.
3 Press [1] (PLAY).
Play now begins in the programmed sequence.
To add or change tracks
Press [3, 4] to select an available item, then repeat step 2.
To move to the page before or after the one shown
Press [6, 5].
To clear the programmed tracks one by one
Press [3, 4] to select the track and press [CANCEL]. (Alternatively
you can select “Clear” and press [ENTER].)
To clear the whole program
Move to “Clear all” with [3, 4, 2, 1] and press [ENTER].
The whole program is also cleared when the unit is turned off, or the
disc tray is opened.
To exit the program mode
Press [PLAY MODE] while stopped until the program play screen dis-
appears.
³The program is retained in memory.
»
B
Random play
DVD-RV41 for all regions and
DVD-RV31 for the United Kingdom and Continental Europe:
Remote control only
The unit plays the tracks on a disc in random order.
While stopped
Press [PLAY MODE] until the random
play screen appears.
Press [1] (PLAY).
Play now begins in random order.
To exit random mode
Press [PLAY MODE] while stopped until the random play screen dis-
appears.
DVD-RV31 for Australia, N.Z. and Asia:
The random play screen also appears if you press [RANDOM] on the
main unit.
= Track No. > Program No.
[DVD-RV31]
(For Australia, N.Z. and Asia)

Advanced operations
RQT5869
18
2
1
DISPLAY
3
4
c
d
e
f
g
h
i
j
STOP
PAUSE
PLAY
OPEN/CLOSE
SKIP
TOP MENU
MENU
DISPLAY
PLAY MODE SUBTITLE
AUDIO ANGLE
ENTER
RETURN
123
A-B REPEAT
456
789
CANCEL
0
S
10
6:9 5
∫; 1
V.S.S.
<
REPEAT MODE
SLOW / SEARCH
1
2·3·4
ENTER
RETURN
Í
SETUP
T
2
r
100
j
100
OFF BRIGHT
I P B
I P B
T
2
C
2
1 : 46 : 50
1 ENG 3/2.1 ch
Digital
Î
ENG
ON
1
1
N
AB
– – – 1 2 3 ✱✱
OFF
AB
– – – 1 2 3 ✱✱
OFF
OFF
OFF ON
Using GUI screens
[DVD-RV41]
[DVD-RV31]
: Remote control only
[DVD] [VCD] [CD]
GUI (Graphical User Interface) screens are menus that contain infor-
mation about the disc or unit. These menus allow you to perform op-
erations by changing this information.
Common procedures
1 Press [DISPLAY].
Each time you press the button:
[>GUI screen for disc information (c)
l;
l GUI screen for unit information (d)
l;
l Shuttle screen (e)
l;
{----Original display (f)
³The screens depend on the disc contents.
2 [GUI\screen\for\unit\information\only]
While the leftmost icon is highlighted
Press [3, 4] to select the menu.
Each time you press the button:
[>Play menu (g)
l;:
l Video menu (h)
¤
l;:
l Audio menu (i)
l;:
{--.Display menu (j)
¤
Only DVD-RV41 for all regions and
DVD-RV31 for Australia, N.Z. and Asia
3 Press [2, 1] to select the item.
4 Press [3, 4] to select the setting.
Items with “3” or “4” above and below can be changed by
[3, 4]. Other items use different buttons. See page 20 for
details.
For your reference
³Some functions cannot be accessed from the stop mode (e.g.
changing the soundtrack language).
³Press [ENTER] if the setting does not change after pressing [3,4].
³When numbers are displayed (e.g. title No.), the numbered buttons
are also effective for setting. When numbers are entered with the
numbered buttons, press [ENTER] to register the setting.
To clear the GUI screen
Press [RETURN].
When [RETURN] is pressed while one of the icons for unit informa-
tion is highlighted, the leftmost icon is highlighted. The screen is
cleared when you press [RETURN] while the leftmost icon is high-
lighted.
º To change the position of the GUI screens
You can lower the position of the GUI screens if they are cut off for
some reason. There are 5 positions to choose from.
1. Press [2, 1] to select the rightmost icon.
2. Press [3,4] to move the GUI screen.
b Example: DVD
a Numbered
buttons

19
Advanced operations
RQT5869
B
A
T
2
1 : 46 : 50
j
k
a
b
f
c
r
100
j
100
m
l
m
o
n
o
T
2
C
2
1 : 46 : 50
1 ENG 3/2.1 ch
Digital
Î
ENG
ON
1
1
e gh
i
T
2
C
2
1 : 46 : 50
ENG
ON
1
1
1 ✱
Vocal
OFF
P B C
L R
ON
d
Using GUI screens
»
A
Screen for disc information
Audio/Subtitle language
Signal type/data
LPCM/ë Digital/DTS/MPEG: Signal type
k (kHz): Sampling frequency
b (bit): Number of bits
ch (channel): Number of channels
Example:
3/2 .1ch
.1: Subwoofer signal
(not displayed if there is no subwoofer signal)
0: No surround
1: Mono surround
2: Stereo surround (left/right)
1: Center
2: Front leftiFront right
3: Front leftiFront rightiCenter
»
B
Shuttle screen
ENG: English
FRA: French
DEU: German
ITA: Italian
ESP: Spanish
NLD: Dutch
SVE: Swedish
NOR: Norwegian
DAN: Danish
POR: Portuguese
RUS: Russian
JPN: Japanese
CHI: Chinese
KOR: Korean
MAL: Malay
VIE: Vietnamese
THA: Thai
¢: Others
³There are five speeds for both backward and forward slow-motion
and search.
³The numbers on either side of the shuttle screen indicate the maxi-
mum speeds of the search.
Icon
l
m
n
o
Content
Pause
Slow-motion play E: Backward [DVD]
D: Forward [DVD] [VCD]
Play
Search 6: Backward
5: Forward
Icon
a
b
c
d
e
f
g
h
i
j
k
Content
[DVD] Title number [VCD] [CD] Track number
[DVD] Chapter number
[DVD]
Time (select a position to start play by specifying a time)
[VCD] [CD]
Changing the time display
Track elapsed time !# Track remaining time
^-------# Disc remaining time !-------J
[DVD]
Soundtrack language
(See below for language abbreviations.)
Audio signal type (See below for details.)
Karaoke vocal on/off (Karaoke DVD only)
Solo : OFF or ON
Duet: OFF, V1iV2, V1 or V2
[DVD]
Subtitle language
(See below for language abbreviations.)
Subtitle on/off ON()OFF
[DVD] Angle number
[VCD] Audio mode LR()L()R
^--------------------J
[VCD] (with playback control only)
Menu play
Indicates whether menu play (playback control) is on or off.

Advanced operations
RQT5869
20
A
B
C
D
l
m
OFF BRIGHT
I P B
i
j
k
OFF
OFF ON
e
f g h
a
b
c
d
AB
––– 1 2 3 ✱✱
OFF
U
0
0
0
»
B
Icons for video menu
Only DVD-RV41 for all regions and
DVD-RV31 for Australia, N.Z. and Asia
Note
³A-B repeat play (DVD), repeat play and marker functions do not work
if the disc’s elapsed play time is not shown on the unit’s display.
³All the markers are cleared when the unit is turned off, or the disc
tray is opened.
»
D
Icons for display menu
i
j
k
[DVD] (Dolby Digital, 2-channel or over only)
Advanced Surround (V.S.S.) (á page 14)
1()2()OFF
^--------------------J
[DVD-RV31]
Bass Plus (á page 14)
OFF()ON
[DVD] (Dolby Digital, 3-channel or over only)
Dialogue Enhancer (á page 15)
ON()OFF
e
f
g
h
[DVD] [VCD]
Digital picture mode
N: Normal mode C: Cinema mode (á page 15)
U: User mode
(The following items are also displayed when you select “U”.)
Contrast (j7 to i7)
Brightness (0 to i15)
Color (j7 to i7)
Using GUI screens
Screen for unit information
»
A
Icons for play menu
l
m
»
C
Icons for audio menu
Content
A-B repeat (á page 16)
[ENTER] (start point) á [ENTER] (finish point)
To cancel: [ENTER]
Repeat play (á page 16)
[DVD] C (Chapter) ,. T (Title) ,. OFF
^--------------------------------------------J
[VCD] [CD] T(Track) ,. A (All) ,. OFF
^--------------------------------------J
[VCD] [CD]
Play mode display
---: Off PGM: Program play RND: Random play
Marker: You can mark up to 5 positions to play again.
[ENTER] (The unit is now ready to accept markers.)
To mark a position: [ENTER] (at the desired point)
To mark another position: [2, 1] á [ENTER]
To recall a marker: [2, 1] á [ENTER]
To erase a marker: [2, 1] á [CANCEL]
Icon
a
b
c
d
[DVD]
IPB display (á page 29)
Displays the picture type (I/P/B) in the still picture mode.
ON()OFF
Display dimmer: Changes the brightness of the unit’s
display.
BRIGHT()DIM()AUTO
¤
^----------------------------------------J
¤
The display is dimmed during play, but brightens when
you perform operations such as slow-motion, search,
and pause.
Page is loading ...
Page is loading ...
Page is loading ...
Page is loading ...
Page is loading ...
Page is loading ...
Page is loading ...
Page is loading ...
Page is loading ...
Page is loading ...
Page is loading ...
Page is loading ...
-
 1
1
-
 2
2
-
 3
3
-
 4
4
-
 5
5
-
 6
6
-
 7
7
-
 8
8
-
 9
9
-
 10
10
-
 11
11
-
 12
12
-
 13
13
-
 14
14
-
 15
15
-
 16
16
-
 17
17
-
 18
18
-
 19
19
-
 20
20
-
 21
21
-
 22
22
-
 23
23
-
 24
24
-
 25
25
-
 26
26
-
 27
27
-
 28
28
-
 29
29
-
 30
30
-
 31
31
-
 32
32


Panasonic DVDRV31EN Operating instructions
- Category
- DVD players
- Type
- Operating instructions
Ask a question and I''ll find the answer in the document
Finding information in a document is now easier with AI
Related papers
-
Panasonic DVDRA60 Operating instructions
-
-
-
-
-
-
-
-
Panasonic DVDA10 Operating instructions
-