Page is loading ...

2223 197-81
Instrucciones para el montaje
y recomendaciones para el mantenimiento
TKI 170 Frigirìfico - Congelador
Einbauanleitung und Pflegehinweise
TKI 170 Kühl- Gefriergerät
Instruction Manual
TKI 170 Fridge - Freezer
Instructions de montage et d’emploi
TKI 170 Réfrigérateur - Congélateurs
Instruções de utilização e de montagem
TKI 170 Frigorífico - Congelador
Gebruiks-en montageaanwijzing
TKI 170 Diepvries - Koelkast
TEKA GROUP
COUNTRY CITY COMPANY CC TELEPHONE FAX
Australia Victoria TEKA AUSTRALIA Pty. Ltd. 61 3 9550 6100 3 9550 6150
Austria Wien KÜPPERSBUSCH GesmbH 43 1 866 800 1 866 8082
Belgium Zellik B.V.B.A. KÜPPERSBUSCH S.P.R.L. 32 2 466 8740 2 466 7687
Bulgaria Sofia TEKA BULGARIA EOOD. 359 2 9768 330 2 9768 332
Chile Santiago de Chile TEKA CHILE, S.A. 56 2 4386 000 2 4386 097
China (Pop. Rep.) Shanghai TEKA INTERNATIONAL
TRADING (Shanghai) 86 21 511 688 41 21 511 688 44
Czech Republic Liben TEKA CZ S.R.O. 420 2 84 691940 2 84 691923
Ecuador Guayaquil TEKA ECUADOR, S.A. 593 4 2251174 342 250 693
France Cergy Pontoise TEKA FRANCE S.A.S. 33 1 343 01597 1 343 01598
Greece Athens TEKA HELLAS A.E. 30 210 9760283 210 9712725
Hungary Budapest TEKA HUNGARY KFT 36 1 3542110 1 3542115
Indonesia Jakarta PT TEKA BUANA 62 21 390 5274 21 390 5279
Italy Frosinone TEKA ITALIA S.P.A. 39 0775 898271 0775 294681
Korea (Rep. South) Seoul TEKA KOREA CO. LTD. 82 2 599 4444 222 345 668
Malaysia Selangor Darul Ehsan TEKA KÜCHENTECHNIK
(MALAYSIA) SDN. 60 3 7620 1600 3 7620 1626
Mexico Mexico D.F. TEKA MEXICANA S.A. de C.V. 52 555 133 0493 55 5762 0517
Pakistan Lahore KÜPPERSBUSCH-
TEKA PAKISTAN Pvt. Ltd. 92 42 631 2182 42 631 2183
Poland Pruszków TEKA POLSKA SP. ZO.O. 48 22 7383270 22 7383278
Portugal Ílhavo TEKA PORTUGAL, S.A. 351 234 329 500 234 325 457
Russia Moscow TEKA RUS LLC 7 095 737 4690 095 737 4689
Singapore Singapore TEKA SINGAPORE PTE. LTD. 65 67342415 67346881
Thailand Bangkok TEKA (THAILAND) CO. LTD. 66 2 6933237 2 6933242
Turkey Istanbul TEKA TEKNIK MUTFAK 90 212 288 3134 212 274 56 86
Ukraine Kiev TEKA UA 380 44 272 33 90 44 279 58 54
United Arab Emirates Dubai TEKA KÜCHENTECHNIK
MIDDLE EAST FZE 971 4 887 2912 4 887 2913
United Kingdom Milton Abingdon TEKA PRODUCTS LTD. 44 1235 861916 1235 835107
USA Tampa TEKA USA, INC. 1 813 2888820 813 2888604
Venezuela Caracas TEKA ANDINA, S.A. 58 2 1229 12821 2 1229 12825
Teka Industrial S.A.
C/ Cajo, 17
39011 Santander (Spain)
Tel.: 34 - 942 355050
Fax: 34 - 942 347694
http://www.teka.es
Teka Küchentechnik GmbH
Sechsheldener Str. 122
35708 Haiger (Germany)
Tel.: 49 - 2771 8141 0
Fax: 49 - 2771 8141 10
http://www.teka.com

24
WARNINGS
It is most important that this instruction book should be retained with the appliance for future
reference. Should the appliance be sold or transferred to another owner, or should you move house
and leave the appliance, always ensure that the book is supplied with the appliance in order that the
new owner can be acquainted with the functioning of the appliance and the relevant warnings.
If this appliance featuring magnetic door seals is to replace an older appliance having a spring lock
(latch) on the door or lid, be sure to make that spring lock unusable before you discard the old
appliance. This will prevent it from becoming a death-trap for a child.
This must be done before the appliance is built intoThese warnings are provided in the interest of
safety.You must read them carefully before installing or using the appliance.
General Safety
• This appliance is designed to be operated by
adults. Children should not be allowed to tamper
with the controls or play with the product.
• It is dangerous to alter the specifications or
modify this product in any way.
• Care must be taken to ensure that the appliance
does not stand on the electrical supply cable.
Important: if the supply cord is damaged, it must
be replaced by a special cord or assembly availa-
ble from the manufacturer or its service agent.
• Before any cleaning or maintenance work is carried
out, be sure to switch off and unplug the appliance.
• This appliance is heavy. Care should be taken
when moving it
• Ice lollies can cause frost burns if consumed
straight from the appliance.
• Take utmost care when handling your
appliance so as not to cause any damages to
the cooling unit with consequent possible
fluid leakages.
• The appliance must not be located close to
radiators or gas cookers.
• Avoid prolonged exposure of the appliance to
direct sunlight.
• There must be adequate ventilation round the
back of the appliance and any damage to the
refrigerant circuit must be avoided.
• For freezers only (except built-in models): an
ideal location is the cellar or basement.
• Do not use other electrical appliances (such
as ice cream makers) inside of refrigerating
appliances, unless they are approved for this
purpose by the manufacturer.
Service/Repair
• Any electrical work required to install this
appliance should be carried out by a qualified
electrician or competent person
• This product should be serviced by an authorized
Service Centre, and only genuine spare parts
should be used.
• Under no circumstances should you attempt to
repair the appliance yourself. Repairs carried out
by inexperienced persons may cause injury or
more serious malfunctioning. Refer to your local
Service Centre, and always
• This appliance contains hydrocarbons in its
cooling unit; maintenance and recharging must
therefore only be carried out by authorized
technicians.
Use
• The domestic refrigerators and freezers are
designed to be used specifically for the storage
of edible foodstuffs only.
• Best performance is obtained with ambient
temperature between +18°C and +43°C (class T);
+18°C and +38°C (class ST); +16°C and +32°C
(class N); +10°C and +32°C (class SN). The
class of your appliance is shown on its rating
plate.
Warning: when the ambient temperature is not
included within the range indicated for the class
of this appliance, the following instructions must
be observed: when the ambient temperature
drops below the minimum level, the storage
temperature in the freezer compartment cannot
be guaranteed; therefore it is advisable to use the
food stored as soon as possible.
• Frozen food must not be re-frozen once it has
been thawed out.
• Manufacturers’ storage recommendations should
be strictly adhered to. Refer to relevant
instructions.
• The inner lining of the appliance consists of
channels through which the refrigerant passes. If
these should be punctured this would damage the
appliance beyond repair and cause food loss. DO
NOT USE SHARP INSTRUMENTS to scrape off
frost or ice. Frost may be removed by using a
plastic-scraper . Under no circumstances should
solid ice be forced off the liner. Solid ice should be
allowed to thaw when defrosting the appliance.
45
ÍNSTALAÇÃO
Instalação
• Durante o normal funcionamento o condensador
e o compressor, colocados na parte de trás do
aparelho, aquecem sensivelmente. Por razões de
segurança a ventilação deve ser como indicado
na respectiva Figura.
Atenção: mantenha as aberturas para a
ventilação livres de qualquer obstrução.
• O aparelho aquece, sensivelmente, ao nível do
con-densador e do compressor. Certifique-se
que o ar circula, livremente, à volta do aparelho.
Uma ventila-ção insuficiente ocasionaria um mau
funcionamen-to, danos para o aparelho e perda
dos alimentos no seu interior. Siga as instruções
para a correcta instalação do aparelho.
• Assegure-se, quando instalar o aparelho, que este
não repousa sobre o cabo de alimentação eléctrica.
Importante: se o cabo de alimentação se danificar,
deverá ser substituído por um cabo especial ou por
um conjunto, disponíveis junto do construtor ou do
serviço de assistência técnica.
• Os componentes do aparelho que aquecem devido
ao seu funcionamento não devem estar expostos.
Sempre que possível as costas do aparelho devem
ficar encostadas a uma parede
• Desligue sempre a tomada de corrente antes de
proceder à limpeza ou qualquer operação de
manutenção do aparelho.
• Ao transportar o aparelho na horizontal, pode
acontecer que o óleo contido no compressor
escorra para o circuito refrigerante. É portanto
aconselhável esperar pelo menos duas horas antes
de ligar o aparelho à corrente.
Protecão do ambiente
Este aparelho não contem, no seu circuito
refrigerante e nas suas matérias isolantes, gases
nocivos à camada de ozono.Mesmo assim este
aparelho deve, quando for destruido,receber os
cuidados convenientes, de acordo com as
disposições em vigor para a protecção do melo
ambiente. Os materiais utilizados neste
aparelho, marcados com o simbolo são
reciclàveis.
Indicações relativas à remoção
controlada
O símbolo no produto ou na embalagem
indica que este produto não pode ser tratado como
lixo doméstico. Em vez disso, deve ser entregue ao
centro de recolha selectiva para a reciclagem de
equipamento eléctrico e electrónico.
Ao garantir uma eliminação adequada deste
produto, irá ajudar a evitar eventuais consequências
negativas para o
meio ambiente e para a saúde pública, que, de
outra forma, poderiam ser provocadas por um
tratamento incorrecto do produto.
Para obter informações mais pormenorizadas sobre
a reciclagem deste produto, contacte os serviços
municipalizados locais, o centro de recolha selectiva
da sua área de residência ou o estabelecimento
onde adquiriu o produto.
Advertencias e conselhos importantes . . . . . . . . . . . . . . . . . . . . . . . . . . . . . . . . . . . . . . . . . . . . . . . . . . .44
Uso e Funcionamento - Limpeza das partes internas - Arranque - Régulação da température - Refrigeração
dos alimentos - Congelação dos alimentos frescos - Conservação dos alimentos congelados . . . . . . . . . .46
Uso e Funcionamento - Descongelação - Fabricação de cubos de gelo . . . . . . . . . . . . . . . . . . . . . . . . . .
Prateleiras amovíveis - Colocação das prateleiras da porta . . . . . . . . . . . . . . . . . . . . . . . . . . . . . . . . . . . . .47
Conselhos - Conselhos para a refrigeração -
Conselhos para a congelação . . . . . . . . . . . . . . . . . . . . . . .
Conselhos para a conservação dos alimentos congelados
. . . . . . . . . . . . . . . . . . . . . . . . . . . . . . . . . . . . .48
Manutenção - Limpeza periódica - Paragem prolongada - Lâmpara de iluminação - Descongelação . . .49
Assistência técnica e peças de substituição . . . . . . . . . . . . . . . . . . . . . . . . . . . . . . . . . . . . . . . . . . . . . .
Instalação -Colocação . . . . . . . . . . . . . . . . . . . . . . . . . . . . . . . . . . . . . . . . . . . . . . . . . . . . . . . . . . . . . . . .50
Instalação - Ligação eléctrica - Instruções para encastrar . . . . . . . . . . . . . . . . . . . . . . . . . . . . . . . . . . . . .51
Instalação - Instruções para encastrar . . . . . . . . . . . . . . . . . . . . . . . . . . . . . . . . . . . . . . . . . . . . . . . . . . . . .51
Instalação -
Reversão interna da porta
. . . . . . . . . . . . . . . . . . . . . . . . . . . . . . . . . . . . . . . . . . . . . . . . . . . .54

25
Cleaning the interior
Before using the appliance for the first time, wash
the interior and all internal accessories with luke-
warm water and some neutral soap so as to remove
the typical smell of a brand-new product, then dry
thoroughly.
Do not use detergents or abrasive
powders, as these will damage the finish.
USE
CONTENTS
Warnings . . . . . . . . . . . . . . . . . . . . . . . . . . . . . . . . . . . . . . . . . . . . . . . . . . . . . . . . . . . . . . . . . . . . . . . . . . .24
Use - Cleaning the interior - Operation . . . . . . . . . . . . . . . . . . . . . . . . . . . . . . . . . . . . . . . . . . . . . . . . . . . . . . . .25
Use - Temperature regulation - Fresh food refrigeration - Freezing fresh food - Storage of frozen food - Thawing
Ice-cube production . . . . . . . . . . . . . . . . . . . . . . . . . . . . . . . . . . . . . . . . . . . . . . . . . . . . . . . . . . . . . . . . . . . . . . . . .26
Use - Movable shelves - Positioning the door shelves - Hints - Hints for refrigeration . . . . . . . . . . . . . . . . . . . .27
Hints - Hints for freezing - Hints for storage of frozen food . . . . . . . . . . . . . . . . . . . . . . . . . . . . . . . . . . . . . .28
Maintenance - Periodic cleaning - Periods of non-operation . . . . . . . . . . . . . . . . . . . . . . . . . . . . . . . . . . . .28
Maintenance - Interior light - Defrosting . . . . . . . . . . . . . . . . . . . . . . . . . . . . . . . . . . . . . . . . . . . . . . . . . . . .29
Customer service and spare parts - Installation - Location - Electrical connection - Door reversibility . .
Instructions for totally built-in appliances- Building-in instructions . . . . . . . . . . . . . . . . . . . . . . . . . . . . . . . .30
Installation - Inner door reversal . . . . . . . . . . . . . . . . . . . . . . . . . . . . . . . . . . . . . . . . . . . . . . . . . . . . . . . . . .33
• Do not place carbonated or fizzy drinks in the
freezer as it creates pressure on the container,
which may cause it to explode, resulting in
damage to the appliance.
Installation
• During normal operation, the condenser and
compressor at the back of the appliance heat up
considerably. For safety reasons, minimum
ventilation must be as shown in the relevant
Figure.
Attention: keep ventilation openings clear of
obstruction.
• If the appliance is transported horizontally, it is
possible that the oil contained in the compressor
flows in the refrigerant circuit. It is advisable to
wait at least two hours before connecting the
appliance to allow the oil to flow back in the
compressor.
• There are working parts in this product which
heat up. Always ensure that there is adequate
ventilation as a failure to do this will result in
component failure and possible food loss. See
installation instructions.
• Parts which heat up should not be exposed.
Wherever possible the back of the product should
be against a wall.
• If the appliance has been transported
horizontally, it is possible that the oil contained in
the compressor ílows in the refrigerant circuit. It
is advisable to wait at least two hours before
connecting the appliance to allow tl¦e oil to flow
back in the compressor.
Environment Protection
This appliance does not contain gasses which
could damage the ozone layer, in either its
refrigerant circuit or insulation materials.The
appliance shall not be discarded together with
the urban refuse and rubbish. Avoid damaging
the cooling unit, especially at the rear near the
heat exchanger. Information on your local
disposal sites may be obtained from municipal
authorities.The materials used on this appliance
marked by the symbol are recyclable.
Disposal of old Appliances
The symbol on the product or on its packaging
indicates that this product may not be treated as
household waste. Instead it shall be handed over to
the applicable collection point for the recycling of
electrical and electronic equipment. By ensuring this
product is disposed of correctly, you will help prevent
potential negative consequences for the
environment and human health, which could
otherwise be caused by inappropriate waste
handling of this product. For more detailed
information about recycling of this product, please
contact your local city office, your household waste
disposal service or the shop where you purchased
the product.
Operation
Insert the plug into the wall socket.
Open the refrigerator door and turn the thermostat
knob, clockwise, beyond the «O» (STOP) position.
The appliance will start to operate. To stop
operation, simply turn the thermostat knob to
position «O»
44
ADVERTÊNCIAS E CONSELHOS IMPORTANTES
É muito importante que este manual de utilização acompanhe o aparelho para garantir uma futura utilização
correcta. Se o aparelho for vendido ou emprestado a uma outra pessoa, o manual de utilização deve, como
acima se faz notar, acompanhá-lo, de maneira que o utilizador possa ser informado do seu funcionamento,
das advertências e conselhos. Se este aparelho, munido de fecho magnético, veio substituir um outro que
tinha portas com fecho de mola, aconselhamos a inutilizar este fecho, antes do aparelho ser posto
definitivamente de lado. Esta precaução procura evitar que crianças, brincando, se possam fechar no
aparelho o que seria altamente perigoso.
Essas advertências têm por fim garantir a segurança dos utilizadores. Agradecemos, portanto, que leia o
manual atentamente, antes de instalar e utilizar o aparelho.
Segurança
• Este aparelho foi concebido para ser utilizado por
adultos. Deve, por isso, pô-lo ao abrigo das crianças
não consentindo que dele se sirvam como brinquedo.
• É perigoso modificar ou tentar modificar as
características deste aparelho.
• Este aparelho é pesado. Tenha o maior cuidado
quando o deslocar
• Não consuma certos produtos, tais como
gelados, imediatamente após terem saído do
aparelho; a temperatura muito baixa a que se
encontram pode provocar queimaduras.
• Este aparelho contém hidrocarbonetos no
circuito refrigerante; portanto, a manutenção
e a recarga devem ser efectuadas
exclusivamente por pessoal autorizado pelo
produtor.
• Preste a máxima atenção ao deslocar o
aparelho, para não danificar as partes do
circuito refrigerante, evitando assim possíveis
saídas de fluido.
• O aparelho não deve ser instalado perto de
elementos de aquecimento ou fogões de gás.
• Evite a exposição prolongada do aparelho aos
raios do sol.
• A parte de trás do aparelho deve receber uma
suficiente ventilação e deve ser evitado
qualquer dano ao circuito refrigerante.
• Somente para os congeladores (excepto os
de encaixe): a melhor colocação é na cave.
Assistência
• Se uma eventual modificação da instalação
eléctrica, na casa do utilizador, tiver de ser feita para
tornar possível a instalação do aparelho, deve, esta,
ser efectuada por pessoal qualificado.
• Este aparelho deve ser assistido por um Centro
de Assistência autorizado, sendo apenas
aplicadas peças de origem.
• Em caso de avaria, não tente você mesmo, reparar
o aparelho. As reparações executadas por pessoas
inexperientes, podem causar danos físicos e mate-
riais (aumentando as avarias a serem reparadas).
Faça apelo ao seu Centro de Assistência mais
próximo e insista em peças genuínas.
Utilização
• Os frigoríficos e/ou congeladores domésticos
destinam-se, unicamente, à conservação e/ou
congelação de alimentos.
• Os melhores rendimentos são conseguidos com
temperaturas ambiente incluídas entre +18°C e
+43°C (Classe T); +18°C e +38°C (Classe ST);
+16°C e +32°C (Classe N); +10°C e +32°C
(Classe SN); a classe a que pertence o aparelho
é indicada na placa de matrícula (posta na cela
ao lado do compartimento dos legumes).
Atenção: com temperaturas ambiente não
incluídas nas indicadas para a classe climática a
que pertence o produto, é preciso cumprir as
indicações seguintes: quando a temperatura
ambiente descer abaixo do valor mínimo, pode
não ser garantida a temperatura de conservação
no compartimento congelador; portanto,
aconselha-se a consumar rapidamente os
alimentos nele contidos.
• Um produto descongelado não deve, em nenhum
caso, voltar a ser congelado.
• Siga as indicações do fabricante para a
conservação e/ou congelação dos alimentos.
• O revestimento interior do aparelho em composto de
pequenos tubos por onde passa o refrigerante. Se
estes tubos forem danificados o aparelho ficará
irremediavelmente avariado, provocando a perda
dos alimentos no seu interior. NÃO UTILIZE
OBJECTOS PONTEAGUDOS para raspar o gelo
acumulado. Esse gelo pode ser raspado utilizando a
espátula. Para eliminar grandes quantidades de gelo
acumulado, é aconselhável deixá-lo derreter.Veja as
instruções para a descongelação.
• Não coloque no compartimento/congelador a baixa
temperatura, garrafas ou latas com bebidas
gaseificadas dado que se cria uma pressão elevada
no interior da garrafa e/ou lata havendo o perigo de
este explodir. Desta explosão resultariam danos
graves para o aparelho.

26
Temperature regulation
The temperature is automatically regulated and can
be increased to achieve a higher temperature
(warmer) by rotating the thermostat knob toward
lower settings or reduced (colder) rotating the knob
towards higher settings.
However, the exact setting should be chosen
keeping in mind that the temperature inside the
refrigerator depends on:
• room temperature;
• how often the door is opened;
• the quantity of food stored;
• location of appliance.
A medium setting is generally the most suitable.
Important
If the ambient temperature is high or the
appliance is fully loaded, and the appliance is
set to the lowest temperatures, it may run
continuously causing frost to form on the rear
wall. In this case the dial must be set to a higher
temperature to allow automatic defrosting and
therefore reduced energy consumption.
Freezing fresh food
The 4-star compartment is suitable for long term
storage of commercially frozen food and for freezing
fresh food.
To freeze fresh foods it is not necessary to move the
thermostat knob from the normal setting. However,
for a faster freezing operation, turn the termostat
knob to the coldest setting; but remember that, in
this condition, the refrigerator compartment
temperature might drop below 0°C. If this oocurs
reset the thermostat knob to a warmer setting.
Fresh food refrigeration
To obtain the best performance:
• do not store warm food or evaporating liquids in
the refrigerator;
• do cover or wrap the food, particularly if it has a
strong flavour.
• Position food so that air can circulate freely round it.
Storage of frozen food
When first starting-up or after a period out of use,
before putting the products in the compartment let
the appliance run for at least two hours on the
coldest setting, then turn the thermostat knob to the
normal operating position.
Important
If there is a power failure when food is in the
freezer, do not open the door of the freezer
compartment. The frozen food will not be
affected if the power cut is of short duration (up
to 6-8 hours) and the freezer compartment is full,
otherwise, it is recommended that the food
should be used within a short time (a
temperature increase of the frozen food shortens
its safe storage period).
Thawing
Deep-frozen or frozen food, prior to being used, can
be thawed in the refrigerator compartment or at
room temperature, depending on the time available
for this operation.
Small pieces may even be cooked still frozen, directly
from the freezer: in this case, cooking will take longer.
Ice-cube production
This appliance is equipped with one or more trays
for the production of ice-cubes. Fill these trays with
water, then put them in the freezer compartment.
Do not use metallic instruments to remove the
trays from the freezer.
43
PR168
Hb
PR167/1
Hd
Hb
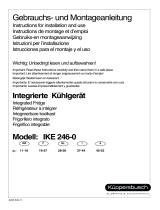
Remettre l’équerre en place sur la glissière et fixer
avec les vis fournies.
Pour effectuer l’éventuel alignement de la porte du
meuble, utiliser le jeu des trous ovales.
A la fin des opérations, il est nécessaire de contrôler
que la porte de l’appareil se ferme parfaitement.
Fixer par encliquetage le couvercle (Hd) sur la
glissière (Hb).
Enlever les équerres et marquer à 8 mm du bord
extérieur de la porte avec le clou (K).
Ha
8mm
K
180°
Réversibilité de la porte

27
HINTS
Movable shelves
The walls of the refrigerator are equipped with a
series of runners so that the shelves can be
positioned as desired.
D338
Positioning the door shelves
To permit storage of food packages of various sizes,
the door shelves can be placed at different heights.
To make these adjustments proceed as follows:
Gradually pull the shelf in the direction of the arrows
until it comes free, then reposition as required.
Hints for refrigeration
Useful hints:
Meat (all types): wrap in polythene bags and place
on the glass shelf above the vegetable drawer.
For safety, store in this way only one or two days
at the most.
Cooked foods, cold dishes, etc..: these should be
covered and may be placed on any shelf.
Fruit and vegetables: these should be thoroughly
cleaned and placed in the special drawer(s)
provided.
Butter and cheese: these should be placed in
special airtight containers or wrapped in aluminium
foil or polythene bags to exclude as much air as
possible.
Milk bottles: these should have a cap and should
be stored in the bottle rack on the door.
Bananas, potatoes, onions and garlic, if not
packed, must not be kept in the refrigerator.
42
Séparer les pièces Ha, Hb, Hc, Hd comme l’indique
de la figure.
PR266
Ha
Hb
Hc
Hd
Appliquez les caches (C-D) sur les ailettes des
butées et dans les trous des charnières.
Appliquez la grille d’aération (B) et le couvre-
charnière (E).
B
E
C
D
PR167
Ha
Hb
8mm
Ouvrir la porte de l’appareil et celle du meuble à 90°
environ. Introduire l’équerre (Hb) dans la glissière
(Ha). Tenir ensemble la porte de l’appareil et celle du
meuble et marquer la position des trous comme
l’indique la figure.
Fixer par encliquetage le couvercle (Hc) sur la
glissière (Ha).
PR33
Hc
Ha
2
1
m
m
2
1
m
m
ca. 50 mm
90°
90°
ca. 50 mm
Poser la glissière (Ha) sur la partie interne de la
porte du meuble dessus et dessous comme l’indique
la figure et marquer la position des trous externes.
Après avoir pratiqué les trous, fixer la glissière avec
les vis fournies.

28
• it is advisable to show the freezing-in date on
each individual pack to enable you to keep tab of
the storage time;
• on the inner door or special card (if supplied) you
will find sketches of various animals and food
types together with the recommended storage
time (in months) from the time of freezing;
• do not put carbonated liquids (fizzy drinks,
etc.) in the freezer compartment as they may
burst.
Hints for freezing
To help you make the most of the freezing process,
here are some important hints:
• the maximum quantity of food which can be
frozen in 24 hrs. is shown on the rating plate;
• the freezing process takes 24 hours. No further
food to be frozen should be added during this
period;
• only freeze top quality, fresh and thoroughly
cleaned, foodstuffs;
• prepare food in small portions to enable it to be
rapidly and completely frozen and to make it
possible subsequently to thaw only the quantity
required;
• wrap up the food in aluminium foil or polythene
and make sure that the packages are airtight;
• do not allow fresh, unfrozen food to touch food
which is already frozen, thus avoiding a rise in
temperature of the latter;
• lean foods store better and longer than fatty
ones; salt reduces the storage life of food;
• water ices, if consumed immediately after
removal from the freezer compartment, can
possibly cause the skin to be freeze burnt;
Hints for storage of frozen food
To obtain the best performance from this appliance,
you should:
• make sure that the commercially frozen
foodstuffs were adequately stored by the retailer;
• be sure that frozen foodstuffs are transferred
from the foodstore to the freezer in the shortest
possible time;
• not open the door frequently or leave it open
longer than absolutely necessary.
• Once defrosted, food deteriorates rapidly and
cannot be refrozen.
• Do not exceed the storage period indicated by
the food manufacturer.
MAINTENANCE
Unplug the appliance before carrying out
any maintenance operation.
Warning
This appliance contains hydrocarbons in its cooling
unit; maintenance and recharging must therefore
only be carried out by authorized technicians.
Periodic cleaning
Clean the inside with warm water and bicarbonate of
soda. Rinse and dry thoroughly.
Clean the condenser (black grill) and the
compressor at the back of the appliance with a
brush or a vacuum cleaner. This operstion will
improve the performance of the appliance and save
electricity consumption.
Periods of non-operation
When the appliance is not in use for long periods,
take the following precautions:
• remove the plug from the wall socket;
• remove all food;
• defrost and clean the interior and all accessories;
• leave the door ajar to allow air to circulate to
prevent unpleasant smells.
41
Insérer l'appareil dans la niche en l'appuyant contre
la paroi intérieure, correspondant au côté
d'ouverture de la porte, jusqu'à ce que le cache
supérieur soit à fleur (1) et veiller à ce que la
charnière du bas soit alignée sur la paroi du meuble
(2).
D022
1
2
D724
Appliquez le joint à pression, entre l’appareil et le
meuble.
Instructions pour
l’encastrement
Dimensions de la niche
Hauteur 1030 mm
Profondeur 550 mm
Breite 560 mm
Pour des raisons de sécurité, la ventilation doit être
prévue comme indiqué dans le Fig.
Attention: veillez à ne pas obstruer les
ouvertures de ventilation.
Il est également nécessaire que la niche soit
équipée d’un conduit d’areation ayant les mesures
suivantes:
Profondeur 50 mm
Largeur 540 mm
Réversibilité des portes
La porte de l’appareil a été immobilisée pour le
transport au moyen de pivots. Enlevez le pivot
supérieur et inférieur conformément au sens
d’ouverture de la porte
50 mm
min.
200 cm
2
200 cm
2
min.
D567
PR01
540
50
B
T
H
I
Fixez l’appareil à l’aide des 4 vis livrées à cet effet.

29
Important
Never use sharp metal tools to scrape off frost
from the evaporator as you could damage it.
Do not use a maechanical device or any artificial
means to speed up the thawing process other
than those recommended by the manufacturer.
A temperature rise of the frozen food packs,
during defrosting, may shorten their safe storage
life.
Interior light
The light bulb inside the refrigerator compartment
can be reached as follows:
- unscrew the light cover securing screw.
- unhook the moving part as shown in the figure.
If the light does not come on when the
door is open, check that it is screwed into place
properly. If it still does not light up, change the
bulb.The rating is shown on the light bulb cover.
D411
Defrosting
Frost is automatically eliminated from the evaporator
of the refrigerator compartment every time the motor
compressor stops, during normal use. The defrost
water drains out through a trough into a special
container at the back of the appliance, over the
motor compressor, where it evaporates.
It is important to periodically clean the defrost
water drain hole in the middle of the refrigerator
compartment channel to prevent the water
overflowing and dripping onto the food inside.
Use the special cleaner provided, which you will
find already inserted into the drain hole.
The freezer compartment, however, will become
progressively covered with frost. This should be
removed with a plastic scraper , whenever the
thickness of the frost exceeds 4 mm. During this
operation it is not necessary to switch off the power
supply or to remove the foodstuffs.
However, when the ice becomes very thick on the
inner liner, complete defrosting should be carried out
and it is advisable to carry out this operation when
the appliance is empty.
To carry out complete defrosting of the freezer
compartment proceed as follows:
1. pull out the plug from the wall socket or turn the
thermostat knob to the «O» setting;
2. remove any stored food, wrap it in several layers
of newspaper and put it in a cool place;
3. leave the door open, place a basin on the top
shelf of the refrigerator compartment under the
drain hole, remove the plugas shown in the
figure;
4. when defrosting is completed, dry the interior
thoroughly and refit the plug;
5. turn the thermostat knob back to the required
setting or replace the plug in the power socket.
After letting the appliance run for at least half an
hour, replace the previously removed food into
the compartment.
PR151
D037
40
3. maintenez la porte ouverte; placez un récipient
sur la premire clayette du réfrigérateur, à l’endroit
qui correspond à l’ouverture de vidange, et
retirez le bouchon, comme l’illustre la figure.
4. épongez et séchez soigneusement les parois et
le fond;
5. ramenez le bouton du thermostat sur la position
désirée ou rebranchez l’appareil.
6. Après 2-3 heures de fonctionnement l’appareil
est à nouveau prêt à la con-servation des
produits surgelés.
Important
Pour cette opération n’utilisez jamais d’objet
métallique qui risquerait de détériorer l’appareil.
N’utilisez jamais de dispositifs mécaniques ou
autres moyens artificiels pour accélérer le
ANOMALIE DE FONCTIONNEMENT
Si l'appareil marche mal, il faut contrôler:
• si la fiche est bien branchée à la prise de courant
et si l'interrupteur est éteint;
• s'il n'y a pas de panne de courant;
• si les commandes sont bien dans la bonne
position;
• s'il y a des traces d'eau au fond du compartiment
et si l'orifice d'écoulement de l'eau de dégivrage
est bouché (voir chapitre “Dégivrage”).
Une fois que tous ces contrôles ont été effectués, si
l'anomalie de fonctionnement continue, adressez-
vous au Service Après-Vente le plus proche.
Pour que l'intervention soit plus rapide, au
moment de l'appel, il vaut mieux indiquer le code
du modèle et le numéro d'immatriculation, qui se
trouvent sur le certificat de garantie ou sur la
plaque d'immatriculation placée à l'intérieur de
l'appareil, à gauche et en bas.
INSTALLATION
Emplacement
Placez de préférence votre appareil loin d’une
source de chaleur (chauffage, cuisson ou rayons
solaires trop intenses).
Pour l’encastrement rapportez-vous aux instructions
relatives ci-jointes.
Branchement électrique
Contrôlez, avant de brancher l’appareil, que le
voltage et la fréquence indiqués sur la plaque
signalétique correspondent à ceux de votre réseau.
Tolérance admise: ±6%.
Pour l’adaptation de l’appareil à des voltages
différents, l’adjonction d’un autotransformateur d’une
puissance adéquate est indispensable.
Il faut absolument brancher l'appareil à une prise
de terre qui marche.
C'est pour cela que la prise du câble d'alimentation
est munie d'un contact prévu exprès. Si la prise de
courant du réseau domestique n'est pas branchée à
la terre, branchez l'appareil à une prise de terre à
part, conformément aux normes en vigueur, en vous
adressant à un technicien spécialisé.
Le fabricant décline toute responsabilité, si cette
norme de prévention des accidents n'est pas
respectée.
-Cet appareil est conforme aux Directives
Communautaires suivantes:
- 87/308 CEE du 2.6.87 concernant la
suppression des interférences radio-électriques
.- 73/23 CEE 19/02/73 (Basse Tension) et
modifications successives;
- 89/336 CEE 03/05/89 (Compatibilité
Electromagnétique) et modifications
successives.
Important: L’appareil doit pouvoir être débranché du
secteur ; il est donc nécessaire que la fiche reste
accessible une fois que l’installation est terminée.
dégivrage, à part ceux préconisés.
L’élévation de température des denrées
congelées peut diminuer leur durée de
conservation.
PR151

30
The Manufacturer declines all responsibility if
the above safety precautions are not observed.
This appliance complies with the following
E.E.C. Directives:
- 87/308 EEC of 2/6/87 relative to radio interference
suppression.
- 73/23 EEC of 19.2.73 (Low Voltage Directive) and
subsequent modifications;
- 89/336 EEC of 3.5.89 (Electromagnetic
Compatibility Directive) and subsequent
modifications.
CUSTOMER SERVICE AND SPARE PARTS
If the appliance is not functioning properly, check
that:
• the plug is firmly in the wall socket and the mains
power switch is on;
• there is an electricity supply (find out by plugging
in another appliance);
• the thermostat knob is in the correct position.
• If there are water drops on the bottom of the
cabinet, check that the defrost water drain
opening is not obstructed (see “Defrosting”
section).
• If your appliance is still not working properly after
making the above checks, contact the nearest
service centre.
To obtain fast service, it is essential that when you
apply for it you specify the model and serial number
of your appliance which can be found on the
guarantee certificate or on the rating plate located
inside the appliance, on the bottom left-hand side.
INSTALLATION
Location
The appliance should be installed well away from
sources of heat such as radiators, boilers, direct
sunlight etc.
Electrical connection
Before plugging in, ensure that the voltage and
frequency shown on the serial number plate
correspond to your domestic power supply. Voltage
can vary by ±6% of the rated voltage.
For operation with different voltages, a suitably sized
auto-transformer must be used.
The appliance must be earthed.
The power supply cable plug is provided with a
contact for this purpose.
If the domestic power supply socket is not earthed,
connect the appliance to a separate earth in
compliance with current regulations, consulting a
specialist technician.
ATTENTION!
It must be possible to disconnect the appliance from
the mains power supply; the plug must therefore be
easily accessible after installation.
Door reversibility
The appliance’s door has been locked in position for
transport by means of pins on both sides.According
to the door opening direction, remove relevant pins
at the top and at the bottom.
Instructions for totally built-in appliances
50 mm
min.
200 cm
2
200 cm
2
min.
D567
Building-in instructions
Dimensions of housing
Height 1030 mm
Depth 550 mm
Width 560 mm
For safety reasons, minimum ventilation must be as
shown in Fig.
Attention: keep ventilation openings clear of
obstruction.
39
Dégivrage
Le dégivrage du compartiment réfrigérateur
s’effectue automatiquement, à chaque arrêt du
compresseur. L’eau de dégivrage est évacuée dans
un bac situé à l’arrière de l’appareil où elle
s’évapore.
Nous recommandons de nettoyer périodique-
ment l’orifice d’écoulement de l’eau de
dégivrage se trouvant dans la partie centrale de
la gouttière du compartiment réfrigérateur afin
d’éviter que l’eau, en débordant, ne coule sur les
denrées stockées dans la cuve. Utilisez à cet
effet le bâtonnet se trouvant dans l’orifice.
Dans le congélateur, par contre, il faut éliminer le
givre à chaque fois qu'il y a une couche épaisse qui
s'est formée (de 4 mm environ), en se servant une
spatule en plastique. Pendant que l'on effectue cette
opération, il n'est pas nécessaire de couper le
courant ou d'enlever les denrées qui se trouvent
dans le compartiment.
Pour effectuer un dégivrage complet procédez de la
manière suivante:
1. tournez le bouton du thermostat sur la position
«O» ou débranchez l’appareil;
2. enveloppez les denrées dans plusieurs feuilles
de papier journal et conservez-les dans un
endroit frais;
Nettoyage
N’utilisez jamais d’objets métalliques pour nettoyer
l’appareil; vous risquez de l’endommager.
Nettoyez périodiquement l’intérieur de votre appareil
avec de l’eau tiède et du bicarbonate de soude.
Rincez et séchez soigneusement.
Dépoussiérez le condenseur situé à l'arrière de
l'appareil à l'aide d'une brosse ou d'un aspirateur.
Une accumulation de poussière risquerait de
diminuer le rendement de l'appareil.
Changement de l’ampoule
L’ampoule d’éclairage dans le compartiment
réfrigérateur est accessible si on effectue les
opérations suivantes:
• dévissez la vis de fixation du plafonnier;
• décrochez la partie mobile en exerçant une
pression sur celle-ci comme indiqué dans la
figure.
Lorsque la porte est ouverte, si l’ampoule
ne s’allume pas, il faut contrôler qu’elle soit bien
vissée; si cela n’élimine pas le problème, mettre
une autre ampoule qui ait la même puissance.La
puissance maximale est indiquée sur le
diffuseur.
D411
D037

32
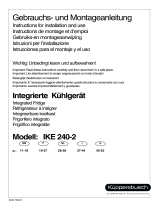
PR266
Ha
Hb
Hc
Hd
Separate parts Ha, Hb,Hc, Hd as shown in the
figure.
Place guide (Ha) on the inside part of the furniture
door, up and down as shown in the figure and mark
the position of external holes. After having drilled
holes, fix the guide with the screws supplied.
2
1
m
m
2
1
m
m
ca. 50 mm
90°
90°
ca. 50 mm
Fix cover (Hc) on guide (Ha) until it clips into place.
PR33
Hc
Ha
PR167
Ha
Hb
8mm
Open the appliance door and the furniture door at
90°. Insert the small square (Hb) into guide (Ha).
Put together the appliance door and the furniture
door and mark the holes as indicated in the figure.
Remove the brackets and mark a distance of 8 mm
from the outer edge of the door where the nail must
be fitted (K).
Ha
8mm
K
37
Décongélation
Avant d’être utilisés, les aliments congelés ou
surgelés doivent être décongelés dans le
réfrigérateur ou à température ambiante, selon le
temps dont on dispose pour cette opération.
S’il s’agit de produits minces ou divisés, placez-les
directement à cuire: dans ce cas le temps de
cuisson sera plus long.
Glaçons
L'appareil est équipé d'un ou de plusieurs bacs à
glace pour faire des glaçons. Il faut remplir ces bacs
d'eau potable et les placer dans le congélateur.
N’employez pas d’objet métallique pour décoller
les bacs à glace.
Conservation des produits
surgelés
A la première mise en fonctionnement ou après un
arrêt prolongé faites fonctionner l’appareil pendant
deux heures au moins, avec le bouton du thermostat
sur la position de froid maximum. Ramenez ensuite
le thermostat sur une position moyenne.
Attention
En cas de coupure de courant abstenez-vous
d’ouvrir la porte. Si l’interruption est de courte
durée (jusqu’à 6-8 heures) et si le congélateur
est rempli, il n’y a aucun risque d’altération pour
les aliments. En cas contraire vous devrez
consommer les aliments le plus rapidement
possible (une augmentation de la température
peut réduireremarquablement la durée de
conservation des aliments).
Positionnement des balconnets de
la contre-porte
Il est possible de changer de place les balconnets.
A cet effet procédez comme suit:
Dégagez les balconnets en agissant dans le sens
indiqué par les flèches. Remontez les balconnets à
la hauteur désirée.
Tablettes amovibles
Les glissières se trouvant sur les parois de la cuve
vous permettent de positionner les tablettes à
différentes hauteurs, selon vos besoins.
Pour une meilleure utilisation de l’espace vous
pouvez superposer les demi-tablettes antérieures
aux demi-tablettes postérieures.
D338
/