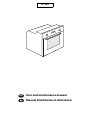
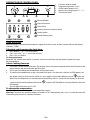
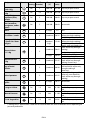
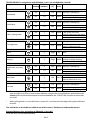
The LADEN FP 295/IX is a multifunctional oven offering a range of cooking options. It features various heating functions, including top and bottom heat, grill, and fan-assisted cooking, providing versatility for different recipes. The oven also includes a defrost function for conveniently thawing frozen food. With its user-friendly controls and temperature settings, the LADEN FP 295/IX simplifies the cooking process, allowing you to prepare delicious meals with ease.
The LADEN FP 295/IX is a multifunctional oven offering a range of cooking options. It features various heating functions, including top and bottom heat, grill, and fan-assisted cooking, providing versatility for different recipes. The oven also includes a defrost function for conveniently thawing frozen food. With its user-friendly controls and temperature settings, the LADEN FP 295/IX simplifies the cooking process, allowing you to prepare delicious meals with ease.


-
 1
1
-
 2
2
-
 3
3
-
 4
4
-
 5
5
-
 6
6
-
 7
7
-
 8
8
-
 9
9
-
 10
10
-
 11
11
-
 12
12
-
 13
13
-
 14
14
-
 15
15
-
 16
16
-
 17
17
-
 18
18
-
 19
19
-
 20
20


The LADEN FP 295/IX is a multifunctional oven offering a range of cooking options. It features various heating functions, including top and bottom heat, grill, and fan-assisted cooking, providing versatility for different recipes. The oven also includes a defrost function for conveniently thawing frozen food. With its user-friendly controls and temperature settings, the LADEN FP 295/IX simplifies the cooking process, allowing you to prepare delicious meals with ease.
Ask a question and I''ll find the answer in the document
Finding information in a document is now easier with AI
Related papers
Other documents
-
Ignis AKS 207/IX User guide
-
Whirlpool AKZ 876/IX User guide
-
-
-
-
-
-
-
-