Page is loading ...

User’s Manual
© 2012 VTech
Printed in China
91-002772-000
US
TM
ATTILA THE ANKYLOSAURUS
ATTILA THE ANKYLOSAURUS
TM

Hi Friend,
You’re about to embark on a “dino-mite” adventure with
me, Attila the Ankylosaurus™! Just so you know, I’ve been
specially created just for you and am part of the VTech
®
Switch & Go Dinos™ crew! Switch & Go Dinos™ are a
special breed of dinosaurs that transform from vehicle
to dino in a few easy steps. You’re going to love playing
with me!
Not only can you help me do some wicked transformations,
but you can help me do other cool things, too! Customize
me by choosing my eyes in dino mode or picking a driver
when I’m in vehicle mode! Try pushing me on the ground
or pressing a button and you’ll hear me make awesome
sounds! Press another button to hear me talk, and I’ll tell
you all about my wild life as a dinosaur! Maybe you’ll even
learn a thing or two.
For more fun, be sure to check out the rest of the Switch &
Go Dinos™ crew (each sold separately)! And remember,
with me you’re in for some dino switchin’, road racing fun!
Your pal,
Attila the Ankylosaurus™

2
INTRODUCTION
This is Attila the Ankylosaurus
TM
, and I’m the toughest dinosaur
of them all! Nobody can get through my hard armor, and I’ve got a
special surprise for anybody who’s dumb enough to try. One swing
of my mighty tail will knock anybody out!
As a dino I may break things, but I’ve also got a softer side. I can turn into
a heavy-duty construction truck. So when I’m done tearing something
apart, I can put it back together again too!
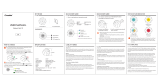
Introduction
LCD
Screen
Style
Button
Sound
Button
Volume
Button
Talk
Button
Action
Button
ON/OFF
Switch

3
INCLUDED IN THIS PACKAGE
• OneVTech
®
SWITCH & GO DINOS
TM
: Attila the Ankylosaurus
TM
• Oneuser’smanual
WARNING:
All packing materials, such as tape, plastic sheets, packaging
locks and tags are not part of this toy, and should be discarded
for your child’s safety.
ATTENTION:
Pour la sécurité de votre enfant, débarrassez-vous de tous
les produits d’emballage tels que rubans adhésifs, feuilles de
plastique, attaches et étiquettes. Ils ne font pas partie du jouet.
NOTE:
Please keep the user’s manual as it contains important
information.
GETTING STARTED
BATTERY INSTALLATION
1. Make sure the unit is turned OFF.
2. Locate the battery cover on the bottom
of the unit. Use a screwdriver to loosen
the screw.
3. Install new “AA” (LR6/AM-3) batteries
into the main unit following the diagram
inside the battery box. (The use of new,
alkaline batteries is recommended for
maximum performance.)
4. Replace the battery cover and tighten
the screw to secure.
Getting Started

4
BATTERY NOTICE
• Usenewalkalinebatteriesformaximumperformance.
• Useonlybatteriesofthesameorequivalenttypeasrecommended.
• Donotmixdifferenttypesofbatteries:alkaline,standard(carbon-
zinc) or rechargeable (Ni-Cd, Ni-MH), or new and used batteries.
• Donotusedamagedbatteries.
• Insertbatterieswiththecorrectpolarity.
• Donotshort-circuitthebatteryterminals.
• Removeexhaustedbatteriesfromthetoy.
• Removebatteriesduringlongperiodsofnon-use.
• Donotdisposeofbatteriesinre.
• Donotchargenon-rechargeablebatteries.
• Remove rechargeable batteries from the toy before charging (if
removable).
• Rechargeable batteries are only to be charged under adult
supervision.
Battery Notice

5
PRODUCT FEATURES
1. TURNING THE UNIT ON
Slide the ON/OFF Switch to ON to turn
the unit ON.
2. STYLE BUTTON
Press the Style Button to choose a driver
or change the dino eyes.
3. TALK BUTTON
Press the Talk Button to hear the dino
or driver talk.
4. SOUND BUTTON
Press the Sound Button to hear cool
sound effects.
5. VOLUME BUTTON
Press the Volume Button to adjust the
volume.
6. ACTION BUTTON
Press the Action Button to swing the tail
or the crane
.
Product Features

6
7. WRECKING BALL & TOW HOOK
Use the Hook to tow other SWITCH & GO DINOS
TM
. Or switch to
the Wrecking Ball for some demolition fun!
8. DUMP TRAILER
Carry heavy loads in the Dump Trailer.
9. TURNING THE UNIT OFF/ AUTOMATIC SHUT-OFF
Slide the ON/OFF switch to OFF or hold the Talk Button / Sound
Button for a few seconds to turn the unit OFF.
Product Features

7
HOW TO SWITCH THE TRUCK TO A DINO
2. Attach the wrecking ball to the end of the crane and extend the crane
to form the tail.
3. Flip the front legs down.
(Note: When switching the dino back to a truck, push the release lever
inbeforeippingthelegsup.)
How to Switch
1. Truck shape.
1
3
2

8
How to Switch
5. Pull out the back feet.
4. Turn the back legs forward.
6. Turn the dump trailer upside down and put it on the back to form the
armor.

9
7. Flip the trailer treads up and pull out the spikes.
8. Dino shape.
Note:
To change the dino back into a truck, reverse the order of the steps above.
Duringstep3,thereleaselevermustbepushedinbeforeippingthe
front legs up (please see the image below).
How to Switch

10
CARE & MAINTENANCE
1. Keep the unit clean by wiping it with a slightly damp cloth.
2. Keep the unit out of direct sunlight and away from any direct heat
source.
3. Remove the batteries when the unit is not in use for an extended
period of time.
4. Do not drop the unit on hard surfaces and do not expose the unit to
moisture or water.
TROUBLESHOOTING
If for some reason the unit stops working or malfunctions, please follow
these steps:
1. Please turn the unit OFF.
2. Interrupt the power supply by removing the batteries.
3. Let the unit stand for a few minutes, then replace the batteries.
4. Turn the unit ON. The unit should now be ready to play again.
5. If the product still does not work, replace with a new set of batteries.
If the problem persists, please call our Consumer Services Department
at 1-800-521-2010 in the U.S. or 1-877-352-8697 in Canada, and a
service representative will be happy to help you.
Care & Maintenance / Troubleshooting

11
Note
NOTE:
FCCinformation:Thisequipmenthasbeentestedandfoundtocomply
with the limits for a Class B digital device, pursuant to Part 15 of the
FCC Rules. These limits are designed to provide reasonable protection
againstharmfulinterferenceinaresidentialinstallation.Thisequipment
generates, uses andcan radiate radio frequencyenergy and, if not
installed and used in accordance with the instructions, may cause
harmful interference to radio communications. However, there is no
guarantee that interference will not occur in a particular installation. If
thisequipmentdoescauseharmfulinterferencetoradioortelevision
reception,whichcanbedeterminedbyturningtheequipmentoffand
on, the user is encouraged to try to correct the interference by one or
more of the following measures:
• Reorientorrelocatethereceivingantenna.
• Increasetheseparationbetweentheequipmentandreceiver.
• Connecttheequipmentintoanoutletonacircuitdifferentfromthat
to which the receiver is connected.
• Consultthedealeroranexperiencedradio/TVtechnicianforhelp.
Caution:changesormodicationsnotexpresslyapprovedbytheparty
responsible for compliance could void the user’s authority to operate
theequipment.
THIS DEVICE COMPLIES WITH PART 15 OF THE FCC
RULES. OPERATION IS SUBJECT TO THE FOLLOWING TWO
CONDITIONS: (1) THIS DEVICE MAY NOT CAUSE HARMFUL
INTERFERENCE, AND (2) THIS DEVICE MUST ACCEPT ANY
INTERFERENCE RECEIVED, INCLUDING INTERFERENCE
THAT MAY CAUSE UNDESIRED OPERATION.
THIS CLASS B DIGITAL APPARATUS COMPLIES WITH
CANADIAN ICES-003.
CET APPAREIL NUMÉRIQUE DE LA CLASSE B EST
CONFORME À LA NORME NMB-003 DU CANADA.
/