Page is loading ...

ROKSAN AUDIO LIMITED
6 NORTHFIELD INDUSTRIAL ESTATE
BERESFORD AVENUE ALPERTON
MIDDLESEX HA0 1NW ENGLAND
TEL. +44 (0)208 900 6801
+44 (0)208 900 6802
FAX. +44 (0)208 900 0734
Kandy
AM / FM TUNER
MkIII
USER MANUAL

Roksan Audio ltd Kandy Integrated Amplifier User Manual
CLASSIFICATION: General Use Version 3.0
All specifications are liable to change without notice. E&OE Page 2 of 8 ENGLISH
Congratulations on your purchase of the ROKSAN Kandy AM / FM Tuner. This Tuner is designed and
manufactured to high specification and rigorously tested to reward you many years of listening
pleasure. Your Kandy Tuner is an important source for your hi-fi system. Its correct installation, set-up
and operation will have a profound influence on the sonic performance of the entire hi-fi installation.
Please read the contents of this manual thoroughly. It will help you to understand your hi-fi equipment
better and enhance your listening pleasure.
This manual is divided into the following sections:
• Safety Instructions (Accompanying Card)
• Introduction
• Installation
• Setup
• Operation
• Remote Control
• Guarantee
• Specifications
U
U
N
N
P
P
A
A
C
C
K
K
I
I
N
N
G
G
Included in the packing of your Kandy Tuner you will find:
• One mains lead fitted with the correct mains power plug for your country
• One Kandy MkIII System Remote Handset and AA batteries (x2)
• One FM indoor ‘T’ Aerial and Adaptor
• One AM indoor Aerial
• One information pack and warranty card
After removing these items please retain all packing materials. Correct packing is necessary for safe
transportation of your Kandy Tuner.
M
M
A
A
I
I
N
N
T
T
E
E
N
N
A
A
N
N
C
C
E
E
After disconnecting the Tuner from the mains supply, the cabinet and front panel may be cleaned with
a lightly dampened soft cloth or chamois leather. Avoid using abrasives or solvents.
E
E
U
U
D
D
I
I
R
R
E
E
C
C
T
T
I
I
V
V
E
E
S
S
This product is designed to comply with the legal provisions of EU Directives 89/3336/EC and
72/23/EC. The standards which have been applied are those which were in force at the time of the
introduction of this product.
This product bears the CE mark.
This product is compliant to EN 60065.
This product must be earthed.
Please ensure that other equipment connected to it is earthed
according to the manufacturer’s instructions.
INTRODUCTION K a n d y AM / FM Tuner

Roksan Audio ltd Kandy Integrated Amplifier User Manual
CLASSIFICATION: General Use Version 3.0
All specifications are liable to change without notice. E&OE Page 3 of 8 ENGLISH
AC MAINS SUPPLY
Your Kandy Integrated Amplifier is set to operate from a fixed supply voltage which is marked on a label next to
the mains input plug. Before connecting the mains lead please check that your mains supply corresponds to this
label as below:
230V Products ………………………………….Voltage Range: 220V – 240V
115V Products ………………………………….Voltage Range: 100V – 120V
The mains lead supplied with this product has an IEC mains socket which plugs into the IEC connector on the
unit’s rear panel. The other end is normally attached to the appropriate mains plug for your country. In the UK
this is the standard UK13A plug.
This plug should ordinarily not be removed from the lead. If you do remove it, please dispose of it safely so that it
cannot be plugged into a mains socket whilst in a potentially dangerous condition. We suggest that you obtain
from your dealer a complete replacement lead.
Should you move to another area where either the mains voltage or the mains plugs are different from those as
supplied with your Integrated Amplifier, please contact the appointed ROKSAN distributor for assistance.
Please observe correct mains polarity at all times.
The Integrated Amplifier mains fuse is located on the rear panel next to the IEC mains connector. This must only
be replaced by the fuse of the type and rating as described on the fuse rating label on the rear panel of the unit.
This product requires connection to earth (ground). The earth wire (in the UK this is colour coded green/yellow)
of the mains cable supplied with your Integrated Amplifier must be connected to a suitable earthing point
established for this purpose by your electricity supply company. If you are in any doubt, consult a qualified
electrician.
If the equipment is likely to be unused for some time, unplug it from the mains supply.
GENERAL CAUTIONS
FCC WARNING
This equipment may generate or use Radio Frequency energy. The user may lose the right to operate this
equipment if unauthorised modifications are made.
INTERFERENCE
Properly installed, this unit should not cause harmful interference to radio communications, There is, however, no
guarantee that such interference will not occur in a specific installation. If interference arises (which you can
determine by switching the unit off and on) you could try to remedy matters by the following:
• Re-orient or re-locate the receiving antenna
• Increase the distance between the Kandy Integrated Amplifier and receiver
• Connect the unit to a different mains circuit from that of the receiver
• Consult your ROKSAN appointed dealer or an experienced Radio/TV technician for help and advice
LOCATION
Your Kandy Integrated Amplifier should be located in a well ventilated area and kept away from sources of heat,
dust and humidity and from direct sunlight.
The Integrated Amplifier may be positioned either as a free standing unit or alongside another audio/video
product.
Never place the Integrated Amplifier on carpet or any surface likely to hinder normal ventilation.
Never allow liquids or other objects to fall into the unit.
This unit contains no user serviceable parts. Do Not remove any panels or attempt to service it yourself.
Unauthorised servicing will void the warranty.
CAUTIONS Kandy Integrated Amplifier

Roksan Audio ltd Kandy Integrated Amplifier User Manual
CLASSIFICATION: General Use Version 3.0
All specifications are liable to change without notice. E&OE Page 4 of 8 ENGLISH
R
R
O
O
K
K
S
S
A
A
N
N
K
K
a
a
n
n
d
d
y
y
T
T
u
u
n
n
e
e
r
r
-
-
F
F
r
r
o
o
n
n
t
t
P
P
a
a
n
n
e
e
l
l
V
V
i
i
e
e
w
w
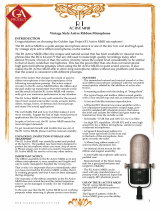
1. Mains AC Power Button
2. Band Selection Button
3. FL Display
4. Preset Button
5. Stereo / Mono Button
6. Tunning / Selection Knob
7. Mute Button
8. Autoscan Button
R
R
O
O
K
K
S
S
A
A
N
N
K
K
a
a
n
n
d
d
y
y
T
T
u
u
n
n
e
e
r
r
-
-
R
R
e
e
a
a
r
r
P
P
a
a
n
n
e
e
l
l
V
V
i
i
e
e
w
w
1. FM 75 Ω Antenna Input
2. AM Antenna Input
3. Analogue Output (Left & Right)
4. IEC Mains Inlet Socket
5. Voltage & Fuse Rating Label
C
C
O
O
N
N
N
N
E
E
C
C
T
T
I
I
N
N
G
G
M
M
A
A
I
I
N
N
S
S
P
P
O
O
W
W
E
E
R
R
The moulded IEC connector of the supplied mains lead should be plugged into the socket (4) on the
rear of the unit first and then plugged into the mains supply. The Mains power switch (1) is on the front
panel of the Tuner. Your
Tuner should be switched off when not in use and if it is to be unattended for
a long period, it should be switched off and the mains lead unpluged from the wall.
INSTALLATION K a n d y AM / FM Tuner
SETUP K a n d y AM / FM Tuner
POWER
PRESET
TUNE/SELECT
AM / FM TUNER KT-I MkIII
ST/MONO
BAND
ROKSAN
AUTOSCAN
MUTE
2 3 4
5
1
6 7 8
5
3 4 1 2

Roksan Audio ltd Kandy Integrated Amplifier User Manual
CLASSIFICATION: General Use Version 3.0
All specifications are liable to change without notice. E&OE Page 5 of 8 ENGLISH
ANTENNA CONNECTIONS
FM Antenna:
Connect the adaptor & the ‘T’ FM Antenna supplied to the antenna socket (1)
on the back panel. (NOTE: A high quality indoor or out door FM aerial can
improove the performance of your Kandy Tuner)
AM Antenna:
Connect the AM Antenna supplied to the antenna sockets (2) on the back
panel. (NOTE: A high quality AM aerial can improve the performance of your
Kandy Tuner).
IMPORTANT NOTE: For optimum performance it is recommended to use high quality inter-connect cables such
as ROKSAN HDC-02A High Definition Analogue Cable and ROKSAN HDC-01D High Definition Coaxial Cable
for aerial extensions.
S
S
W
W
I
I
T
T
C
C
H
H
I
I
N
N
G
G
O
O
N
N
The Mains power switch (1) is located on the front panel of the Tuner. When switched ON, your Kandy
Tuner FL Display will illuminate with the word ‘ROKSAN’ for a few seconds it will then revert to the
previously selected preset.
U
U
S
S
I
I
N
N
G
G
T
T
H
H
E
E
C
C
O
O
N
N
T
T
R
R
O
O
L
L
S
S
BAND SELECTION
Press the Band Selection Button (2) on the front panel to toggle between FM and AM. Notice on the
display the frequency indication will change from MHz to kHz and the preset indicator will also change
from ‘F’ to ‘A’ for FM and AM respectively.
AUTO/MANUAL SCAN
Press the Auto-scan Button (8) on the front panel to toggle between scan tuning and manual tuning.
Notice on the display if ‘AUTO’ is lit. If so by simply turning the Tune/Select Knob (6) by approximately
a ¼ turn clockwise or anti-clockwise, the tuner will automatically scan up or down until a strong enough
signal is detected. It will then stop at that frequency and if it happens to be a desired radio station, you
can store it in one of the preset memories. Otherwise, just turn the knob a little again and the tuner will
search for the next strong signal and so on.
In manual mode (‘AUTO’ not illuminated) turning the Tune/Select Knob will advance up or down the
tuning frequency to allow you select your desired radio station.
PRESET SELECTION
Press the Tune/Select Knob (6) to toggle between tuning and preset selection. Notice when preset
selection is chosen the preset indicator and memory indicator ‘MEM’ flash. Simply turn the knob anti-
clockwise to go back and clockwise to go forward to your desired preset (For example the 5
th
preset
location: 05F). Once on the desired preset, press the knob again to complete your selection.
PRESET PROGRAMMING
You can programme up to 99 presets to your favourite radio stations. Once you have selected a radio
station, press the Preset Button (4); the preset indicator and memory indicator ‘MEM’ start to flash.
Simply turn the Knob (6) until you get to the desired preset number that you wish to store this station in
(For example the 11
th
preset location: 11F or 11A if storing an AM frequency) and press the Preset
Button again to store and complete your selection.
OPERATION K a n d y AM / FM Tuner
Page 5

Roksan Audio ltd Kandy Integrated Amplifier User Manual
CLASSIFICATION: General Use Version 3.0
All specifications are liable to change without notice. E&OE Page 6 of 8 ENGLISH
STEREO / MONO SELECTION
Press the St/Mono Button (5) on the front panel to toggle between Stereo and Mono (while you are
listening to a stereo FM broadcast). This is a useful feature especially when tuned to a ‘weak’ radio
station with excessive background noise. To reduce this background noise, simply select Mono which
increases the tuner’s signal to noise ratio.
MUTE SELECTION
Press the Mute Button (7) on the front panel to toggle between Muted and normal audio output. Notice
when mute is selected the display will show ‘MUTE’ and the audio put puts are muted completely.
Press the mute button again to revert to the previously selected radio station with unmated audio out
put.
Your Tuner is supplied with a Kandy MKIII System
Remote Handset.
The Remote Control Handset is powered by two 1.5V AA
batteries (supplied). When inserting the batteries observe
the correct polarity.
The handset duplicates all front panel controls (except
mains AC power switch) and contains some additional
features.
NUMERIC KEYS
1. To activate the Numeric Keys (9) for the Tuner press TU.# Button (10).
2. To enter any digit (for example the station Frequency) press corresponding digits from the
Numeric Keys (9).
FREQUENCY
Pressing the Freq. Button (3) lets you enter the station frequency directly from the numeric key pad
without scanning up or down.
REMOTE CONTROL K a n d y AM / FM Tuner
1 PRESET UP
2 PRESET DOWN
3 FREQUENCY INPUT
4 AM/FM BAND SELECTION
5 TUNE DOWN
6 TUNE UP
7 MUTE
8 MEMORY STORE
9 NUMERIC KEYS
10 TUNER NUMERIC KEY
SELECTOR
5
6
10
3
8
9
2
1
4
7

Roksan Audio ltd Kandy Integrated Amplifier User Manual
CLASSIFICATION: General Use Version 3.0
All specifications are liable to change without notice. E&OE Page 7 of 8 ENGLISH
1. Press the Freq. Button (3) the display will blank the frequency digits ready for entering the new
ones.
2. Enter the corresponding digits from the Numeric Keys (9).
There are no user-serviceable parts inside your Kandy Tuner. If a fault should develop, refer any servicing to
your appointed ROKSAN dealer, distributor or ROKSAN approved service agent.
Your ROKSAN Kandy Tuner is guaranteed against any defect in materials and workmanship for a period of two
years from the date of purchase.
This guarantee only becomes effective if the warranty card is validated by the ROKSAN retailer from whom the
equipment was purchased and returned to ROKSAN within 28 days of purchase.
This guarantee excludes:
1. Damage caused due to accident, misuse, neglect and incorrect installation, adjustment or repair.
2. Liability for damage or loss during transit from the retailer or purchaser to ROKSAN or its authorised
distributor for the purposes of repair or inspection.
Carriage costs to ROKSAN shall be borne by the consignor.
All claims under this guarantee must be made through an authorised ROKSAN retailer.
If equipment returned for repair to ROKSAN is found on inspection to comply with the product specification
ROKSAN reserves the right to make a charge for examination and return carriage.
Unauthorised servicing will void this guarantee.
Number of presets 99
Audio Output (@ 75kHz Dev. Mono 1kHz) 1.3 V
Aerial Input FM 75Ω Coaxial
AM Quick Connect Terminals
S/N Ratio (CCIR – ARM) FM: Mono >75dB
Stereo >69dB
AM: >50dB
THD+N @ 1kHz 775mV (400Hz HPF, 30kHz LPF) Mono, 75kHz Deviation <0.4%
Stereo, 75kHz Deviation <0.5%
Sensitivity (IHF) 11dB µ
Tuning Range FM: 87.5 – 108 MHz
AM: 522 – 1611 kHz
Frequency Response (FM) 20Hz - 15kHz (-1dB)
Power Source 220V – 240V 50Hz / 60Hz
100V – 120V 50Hz / 60Hz
Power Consumption <17 W
Dimension 432 x 380 x 90 (W x D x H) mm
432 x 380 x 102 (including feet)
Weight 7Kg
SPECIFICATIONS K a n d y AM / FM Tuner
GUARANTEE K a n d y AM / FM Tuner

Roksan Audio ltd Kandy Integrated Amplifier User Manual
CLASSIFICATION: General Use Version 3.0
All specifications are liable to change without notice. E&OE Page 8 of 8 ENGLISH
Kandy Integrated Amplifier MKIII Serial Number: …………………………
Purchase Date Year .……… Month …….. Day ……..
ROKSAN Retailer Name: …………………………………
Location: ………………………………
Please keep a record for future reference
www.roksan.co.uk
NOTES Kandy Integrated Amplifier
/