Sharp MX-3501N User manual

Category
Print & Scan
Type
User manual
User's Guide
MX-3500N
MX-3501N
MX-4500N
MX-4501N
MX-2300G
MX-2300N
MX-2700G
MX-2700N
MODEL:
1
TABLE OF CONTENTS
ABOUT THIS MANUAL . . . . . . . . . . . . . . . . . . . . . . . . 2
• MANUALS PROVIDED WITH THE MACHINE . . . 2
1
BEFORE USING THE MACHINE
PART NAMES AND FUNCTIONS . . . . . . . . . . . . . . . . 4
• EXTERIOR . . . . . . . . . . . . . . . . . . . . . . . . . . . . . . . 4
• INTERIOR . . . . . . . . . . . . . . . . . . . . . . . . . . . . . . . 6
• AUTOMATIC DOCUMENT FEEDER AND
DOCUMENT COVER . . . . . . . . . . . . . . . . . . . . . . . 7
• CONNECTORS . . . . . . . . . . . . . . . . . . . . . . . . . . . 8
• OPERATION PANEL . . . . . . . . . . . . . . . . . . . . . . . 9
TOUCH PANEL . . . . . . . . . . . . . . . . . . . . . . . . . . . . . 11
PRINT/SEND STATUS (JOB STATUS). . . . . . . . . . . 12
TURNING THE POWER ON AND OFF . . . . . . . . . . . 13
• ENERGY SAVE FUNCTIONS . . . . . . . . . . . . . . . 14
• [POWER SAVE] KEY . . . . . . . . . . . . . . . . . . . . . . 14
USER AUTHENTICATION . . . . . . . . . . . . . . . . . . . . . 15
• AUTHENTICATION BY USER NUMBER. . . . . . . 15
• AUTHENTICATION BY LOGIN NAME /
PASSWORD. . . . . . . . . . . . . . . . . . . . . . . . . . . . . 17
2
LOADING PAPER
IMPORTANT POINTS ABOUT PAPER . . . . . . . . . . . 20
• NAMES AND LOCATIONS OF TRAYS . . . . . . . . 20
• THE MEANING OF "R" IN PAPER SIZES . . . . . . 21
• USEABLE PAPER . . . . . . . . . . . . . . . . . . . . . . . . 21
TRAY SETTINGS FOR TRAYS 1 TO 4 . . . . . . . . . . . 23
• LOADING PAPER . . . . . . . . . . . . . . . . . . . . . . . . 23
• CHANGING THE PAPER SIZE . . . . . . . . . . . . . . 24
LOADING PAPER IN TRAY 5 (Large capacity
tray) . . . . . . . . . . . . . . . . . . . . . . . . . . . . . . . . . . . . . . 26
LOADING PAPER IN THE BYPASS TRAY . . . . . . . . 28
• IMPORTANT POINTS WHEN USING THE
BYPASS TRAY. . . . . . . . . . . . . . . . . . . . . . . . . . . 30
3
ORIGINALS
PLACING THE ORIGINAL . . . . . . . . . . . . . . . . . . . . . 33
• PLACING ORIGINALS IN THE AUTOMATIC
DOCUMENT FEEDER . . . . . . . . . . . . . . . . . . . . . 33
• PLACING THE ORIGINAL ON THE
DOCUMENT GLASS . . . . . . . . . . . . . . . . . . . . . . 36
4
PERIPHERAL DEVICES
PERIPHERAL DEVICES . . . . . . . . . . . . . . . . . . . . . . 38
FINISHER . . . . . . . . . . . . . . . . . . . . . . . . . . . . . . . . . . 40
• PART NAMES . . . . . . . . . . . . . . . . . . . . . . . . . . . 40
• SUPPLIES . . . . . . . . . . . . . . . . . . . . . . . . . . . . . . 40
• FINISHER MAINTENANCE . . . . . . . . . . . . . . . . . 41
SADDLE STITCH FINISHER . . . . . . . . . . . . . . . . . . . 45
• PART NAMES . . . . . . . . . . . . . . . . . . . . . . . . . . . 45
• SUPPLIES . . . . . . . . . . . . . . . . . . . . . . . . . . . . . . 45
• SADDLE STITCH FINISHER MAINTENANCE . . 46
5
MAINTENANCE
REGULAR MAINTENANCE . . . . . . . . . . . . . . . . . . . . 52
• CLEANING THE DOCUMENT GLASS AND
AUTOMATIC DOCUMENT FEEDER . . . . . . . . . . 52
• CLEANING THE MAIN CHARGER OF THE
PHOTOCONDUCTIVE DRUM . . . . . . . . . . . . . . . 55
• CLEANING THE BYPASS FEED ROLLER . . . . . 55
• CLEANING THE ORIGINAL FEED ROLLER. . . . 55
• CLEANING THE LASER UNIT. . . . . . . . . . . . . . . 56
REPLACING THE TONER CARTRIDGES. . . . . . . . . 60
REPLACING THE WASTE TONER BOX. . . . . . . . . . 63
6
ENTERING TEXT
FUNCTIONS OF THE MAIN KEYS . . . . . . . . . . . . . . 66
• CHANGING THE ENTRY MODE . . . . . . . . . . . . . 67
• ENTERING TEXT FROM AN EXTERNAL
KEYBOARD . . . . . . . . . . . . . . . . . . . . . . . . . . . . . 67
2
ABOUT THIS MANUAL
Please note
Where this manual shows the "MX-2300/2700 series" or the "MX-3500/4500 series", the following models are indicated:
MX-2300/2700 series: MX-2300G, MX-2300N, MX-2700G, MX-2700N
MX-3500/4500 series: MX-3500N, MX-3501N, MX-4500N, MX-4501N
This manual contains references to the fax function. However, please note that the fax function is not available in some
countries and regions.
Considerable care has been taken in preparing this manual. If you have any comments or concerns about the manual, please
contact your dealer or nearest authorised service representative.
This product has undergone strict quality control and inspection procedures. In the unlikely event that a defect or other problem
is discovered, please contact your dealer or nearest authorised service representative.
Aside from instances provided for by law, SHARP is not responsible for failures occurring during the use of the product or its
options, or failures due to incorrect operation of the product and its options, or other failures, or for any damage that occurs due
to use of the product.
Warning
Reproduction, adaptation or translation of the contents of manual without prior written permission is prohibited, except as
allowed under copyright laws.
All information in this manual is subject to change without notice.
Illustrations and the operation panel and touch panel shown in this manual
The peripheral devices are generally optional, however, some models include certain peripheral devices as standard equipment.
The explanations in this manual assume that a right tray and stand/2 x 500 sheet paper drawer are installed on the MX-2700N
(equipped standard with an automatic document feeder).
To further explain certain functions and uses, some explanations assume that additional peripheral devices are installed.
MANUALS PROVIDED WITH THE MACHINE
Printed manuals and manuals stored in PDF format on the machine's hard drive are provided with the machine. When
using the machine, read the appropriate manual for the feature you are using.
Printed manuals
The display screens, messages, and key names shown in the manual may differ from those on the actual machine
due to product improvements and modifications.
Manual name Contents
Safety Guide
This manual contains instructions for using the machine safely and lists the specifications of the machine
and its peripheral devices.
Software Setup
Guide
This manual explains how to install the software and configure settings to use the machine as a printer
or scanner.
Quick Start Guide
This manual provides easy-to-understand explanations of all the functions of the machine in a single
volume.
Detailed explanations of each of the functions can be found in the manuals in PDF format.
Troubleshooting
This manual explains how to remove paper misfeeds and provides answers to frequently asked
questions regarding the operation of the machine in each mode. Refer to this manual when you have
difficulty using the machine.
Facsimile Quick
Reference Guide
This manual explains the basic procedures for using the fax function of the machine, and provides an
overview of the features of the fax function, troubleshooting procedures, and specifications.
For detailed information on using the fax function and the system settings for fax, see the "Facsimile
Guide" in PDF format.
3
Operation manuals in PDF format
The manuals in PDF format provide detailed explanations of the procedures for using the machine in each mode. To
view the PDF manuals, download them from the hard drive in the machine. The procedure for downloading the manuals
is explained in "How to download the manuals in PDF format" in the Quick Start Guide.
Icons used in the manuals
The icons in the manuals indicate the following types of information:
Manual name Contents
User's Guide
(This manual)
This manual provides information, such as basic operation procedures, how to load paper, and machine
maintenance.
Copier Guide This manual provides detailed explanations of the procedures for using copy function.
Printer Guide This manual provides detailed explanations of the procedures for using print function.
Facsimile Guide
This manual provides detailed explanations of the procedures for using fax function and the "System
Settings" that are related to fax.
Scanner Guide
This manual provides detailed explanations of the procedures for using scan function and Internet Fax
function.
Document Filing
Guide
This manual provides detailed explanations of the procedures for using the document filing function. The
document filing function allows you to save the document data of a copy or fax job, or the data of a print
job, as a file on the machine's hard disk. The file can be called up as needed.
System Settings
Guide
This manual explains the "System Settings", which are used to configure a variety of parameters to suit
the aims and the needs of your workplace. Current settings can be displayed or printed out from the
System Settings.
This alerts you to a situation where
there is a risk of machine damage or
failure.
This indicates the name of a system setting and a provides a brief
explanation of the setting. For detailed information on each system
setting, see the System Settings Guide.
When "System Settings:" appears:
A general setting is explained.
When "System Settings (Administrator):" appears:
A setting that can only be configured by an administrator is
explained.
This provides a supplemental
explanation of a function or procedure.
This explains how to cancel or correct
an operation.
Warning
This alerts you to a situation where there is a risk of human death or injury.
Caution
This alerts you to a situation where there is a risk of human injury or property damage.
4
This chapter provides basic information about the machine. Please read this chapter before using the machine.
PART NAMES AND FUNCTIONS
EXTERIOR
(1) Document cover*
1,
*
2
This holds down the original.
(2) Duplex single pass feeder
(automatic document feeder)
This automatically feeds and scans multiple originals. Both
sides of two-sided originals can be automatically scanned.
Installed standard on the MX-3501N/4501N. Cannot be
installed on other models.
PLACING THE ORIGINAL (page 33)
(3) Reversing single pass feeder*
1,
*
2
(automatic document feeder)
This automatically feeds and scans multiple originals. Both
sides of two-sided originals can be automatically scanned.
PLACING THE ORIGINAL (page 33)
(4) Front cover
Open this cover to switch the main power switch to "On"
or "Off" or to replace a toner cartridge.
TURNING THE POWER ON AND OFF (page 13)
REPLACING THE TONER CARTRIDGES (page 60)
(5) Paper pass unit
*1
This transfers output to the saddle stitch finisher.
(6) Operation panel
This is used to select functions and enter the number of
copies.
OPERATION PANEL (page 9)
(7) Exit tray unit (right tray)
*1
When installed, output can be delivered to this tray.
(8) Output tray (centre tray)
Copy jobs and print jobs are delivered to this tray.
(9) Finisher*
1
This can be used to staple output. A punch module can
also be installed to punch holes in output.
FINISHER (page 40)
1
BEFORE USING THE MACHINE
(2)
(1)
(3)
(4)
(5)
(8)
(7)
(6)
(9)
When a finisher, paper pass unit and
saddle stitch finisher (peripheral
devices) are not installed.
When a finisher (peripheral
device) is installed.
When an automatic
document feeder is not
installed.
When using the
MX-3501N/4501N
*1 Peripheral Devices
The peripheral devices are generally optional, however, some models include certain peripheral devices as standard equipment.
*2 The MX-2300G/2300N/2700G/2700N/3500N/4500N are equipped as standard with peripheral devices. On the
MX-2300G/MX-2700G, you can select whether to equip the machine with a document cover or a reversing single pass feeder.
5
(10) Saddle stitch finisher
*
This can be used to staple output. The saddle stitch
finisher can automatically staple output at the centre line
and fold the pages to create a pamphlet. A punch module
can also be installed to punch holes in output.
SADDLE STITCH FINISHER (page 45)
(11) Tray 1
This holds paper. Up to 500 sheets of paper can be
loaded.
TRAY SETTINGS FOR TRAYS 1 TO 4 (page 23)
(12) Tray 2
This holds paper. Up to 500 sheets of paper can be
loaded.
TRAY SETTINGS FOR TRAYS 1 TO 4 (page 23)
(13) Tray 3 (when a stand/1 x 500 sheet paper drawer or a
stand/2 x 500 sheet paper drawer is installed)*
This holds paper. Up to 500 sheets of paper can be
loaded.
TRAY SETTINGS FOR TRAYS 1 TO 4 (page 23)
(14) Tray 4 (when a stand/2 x 500 sheet paper drawer is
installed)*
This holds paper. Up to 500 sheets of paper can be
loaded.
TRAY SETTINGS FOR TRAYS 1 TO 4 (page 23)
(15) Tray 5 (when a large capacity tray is installed)*
This holds paper. Up to 3500 sheets of paper can be
loaded.
LOADING PAPER IN TRAY 5 (Large capacity tray)
(page 26)
(15)(11)(10) (14)(12) (13)
* Peripheral Devices
The peripheral devices are generally optional, however, some models include certain peripheral devices as standard
equipment.
6
INTERIOR
(16) Toner cartridges
When the toner in a cartridge runs out, the cartridge must
be replaced with a new cartridge of the same colour.
The shape of the toner cartridge varies slightly by model.
REPLACING THE TONER CARTRIDGES (page 60)
(17) Fusing area
Heat is applied here to fuse the transferred image onto
the paper.
(18) Transfer belt
During full colour copying, the toner images of each of
the four colours on each of the photoconductive drums
are combined together on the transfer belt.
During black and white copying, only the black toner
image is transferred onto the transfer belt.
(19) Right side cover
Open this cover to operate the fusing area pressure
adjustment lever and to remove a misfeed.
Fusing unit pressure adjusting levers (page 32)
(20) Paper reversing section cover
This is used when 2-sided copying and printing is
performed. Open this cover to remove a paper misfeed.
(21) Bypass tray
Use this tray to feed paper manually.
When loading paper larger than A4R or 8-1/2" x 11"R, be
sure to pull out the bypass tray extension.
LOADING PAPER IN THE BYPASS TRAY (page 28)
(22) Main power switch
This is used to power on the machine.
When using the fax or Internet fax functions, keep this
switch in the "On" position.
TURNING THE POWER ON AND OFF (page 13)
(23) Waste toner box
This collects excess toner that remains after copying and
printing.
(24) Waste toner box release button
Press this button when you need to release the waste
toner box lock to replace the waste toner box or clean the
laser unit.
CLEANING THE LASER UNIT (page 56)
REPLACING THE WASTE TONER BOX (page 63)
(25) Handle
Pull this out and grasp it when moving the machine.
(26) Right cover of stand/1 x 500 sheet paper drawer
Right cover of stand/2 x 500 sheet paper drawer
(when a stand/1 x 500 sheet paper drawer or a
stand/2 x 500 sheet paper drawer is installed)
Open this to remove a paper misfeed in tray 3 or tray 4.
(27) Paper tray right side cover
Open this to remove a paper misfeed in tray 1 or tray 2.
(28) Right side cover release lever
To remove a paper jam, pull and hold this knob up to
open the right side cover.
(16) (17) (18) (21)(20)(19)
(24)(23)(22) (27) (28)(26)(25)
When using the MX-3500/4500 Series
Caution
The fusing unit is hot. Take care not to burn yourself
when removing a paper misfeed.
Do not touch or damage the transfer belt.
This may cause a defective image.
Your service technician will collect the waste toner
box.
7
AUTOMATIC DOCUMENT FEEDER AND DOCUMENT COVER
Automatic document feeder
(MX-3501N/4501N)
Document cover
(1) Paper feed roller
This roller rotates to automatically feed the original.
(2) Document feeding area cover
Open this cover to remove an original misfeed or clean
the paper feed roller.
(3) Original guides
These help ensure that the original is scanned correctly.
Adjust the guides to the width of the original.
PLACING THE ORIGINAL (page 33)
(4) Document feeder tray
Place originals in this tray. 1-sided originals must be
placed face up.
PLACING THE ORIGINAL (page 33)
(5) Original exit tray
Originals are delivered to this tray after scanning.
(6) Scanning area
Originals placed in the document feeder tray are scanned
here.
REGULAR MAINTENANCE (page 52)
(7) Original size detector
This detects the size of an original placed on the
document glass.
PLACING THE ORIGINAL ON THE DOCUMENT
GLASS (page 36)
(8) Reversing tray
During scanning of a 2-sided original, the original is
temporarily output to this tray in order to be turned over
for scanning of the reverse side.
(9) Original holder
Originals can be placed here.
(10) Document glass
Use this to scan a book or other thick original that cannot
be fed through the automatic document feeder.
PLACING THE ORIGINAL ON THE DOCUMENT
GLASS (page 36)
(2)
(8)
(10)
(3) (4) (5) (6) (7)(1)
(2) (3) (4) (5)
(9)
8
CONNECTORS
(1) USB connecter (A type)
This is used to connect a USB hub or USB memory
device to the machine.
For the USB cable, use a shielded type cable.
(2) USB connecter (B type )
A computer can be connected to this connector to use
the machine as a printer.
For the USB cable, use a shielded type cable.
(3) LAN connecter
Connect the LAN cable to this connector when the
machine is used on a network.
For the LAN cable, use a shielded type cable.
(4) Service-only connector
(5) Extension phone socket
When the fax function of the machine is used, an
extension phone can be connected to this socket.
(6) Telephone line socket
When the fax function of the machine is used, the
telephone line is connected to this socket.
When the fax expansion kit is installed
(1)
(2)
(3)
(4)
Caution
Connecting a cable to this connector may cause the
machine to malfunction.
Important note for service technicians:
The cable connected to the service connector must be
less than 3 m (118") in length.
(5)
(6)
9
OPERATION PANEL
(1) Touch panel
Messages and keys appear in the touch panel display.
Touch the displayed keys to perform a variety of operations.
When a key is touched, a beep sounds and the selected
item is highlighted. This provides confirmation as you
perform an operation.
TOUCH PANEL (page 11)
(2) Mode select keys and indicators
Use these keys to change the mode displayed in the
touch panel.
The indicator of a key lights when the key is selected.
[DOCUMENT FILING] key
Press this key to switch to document filing mode when
you wish to store a document as an image file on the
hard drive or print or transmit an image stored on the
hard drive.
Document Filing Guide
[IMAGE SEND] key
Press this key to select network scanner / fax mode to
use the scanner function or fax function.
Facsimile Guide
Scanner Guide
LINE indicator
This lights up during transmission or reception in fax or
Internet fax, and during transmission in scan.
DATA indicator
This lights up during reception in fax or Internet fax.
This blinks when a received fax cannot be printed
because of a problem such as out of paper. This lights
up when an image is being sent in scan mode.
[COPY] key
Press this key to select copy mode. Hold the [COPY] key
down to view the machine's total page use count and
amount of toner remaining.
Copier Guide
(3) PRINT mode indicators (READY indicator / DATA
indicator)
READY indicator
Print data can be received when this indicator is lit.
DATA indicator
This blinks while print data is being received and lights
steadily while printing is taking place.
(4) Numeric keys
These are used to enter the number of copies and fax
numbers.
(5) [CLEAR] key ( )
Press this key to return the number of copies to "0".
(6) [JOB STATUS] key
Press this key to display the job status screen. The job
status screen is used to check information on jobs and
cancel jobs.
The indicator in the key lights up when the job status
screen is displayed.
PRINT/SEND STATUS (JOB STATUS) (page 12)
(7) [SYSTEM SETTINGS] key
Press this key to display the system settings menu
screen. The system settings can be adjusted to make the
machine easier to use, such as configuring paper tray
settings and storing addresses.
System Settings Guide
(8) [LOGOUT] key ( )
Press this key to log out after you have logged in and used
the machine. When using the fax function, this key can
also be pressed to send tone signals on a pulse dial line.
USER AUTHENTICATION (page 15)
(9) [PROGRAM] key ( )
When using the copy function, press this key to use a job
program. When using the fax function, this key can be
used for dialing.
DOCUMENT
FILING
IMAGE SEND
COPY
JOB STATUS
SYSTEM
SETTINGS
LOGOUT
LINE
DATA
PRINT
READY
DATA
(7)(6) (8) (9)
(3) (4) (5)(2)(1)
10
(10) [CLEAR ALL] key ( )
Press this key to return to the initial operation state.
Use this key when you wish to cancel all settings that
have been selected and start operation from the initial
state.
(11) [STOP] key ( )
Press this key to stop a copy job or scanning of an
original.
(12) [BLACK & WHITE START] key ( )
Press this key to copy or scan an original in black and
white. This key is also used to send a fax in fax mode.
(13) [COLOUR START] key ( )
Press this key to copy or scan an original in colour.
This key cannot be used for fax or Internet fax.
(14) [POWER SAVE] key ( ) / indicator
Use this key to put the machine into auto power shut-off
mode to save energy.
The [POWER SAVE] key blinks when the machine is in
auto power shut-off mode.
[POWER SAVE] KEY (page 14)
(15) [POWER] key ( )
Use this key to turn the machine power on and off.
TURNING THE POWER ON AND OFF (page 13)
(16) Main power indicator
This lights up when the machine's main power switch is
in the "On" position.
TURNING THE POWER ON AND OFF (page 13)
DOCUMENT
FILING
IMAGE SEND
COPY
JOB STATUS
SYSTEM
SETTINGS
LOGOUT
LINE
DATA
PRINT
READY
DATA
(10) (12)(11) (13) (14) (15) (16)
The indicators of the operation panel may differ depending on the country and region.
11
TOUCH PANEL
The touch panel (screen) shown in this manual is a descriptive image. The actual screen is slightly different.
Using the touch panel
Example 1
(1) Settings for each function are easily selected and cancelled by touching the keys on the screen with your finger.
When an item is selected, a beep will sound and the item will be highlighted to confirm the selection.
(2) Keys which are greyed out cannot be selected.
Example 2
(1) If a key is initially highlighted in a screen, the key is
selected. To change the selection, touch one of the
other keys to highlight that key.
(2) Touch the [OK] key to enter the selection.
(3) Touch this key to cancel the setting.
(4) The keys can be used to increase or
decrease a value. To make a value change quickly,
keep your finger on the key.
Example 3
(1) Some items in the special modes screen are
selected by simply touching the key of the item.
To cancel a selected item, touch the highlighted key
once again so that it is no longer highlighted.
(2) When settings extend over multiple screens, touch
the key or the key to switch through the
screens.
Example 4
(1) When at least one special mode is selected, the
key appears in the base screen.
(2) The key can be touched to display a list of the
selected special modes.
Job Queue Sets / Progress Status
Detail
Priority
Stop/Delete
Internet Fax
Fax JobScan toPrint Job
1/1
Spool
Complete
Job Queue
Copy 020 / 001 Copying
Copy 020 / 000 Paper Empty
BBB BBB 020 / 000 Waiting
0312345678 002 / 000 Waiting
Beep
Tone
(1)
(2)
Special Modes
Margin Shift
OK
OKCancel
Right
Left
Down
Side 1
10 10
Side 2
(0 20)
mm
(0 20)
mm
(2)
(3)
(4)(1)
Special Modes
OK
1/4
Margin Shift
Pamphlet Copy
Erase
Tandem
Copy
Dual Page
Copy
Job
Build
(1) (2)
Ready to scan for copy.
2-Sided Copy
Original
A4
0
Output
Special Modes
File
Quick File
Full Colour
Colour Mode
2.
3.
4.
1.
A4R
B4
A3
A4
Auto
Exposure
100%
Copy Ratio
Job Detail
Settings
A4
Plain
Function Review
Margin Shift
Shift:Right
Front:10mm/Back:10mm
OK
1/3
:
Erase
Edge:10mm
Centre:10mm
:
Covers/Inserts
Front:2-Sided/Back:Insert
Insertion A:10Page/B:10Page
:
(1)
If a key that cannot be selected is touched, a double beep will sound.
System Settings (Administrator): Keys Touch Sound
This is used to adjust the volume of the beep that sounds when keys are touched. The key touch sound can also be turned
off.
12
PRINT/SEND STATUS (JOB STATUS)
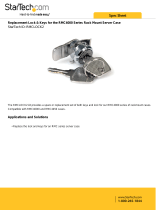
This screen appears when the [JOB STATUS] key on the operation panel is pressed.
The screen shows lists of the jobs that are reserved and in progress, and jobs that have been completed. This screen is
used to check jobs, move a job to the top of the job queue, or delete a job.
(1) "Paper Empty" display
Add paper.
When the status is "Paper Empty", the specified size of
paper for the job is not loaded in any of the trays. In this
case, the job will be held until the required size of paper
is loaded. Other jobs that are waiting will be printed (if
possible) ahead of the held job. (However, other jobs will
not be printed if the paper ran out while printing was in
progress.)
If you need to change the paper size because the
specified paper size is not available, touch the key of the
job in the list to select it, touch the [Detail] key described
in (8), and select a different paper size.
(2) Job list
Lists are displayed of jobs that are reserved and in
progress (the job queue), and completed.
When the [Print Job] key is touched in the mode switch
keys, the job status screen selector key changes to
show the "Spool" list.
Each job key in the lists shows a brief description of
the job and its status.
The "Spool" screen shows spooled print jobs and
encrypted PDF direct print jobs. To move an encrypted
PDF job from the spool list to the "Job Queue", touch
the key of the job and enter the job password.
(3) Job status screen selector key
This switches the job list display to spooled jobs, the job
queue, or completed jobs.
[Spool]: This shows encrypted PDF jobs printed by direct
printing. The [Spool] key can be displayed when
print jobs are displayed.
[Job Queue]: This shows reserved jobs and the job in
progress.
[Complete]: This shows completed jobs.
(4) Mode switch keys
Use these keys to switch to print mode, scan mode, fax
mode, or Internet fax mode.
The [Print Job] key shows the list of copy, print,
received fax, received Internet fax, and self print jobs.
The [Scan to] key shows the list of transmission jobs
that use the scanner function.
The [Fax Job] key shows the list of transmission jobs
that use the fax and PC-Fax functions.
The [Internet Fax] key shows the list of transmission
jobs that use the Internet fax and PC-I-fax functions.
For more information on the job status screen in each
mode, see the manual for each mode.
(5) keys
These change the page of the displayed job list.
(6) [Stop/Delete] key
Use this key to cancel the job currently in progress or a
selected reserved job. Note that printing of received
faxes and received Internet faxes cannot be cancelled.
(7) [Priority] key
A reserved job in the "Job Queue" screen can be printed
ahead of all other reserved jobs by selecting the job and
then touching this key.
In the print job queue, you can select a print or copy job
to which you wish to give priority and touch this key. The
job in progress stops and printing of the selected job
begins. When the selected job is completed, the
interrupted job resumes.
(8) [Detail] key
This shows detailed information on a selected job.
When a job has been stored using Quick File or File in
document filing mode, or when a broadcast transmission
has been performed in image send mode, the job
appears as a key in the [Complete] screen. You can
touch this key to show details on the completed job, and
you can also touch the [Call] key that appears to reprint
or resend the job.
(9) [Call] key
A job that appears in the completed jobs screen as a key
can be touched followed by the [Call] key to reprint or
resend the job. This is the same [Call] key that appears
when the [Detail] key is touched.
Job Queue Sets / Progress Status
Detail
Priority
Stop/Delete
Internet Fax
Fax JobScan toPrint Job
1/1
Spool
Complete
Job Queue
Copy 020 / 001 Copying
Copy 020 / 000 Paper Empty
BBB BBB 020 / 000 Waiting
0312345678 002 / 000 Waiting
Detail
Call
Internet Fax
Spool
Complete
Job Queue
(2)(1)
(5)(4) (6) (9)(7) (8)
(3)
"Complete"
job screen
13
TURNING THE POWER ON AND OFF
The machine has two power switches. The main power switch is at the lower left after the front cover is opened. The
other power switch is the [POWER] key ( ) on the operation panel at the top right.
Main power switch
When the main power switch is switched on, the main
power indicator on the operation panel lights up.
[POWER] key
Turning on the power
(1) Switch the main power switch to the "On" position.
(2) Press the [POWER] key ( ) to turn on the power.
Turning off the power
(1) Press the [POWER] key ( ) to turn off the power.
(2) Switch the main power switch to the "Off" position.
When using the fax or Internet fax functions
Always keep the main power switch in the "On" position.
Keep the main power switch in the "On" position and press the [POWER] key ( ) to turn off the power.
The power should be turned off in this way at night or at other times when the machine is not being used.
The touch panel cannot be used, but the following functions will operate:
Fax functions:
Faxes can be received automatically, and timer transmission jobs and other previously reserved fax jobs can be
transmitted. In addition, functions that send faxes at the request of other machines (remote transmission, relay
transmission when a relay request is received) can also be used.
Internet fax functions:
Internet faxes can be received automatically, and timer transmission jobs and other previously reserved fax jobs can
be transmitted.
"On" position
"Off" position
[POWER] key
Main power indicator
Before switching off the main power switch, make sure that the DATA indicator for printing and the DATA and LINE
indicators for image transmission and fax transmission and reception are not lit or blinking.
Switching off the main power switch or removing the power cord from the outlet while any of the indicators are lit or blinking
may damage the hard drive and cause data to be lost.
Switch off both the main power switch and the [POWER] key ( ) and unplug the power cord if you suspect a machine
failure, if there is a bad thunderstorm nearby, or when you are moving the machine.
If the main power is switched off more than approximately one minute after the power has been turned off by pressing the
[POWER] key ( ) on the operation panel, the main power indicator on the operation panel will not turn off immediately.
(The indicator will remain on for approximately another minute. This is normal and does not indicate a failure.)
14
ENERGY SAVE FUNCTIONS
This product has the following two energy save functions that conform to the Energy Star guidelines to help conserve
natural resources and reduce environmental pollution.
Preheat Mode
Preheat mode automatically lowers the temperature of the fuser unit and thereby reduces power consumption if the
machine remains in the standby state for the interval of time set in "Preheat Mode" in the system settings
(administrator).
The machine automatically wakes up and returns to normal operation when a print job is received, a key is pressed on
the operation panel, or an original is placed.
Auto power shut-off mode (Sleep mode)
Auto power shut-off mode automatically shuts off power to the display and the fusing unit if the machine remains in the
standby state for the interval of time set in "Auto Power Shut-Off" in the system settings (administrator). This mode
provides the lowest level of power consumption. Considerably more power is saved than in preheat mode, however, the
wakeup time is longer. This mode can be disabled in the system settings (administrator).
The machine automatically wakes up and resumes normal operation when a print job is received or when the blinking
[POWER SAVE] key is pressed.
[POWER SAVE] KEY
Press the [POWER SAVE] key to put the machine in auto power shut-off mode or wake it up from auto power shut-off
mode. The [POWER SAVE] key has an indicator that indicates whether or not the machine is in auto power shut-off
mode.
When the [POWER SAVE]
key indicator is off in the
standby state
The machine is ready to be used.
If the [POWER SAVE] key is pressed when the indicator is off, the indicator will blink and
the machine will enter auto power shut-off mode after a brief interval.
When the [POWER SAVE]
key indicator light is blinking.
The machine is in auto power shut-off mode.
If the [POWER SAVE] key is pressed when the indicator is blinking, the indicator will turn
off and the machine will return to the ready state after a brief interval.
LOGOUT
[POWER SAVE] key / indicator
15
USER AUTHENTICATION
When the administrator of the machine has enabled user authentication, one of two screens shown below will appear. If
either screen appears, enter the user number or login name and password that you received from the administrator.
When controlled by user number When controlled by login name and password
(Different items will appear in the screen when LDAP
authentication is used.)
AUTHENTICATION BY USER NUMBER
The following procedure is used to log in using a user number received from the administrator of the machine.
Admin Login
Enter your user number.
OK
Please enter your login name /
password.
User Authentication
Login Name
User Name
Password
Auth to:
OK
Login Locally
1
Enter your user number (5 to 8 digits)
with the numeric keys.
Each entered digit will be displayed as " ".
2
Touch the [OK] key.
After the entered user number is authenticated, the user count
screen will appear briefly.
The number of pages remaining appears when page limits
have been set in "Pages Limit Group Registration" in the
system settings (administrator). (The remaining number of
pages that the user can use in each mode (copy, scan, etc.)
appears.) The amount of time that this screen appears can be
changed using "Message Time Setting" in the system settings
(administrator).
When the user number is an 8-digit number, this step is not necessary. (Login takes place automatically after the user
number is entered.)
Enter your user number.
Admin Login
Enter your user number.
OK
Usage status : used/remaining pages
Black-white :87,654,321/12,345,678
Full colour :87,654,321/12,345,678
2-colour :87,654,321/12,345,678
Single colour :87,654,321/12,345,678
16
If an incorrect user number is entered 3 times in a row...
If "A Warning when Login Fails" is enabled in the system settings (administrator), the machine will lock for 5 minutes if
an incorrect user number is entered 3 times in a row.
Verify the user number that you should use with the administrator of the machine.
3
When you have finished using the
machine and are ready to log out, press
the [LOGOUT] key ( ).
Note that the [LOGOUT] key ( ) cannot be used to log out when a fax number is being entered in fax mode, as
[LOGOUT] key ( ) input is treated as part of a fax number.
If a preset duration of time elapses after the machine is last used, the Auto Clear function will activate. When Auto
Clear activates, logout automatically takes place. However, when PC Scan mode is used, logout does not take
place when the [LOGOUT] key ( ) is pressed and Auto Clear does not operate. Change to a different mode on
the machine and then log out.
The administrator can clear the locked state. This is done from [User Control] and then [Default Settings] in the Web page
menu.
LOGOUT
17
AUTHENTICATION BY LOGIN NAME / PASSWORD
The following procedure is used to log in using a login name and password received from the administrator of the
machine or the administrator of the LDAP server.
1
Touch the [Login Name] key or the
key.
If the [Login Name] key is touched, a screen for selecting the
user name appears. Go to the next step.
If the key is touched, [---] (the registration number
display) appears in the 2-line message display.
Use the numeric keys to enter your registration number that
has been stored in "User Registration" in the system settings
(administrator). After entering the registration number, go to
step 3.
2
Select your user name.
(A) User selection keys
Touch your user name that has been stored in "User
Registration" in the system settings (administrator).
(B) Index tabs
All users appear on the [All Users] tab. Touch a tab to
display the users whose leading initials match the tab
index.
(C) [Direct Entry] key
Use this key if you have not been stored in "User
Registration" in the system settings (administrator) and
have only been stored for LDAP authentication.
A text entry screen will appear. Enter your login name that
is stored on the LDAP server.
To enter text, see "6. ENTERING TEXT" (page 66).
(D) [Back] key
Touch this key to return to the login screen.
LDAP authentication can be used when the administrator of the server provides LDAP service on the LAN (local area
network).
Please enter your login name /
password.
User Authentication
Login Name
User Name
Password
Auth to: Login Locally
OK
Please select a user
to be logged in.
Admin Login
Direct Entry
ABC User
User 0001
User 0003
User 0005
User 0007
All Users ABCD EFGHI JKLMN OPQRST UVWXYZ
User 0002
User 0004
User 0006
User 0008
25
1
Back
(D)(A)
(B)
(C)
18
3
Touch the [Password] key.
A text entry screen for entering the password will appear.
Enter your password that is stored in "User Registration" in the
system settings (administrator).
If you are logging in to an LDAP server, enter the password that
is stored with your LDAP server login name.
Each entered character will be displayed as " ". When you
have finished entering the password, touch the [OK] key.
When authentication is by LDAP server and you have different
passwords stored in "User Registration" in the system settings
(administrator) and in the LDAP server, use the password
stored in the LDAP server.
When an LDAP server has been stored, [Auth to:] can be changed.
If you are logging in using a user selection key...
If you are logging in using a user selection key, the LDAP server was stored when your user information was stored,
and thus the LDAP server will appear in an authenticated server when you select your login name. Go to step 4.
When logging in using the [Direct Entry] key...
Touch the [Auth to:] key.
Select the LDAP server and touch the [OK] key.
4
(Different items will appear in the screen when LDAP
authentication is used.)
Touch the [OK] key.
After the entered login name and password are authenticated,
the user count screen will appear briefly.
The number of pages remaining appears when page limits
have been set in "Pages Limit Group Registration" in the
system settings (administrator). (The remaining number of
pages that the user can use in each mode (copy, scan, etc.)
appears.) The amount of time that this screen appears can be
changed using "Message Time Setting" in the system settings
(administrator).
Please enter your login name /
password.
User Authentication
Login Name
Login Locally
User 0001User Name
Password
Auth to:
OK
Login Locally
Direct Entry
OK
Please enter your login name /
password.
User Authentication
Login Name
User Name
Password
Auth to:
OK
1/2
Select the authentication system of registered user.
Authenticate to:
Login Locally
Server 2
Server 3
Server 1
Please enter your login name /
password.
User Authentication
Login Name
Login Locally
User 0001User Name
Password
Auth to:
OK
Usage status : used/remaining pages
Black-white :87,654,321/12,345,678
Full colour :87,654,321/12,345,678
2-colour :87,654,321/12,345,678
Single colour :87,654,321/12,345,678
19
If an incorrect login name or password is entered 3 times in a row...
If "A Warning when Login Fails" is enabled in the system settings (administrator), the machine will lock for 5 minutes if an
incorrect login name or password is entered 3 times in a row.
Verify the login name and password that you should use with the administrator of the machine.
5
When you have finished using the
machine and are ready to log out, press
the [LOGOUT] key ( ).
Note that the [LOGOUT] key ( ) cannot be used to log out when a fax number is being entered in fax mode, as
[LOGOUT] key ( ) input is treated as part of a fax number.
If a preset duration of time elapses after the machine is last used, the Auto Clear function will activate. When Auto
Clear activates, logout automatically takes place. However, when PC Scan mode is used, logout does not take
place when the [LOGOUT] key ( ) is pressed and Auto Clear does not operate. Change to a different mode on
the machine and then log out.
The administrator can clear the locked state. This is done from [User Control] and then [Default Settings] in the Web page
menu.
Depending on the LDAP authentication method, the [E-mail Address] key may appear. If the [E-mail Address] key appears
in step 3, touch it.
A text entry screen will appear.
Enter your e-mail address. To enter text, see "6. ENTERING TEXT" (page 66).
System Settings (Administrator): User Registration
A user name is stored when a user is registered in "User Registration". Detailed information such as the login name, user
number, and password are also stored. Ask the administrator of the machine for the information that you need to use the
machine.
LOGOUT
Server 2
User 0002
OK
Please enter your login name /
E-mail address / password.
User Authentication
Login Name
User Name
E-mail Address
Password
Auth to:
  • Page 1 1
  • Page 2 2
  • Page 3 3
  • Page 4 4
  • Page 5 5
  • Page 6 6
  • Page 7 7
  • Page 8 8
  • Page 9 9
  • Page 10 10
  • Page 11 11
  • Page 12 12
  • Page 13 13
  • Page 14 14
  • Page 15 15
  • Page 16 16
  • Page 17 17
  • Page 18 18
  • Page 19 19
  • Page 20 20
  • Page 21 21
  • Page 22 22
  • Page 23 23
  • Page 24 24
  • Page 25 25
  • Page 26 26
  • Page 27 27
  • Page 28 28
  • Page 29 29
  • Page 30 30
  • Page 31 31
  • Page 32 32
  • Page 33 33
  • Page 34 34
  • Page 35 35
  • Page 36 36
  • Page 37 37
  • Page 38 38
  • Page 39 39
  • Page 40 40
  • Page 41 41
  • Page 42 42
  • Page 43 43
  • Page 44 44
  • Page 45 45
  • Page 46 46
  • Page 47 47
  • Page 48 48
  • Page 49 49
  • Page 50 50
  • Page 51 51
  • Page 52 52
  • Page 53 53
  • Page 54 54
  • Page 55 55
  • Page 56 56
  • Page 57 57
  • Page 58 58
  • Page 59 59
  • Page 60 60
  • Page 61 61
  • Page 62 62
  • Page 63 63
  • Page 64 64
  • Page 65 65
  • Page 66 66
  • Page 67 67
  • Page 68 68
  • Page 69 69

Sharp MX-3501N User manual

Category
Print & Scan
Type
User manual

Ask a question and I''ll find the answer in the document

Finding information in a document is now easier with AI