Philips PHIPSC703K User manual
- Category
- Audio cards
- Type
- User manual
This manual is also suitable for

User’s Manual
Philips Consumer Electronics Company
A Division of Philips Electronics
North America Corporation
Knoxville, TN 37914-1810, U.S.A.
Printed in the U.S.A.
PSC
703
703
PSC

Philips Rhythmic Edge™
4-Channel PCI Sound Card
PSC703
____________________________
Philips Consumer Electronics Company
One Philips Drive
Knoxville,TN 37914
Revised 03/9/01
703_rhythmic_usermanual.qxd 3/12/01 10:30 AM Page 1

SOFTWARE END USER LICENSE AGREEMENT
PLEASE READ THE FOLLOWING TERMS AND CONDITIONS CAREFULLY.If you (end user,either an entity or an individual)
do not agree with these terms and conditions do not install the software.This End User License Agreement is a contract
between you and Philips Consumer Electronics B.V, including its suppliers and licensors (“Philips”) for this software program
(“Licensed Software”).By installing the Licensed Software or using the Licensed Software you agree to and accept the terms
and conditions of this End User License Agreement. YOU AGREE THAT YOUR USE OF THE LICENSED SOFTWARE
ACKNOWLEDGES THAT YOU HAVE READ THIS END USER LICENSE AGREEMENT, UNDERSTAND IT,AND AGREE TO BE
BOUND BY ITS TERMS AND CONDITIONS:
1. Copyright
The Licensed Software is a proprietary product of Philips,and is protected by copyright laws.Title, ownership rights and
intellectual property rights in and to the Licensed Software shall remain with Philips.
2. Right to use
Philips hereby grants you the personal,non-exclusive license to use the Licensed Software only on and in conjunction
with one (1) computer at one time.You may not sell,rent, redistribute, sublicense or lease the Licensed Software, or
otherwise transfer or assign the right to use it.You may not decompile, disassemble, reverse engineer, or in any way
modify program code,except where this restriction is expressly prohibited by applicable law.Except for one (1) copy
which may be made for backup purposes only, you may not copy the Licensed Software.You are not allowed to alter or
remove any proprietary notices, including copyright notices,in the Licensed Software.
3. Disclaimer of Warranty
THE LICENSED SOFTWARE IS PROVIDED AS IS WITHOUT WARRANTY OF ANY KIND.THE ENTIRE RISK OF USE
OF THE LICENSED SOFTWARE REMAINS WITH YOU.TO THE MAXIMUM EXTENT PERMITTED BY LAW, PHILIPS
MAKES NO FURTHER REPRESENTATIONS OR WARRANTIES EXPRESSLY OR IMPLIED SUCH AS BY WAY OF
EXAMPLE BUT NOT OF LIMITATION REGARDING MERCHANTABILITY OR FITNESS FOR ANY PARTICULAR
PURPOSE,OR THAT LICENSED SOFTWARE IS ERROR FREE,OR THAT THE USE OF THE LICENSED SOFTWARE
OR ANY COPIES THEREOF WILL NOT INFRINGE ANY PATENT, COPYRIGHT,TRADEMARK OR OTHER RIGHT OF
THIRD PARTIES.
4. Updated
This license does not grant you the right to any upgrades or updates of the Licensed Software. However, Philips will be
entitled to offer updates and/or modifications to the Licensed Software at its discretion.
5. Changes of the agreement
No changes of this Agreement are valid unless with Philips’ and your written approval.Any terms and conditions provided
by you are inapplicable, whether or not contained in order forms or otherwise, unless specifically accepted by Philips in
writing by means of a duly signed addition to this Agreement.
6. Limitations of liability
PHILIPS ACCEPTS NO LIABILITY FOR ANY DAMAGES,INCLUDING ANY LOSS OF PROFIT,LOSS SAVINGS, LOSS
OF DATA, BUSINESS INTERRUPTIONS,OR ANY DIRECT, INDIRECT,INCIDENTAL, CONSEQUENTIAL, SPECIAL OR
PUNITIVE DAMAGES ARISING OUT OF YOUR USE OR INABILITY TO USE THE LICENSED SOFTWARE, EVEN IF
PHILIPS OR ITS REPRESENTATIVES HAVE BEEN ADVISED OF THE POSSIBILITY OF SUCH DAMAGES,OR FOR ANY
CLAIM BY ANY OTHER PARTY. SINCE SOME JURISDICTIONS DO NOT ALLOW THIS LIMITATION OF LIABILITY,
THIS LIMITATION OF LIABILITY MAY NOT APPLY TO YOU.
7. Validity and Termination
The license granted hereunder shall terminate automatically and without notice if you do not comply with all the terms
and conditions of this End User License Agreement.In the event of termination, you shall immediately stop any use of the
Licensed Software and destroy all copies thereof. In addition, in the event of termination because of your failure to com-
ply with your obligations,Philips reserves the right to invoke any and all other remedies available to it in law or contract
including the right to claim damages.
8. Applicable Law
This contract shall exclusively be governed by the laws of the Kingdom of The Netherlands without regard to its conflict
of law provisions.
9. Competent Court
The competent court for any dispute between you and Philips pursuant to this End User License Agreement is the court
of ‘s-Hertogenbosch, the Netherlands.
© Philips Consumer Electronics B.V.,1999,Eindhoven,The Netherlands
V-1 991214
Philips Rhythmic Edge™
4-Channel PCI Sound Card
© Copyright 2000
Rhythmic Edge™ is a trademark of Philips Consumer Electronics
ThunderBird Avenger™ is a trademark of Philips Semiconductors
QSound, QEM, QSound Environmental Modeling, QSound Multi-Speaker System,
QMSS, Q3D, QSound3DInteractive, Q3DI, QXpander,AudioPix and the Q logo are
trademarks of QSound Labs, Inc.
Siren is a trademark of Sonic Foundry, Incorporated
EAX and Environmental Audio Extensions are trademarks of Creative Technology
Ltd. in the United States and other countries.
Microsoft and Windows are registered trademarks of Microsoft Corporation. DirectX
and DirectSound are trademarks of Microsoft Corporation.
All other trademarks are the property of their respective owners.
2 3
703_rhythmic_usermanual.qxd 3/12/01 10:30 AM Page 2

Recording Source Configuration.....................................................................................59
Resolving I/O Conflicts..............................................................................................................62
Uninstalling Software Drivers............................................................................................62
Windows
®
95/98/Me Uninstall.............................................................................................62
Windows NT
®
Uninstall...........................................................................................................62
Windows
®
2000 Uninstall........................................................................................................63
Introduction
Key Features .......................................................................................................................................7
Minimum System Requirements ............................................................................................8
What’s Included ...............................................................................................................................8
Installing Rhythmic Edge
Hardware Installation ..........................................................................................................9
What you need for Installation .............................................................................................9
Video Guide .......................................................................................................................................9
Installing the Sound Card ........................................................................................................10
Sound Card Configuration ......................................................................................................13
Connecting to your Rhythmic Edge Sound Card .....................................................14
Software Installation
Windows
®
95/98/Me/2000 Installation . . . . . . . . . . . . . . . . . . . . . . . . . . .16
Yamaha SoftSynthesizer Installation . . . . . . . . . . . . . . . . . . . . . . . . . . . . . .24
Siren Express Installation . . . . . . . . . . . . . . . . . . . . . . . . . . . . . . . . . . . . . .29
Windows NT
®
Installation . . . . . . . . . . . . . . . . . . . . . . . . . . . . . . . . . . . . .30
Real Mode DOS Installation . . . . . . . . . . . . . . . . . . . . . . . . . . . . . . . . . . . .31
Joystick Configuration for Windows
®
95/98/Me . . . . . . . . . . . . . . . . . . . .32
Technical Support ........................................................................................................................35
Philips Rhythmic Edge™ DSP Special Effects and Algorithms..........36
Philips Rhythmic Edge™ Control Panel...................................................................37
Help Button.......................................................................................................................................37
Utilities Tab.........................................................................................................................................37
Settings Tab ........................................................................................................................................38
S/PDIF Tab ..........................................................................................................................................42
Effects Tab...........................................................................................................................................44
MIDI Tab ..............................................................................................................................................46
Speaker Test Tab..............................................................................................................................50
Information Tab................................................................................................................................52
DVD Playback Modes..................................................................................................................53
About SIREN™ XPress............................................................................................................54
About AudioPix™...........................................................................................................................58
4 5
Table of Contents
703_rhythmic_usermanual.qxd 3/12/01 10:30 AM Page 4

Rhythmic Edge truly revolutionizes PC sound. Install your sound card as directed,
connect a 4 channel surround speaker system and try these:
• Play the latest Hollywood DVD hit and be prepared for goosebumps as sound
effects sweep you away.
• Rediscover your favorite music in a whole new dimension – even those golden
oldies.You’ve never heard them like this before!
• Play a 3D audio-enabled game and experience what "virtual reality" can mean.
• Elevate your classic 2D games to a whole new level of audio realism.
• Compare enhanced QMSS to ordinary Dolby Digital on DVD and hear the
remarkable differences.
K
EY FEATURES
• 256 streams of DirectSound acceleration and digital mixing
• 96 streams of 3D audio acceleration including positional reverb, obstruction
and occlusion
• Full-duplex, 48khz digital recording and playback
• Philips ThunderBird Avenger™ high performance audio accelerator
• Hardware DSP accelerated QSound 3D algorithms including
QSound3DInteractive™ positional 3D
QSound Environmental Modeling for EAX™ and DS3D™ games
QSound Multi Speaker System™ for quad output of stereo sources
QXpander™ for 3D enhancement of stereo
DVD QSurround™ 5.1 speaker virtualization over stereo speakers
• 576 voice total wavetable synthesis music polyphony
512 Voice professional quality soft-synth with XG and GM compatibility
64 channel hardware wavetable synthesizer
• Dual gameport accelerator with legacy and digital joy-stick modes
• DirectSound™, DirectSound3D™, EAX™ 1.0 , EAX™2.0/I3D Level 2, and A3D™
1.0 compatibility
• Stereo,4 channel surround speaker or headphone output
• QMSS™ enhanced DVD playback mode (compatible SoftDVD player required)
C
ONGRATULATIONS ON YOUR PURCHASE OF THE
PHILIPS RHYTHMIC EDGE™ SOUND CARD!
Thank you for enhancing your computer with the Philips Rhythmic Edge™.
We know you’ll agree, once you give it the edge, that your PC will never sound the
same again.
Now get ready to ignite your imagination with the most immersive soundstage ever
created on a PC . . .
… a full-blown, digital surround-sound, quadraphonic home theater experience
through your new Philips Rhythmic Edge Sound Card. Philips sound cards are the first
to deliver the impact of 4 distinct channels of sound from every application. Utilizing
advanced digital signal processing algorithms and extreme hardware acceleration,
Rhythmic Edge extracts audio-phile-quality sound from your PC with no added strain
to your processor – not just from DVD’s or 3D audio games but from all your
games, music and movies.
Load your favorite music, games and movies and be prepared to hear every detail as
never before articulated through 96 distinct 3D voices,256 distinct DirectSound
voices and 576 distinct synthesized Wavetable voices.
The heart of your sound card is Philips’ powerful new ThunderBird Avenger audio
processor, which relieves your computer of performing enormously complex audio
processing.The results are dramatically faster, more-responsive gaming effects and
more-convincing three-dimensional audio sound fields, all without placing new
demands on your computer.
Advanced DSP algorithms from QSound Labs provide rich three-dimensional sound
for every application. If you have headphones or only two speakers, Rhythmic Edge’s
patented psycho-acoustic codes envelop you in a virtual sound field created from up
to ninety-six independent 3D voices.
Add surround speakers, and Rhythmic Edge will transform your PC into your
personal home theatre system, fully capable of playing the very latest Hollywood
DVD releases in full-blown digital glory.Take your music CDs, MP3s, video files,cut
scenes and stereo games to the max while you’re at it – rediscover your existing col-
lection while you add new favorites too!
6 7
Introduction
703_rhythmic_usermanual.qxd 3/12/01 10:30 AM Page 6

WHAT YOU NEED FOR INSTALLATION
Computers come in different shapes and sizes.The installation procedures in this
manual apply generally and you should compare the illustrations here with your
computer before you start your sound card installation.
• Sound card
• Installation CD
• CD Analog Audio Cable
• Line out Cable
• A Phillips screwdriver
Have your Windows
®
installation CD available as it may be needed to complete
installation of common software components.
Video Guide
A 3-part video installation guide can be found on the Acoustic Edge Installation CD:
If CD/DVD autorun is enabled, a Philips Edge Series Autorun window will pop up
when the CD is inserted into the CD drive.Then click on the“View
PSC703/PSC705 Installation Videos" icon from the window.Another Philips Edge
Series AutoRun window will pop up; click on either Part 1: Introduction.mpg, Part 2:
Hardware.mpg, Part 3: Software.mpg, depending on which part you want to view.
If CD/DVD autorun is disabled, double-click on “autorun.exe”, located in the root
directory of the Philips install CD, or run it from the Windows-Start/Run menu.
Another way to manually start is by double clicking on Desktop/My Computer, then
click on the Philips Edge icon. Once the Philips Edge Series AutoRun window pops
up you may make the same choices as stated above (Part 1: Introduction.mpg, Part 2:
Hardware.mpg, Part 3: Software.mpg)
MINIMUM SYSTEM REQUIREMENTS
Installation of your Philips Rhythmic Edge™ requires the following minimum hard-
ware and operating system:
• One available PCI 2.1 compliant slot
• Intel Pentium
®
class or 100% compatible 166MHz or faster processor
• Intel
®
or 100% compatible motherboard chip set
• 16MB system RAM
• CD ROM for driver installation
• Stereo,4 channel surround powered speakers or headphones
• Windows
®
95,Windows
®
98,Windows NT
®
4.0 (SP3)*,Windows
®
2000,
Windows
®
Me
WHAT’S INCLUDED
You will find the following items in your Rhythmic Edge™ package:
1 – Rhythmic Edge™ sound card in a anti-static pouch
1 – Rhythmic Edge™ installation CD
1 – Analog audio cable to connect CD/DVD drive to sound card
1 – Line Out cable
1 – Rhythmic Edge™ user’s manual
1 – Product registration card
Bundled applications may be included on the installation CD or on separate media
depending on the Rhythmic Edge™ model.
Please retain the Yamaha Certificate of Authenticity.The included serial number will
be needed during software installation.
* Not all product features supported using this operating system.
8 9
Introduction
703_rhythmic_usermanual.qxd 3/12/01 10:30 AM Page 8

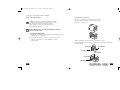
TO INSTALL THE SOUND CARD:
Turn off your computer, and disconnect the power cable.
Disconnect all devices that are connected to the computer.
Remove the computer cover.
Select an available PCI slot and, if necessary, remove its cover plate.
Keep the mounting screw to secure your sound card later. Save the mounting plate
for possible use later.
INSTALLING THE SOUND CARD
Uninstall the drivers for any previously installed sound cards.
Consult your previous sound card documentation for details.
Turn off computer and remove existing sound card.
If your computer has on-board sound,consult your PC
documentation to disable it.
STATIC ELECTRICITY CAN CAUSE PERMANENT DAMAGE
TO YOUR SOUND CARD
To prevent damage please:
1. Always hold your sound card by its edges.Avoid touching any electronic
components on your sound card.
2. Use a grounding strap or touch any non -painted surface of your
computer chassis before you begin installation to discharge
static electricity.
10 11
Installing Rhythmic Edge
✔
✔
PCI Bus Slot
PCI Bus Slot
Cover Plate
Mounting Screw
Cover Plate
Mounting Screw
703_rhythmic_usermanual.qxd 3/12/01 10:30 AM Page 10

SOUND CARD CONFIGURATION (ACTUAL CARD LAYOUT MAY VARY)
13
Line In
Mic In
Front Out
S/PDIF
(Coax)
Game/Midi
Port
TAD
AUX In
Analog
CD IN
CD ANALOG CABLE
Rear Out
END BRACKET CONFIGURATION
Remove the Rhythmic Edge™ Sound Card from the anti-static bag. Align your sound
card with the selected PCI Bus-Slot and firmly push it into the slot. Be sure the
sound card is aligned properly and fits snugly into the slot.
Use the screw from the slot cover to secure the sound card to the frame
of the computer chassis, but do not over-tighten. Securing the card assures
proper grounding.
12
Installing Rhythmic Edge
PCI Bus Slot
Mounting Screw
Sound Card
Top & Bottom View
Align sound card and fit firmly in place
PCI Bus Slot
703_rhythmic_usermanual.qxd 3/12/01 10:30 AM Page 12

Internal Connections
Connectors for three line level analog inputs (Aux In,TAD,Analog CD In) are
provided along the top of the sound card as indicated in the picture on page 16.
Use the 4 pin CD audio cable to connect the analog audio output of your internal
CD or DVD drive to the sound cards "Analog CD In" connector.
Replace computer cover and reconnect the power cable, monitor and other devices.
SOFTWARE INSTALLATION
WINDOWS® 95/98/Me/2000 INSTALLATION
Now that the hardware is installed,it is time to configure the drivers.
Plug and Play uses your system’s BIOS and the Plug and Play features of
Windows
®
95/98/2000 to allocate resources for Philips Rhythmic Edge™.
Which version of Windows do you have?
Microsoft issued a maintenance release of Windows
®
95 referred to as OSR2.
This version shipped as the stock operating system on many PC’s. Newer and
recently upgraded PC’s will have the Windows
®
98 operating system. Other systems
will have the original Windows
®
95 or “Gold” version. The following procedure
describes installation using Windows
®
98/98SE. Windows
®
2000 screens are slightly
different but the procedure is the same as described. If you have older versions of
Windows
®
95 then the installation will be slightly different than described below.
1514
CONNECTING TO YOUR RHYTHMIC EDGE SOUND CARD
Speakers
Connect your front speakers or headphones into the FRONT OUT stereo jack on
the end bracket. Connect your rear/surround speakers to the REAR OUT stereo
jack on the end bracket. If you are using a pair of digital (S/PDIF) speakers for your
front or rear speakers then plug them into the S/PDIF Out phono jack as indicated
below.
S/PDIF
To connect digital speakers, an AC3 or DTS decoder, receiver or other device to to
the S/PDIF out of the sound card, plug it into the S/PDIF jack on the end bracket.
Line In, Mic In and MIDI/Joystick
External analog stereo sources with line level output can be connected to light blue
3.5mm stereo jack at the top of the sound card bracket. A microphone can be
connected to the pink 3.5mm mono jack. An analog or digital joystick and/or MIDI
devices can be connected to the large connector at the bottom of the bracket.
Installing Rhythmic Edge
703_rhythmic_usermanual.qxd 3/12/01 10:30 AM Page 14

1716
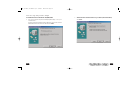
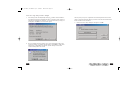
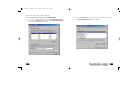
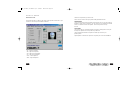
2. Select Search for the best driver for your device (Recommended).
Click NEXT.
To install the drivers for Windows
®
95/98/Me/2000
1. Turn on the computer and place the Philips Rhythmic Edge™ CD in your
CD-ROM drive.
When the Add New Hardware Wizard dialog box reports that a new PCI
Multimedia Audio Device has been detected, click
NEXT.
Installing Rhythmic Edge
703_rhythmic_usermanual.qxd 3/12/01 10:30 AM Page 16

1918
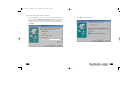
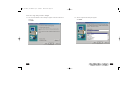
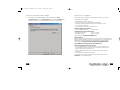
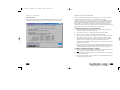
4 Select NEXT to install the drivers.3. If you are installing from the install CD or if you have copied the install to any
other location, select SPECIFY A LOCATION and browse to your directory
where the setup files are located. For Windows
®
95/98/Me, select Win9x
directory then choose english. For Windows
®
2000, select WDM directory.
Click NEXT.
Installing Rhythmic Edge
703_rhythmic_usermanual.qxd 3/12/01 10:30 AM Page 18

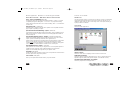
6. The installation will continue to install the files to your system.
For Windows
®
95/98/Me,
Click FINISH.
For Windows
®
2000, you must install the Philips Rhythmic Edge Audio™
and Philips Rhythmic Edge GamePort Enumerator devices. Browse to
the Driver disk directory WDM\English to install these files. You will find these
files in the same WDM install directory and Windows
®
will finish installing the
drivers for Philips Rhythmic Edge™ automatically.
Click
FINISH on each screen to install each of these devices.
2120
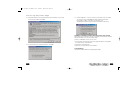
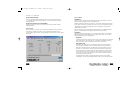
5. Windows
®
then copies the files. You may be prompted to insert your
Windows
®
CD or floppy, as the core sound components of the operating
system may need to be copied as well. These include audio Codecs, the Mixer
and the Sound Recorder program.
Installing Rhythmic Edge
703_rhythmic_usermanual.qxd 3/12/01 10:30 AM Page 20

Note: Any time you say No to a Applications Launcher dialog box like the one shown
above, a second box will appear asking if you want to launch the next time Windows is
started. Answer Yes or No as desired.
9. Next, the DirectX
®
Setup dialog box will appear. Click OK.
23
7. After clicking “Finish” the Philips Rhythmic Edge™ GamePort will be installed. It
is possible during gameport installation,Windows
®
will detect newer versions of
msanalog.vxd, vjoyd.vxd and msjstick.drv. It is recommended that you keep your
existing files. ClickYES on all 3 screens that appear.
8. Next, the software launcher will allow you to open the Rhythmic Edge control
panel and configure your speaker settings if desired. SelectYES to modify these
settings now, or select NO to modify later. Speaker settings are described
under the Settings Tab in this manual.
22
Installing Rhythmic Edge
703_rhythmic_usermanual.qxd 3/12/01 10:30 AM Page 22

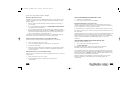
12. Enter the serial number located on the Yamaha Corporation Certificate of
Authenticity included with your documentation. This serial number is case
sensitive!
Click NEXT.
25
YAMAHA SOFTSYNTHESIZER INSTALLATION
10. After Rhythmic Edge™ driver installation, the software launcher will prompt you
to install the Yamaha SoftSynthesizer. Click YES.
11. The Yamaha SoftSynthesizer Welcome page appears. Click NEXT.
24
Installing Rhythmic Edge
703_rhythmic_usermanual.qxd 3/12/01 10:30 AM Page 24

2726
14. Select A Program Folder dialog box appears.
Click NEXT
13. The Choose Destination Location dialog box appears. Follow the instructions
in this box .
Click NEXT
Installing Rhythmic Edge
703_rhythmic_usermanual.qxd 3/12/01 10:30 AM Page 26

2928
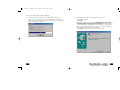
17. Product Registration – If you are connected to the internet, you can register
your product now by clicking YES in the dialog window shown below.
If you prefer to register your product at a later time, go to:
www.philipsusa.com/prod_reg_bounce.html and follow the instructions.
Installation of Additional Software Packages (such as Siren XPress)
Follow these steps to install Siren XPress (or any other included software package).
Siren XPress allows you to play and organize music.
1. Insert your installation CD into your CD drive.
2. From the Start Menu select Run and type D:\Applications\Sonic Foundry\Siren\
(D: represents your CD-ROM drive).
3. Double click on Sirensetup.exe
4. Follow the on-screen instructions for installation.
Congratulations!
You have successfully installed your Philips Rhythmic Edge™.
15. The Yamaha Software License Agreement dialog box is displayed. If you accept
the terms and conditions, Click YES.
16. You must restart your computer at this time. Click OK
Installing Rhythmic Edge
703_rhythmic_usermanual.qxd 3/12/01 10:30 AM Page 28

Siren XPress Installation for Windows NT
®
(cont)
3. Double Click on Sirensetup.exe
4. Follow the on-screen instructions for installation
REAL MODE DOS INSTALLATION (OPTIONAL)
This step is only required if you intend to run DOS applications under real DOS
mode by restarting your computer in “MS-DOS mode”. This step is not required to
run DOS applications in a DOS box (MS-DOS prompt).
In real DOS mode, you must have your DOS CD-ROM drivers loaded for access to
the install CD. Another way to do this is to simply run INST_DOS.BAT from a DOS
box in Windows.
Run INSTALL.EXE from the DOS directory on the CD. This installation program will
create the TBird directory on any drive you desire. Follow the screen prompts to
install the files to your hard drive. The install program will edit your autoexec.bat file
to perform automatic initialization of Philips Rhythmic Edge™ for use in real
mode DOS .
Using the Philips Rhythmic Edge Control Panel for DOS
To launch the DOS control panel:
1. Go to C:\PSC703\ (C represents you hard drive)
2. TypeVOLCNTRL.EXE
This application allows you to adjust volume levels, balance, input levels,
synthesizer modes,speaker modes, and midi effects in real DOS.
In DOS games that have music settings,if you select FM synthesis in the game, make
sure the synth control in the control panel is set to OPL3. For games that support
MIDI (mpu-401), select the WVTBL (wavetable) option.The game publisher normal-
ly has this information in the program documentation.
NOTE: This application is for real MS-DOS mode only and should not be run under
Windows. In Windows
®
,use the Windows
®
mixer for adjusting playback and
recording levels.
31
WINDOWS NT® INSTALLATION
Installation of the drivers for your Philips Rhythmic Edge™ in a Windows NT
®
envi-
ronment are as follows (note:you must have the appropriate privileges in order to
install the drivers):
1. Boot the system to the Windows NT
®
desktop and insert your install CD in
your CD-ROM.
2. Go to D:\NT40\English and double click on
Philips Rhythmic Edge Install.exe.
(D: represents your CD-ROM drive).
3. Wait a couple of minutes while the data transfers. Once it finishes the Philips
Rhythmic Edge Settings window will appear. Click OK on the settings page and
then when the “System Settings Change” page comes up and prompts you to
restart, click the “Restart Computer Now” button.
That’s it! Once the system reboots to Windows NT
®
your Philips Rhythmic Edge™
should be fully functional as indicated by the Windows
®
Startup sound.
Y
AMAHA SOFTSYNTHESIZER INSTALLATION FOR WINDOWS NT®
Follow these steps to install the Yamaha SoftSynthesizer from your install CD:
1. Insert your install CD into your CD drive
2. Go to D:\S-yxg50\Nt40\Disk1\ (D: represents your CD-ROM drive)
3. Double Click on Setup.exe
4. Follow the on-screen instructions for installation. The required serial number is
located on the Yamaha Corporation Certificate of Authenticity included with
your documentation.
SIREN XPRESS INSTALLATION FOR WINDOWS NT®
Follow these steps to install the Siren XPress. This application allows you to play and
organize music.
1. Insert your install CD into your CD drive
2. Go to D:\Applications\Sonic Foundry\Siren\ (D: represents your
CD-ROM drive)
30
Installing Rhythmic Edge
703_rhythmic_usermanual.qxd 3/12/01 10:30 AM Page 30

3332
2. Select the GENERAL tab and click the Add button. You may select any one of
the GAME CONTROLLERS listed, then click OK.
JOYSTICK CONFIGURATION FOR WINDOWS® 95/98/Me/2000:
1. Open the Control Panel and double-click on the GAME CONTROLLERS
icon. Select the ADVANCED tab and under PORT DRIVER ASSIGNMENT
and select Philips Rhythmic Edge GamePort.
Installing Rhythmic Edge
703_rhythmic_usermanual.qxd 3/12/01 10:30 AM Page 32

Before calling the technical support number please make sure you have the
following information available:
• Model number and date of purchase.
• Computer type, processor speed, and memory available.
• Computer Operating System (IE:Windows
®
95,Windows
®
98, etc.)
• On-screen error information.
• Other hardware connected to your sound card.
Technical Support Information:
• Toll-Free Telephone Number: 1-800-835-3506
Operating Hours (US Central Time):
• Monday through Friday 7:00am – 11:00pm
• Saturday & Sunday 8:00am – 10:00pm
Internet Address: www.pcsound.philips.com
Product Return
Before returning the Philips sound card, you must first contact the Philips Technical
Support group to determine the nature of product defect. Once the nature of the
problem has been determined, a Return Authorization number and address
will be supplied. A RETURN AUTHORIZATION NUMBER MUST
ACCOMPANY THE RETURN OF THIS PRODUCT.
When returning the product for service:
• The cost of shipment is at your expense and you assume all the risk. It is
recommended to ship the product through a carrier that provides proof of
delivery and product should be insured.
• Return Authorization number must be clearly marked on the outside of
the package.
• Use proper packing materials for shipment
• A dated proof of purchase proving the product is still under Warranty
Warranty: 3-year limited warranty
3534
Technical Support
3. After making your selection,highlight the selected controller in GAME
CONTROLLERS
and click the PROPERTIES button. Select CALIBRATE and
calibrate your joystick. Your joystick should be installed and ready for flight!
Installing Rhythmic Edge
703_rhythmic_usermanual.qxd 3/12/01 10:30 AM Page 34

HELP BUTTON
Click the blue “Help” button on any tab and you will have access to comprehensive
hyper linked help file describing the control panel. Within the help file you can
navigate by simply clicking on parts of the image of the control panel, searching or
by using contents or index lists.
U
TILITIES TAB
Windows® Audio Applications
Volume Control:
Windows
®
audio mixer for adjusting volume of various sound sources.
Multimedia Properties:
Windows
®
utility for selecting multimedia devices. Use it to switch between the
Rhythmic Edge’s two MIDI music synthesis engines. (See “MIDI Tab” section)
Sound Recorder, Media Player & CD Player:
Windows
®
playback and record applications.
37
PHILIPS RHYTHMIC EDGE™ DSP SPECIAL EFFECTS AND ALGORITHMS
EAX™ Game Compatibility (Effects Tab)
The Rhythmic Edge uses QSound Environmental Modeling™ (QEM™) to achieve
compatibility with games utilizing EAX™ 1.0 or EAX™ 2.0 properties including
environmental reverb, obstruction and occlusion modeling. EAX™ is a trademark of
Creative Labs.
DVD QSurround™ (Settings Tab)
Provides virtual 5.1 playback using just stereo speakers and a compatible soft-DVD
player capable of providing 5.1 output.
QSound Environmental Modeling™ /QEM™ (Effects Tab)
QSound Environmental Modeling (QEM) provides EAX game compatibility and the
ability to apply reverb to non-EAX sound sources including applications,S/PDIF In
and external inputs.
QSound Multi-Speaker System™ /QMSS™ (Settings and S/PDIF Tabs)
QMSS (QSound Multi-Speaker System) transforms stereo sources into 4 channel
output. QMSS is automatically invoked for stereo applications if 4
speaker mode is selected for all operating systems except Windows® 2000 (WDM
drivers). For Windows® 2000 (WDM drivers) the "Expand All" box must be
checked bef
ore starting the application. QMSS will also be applied to analog inputs
(CD In, Line In, etc.) and the S/PDIF In if enabled on the control panel.
QSound3DInteractive™/Q3DI™ (Automatic)
Q3DI positions sounds all around you using stereo or surround speaker systems or
headphones when playing 3D audio enabled applications.The proper DSP
algorithm is automatically selecting based on your speaker mode.
QXpander (Settings Tab)
QXpander widens the sound field of stereo music and provides 3D enhancement to
2D audio games when using stereo speakers.
Tone Control (Settings Tab)
Allow you to adjust treble and base levels to your personal taste.
36
Control PanelDSP Special Effects and Algorithms
703_rhythmic_usermanual.qxd 3/12/01 10:30 AM Page 36
Page is loading ...
Page is loading ...
Page is loading ...
Page is loading ...
Page is loading ...
Page is loading ...
Page is loading ...
Page is loading ...
Page is loading ...
Page is loading ...
Page is loading ...
Page is loading ...
Page is loading ...
Page is loading ...
-
 1
1
-
 2
2
-
 3
3
-
 4
4
-
 5
5
-
 6
6
-
 7
7
-
 8
8
-
 9
9
-
 10
10
-
 11
11
-
 12
12
-
 13
13
-
 14
14
-
 15
15
-
 16
16
-
 17
17
-
 18
18
-
 19
19
-
 20
20
-
 21
21
-
 22
22
-
 23
23
-
 24
24
-
 25
25
-
 26
26
-
 27
27
-
 28
28
-
 29
29
-
 30
30
-
 31
31
-
 32
32
-
 33
33
-
 34
34


Philips PHIPSC703K User manual
- Category
- Audio cards
- Type
- User manual
- This manual is also suitable for
Ask a question and I''ll find the answer in the document
Finding information in a document is now easier with AI
Related papers
Other documents
-
Genius MINI GAME PAD Owner's manual
-
-
-
LogiLink PC0027B Datasheet
-
Rosewill RC-701 User manual
-
Ideazon ZXP 2000 ILluminated Gaming Keyboard User manual
-
-
Yamaha Expansion Manager Digital Workstations Installation guide
-
Trust Sound Expert Digital Surround User manual
-
Vixen Horns VXS6200 Installation guide