Tripp Lite B021-000-19-SH Owner's manual
- Category
- Rack consoles
- Type
- Owner's manual

1
Owner’s Manual
1U Short-Depth Rackmount Console
with 19” Display
For KVM Switch or Server
Model: B021-000-19-SH
1111 W. 35th Street, Chicago, IL 60609 USA
(773) 869-1234 • www.tripplite.com
Copyright © 2008 Tripp Lite. All rights reserved.
WARRANTY
REGISTRATION:
register online today for a
chance to win a FREE Tripp Lite
product—www.tripplite.com/warranty
1. Introduction 2
2. Important Safety Instructions 2
3. System Components & Compatibility 3
4. Features 3
5. Rackmounting 4
6. Connection 4
7. LCD OSD Confi guration 5
8. Storage & Service 5
9. Specifi cations 6
10. Warranty & Warranty Registration 6
Español 7
Français 13

2
1. Introduction
The B021-000-19-SH 1U Short-Depth Rackmount Console features an integrated LCD panel, full keyboard and touch pad in a 1U rackmountable housing.
It is designed for use with a server or a KVM switch with PS/2 or USB console port connectors. The B021-000-19-SH’s compact design permits installation
in short-depth enclosures. Features include:
Rackmount console combines a 19-in. LCD display, keyboard and touch pad in an integrated 1U rackmountable housing•
Sleep mode is automatically invoked when the monitor cover is closed•
Supports resolutions of up to 1024 x 768 pixels•
Can be used with any device that includes PS/2 or USB console port connectors•
Rackmountable in short-depth enclosures down to 19 in.•
2. Important Safety Instructions
SAVE THESE INSTRUCTIONS
This manual contains instructions and warnings that should be followed during the installation and operation of this product. Failure to comply may
invalidate the warranty and cause property damage and/or personal injury.
Installation Warnings
Install the Console in a controlled indoor environment, away from moisture, temperature extremes, fl ammable liquids and gasses, conductive •
contaminants, dust and direct sunlight.
Operate the Console at indoor temperatures between 32° F and 104° F (0° C and 40° C).•
When connecting the Console to the facility’s power supply circuit, ensure that the circuit is not overloaded.•
Rackmount Warnings
Ensure there is adequate airfl ow within the rack.•
Mount the Console evenly within the rack to eliminate potentially hazardous uneven mechanical loading conditions.•
Ensure that all rackmount equipment is reliably grounded.•
Connection Warnings
Use of this equipment in life support applications where failure of this equipment can reasonably be expected to cause the failure of the life support •
equipment or to signifi cantly affect its safety or effectiveness is not recommended. Do not use this equipment in the presence of a fl ammable anesthetic
mixture with air, oxygen or nitrous oxide.
Ensure that the cables used with the Console are not close to any sources of electrical noise interference such as fl uorescent lights, HVAC systems or •
motors.
Ensure that the distance between any computer and the Console does not exceed 33 ft. (10m).•
Maintenance Warnings
The Console does not require routine maintenance. There are no user-serviceable parts inside. Only authorized service personnel should open the case for •
any reason.
Disconnect the unit from AC input power before servicing. •

3
3. System Components & Compatibility
4. Features
Package contains:
B021-000-19-SH 1U Short-Depth Rackmount Console•
Mounting Hardware•
USB Cable Kit with PS/2 Adapter•
AC Power Adapter•
User’s Guide•
The B021-000-19-SH supports most servers and KVM switches with PS/2 or USB console port connectors.
1
Handle: Pull to slide the Console out; push to slide in.
2
LCD Monitor: After sliding the Console out, fl ip up the cover to access the LCD monitor, keyboard and touch pad.
3
Keyboard
4
Slide Release: Locks the drawer closed when the Console is
not in use and prevents it from accidentally sliding open. To
slide the Console out, release it by moving this tab sideways.
5
Rackmounting Brackets: Included with the B021-000-
19-SH; install at each corner of the unit. For rackmounting
instructions, see Section 5.
6
Three-Button Touch Pad: The left and right buttons
perform as standard left and right mouse buttons. The middle
button can be used in conjunction with the scroll pad to scroll
through a computer screen
7
LCD Display Controls: Control the position and picture
settings of the LCD display. Also includes a power LED to
indicate the status of the LCD panel. See Section 7, LCD
OSD Confi guration, for details.
8
Railway Release Tabs: When the Console is fully extended,
the railway system will lock. Push the release tabs to unlock
the Console so that it can be slid back in.
9
Console Port Section: The included cable kit required to
connect the Console to your server or KVM switch plugs in
here.
10
Power Socket: The included Power Adapter plugs in here.
1
4
2
3
5
6
8
7
9
10

4
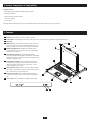
5. Rackmounting
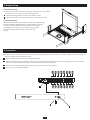
6. Connection
Standard Rackmounting
The B021-000-19-SH can be mounted in a standard 1U system rack, or in a short-depth
enclosure down to 19 in., using the included mounting brackets.
1
Install the mounting brackets to the sides of the module as shown.
2
Slide the module into the rack enclosure and secure it to the rack with screws.
Optional Rackmounting
The B021-000-19-SH can also be mounted in a 2-post rack installation using a
2-Post Rackmount Kit (Model B010-000), available separately from Tripp
Lite. This kit includes mounting hardware that enables the console to
be extended with the drawer in any position. Heavy-duty 14-gauge
steel provides stability and prevents the console frame from
twisting.
Note: Diagram shows the B021-000-19-SH connecting to a Tripp Lite B022-016 KVM switch. If you are connecting to a different KVM or server, the con-
sole port connectors may be in a different location.
1
Plug the included cable kit into the port on the B021-000-19-SH.
2
Plug the cable keyboard, monitor and mouse connectors on the other end of the USB cable kit into their corresponding ports on the server or KVM
switch. The cable kit includes a PS/2 adapter to accommodate both USB and PS/2 connections.
3
Plug the Power Adapter into the B021-000-19-SH’s power socket and into an AC power source.
4
Power up your server or KVM installation.
1
3
2

5
Left
Right
Menu/Selection
Power
Power LED
Up
Down
Exit
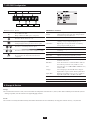
7. LCD OSD Confi guration
OSD Menu Controls Function
Power “ON/OFF” LED
Green = OSD menu “ON”
Orange = OSD menu “OFF” (power saving mode)
Press this to turn the monitor on or off.
Press this to bring up the configuration menu. Also, when
scrolling through the menu, press this to select an option.
Press these to scroll through the menu options.
Press these to increase or decrease the configuration settings.
Press this to return to the previous menu screen. Also, press
this to perform an auto adjust when not in the menu
configuration.
BRIGHTNESS / CONTRAST
Brightness: Adjusts background black level of the screen image.
Contrast: Adjusts the difference between the image background (black
level) and the foreground (white level).
AUTO ADJUST
Auto Adjust: Fine-tunes the video signal to eliminate distortion. An
“Adjusting” message is displayed during the process.
Auto Balance: Optimizes phase, clock, position and size. An “Adjusting”
message is displayed during the process.
PHASE/CLOCK
Phase / Clock: Adjusts the vertical (phase) or horizontal (clock) size of the
screen image.
H/V POSITION
H/V Position: Aligns the screen image left or right and up or down.
MISC
Information: Displays the current resolution, refresh rate and frequency
information on the screen.
OSD Timer: Sets the time duration in seconds that the OSD is visible after
the last button is pressed. The factory default is 8 seconds.
Color: Selects the screen color - 5500K, 6500K & 9300K. The factory
default is 9300K.
Language: Selects the language in which the OSD menu is displayed -
English, Chinese, Japanese, German, French, Spanish, Italian.
Display Mode: Functional only in DOS mode. User can choose to display in
Graphic Mode (640 x 480) or Text Mode (720 x 400).
RESET
Reset: Restores the settings to factory defaults.
8. Storage & Service
Storage
The Console must be stored in a clean, secure environment at a temperature of less than 40° C (104° F) and a relative humidity of less than 90% (noncon-
densing). If possible, store the console in its original shipping container.
Service
The Console is covered by the limited warranty described in this manual. For more information, call Tripp Lite Customer Service, (773) 869-1234.

6
9. Specifi cations
10. Warranty & Warranty Registration
1-Year Limited Warranty
TRIPP LITE warrants its products to be free from defects in materials and
workmanship for a period of one (1) year from the date of initial purchase.
TRIPP LITE’s obligation under this warranty is limited to repairing or
replacing (at its sole option) any such defective products. To obtain service
under this warranty, you must obtain a Returned Material Authorization
(RMA) number from TRIPP LITE or an authorized TRIPP LITE service
center. Products must be returned to TRIPP LITE or an authorized TRIPP
LITE service center with transportation charges prepaid and must be
accompanied by a brief description of the problem encountered and proof
of date and place of purchase. This warranty does not apply to equipment,
which has been damaged by accident, negligence or misapplication or has
been altered or modifi ed in any way.
EXCEPT AS PROVIDED HEREIN, TRIPP LITE MAKES NO
WARRANTIES, EXPRESS OR IMPLIED, INCLUDING WARRANTIES
OF MERCHANTABILITY AND FITNESS FOR A PARTICULAR
PURPOSE. Some states do not permit limitation or exclusion of implied
warranties; therefore, the aforesaid limitation(s) or exclusion(s) may not
apply to the purchaser.
EXCEPT AS PROVIDED ABOVE, IN NO EVENT WILL TRIPP LITE
BE LIABLE FOR DIRECT, INDIRECT, SPECIAL, INCIDENTAL OR
CONSEQUENTIAL DAMAGES ARISING OUT OF THE USE OF THIS
PRODUCT, EVEN IF ADVISED OF THE POSSIBILITY OF SUCH
DAMAGE. Specifi cally, TRIPP LITE is not liable for any costs, such as
lost profi ts or revenue, loss of equipment, loss of use of equipment, loss
of software, loss of data, costs of substitutes, claims by third parties, or
otherwise.
Warranty Registration
Visit www.tripplite.com/warranty today to register the warranty for your
new Tripp Lite product. You’ll be automatically entered into a drawing for a
chance to win a FREE Tripp Lite product!*
* No purchase necessary. Void where prohibited. Some restrictions apply.
See website for details.
FCC Radio/TV Interference Notice
This equipment has been tested and found to comply with the limits for a
Class A digital device, pursuant to part 15 of the FCC Rules. These limits are
designed to provide reasonable protection against harmful interference when
the equipment is operated in a commercial environment. This equipment
generates, uses, and can radiate radio frequency energy and, if not installed
and used in accordance with the instruction manual, may cause harmful
interference to radio communications. Operation of this equipment in a
residential area is likely to cause harmful interference in which case the user
will be required to correct the interference at his own expense. The user
must use shielded cables and connectors with this product. Any changes or
modifi cations to this product not expressly approved by the party responsible
for compliance could void the user’s authority to operate the equipment.
WEEE Compliance Information for Tripp Lite Customers and
Recyclers (European Union)
Under the Waste Electrical and Electronic Equipment (WEEE) Directive and
implementing regulations, when customers buy new electrical and electronic
equipment from Tripp Lite they are entitled to:
Send old equipment for recycling on a one-for-one, like-for-like basis•
(this varies depending on the country)
Send the new equipment back for recycling when this ultimately•
becomes waste
Tripp Lite follows a policy of continuous improvement. Specifi cations are
subject to change without notice.
Made in China.
Function Specifi cations
Connectors Console 1 x HD15 male
Power 1 x AC Adapter Port
LEDs 1 x Power (Blue)
Resolution 1024 x 768; DDC2B
Environment Operating Temperature: 32°- 122° F
Storage Temperature: -4°- 140° F
Humidity: 0 - 80% RH Noncondensing
Housing Metal
Weight 37 pounds
Dimensions (L x W x H) 19 x 17.25 x 1.75 inches

1111 W. 35th Street, Chicago, IL 60609 USA
773.869.1234 (USA) • 773.869.1212 (International)
www.tripplite.com
2009XXXXX 93-2801_EN
-
 1
1
-
 2
2
-
 3
3
-
 4
4
-
 5
5
-
 6
6
-
 7
7


Tripp Lite B021-000-19-SH Owner's manual
- Category
- Rack consoles
- Type
- Owner's manual
Ask a question and I''ll find the answer in the document
Finding information in a document is now easier with AI
Related papers
-
Tripp Lite B021-000-19-SH User manual
-
-
Tripp Lite B021-000-17 User manual
-
-
Tripp Lite B019-000 Owner's manual
-
-
-
Tripp Lite B021-000-19 User manual
-
-