
Dishwasher
Use & Care Guide
Lavavajillas
Manual de uso y cuidado
Lave-vaisselle
Guide de l'utilisation et d'entretien
Model/Modelo/Modèle 587.14432, 587.14439, 587.14538, 587.17248,
587.17252, 587.17259
154578201
Sears Roebuck and Co., Hoffman Estates, IL 60179 U.S.A.
Sears Canada, Inc., Toronto, Ontario, Canada MB5 2B8
www.sears.com
www.sears.ca
ENGLISHENGLISH
ENGLISHENGLISH
ENGLISH
ESPESP
ESPESP
ESP
AÑOLAÑOL
AÑOLAÑOL
AÑOL
FRANÇAISFRANÇAIS
FRANÇAISFRANÇAIS
FRANÇAIS
®

2
U.S. Warranty ................................................................... 2
Safety Instructions ......................................................... 3
Dishwasher Features ..................................................... 4
Operating Instructions ................................................... 5
Preparing and Loading Dishes ............................ 6-7
Dishwasher Dispenser and Detergents .....................8-9
Factors Affecting Performance...................................... 9
Care and Cleaning ...................................................10-11
Installing Wood Panels ................................................. 11
Connecting Portable Dishwasher................................ 12
Common Dishwasher Problems and Solutions .... 13-14
Troubleshooting ................................................. 14
Canadian Warrenty ....................................................... 15
Service........................................................... Back Cover
TT
TT
T
able of Contentsable of Contents
able of Contentsable of Contents
able of Contents
ENGLISHENGLISH
ENGLISHENGLISH
ENGLISH
KenmorKenmor
KenmorKenmor
Kenmor
e Appliance We Appliance W
e Appliance We Appliance W
e Appliance W
arar
arar
ar
rantyranty
rantyranty
ranty
One Year Limited Warranty
When installed, operated and maintained according to all instructions supplied with the product, if this appliance fails due to
a defect in material or workmanship within one year from the date of purchase, call 1-800-4-MY-HOME® to arrange for free
repair. If this appliance is used for other than private family purposes, this warranty applies for only 90 days from the date of
purchase.
This warranty covers only defects in material and workmanship. Sears will NOT pay for:
1. Expendable items that can wear out from normal use, including but not limited to filters, belts, light bulbs, and bags.
2. A service technician to instruct the user in correct product installation, operation or maintenance.
3. A service technician to clean or maintain this product.
4. Damage to or failure of this product if it is not installed, operated or maintained according to all instructions supplied with
the product.
5. Damage to or failure of this product resulting from accident, abuse, misuse or use for other than its intended purpose.
6. Damage to or failure of this product caused by the use of detergents, cleaners, chemicals or utensils other than those
recommended in all instructions supplied with the product.
7. Damage to or failure of parts or systems resulting from unauthorized modifications made to this product.
Disclaimer of implied warranties; limitations of remedies
Customer’s sole and exclusive remedy under this limited warranty shall be product repair as providedherein. Implied warranties,
including warranties of merchantability or fitness for a particular purpose, are limited to one year or the shortest period allowed
by law. Sears shall not be liable for incidental or consequential damages. Some states and provinces do not allow the exclusion
or limitation of incidental or consequential damages, or limitations on the duration of implied warranties of merchantability or
fitness, so these exclusions or limitations may not apply to you.
This warranty applies only while this appliance is used in the United States and Canada.
This warranty gives you specific legal rights, and you may also have other rights which vary from state to state.
Sears, Roebuck and Co.,
Dept. 817WA, Hoffman Estates, IL 60179
Sears Canada Inc.
Toronto, Ontario, Canada M5B 2B8

3
ImporImpor
ImporImpor
Impor
tant Safety Instrtant Safety Instr
tant Safety Instrtant Safety Instr
tant Safety Instr
uctionsuctions
uctionsuctions
uctions
• Read all instructions before using your
dishwasher.
• Use your dishwasher only as instructed in
this Use & Care Guide.
• This Guide does not cover every possible
condition and situation that may occur. Use
common sense and caution when installing,
operating and maintaining any appliance.
• DISHWASHER MUST BE ELECTRICALLY
GROUNDED. Read the Installation
Instructions for details.
• This dishwasher is designed to operate on
regular house current (120 V, 60 Hz). Use a
circuit equipped with a 15 ampere fuse or
circuit breaker. Use a 20 ampere fuse if
dishwasher is connected with a food waste
disposer.
• Do not operate dishwasher unless all
enclosure panels are in their proper place.
• To avoid entrapment and/or suffocation,
remove door or door latch mechanism from
any dishwasher that is discarded or not in
use.
• Keep young children and infants away from
dishwasher when it is operating.
• Do not let children abuse, sit, stand or play
on door or racks of a dishwasher.
• Use only detergents and rinse agents
recommended for use in a dishwasher.
• Store dishwasher detergent and rinse
agents out of the reach of children.
Printed in U.S.A.
• Do not wash plastic items unless marked
“dishwasher safe” or the equivalent. Check
with manufacturer for recommendations, if
not marked. Items that are not dishwasher
safe may melt and create a potential fire
hazard.
• If the dishwasher drains into a food
disposer, make sure disposer is completely
empty before running dishwasher.
• Disconnect electrical power to dishwasher
before servicing.
• Repairs should be done by a qualified
technician.
• Do not tamper with controls.
• Do not touch the heating element during or
immediately after use.
• When loading items to be washed:
- Locate sharp items and knives so that
they are not likely to damage the door
seal or tub.
- Load sharp items and knives with the
handles up to reduce the risk of cut-type
injuries.
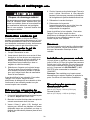
• Under certain conditions, hydrogen gas may
be produced in a hot water system that has
not been used for 2 weeks or more.
HYDROGEN GAS IS EXPLOSIVE. If hot
water system has not been used for such a
period, before using dishwasher, turn on all
hot water faucets and let water flow from
each for several minutes. This will release
any accumulated hydrogen gas.
HYDROGEN GAS IS FLAMMABLE. Do not
smoke or use an open flame during this
time.
• Do not store or use combustible materials,
gasoline or other flammable vapors and
liquids in the vicinity of this or any other
appliance.
SASA
SASA
SA
VE THESEVE THESE
VE THESEVE THESE
VE THESE
INSTRUCTIONSINSTRUCTIONS
INSTRUCTIONSINSTRUCTIONS
INSTRUCTIONS
This symbol will help alert you to such
dangers as personal injury, burns, fire and
electrical shock.
To reduce the risk of fire, electrical shock, or
injury when using your dishwasher, follow
basic precautions including the following:
ENGLISHENGLISH
ENGLISHENGLISH
ENGLISH

4
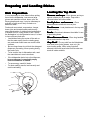
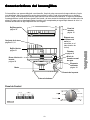
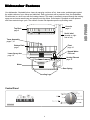
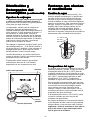
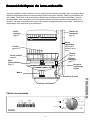
Door Spring
Motor
Bottom Rack
page 7
Serial label
(located on right
side of tub)
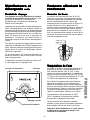
Your dishwasher, illustrated below, cleans by spraying a mixture of hot, clean water, and detergent against
the soiled surfaces of your dishes and tableware. Each cycle starts with a pre-drain. Next, the dishwasher
fills with water to a level even with the heating element. This water is constantly pumped through the rotating
spray arm and center wash tower and sprayed onto the dishes. Soiled water is pumped out and replaced
with clean water during a cycle. The number of water fills depends upon the cycle being used.
Leveling Legs
Heating Element
page 10
Normal Water
Fill Level
Float
page 10
Console
page 4
Lower Spray Arm
page 10
Tower Assembly
pages 7,10
Top Rack
page 6
Dishwasher FeaturDishwasher Featur
Dishwasher FeaturDishwasher Featur
Dishwasher Featur
eses
eses
es
ENGLISHENGLISH
ENGLISHENGLISH
ENGLISH
Control Panel

5
EnerEner
EnerEner
Ener
gy Optionsgy Options
gy Optionsgy Options
gy Options
WW
WW
W
ater Heat Optionater Heat Option
ater Heat Optionater Heat Option
ater Heat Option
When WATER HEAT option is selected, the
heating element in bottom of tub will raise the
main wash water temperature to approximately
140°F. Wash action will continue but timer will not
advance until this water temperature has been
reached. The hotter water provided by this option
helps activate dishwasher detergent to clean food
grease and soil from dishes. WATER HEAT option
can be used with any cycle except RINSE HOLD.
The WATER HEAT light will glow until the water
temperature reaches 140°F. To turn off option
press RESET OPTIONS.
Operating InstrOperating Instr
Operating InstrOperating Instr
Operating Instr
uctionsuctions
uctionsuctions
uctions
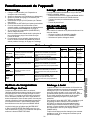
Cycle CharCycle Char
Cycle CharCycle Char
Cycle Char
tt
tt
t
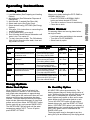
Getting StarGetting Star
Getting StarGetting Star
Getting Star
tedted
tedted
ted
1. Load dishwasher (See Preparing and Loading
Dishes).
2. Add detergent (See Dishwasher Dispenser &
Detergents).
3. Add rinse aid, if needed (See Rinse Aid).
4. Select wash cycle (See Cycle Chart).
5. Select desired energy OPTIONS (See Energy
Options).
6. See page 12 for instructions on connecting the
portable dishwasher.
7. If using Wash Delay, go to step 9.
8. Run hot water faucet nearest dishwasher until
water is hot. Turn water off.
9. To start, close door to latch. The ON indicator
light will glow throughout the wash, rinse and
dry portions of cycle.
* Includes dry time.
CyclesCycles
CyclesCycles
Cycles
WaterWater
WaterWater
Water
(approx.)(approx.)
(approx.)(approx.)
(approx.)
Time*Time*
Time*Time*
Time*
(approx.)(approx.)
(approx.)(approx.)
(approx.)
Washes/Washes/
Washes/Washes/
Washes/
RinsesRinses
RinsesRinses
Rinses
For heavily soiled dishes and
silverware.
HeavyHeavy
HeavyHeavy
Heavy
WashWash
WashWash
Wash
9.5
36.0
gal.
liters
2 washes
NormalNormal
NormalNormal
Normal
WashWash
WashWash
Wash
88 min.8.0
30.3
gal.
liters
2 washes
DescriptionDescription
DescriptionDescription
Description
To Select CycleTo Select Cycle
To Select CycleTo Select Cycle
To Select Cycle
96 min.
For regularly soiled dishes
and silverware.
• Press POTS PANS button.
• Select desired OPTIONS.
• Turn dial to HEAVY WASH.
• Press NORMAL WASH button.
• Select desired OPTIONS.
• Turn dial to NORMAL WASH.
WaterWater
WaterWater
Water
MiserMiser
MiserMiser
Miser
80 min.6.4
24.2
gal.
liters
1 washFor lightly soiled or pre-rinsed
dishes and silverware.
• Press NORMAL WASH button.
• Select desired OPTIONS.
• Turn dial to WATER MISER.
RinseRinse
RinseRinse
Rinse
HoldHold
HoldHold
Hold
8 min.1.6
6.1
gal.
liters
For rinsing dishes that will be
washed later.
• DO NOT USE detergent.
• Press NORMAL WASH button.
• Select NO HEAT DRY option.
• Turn dial to RINSE HOLD.
1 rinse
3 rinses
4 rinses
3 rinses
For pots, pans, casseroles
and dinnerware with dried-on
or baked-on soils.
PotsPots
PotsPots
Pots
PansPans
PansPans
Pans
11.1
42.0
gal.
liters
2 washes104 min.
• Press POTS PANS button.
• Select desired OPTIONS.
• Turn dial to POTS PANS.
5 rinses
ENGLISHENGLISH
ENGLISHENGLISH
ENGLISH
WW
WW
W
ash Delayash Delay
ash Delayash Delay
ash Delay
Allows you to delay starting the POTS PANS or
NORMAL WASH cycle.
• Press POTS PANS or NORMAL WASH
button and select desired OPTIONS.
• Turn dial to number of hours for wash delay.
• Close door to latch.
Plate WPlate W
Plate WPlate W
Plate W
arar
arar
ar
mermer
mermer
mer
For warming dishes and serving plates before
serving hot foods.
• Load clean plates and dishes to be warmed.
• Turn dial to PLATE WARMER.
• Select heat dry option.
No Heat DrNo Heat Dr
No Heat DrNo Heat Dr
No Heat Dr
y Optiony Option
y Optiony Option
y Option
NO HEAT DRY option saves electricity. The
heating element stays off during drying portion of
cycle. Additional drying time may be required, with
door open, to completely air dry dishes. Some
water droplets may remain on door and in areas
where dishes touch dishwasher basket or rack.
To turn NO HEAT DRY option off and select a
heated drying cycle, push the RESET OPTIONS
button. If NO HEAT DRY option is not selected, a
heated drying cycle is automatically provided. NO
HEAT DRY option must be selected with the
RINSE HOLD cycle.
The drying option may be changed at any time
during the cycle and affects only the drying period.

6
Dish PrDish Pr
Dish PrDish Pr
Dish Pr
eparationeparation
eparationeparation
eparation
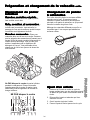
It is not necessary to rinse dishes before putting
them into the dishwasher. Just remove large
pieces and quantities of food, bones, pits, etc.
Empty glasses and cups. It may be necessary to
presoak or lightly scour firmly cooked-on or
baked-on foods.
Foods such as mustard, mayonnaise, vinegar,
lemon juice and tomato-based products may
cause discoloration of stainless steel and plastics
if allowed to sit for a long period of time. Unless
the dishwasher is to be operated at once, it is best
to rinse off these food soils.
• Load dishes facing the center of the rack so
that the water spray from the rotating spray
arm and center wash tower can reach soiled
surfaces.
• Be sure large items do not block the detergent
dispenser, preventing it from opening during
the wash cycle.
• To be sure an item is dishwasher safe, read
the manufacturer's care instructions.
• If the dishwasher drains into a food disposer,
be sure disposer is completely empty
before dishwasher is started.
• To save energy, wash full loads.
• For best washing results, load correctly and
avoid overloading.
PrPr
PrPr
Pr
eparing and Loading Disheseparing and Loading Dishes
eparing and Loading Disheseparing and Loading Dishes
eparing and Loading Dishes
Loading the TLoading the T
Loading the TLoading the T
Loading the T
op Rackop Rack
op Rackop Rack
op Rack
Glasses and cupsGlasses and cups
Glasses and cupsGlasses and cups
Glasses and cups
—Place glasses and cups
against outside pins at an angle. Cups with a
concave bottom will collect water.
Small plates and saucersSmall plates and saucers
Small plates and saucersSmall plates and saucers
Small plates and saucers
—Place
dishes between middle two rows of pins.
PlasticwarPlasticwar
PlasticwarPlasticwar
Plasticwar
ee
ee
e—Load plasticware in the top rack
to avoid melting.
BowlsBowls
BowlsBowls
Bowls—Place bowls between the middle 2 rows
of pins facing down.
Miscellaneous itemsMiscellaneous items
Miscellaneous itemsMiscellaneous items
Miscellaneous items—Place long handled
knives and utensils in top rack.
Cup ShelfCup Shelf
Cup ShelfCup Shelf
Cup Shelf—The cup shelf can be folded down
over short items (juice glasses, cups, etc.) for
more loading space. When using cup shelf,
alternate items with layer below so that water can
reach all inside surfaces.
ENGLISHENGLISH
ENGLISHENGLISH
ENGLISH

7
Loading the Bottom RackLoading the Bottom Rack
Loading the Bottom RackLoading the Bottom Rack
Loading the Bottom Rack
LarLar
LarLar
Lar
ge plates and plattersge plates and platters
ge plates and plattersge plates and platters
ge plates and platters—Place
between the support pins with soiled sides facing
inward.
Bowls, casserBowls, casser
Bowls, casserBowls, casser
Bowls, casser
oles and sauceoles and sauce
oles and sauceoles and sauce
oles and sauce
panspans
panspans
pans
— Load upside down or at an angle
facing inward. Slightly tilting items will provide
better drainage.
Pots and pansPots and pans
Pots and pansPots and pans
Pots and pans—Place upside down and
at an angle. Do not allow handles to protrude
through bottom of rack, blocking wash arm
rotation. Load large items at the sides and not
across the front so they do not block the
detergent dispenser preventing it from opening.
Loading the SilverLoading the Silver
Loading the SilverLoading the Silver
Loading the Silver
warwar
warwar
war
ee
ee
e
BasketBasket
BasketBasket
Basket
Adding a DishAdding a Dish
Adding a DishAdding a Dish
Adding a Dish
1. Make sure there is a full wash cycle yet to be
completed so that any added items are
thoroughly washed and rinsed.
2. Unlatch door and wait for water action to stop.
3. Open door and add dish.
4. Firmly close door to latch and resume cycle.
PrPr
PrPr
Pr
eparing and Loading Disheseparing and Loading Dishes
eparing and Loading Disheseparing and Loading Dishes
eparing and Loading Dishes
continued
DO NOT block the center area of the lower
rack when loading. Because the center wash
tower extends through this area, blockage
may result in poor cleaning.
Load sharp items with handles up. Be sure items
do not protrude through the holes in the basket
and stop the rotation of the spray arm.
Load silverware so items are mixed in each
section to prevent nesting. Water spray cannot
effectively reach nested items.
ENGLISHENGLISH
ENGLISHENGLISH
ENGLISH

8
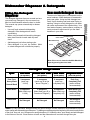
Dishwasher Dispenser & DeterDishwasher Dispenser & Deter
Dishwasher Dispenser & DeterDishwasher Dispenser & Deter
Dishwasher Dispenser & Deter
gentsgents
gentsgents
gents
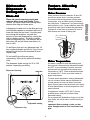
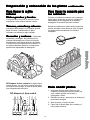
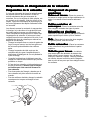
Filling the DeterFilling the Deter
Filling the DeterFilling the Deter
Filling the Deter
gentgent
gentgent
gent
DispenserDispenser
DispenserDispenser
Dispenser
The detergent dispenser has one covered and one
uncovered cup. Detergent in the uncovered cup
falls into the dishwasher when the door is closed.
The covered cup opens automatically to release
detergent.
• Use only fresh automatic dishwashing
detergent. Other detergents will cause
oversudsing.
• When using automatic dishwashing detergent
tabs, place one tab in main wash cup and
close.
• Add detergent just before starting cycle.
• Store detergent in a cool, dry location. Moist
or caked detergent will not dissolve properly.
Pots Pans
Heavy Wash
Normal Wash
How much DeterHow much Deter
How much DeterHow much Deter
How much Deter
gent to usegent to use
gent to usegent to use
gent to use
The amount of detergent to use depends on the
water hardness. Water hardness is measured in
grains per gallon. Using too little detergent can
result in poor cleaning and hard water filming or
spotting. Using too much detergent in soft water
can cause a permanent film called etching. Your
local water company, water softener company or
county extension agent can tell you the water
hardness in your area.
DeterDeter
DeterDeter
Deter
gent Usage Guidegent Usage Guide
gent Usage Guidegent Usage Guide
gent Usage Guide
CycleCycle
CycleCycle
Cycle
Soft WaterSoft Water
Soft WaterSoft Water
Soft Water
(0-3 grains)
Medium Hard WaterMedium Hard Water
Medium Hard WaterMedium Hard Water
Medium Hard Water
(4-8 grains)
Hard WaterHard Water
Hard WaterHard Water
Hard Water
(9-12 grains)
Very Hard Water*Very Hard Water*
Very Hard Water*Very Hard Water*
Very Hard Water*
(over 12 grains)
2 teaspoons
(each cup–
1/4 full)
5 teaspoons
(each cup–fill to line
above "Regular")
8 teaspoons
(each cup–
completely full)
Each Cup–
Completely Full
(water softener
recommended)
Water Miser
2 teaspoons
(Main Wash cup–
1/4 full)
5 teaspoons
(Main Wash cup–fill to
line above "Regular")
8 teaspoons
(Main Wash cup–
completely full)
Main Wash Cup–
Completely Full
(water softener
recommended)
Rinse Hold
No Detergent No Detergent No Detergent
No Detergent
(water softener
recommended)
*Note: For very hard water, detergent alone may not be enough. A water softener is recommended to improve
water quality and dishwashing performance. Try adding more detergent at the beginning of the main wash portion
of the cycle. As a rule, use 1 teaspoon for each grain above 12. Unlatch the door, open slowly and add detergent
to the bottom of the tub. Close the door to latch and the dishwasher will continue through the cycle.
ENGLISHENGLISH
ENGLISHENGLISH
ENGLISH
Cover
Main Wash Cup
Pre Wash Cup
Cover Latch
Note: If the cover is closed on the Main Wash Cup,
open by pressing the cover latch.

9
Factors AfFactors Af
Factors AfFactors Af
Factors Af
fectingfecting
fectingfecting
fecting
PerPer
PerPer
Per
forfor
forfor
for
mancemance
mancemance
mance
WW
WW
W
ater Prater Pr
ater Prater Pr
ater Pr
essuressur
essuressur
essur
ee
ee
e
Water pressure should be between 20 and 120
pounds per square inch. Low water pressure
occurs most often during periods of high water
consumption, such as when laundry or showers
are being done. To determine if you have enough
water pressure, put a 2 quart container under fully
opened hot water faucet nearest the dishwasher.
It should fill in less than 14 seconds. Be sure all
other faucets are turned off during test.
WW
WW
W
ater Tater T
ater Tater T
ater T
emperaturemperatur
emperaturemperatur
emperatur
ee
ee
e
Hot water is needed for best dishwashing and
drying results. Water entering dishwasher should
be 120°F to give satisfactory results. Improved
performance may be obtained by raising water
temperature to 140°F. Water temperature should
not exceed 160°F. Check your water heater for
proper temperature.
To check water temperature entering dishwasher,
turn on hot water faucet nearest dishwasher for
several minutes to clear cool water from water
pipes. Place a glass under faucet and use a candy
or meat thermometer to check temperature of the
water collected.
If temperature is below 120°F (49°C), have a
qualified person raise the hot water heater
thermostat setting.
Do not operate the dishwasher during or just after
other heavy use of hot water, such as laundry or
bathing.
Important: Before starting a cycle, run hot
water through faucet to clear cool water from
pipe.
DishwasherDishwasher
DishwasherDishwasher
Dishwasher
Dispenser &Dispenser &
Dispenser &Dispenser &
Dispenser &
DeterDeter
DeterDeter
Deter
gents gents
gents gents
gents
(continued)(continued)
(continued)(continued)
(continued)
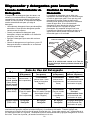
Adjustable setting
Dispenser Opening
Dispenser Cap
Rinse AidRinse Aid
Rinse AidRinse Aid
Rinse Aid
Rinse aid greatly improves drying and
reduces water spots and filming. Water
“sheets” off dishes rather than forming water
droplets that cling and leave spots.
A dispenser, located next to the detergent cup,
automatically releases a measured amount of
rinse aid during the last rinse. If spotting and
poor drying are problems, increase the
amount of rinse aid dispensed by rotating the
dial to a higher number. The dial is located
under the dispenser cap. The indicator will be
dark when full and will show clear when it is
time to refill.
To add liquid rinse aid, turn dispenser cap 1/4
turn counterclockwise and lift out. Pour in rinse
aid until liquid touches the indicated fill level.
Replace cap.
Do not overfill since this can cause
oversudsing. Wipe up any spills with a damp
cloth.
The dispenser holds enough for 35 to 140
washes, depending on setting.
Indicator
ENGLISHENGLISH
ENGLISHENGLISH
ENGLISH
MoreLess

10
CarCar
CarCar
Car
e and Cleaninge and Cleaning
e and Cleaninge and Cleaning
e and Cleaning
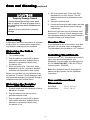
OutsideOutside
OutsideOutside
Outside—Occasionally wash with a mild
nonabrasive detergent and water. Rinse and dry.
InsideInside
InsideInside
Inside—The inside of the dishwasher is self-
cleaning with normal use.
If hard water causes lime deposit buildup, clean
using the following instructions:
1. After dishwasher begins to fill, open door and
pour 2 cups of white vinegar into dishwasher.
Do not add dishes or detergent.
2. Run through any full wash cycle.
If it is felt that further interior cleaning is needed,
general household spray cleansers are
recommended. Follow manufacturer's directions.
Important:
The dishwasher motor is
permanently lubricated at the factory and does
not need to be oiled.
FloatFloat
FloatFloat
Float—is used to measure water level in
dishwasher. See page 4 for location.
• Clean float with
household
cleanser
containing
vinegar or bleach
to dissolve any
buildup. Cleaning
will prevent float
from sticking and
stopping a water
fill or allowing
dishwasher to
overflow.
• Pull up firmly to lift float out. Clean around
areas shown in illustration.
• To replace float, push down until float locks into
place.
• Float should move up and down freely about
one inch when replaced on tube.
Burn Hazard
Allow heating element to cool
before cleaning the interior.
Failure to do so can result in
burns.
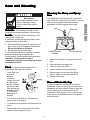
Cleaning the Pump and SprayCleaning the Pump and Spray
Cleaning the Pump and SprayCleaning the Pump and Spray
Cleaning the Pump and Spray
ArAr
ArAr
Ar
mm
mm
m
Your dishwasher will flush away all normal food
soils. However, objects (bones, fruit pits, etc.) may
collect in openings and should be removed
periodically to avoid clogging drain system.
1. Remove tower base by turning counterclock-
wise.
2. Remove locknut and spray arm.
3. Clean out spray arm holes.
4. Clean in and around pump openings.
5. Replace spray arm and securely tighten
locknut. Spray arm should rotate freely.
6. Replace tower base.
Pump Opening
Tower
Heating Element
(caution)
Spray Arm
CarCar
CarCar
Car
e of Drain Air Gape of Drain Air Gap
e of Drain Air Gape of Drain Air Gap
e of Drain Air Gap
If a drain air gap was installed for your built-in
dishwasher, check to make sure it is clean so the
dishwasher will drain properly. Drain air gaps are
usually mounted on countertop and can be
inspected by removing the cover. A drain air gap
is not part of your dishwasher and is not covered
by this warranty.
ENGLISHENGLISH
ENGLISHENGLISH
ENGLISH

11
CarCar
CarCar
Car
e and Cleaninge and Cleaning
e and Cleaninge and Cleaning
e and Cleaning continued
WW
WW
W
interizinginterizing
interizinginterizing
interizing
A dishwasher that will not be used for an extended
length of time or is located where temperatures
may fall below freezing must be winterized.
WW
WW
W
interizing the Built-ininterizing the Built-in
interizing the Built-ininterizing the Built-in
interizing the Built-in
DishwasherDishwasher
DishwasherDishwasher
Dishwasher
1. Turn off water supply.
2. Pour one gallon of nontoxic RV or Marine
water system antifreeze (available from a
hardware or recreational vehicle store)
into bottom of tub.
3. Set for any wash cycle. Close door. Allow
dishwasher to run for 3 minutes to distribute
antifreeze into dishwasher's water system.
Before unit is put back into use, antifreeze must
be removed. To remove, fill both detergent cups
with dishwasher detergent and operate through a
complete normal cycle without dishes.
WW
WW
W
interizing the Porinterizing the Por
interizing the Porinterizing the Por
interizing the Por
table/table/
table/table/
table/
ConverConver
ConverConver
Conver
tible Dishwashertible Dishwasher
tible Dishwashertible Dishwasher
tible Dishwasher
1. Connect coupler and hose assembly to faucet.
Do not turn on water.
2. Plug the electrical cord into a properly
grounded electrical outlet.
3. Pour one gallon of nontoxic RV or Marine
water system antifreeze (available from a
hardware or recreational vehicle store)
into bottom of tub.
Property Damage Hazard
Freezing temperatures may cause water
lines to rupture. Be sure all supply lines to
and circulating lines within dishwasher are
protected.
Failure to do so could result in property
damage.
4. Set for any wash cycle. Close door. Allow
dishwasher to run for 3 minutes. This will
distribute antifreeze into dishwasher's water
system.
5. Unplug the electrical cord.
6. Disconnect hoses from water supply and drain
water from hoses. Return hoses to storage
compartment.
Before unit is put back into use, antifreeze must
be removed. To remove, fill both detergent cups
with dishwasher detergent and operate through a
complete normal cycle without dishes.
VV
VV
V
acation Tacation T
acation Tacation T
acation T
imeime
imeime
ime
If your dishwasher will not be used for more than
one week, turn off water supply to dishwasher.
Turn dishwasher circuit breaker to “OFF” position.
ENGLISHENGLISH
ENGLISHENGLISH
ENGLISH
Door and Access PanelDoor and Access Panel
Door and Access PanelDoor and Access Panel
Door and Access Panel
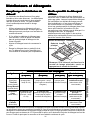
DimensionsDimensions
DimensionsDimensions
Dimensions
Door Panel: 17 7/16” x 17 5/16”
Access Panel: 17
7/16” x 6 1/2”
Installing WInstalling W
Installing WInstalling W
Installing W
ood Panelsood Panels
ood Panelsood Panels
ood Panels
A panel of up to 3/16 " thickness may be used in
place of the panels furnished with your
dishwasher. You will need a wood decorator trim
kit. Call 1-800-FON-PART (1-800-366-7278) to
order kit number 154422801.
Note: Door springs will need to be adjusted to
balance weight of panels. See the Installation
Instructions.

12
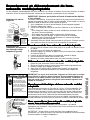
Connecting and Disconnecting the PorConnecting and Disconnecting the Por
Connecting and Disconnecting the PorConnecting and Disconnecting the Por
Connecting and Disconnecting the Por
table/table/
table/table/
table/
ConverConver
ConverConver
Conver
tible Dishwashertible Dishwasher
tible Dishwashertible Dishwasher
tible Dishwasher
The portable/convertible dishwasher must be connected to a faucet and electrical outlet each time it is used.
Follow directions on this page to properly connect dishwasher.
IMPORTANT: Make sure door is latched before moving dishwasher.
The power cord, faucet coupler and hoses are located in a compartment in
back of dishwasher. A special adapter must be installed on faucet before you
can connect dishwasher (Figure A).
1. Remove faucet adapter assembly from literature package.
2. Unscrew existing sink faucet aerator.
3. Check faucet spout to see if threads are inside or outside.
• If threads are on inside of faucet spout, use both thick and thin rubber
washers.
• If threads are on outside of faucet spout, use thin rubber washer only.
• If faucet has no threads, an adapter kit with instructions for attachment to
a non-threaded spout is available at most hardware stores.
4. Assemble faucet spout as shown in Figure A. Make sure the two brass
screens are located below the rubber washers.
Connecting the PorConnecting the Por
Connecting the PorConnecting the Por
Connecting the Por
table/Convertable/Conver
table/Convertable/Conver
table/Conver
tible Dishwashertible Dishwasher
tible Dishwashertible Dishwasher
tible Dishwasher
1. Run water at faucet until it is hot. Turn off faucet.
2. Pull hoses out of compartment.
3. Push collar down and slip faucet connector onto faucet adapter (Figure B).
4. When connector snaps into place, release collar.
5. Slowly turn on hot water all the way.
6. Plug power cord into grounded outlet.
Disconnecting the PorDisconnecting the Por
Disconnecting the PorDisconnecting the Por
Disconnecting the Por
table/Convertable/Conver
table/Convertable/Conver
table/Conver
tible Dishwashertible Dishwasher
tible Dishwashertible Dishwasher
tible Dishwasher
1. When cycle has finished, turn off hot water.
2. Press red button on coupler to release water pressure.
3. Press down on collar to release coupler.
4. Empty remaining water from coupler and return it to compartment.
5. Unplug power cord and return it to compartment.
IMPORTANT: A sink spray hose can burst due to constant water
pressure while in use. If your spray hose is installed on same water line
as the dishwasher, it is your responsibility to disconnect sink's spray
hose and to plug hole.
Electrical Connection for a PorElectrical Connection for a Por
Electrical Connection for a PorElectrical Connection for a Por
Electrical Connection for a Por
table/Convertable/Conver
table/Convertable/Conver
table/Conver
tibletible
tibletible
tible
DishwasherDishwasher
DishwasherDishwasher
Dishwasher
An electrical supply of 120 volts, 60 Hz, AC only, 15 amps is required. For
your safety, the dishwasher must be grounded. If there is a malfunction or
breakdown, grounding will reduce risk of electrical shock. This dishwasher
has a power cord with a 3-prong grounding plug. It must be plugged into a
mating 3-prong grounding type receptacle, installed and grounded in
accordance with the National Electrical Code and any local codes and
ordinances.
Connecting the Portable
Faucet Adapter
Assembly (Figure B)
TT
TT
T
o Convero Conver
o Convero Conver
o Conver
t a Port a Por
t a Port a Por
t a Por
table Model to a Built-intable Model to a Built-in
table Model to a Built-intable Model to a Built-in
table Model to a Built-in
Your portable dishwasher can be installed under the counter. A conversion kit
is required and is available at your Sears Service Center - Part No.
154400101.
IMPORTANT: Do not use the portable water supply hose for permanent
installation. It may burst. Complete instructions are in the conversion
kit.
Electric Shock Hazard
Avoid fire hazard or
electrical shock. Do
not use an adapter
plug, extension cord or
remove grounding
prong from electrical
power cord. Failure to
follow this warning can
cause serious injury,
fire or death.
ENGLISHENGLISH
ENGLISHENGLISH
ENGLISH
Grounding
type wall
receptacle
Do not under any
circumstances cut,
remove or bypass
the grounding
prong from this plug.
Power supply
cord with 3-prong
grounding plug.
For Outside
Threaded
Faucet
For Inside
Threaded
Faucet
Use Thin
Washer
Only
Use
Thick
and
Thin
Washers
Two Brass
Screens
should be
below the
rubber
washers
Adapter
(Dual
Thread)
Faucet Adapter
Assembly
(Figure A)

13
Dishes not clean—Check pages 5 to 9 for
information on correct wash cycle, proper loading,
water temperature, water pressure, hard water,
amount of detergent, old and ineffective detergent,
and dish placement.
Dishes not drying can be greatly improved
by using a rinse aid and very hot water. Hot water
raises temperature of dishes to speed up drying.
When loading, invert cups and bowls so that water
can run off. Avoid nesting of articles. If dishes are
not completely dry at end of cycle (which may
occur when NO HEAT DRY setting is used), open
door, roll out racks, and allow dishes to air dry.
Spotting—Spots form when hard water
droplets evaporate leaving a deposit. Low
phosphate detergents increase the problem in
hard water. To prevent, use hot water and a
detergent with a higher level of phosphates
(preferably 8.7% or higher), or use more of a low
phosphate detergent. Be sure to use a rinse aid. If
water is very hard, it may be necessary to install a
water softener. Load glasses and plates so they
have minimum contact with racks and pins. Avoid
overloading. Spotting will occur where dishes and
glasses touch.
Cloudy films and streaking are usually
caused by a combination of hard water and an
insufficient amount of detergent. Low phosphate
detergents are also a factor. To correct, increase
amount of detergent, check water temperature
and always use a rinse aid. If water is very hard, it
may be necessary to install a water softener.
Etched film on glassware is caused by
using too much detergent in soft or softened
water. This film cannot be removed. It is more
likely to occur on soft leaded glass or expensive
crystal. An early warning of this condition is a
cloudy iridescent appearance on glasses. To
prevent, be sure dishwasher is getting a full fill of
water. Water should reach base of heating
element. If water level is low, have water pressure
checked by a plumber. Use less detergent and
make sure water temperature is not higher than
150°F (66°C). Underload to assure thorough
rinsing. Use the NO HEAT DRY option.
Chipped dishes and glasses can result
from rough handling and improper loading. Do not
put glasses in direct contact with other items.
Place glasses securely against pins.
Crazing of older china and pottery
happens when items are subjected to very hot
water. Once crazing (fine cracks in the glaze)
appears, it cannot be removed. Do not machine
wash again or condition may worsen.
Coffee and tea stains can occur when
water contains traces of iron. To avoid stains,
rinse cups out immediately after use. Increase
amount of detergent and use a rinse aid. Water
temperature should be approximately 140°F
(60°C). If problem persists, install a water softener
with an iron removal unit. To remove stains, hand
wash cups in solution of 1/2 cup (120 ml) bleach
and a quart (1 L) of warm water. Rinse thoroughly.
Gray-black stains on dishes are caused
by manganese in water supply. To correct, install
a manganese filtering system into house water
supply.
Reddish-brown stains on dishes,
glasses and interior
are caused by iron in
water. To avoid iron stain, increase detergent, use
water heated to approximately 140°F (60°C) and a
rinse aid. It may be necessary to install a water
softener with an iron removal unit. To improve
appearance, use a commercial rust and lime scale
remover.
Plastic items can lose their shape due to high
temperatures of automatic dishwashing. Read
labels before washing. Place washable items in
top rack away from heating element.
Discoloration of plasticware by some
foods, such as tomato sauce, can stain
plasticware. If stained, soak item in solution of 1
tablespoon dishwasher detergent and a quart of
hot water or in a solution of 1/2 cup (120 ml)
bleach and a quart of hot water.
Fading of patterns and metallic trim is
due to many washings, detergent and hot water.
Most of today's china is dishwasher safe. Antique,
handpainted china, and handpainted pottery
should be washed by hand.
Common Dishwashing PrCommon Dishwashing Pr
Common Dishwashing PrCommon Dishwashing Pr
Common Dishwashing Pr
oblems and Solutionsoblems and Solutions
oblems and Solutionsoblems and Solutions
oblems and Solutions
ENGLISHENGLISH
ENGLISHENGLISH
ENGLISH

14
Do not place silver next to or touching
stainless steel utensils in dishwasher silverware
basket. This can cause pitting of stainless steel
blades. (Most silver knives have stainless steel
blades. Do not let blades touch other stainless
steel utensils during wash cycle.)
Tarnish on silver plate occurs when worn
down to the base metal and turns a bronze color
when exposed to hot water and detergent.
Remove bronzing by soaking item in vinegar for
10 minutes or use a silver polish. For permanent
protection, have silver replated.
Silver tarnish can be caused by prolonged
contact with air or with foods containing sulphur
like eggs, mayonnaise, or seafood. Contact with
undissolved detergent can also cause tarnish. To
prevent this, rinse silver soon after use. Use care
not to pour detergent directly onto silver. Remove
tarnish with a silver polish.
Discoloration of stainless steel—Food
soil can create a film or discoloration. To avoid,
rinse stainless items promptly. Food soil films can
be removed with a stainless steel cleanser or mild
cleanser. Rinse thoroughly.
Pitting of stainless steel is caused by
prolonged contact with detergent granules and
foods like salt, mayonnaise, fruits, butter or milk.
To prevent, rinse soon after use. Do not allow
detergent to fall directly onto stainless steel items.
Discoloration of aluminum—Anodized
(colored) aluminum cannot withstand machine
washing. Resulting loss of color is permanent.
Other aluminum may darken when machine
washed. To decrease chance of discoloration, do
not place aluminum directly beneath detergent
dispenser. To brighten darkened items, scour with
soap filled steel wool pads. For severely darkened
pans, simmer an acidic food or a solution of 2
teaspoons (10 ml) cream of tartar per quart (1 L)
of water for 1/2 hour. Scour with soap filled steel
wool pad, rinse and dry.
Knife handles become loose when the
cement is exposed to very hot water. Test wash a
single knife for several weeks. Damaged knives
should be professionally re-cemented.
TT
TT
T
rr
rr
r
oubleshootingoubleshooting
oubleshootingoubleshooting
oubleshooting
Noise problems?
It is normal to hear swishing and pulsating sounds.
These sounds mean that water is circulating
through the dishwasher.
It is normal to hear motor sounds before water
enters tub.
Loud ticking usually means something is hitting
wash arm. See Preparing and Loading Dishes.
Vibrating or rattling sounds can mean dishes are
touching each other. See Preparing and Loading
Dishes.
Operating problems?
Be sure door is firmly closed. It is normal for
dishwasher to pause between cycles.
Leaking?
Check for items sticking out of dishwasher that
could prevent door from closing and sealing
properly. Use only fresh dishwashing detergent to
avoid oversudsing.
Water coming through door vents? When a dish is
added after starting dishwasher, wait a few
seconds before latching door. This permits
entering cold air to expand slowly inside
dishwasher.
Dishes not dry?
Check to see if rinse aid dispenser needs refilling.
Hot water temperature may be too low
(min. 120°F 49°C). If NO HEAT DRY option is
being used, additional drying time may be required
with door open.
Water in tub?
A small amount of water in bottom of tub is
normal. It keeps water seal lubricated.
Detergent left in cup?
Detergent may be too old. Discard old detergent.
Use fresh detergent.
Dishes may not be loaded properly. Be sure items
do not protrude from front of bottom rack
preventing detergent cup from opening.
Before calling for service, review this list. It may save
you both time and expense. This list includes
common experiences that are not the result of
defective workmanship or material.
Common DishwashingCommon Dishwashing
Common DishwashingCommon Dishwashing
Common Dishwashing
PrPr
PrPr
Pr
oblems andoblems and
oblems andoblems and
oblems and
SolutionsSolutions
SolutionsSolutions
Solutions
continued
ENGLISHENGLISH
ENGLISHENGLISH
ENGLISH
Page is loading ...
Page is loading ...
Page is loading ...
Page is loading ...
Page is loading ...
Page is loading ...
Page is loading ...
Page is loading ...
Page is loading ...
Page is loading ...
Page is loading ...
Page is loading ...
Page is loading ...
Page is loading ...
Page is loading ...
Page is loading ...
Page is loading ...
Page is loading ...
Page is loading ...
Page is loading ...
Page is loading ...
Page is loading ...
Page is loading ...
Page is loading ...
Page is loading ...
Page is loading ...
Page is loading ...
Page is loading ...
Page is loading ...

44
Get it fixed, at your home or ours!
For repair – in your home – of all major brand appliances,
lawn and garden equipment, or heating and cooling systems,
no matter who made it, no matter who sold it!
For the replacement parts, accessories and
owner's manuals that you need to do-it-yourself.
For Sears professional installation of home appliances
and items like garage door openers and water heaters.
1-800-4-MY-HOME
®
(1-800-469-4663)
Call anytime, day or night (U.S.A. and Canada)
www.sears.ca
For repair of carry-in products like vacuums, lawn equipment,
and electronics, call or go on-line for the location of your nearest
Sears Parts & Repair Center.
1-800-488-1222
Call anytime, day or night (U.S.A. only)
www.sears.com
To purchase a protection agreement (U.S.A.)
or maintenance agreement (Canada) on a product serviced by Sears:
www.sears.com
Your Home
Our Home
1-800-827-6655 (U.S.A.) 1-800-361-6665 (Canada)
Para pedir servicio de reparación a
domicilio, y para ordenar piezas:
1-888-SU-HOGAR
SM
(1-888-784-6427)
Au Canada, pour service en français:
1-800-LE-FOYER
MC
(1-800-533-6937)
www.sears.ca
® Registered Trademark /
TM
Trademark /
SM
Service Mark of Sears Brands, LLC
® Marca Registrada /
TM
Marca de Fábrica /
SM
Marca de Servicio de Sears Brands, LLC
MC
Marque de commerce /
MD
Marque déposée de Sears Brands, LLC © Sears Brands, LLC

Dishwasher
Use & Care Guide
Lavavajillas
Manual de uso y cuidado
Lave-vaisselle
Guide de l'utilisation et d'entretien
Model/Modelo/Modèle 587.14432, 587.14439, 587.14538, 587.17248,
587.17252, 587.17259
154578201
Sears Roebuck and Co., Hoffman Estates, IL 60179 U.S.A.
Sears Canada, Inc., Toronto, Ontario, Canada MB5 2B8
www.sears.com
www.sears.ca
ENGLISHENGLISH
ENGLISHENGLISH
ENGLISH
ESPESP
ESPESP
ESP
AÑOLAÑOL
AÑOLAÑOL
AÑOL
FRANÇAISFRANÇAIS
FRANÇAISFRANÇAIS
FRANÇAIS
®

2
U.S. Warranty ................................................................... 2
Safety Instructions ......................................................... 3
Dishwasher Features ..................................................... 4
Operating Instructions ................................................... 5
Preparing and Loading Dishes ............................ 6-7
Dishwasher Dispenser and Detergents .....................8-9
Factors Affecting Performance...................................... 9
Care and Cleaning ...................................................10-11
Installing Wood Panels ................................................. 11
Connecting Portable Dishwasher................................ 12
Common Dishwasher Problems and Solutions .... 13-14
Troubleshooting ................................................. 14
Canadian Warrenty ....................................................... 15
Service........................................................... Back Cover
TT
TT
T
able of Contentsable of Contents
able of Contentsable of Contents
able of Contents
ENGLISHENGLISH
ENGLISHENGLISH
ENGLISH
KenmorKenmor
KenmorKenmor
Kenmor
e Appliance We Appliance W
e Appliance We Appliance W
e Appliance W
arar
arar
ar
rantyranty
rantyranty
ranty
One Year Limited Warranty
When installed, operated and maintained according to all instructions supplied with the product, if this appliance fails due to
a defect in material or workmanship within one year from the date of purchase, call 1-800-4-MY-HOME® to arrange for free
repair. If this appliance is used for other than private family purposes, this warranty applies for only 90 days from the date of
purchase.
This warranty covers only defects in material and workmanship. Sears will NOT pay for:
1. Expendable items that can wear out from normal use, including but not limited to filters, belts, light bulbs, and bags.
2. A service technician to instruct the user in correct product installation, operation or maintenance.
3. A service technician to clean or maintain this product.
4. Damage to or failure of this product if it is not installed, operated or maintained according to all instructions supplied with
the product.
5. Damage to or failure of this product resulting from accident, abuse, misuse or use for other than its intended purpose.
6. Damage to or failure of this product caused by the use of detergents, cleaners, chemicals or utensils other than those
recommended in all instructions supplied with the product.
7. Damage to or failure of parts or systems resulting from unauthorized modifications made to this product.
Disclaimer of implied warranties; limitations of remedies
Customer’s sole and exclusive remedy under this limited warranty shall be product repair as providedherein. Implied warranties,
including warranties of merchantability or fitness for a particular purpose, are limited to one year or the shortest period allowed
by law. Sears shall not be liable for incidental or consequential damages. Some states and provinces do not allow the exclusion
or limitation of incidental or consequential damages, or limitations on the duration of implied warranties of merchantability or
fitness, so these exclusions or limitations may not apply to you.
This warranty applies only while this appliance is used in the United States and Canada.
This warranty gives you specific legal rights, and you may also have other rights which vary from state to state.
Sears, Roebuck and Co.,
Dept. 817WA, Hoffman Estates, IL 60179
Sears Canada Inc.
Toronto, Ontario, Canada M5B 2B8

3
ImporImpor
ImporImpor
Impor
tant Safety Instrtant Safety Instr
tant Safety Instrtant Safety Instr
tant Safety Instr
uctionsuctions
uctionsuctions
uctions
• Read all instructions before using your
dishwasher.
• Use your dishwasher only as instructed in
this Use & Care Guide.
• This Guide does not cover every possible
condition and situation that may occur. Use
common sense and caution when installing,
operating and maintaining any appliance.
• DISHWASHER MUST BE ELECTRICALLY
GROUNDED. Read the Installation
Instructions for details.
• This dishwasher is designed to operate on
regular house current (120 V, 60 Hz). Use a
circuit equipped with a 15 ampere fuse or
circuit breaker. Use a 20 ampere fuse if
dishwasher is connected with a food waste
disposer.
• Do not operate dishwasher unless all
enclosure panels are in their proper place.
• To avoid entrapment and/or suffocation,
remove door or door latch mechanism from
any dishwasher that is discarded or not in
use.
• Keep young children and infants away from
dishwasher when it is operating.
• Do not let children abuse, sit, stand or play
on door or racks of a dishwasher.
• Use only detergents and rinse agents
recommended for use in a dishwasher.
• Store dishwasher detergent and rinse
agents out of the reach of children.
Printed in U.S.A.
• Do not wash plastic items unless marked
“dishwasher safe” or the equivalent. Check
with manufacturer for recommendations, if
not marked. Items that are not dishwasher
safe may melt and create a potential fire
hazard.
• If the dishwasher drains into a food
disposer, make sure disposer is completely
empty before running dishwasher.
• Disconnect electrical power to dishwasher
before servicing.
• Repairs should be done by a qualified
technician.
• Do not tamper with controls.
• Do not touch the heating element during or
immediately after use.
• When loading items to be washed:
- Locate sharp items and knives so that
they are not likely to damage the door
seal or tub.
- Load sharp items and knives with the
handles up to reduce the risk of cut-type
injuries.
• Under certain conditions, hydrogen gas may
be produced in a hot water system that has
not been used for 2 weeks or more.
HYDROGEN GAS IS EXPLOSIVE. If hot
water system has not been used for such a
period, before using dishwasher, turn on all
hot water faucets and let water flow from
each for several minutes. This will release
any accumulated hydrogen gas.
HYDROGEN GAS IS FLAMMABLE. Do not
smoke or use an open flame during this
time.
• Do not store or use combustible materials,
gasoline or other flammable vapors and
liquids in the vicinity of this or any other
appliance.
SASA
SASA
SA
VE THESEVE THESE
VE THESEVE THESE
VE THESE
INSTRUCTIONSINSTRUCTIONS
INSTRUCTIONSINSTRUCTIONS
INSTRUCTIONS
This symbol will help alert you to such
dangers as personal injury, burns, fire and
electrical shock.
To reduce the risk of fire, electrical shock, or
injury when using your dishwasher, follow
basic precautions including the following:
ENGLISHENGLISH
ENGLISHENGLISH
ENGLISH

4
Door Spring
Motor
Bottom Rack
page 7
Serial label
(located on right
side of tub)
Your dishwasher, illustrated below, cleans by spraying a mixture of hot, clean water, and detergent against
the soiled surfaces of your dishes and tableware. Each cycle starts with a pre-drain. Next, the dishwasher
fills with water to a level even with the heating element. This water is constantly pumped through the rotating
spray arm and center wash tower and sprayed onto the dishes. Soiled water is pumped out and replaced
with clean water during a cycle. The number of water fills depends upon the cycle being used.
Leveling Legs
Heating Element
page 10
Normal Water
Fill Level
Float
page 10
Console
page 4
Lower Spray Arm
page 10
Tower Assembly
pages 7,10
Top Rack
page 6
Dishwasher FeaturDishwasher Featur
Dishwasher FeaturDishwasher Featur
Dishwasher Featur
eses
eses
es
ENGLISHENGLISH
ENGLISHENGLISH
ENGLISH
Control Panel

5
EnerEner
EnerEner
Ener
gy Optionsgy Options
gy Optionsgy Options
gy Options
WW
WW
W
ater Heat Optionater Heat Option
ater Heat Optionater Heat Option
ater Heat Option
When WATER HEAT option is selected, the
heating element in bottom of tub will raise the
main wash water temperature to approximately
140°F. Wash action will continue but timer will not
advance until this water temperature has been
reached. The hotter water provided by this option
helps activate dishwasher detergent to clean food
grease and soil from dishes. WATER HEAT option
can be used with any cycle except RINSE HOLD.
The WATER HEAT light will glow until the water
temperature reaches 140°F. To turn off option
press RESET OPTIONS.
Operating InstrOperating Instr
Operating InstrOperating Instr
Operating Instr
uctionsuctions
uctionsuctions
uctions
Cycle CharCycle Char
Cycle CharCycle Char
Cycle Char
tt
tt
t
Getting StarGetting Star
Getting StarGetting Star
Getting Star
tedted
tedted
ted
1. Load dishwasher (See Preparing and Loading
Dishes).
2. Add detergent (See Dishwasher Dispenser &
Detergents).
3. Add rinse aid, if needed (See Rinse Aid).
4. Select wash cycle (See Cycle Chart).
5. Select desired energy OPTIONS (See Energy
Options).
6. See page 12 for instructions on connecting the
portable dishwasher.
7. If using Wash Delay, go to step 9.
8. Run hot water faucet nearest dishwasher until
water is hot. Turn water off.
9. To start, close door to latch. The ON indicator
light will glow throughout the wash, rinse and
dry portions of cycle.
* Includes dry time.
CyclesCycles
CyclesCycles
Cycles
WaterWater
WaterWater
Water
(approx.)(approx.)
(approx.)(approx.)
(approx.)
Time*Time*
Time*Time*
Time*
(approx.)(approx.)
(approx.)(approx.)
(approx.)
Washes/Washes/
Washes/Washes/
Washes/
RinsesRinses
RinsesRinses
Rinses
For heavily soiled dishes and
silverware.
HeavyHeavy
HeavyHeavy
Heavy
WashWash
WashWash
Wash
9.5
36.0
gal.
liters
2 washes
NormalNormal
NormalNormal
Normal
WashWash
WashWash
Wash
88 min.8.0
30.3
gal.
liters
2 washes
DescriptionDescription
DescriptionDescription
Description
To Select CycleTo Select Cycle
To Select CycleTo Select Cycle
To Select Cycle
96 min.
For regularly soiled dishes
and silverware.
• Press POTS PANS button.
• Select desired OPTIONS.
• Turn dial to HEAVY WASH.
• Press NORMAL WASH button.
• Select desired OPTIONS.
• Turn dial to NORMAL WASH.
WaterWater
WaterWater
Water
MiserMiser
MiserMiser
Miser
80 min.6.4
24.2
gal.
liters
1 washFor lightly soiled or pre-rinsed
dishes and silverware.
• Press NORMAL WASH button.
• Select desired OPTIONS.
• Turn dial to WATER MISER.
RinseRinse
RinseRinse
Rinse
HoldHold
HoldHold
Hold
8 min.1.6
6.1
gal.
liters
For rinsing dishes that will be
washed later.
• DO NOT USE detergent.
• Press NORMAL WASH button.
• Select NO HEAT DRY option.
• Turn dial to RINSE HOLD.
1 rinse
3 rinses
4 rinses
3 rinses
For pots, pans, casseroles
and dinnerware with dried-on
or baked-on soils.
PotsPots
PotsPots
Pots
PansPans
PansPans
Pans
11.1
42.0
gal.
liters
2 washes104 min.
• Press POTS PANS button.
• Select desired OPTIONS.
• Turn dial to POTS PANS.
5 rinses
ENGLISHENGLISH
ENGLISHENGLISH
ENGLISH
WW
WW
W
ash Delayash Delay
ash Delayash Delay
ash Delay
Allows you to delay starting the POTS PANS or
NORMAL WASH cycle.
• Press POTS PANS or NORMAL WASH
button and select desired OPTIONS.
• Turn dial to number of hours for wash delay.
• Close door to latch.
Plate WPlate W
Plate WPlate W
Plate W
arar
arar
ar
mermer
mermer
mer
For warming dishes and serving plates before
serving hot foods.
• Load clean plates and dishes to be warmed.
• Turn dial to PLATE WARMER.
• Select heat dry option.
No Heat DrNo Heat Dr
No Heat DrNo Heat Dr
No Heat Dr
y Optiony Option
y Optiony Option
y Option
NO HEAT DRY option saves electricity. The
heating element stays off during drying portion of
cycle. Additional drying time may be required, with
door open, to completely air dry dishes. Some
water droplets may remain on door and in areas
where dishes touch dishwasher basket or rack.
To turn NO HEAT DRY option off and select a
heated drying cycle, push the RESET OPTIONS
button. If NO HEAT DRY option is not selected, a
heated drying cycle is automatically provided. NO
HEAT DRY option must be selected with the
RINSE HOLD cycle.
The drying option may be changed at any time
during the cycle and affects only the drying period.
Page is loading ...
Page is loading ...
Page is loading ...
Page is loading ...
Page is loading ...
Page is loading ...
Page is loading ...
Page is loading ...
Page is loading ...
Page is loading ...
Page is loading ...
Page is loading ...
Page is loading ...
Page is loading ...
Page is loading ...
Page is loading ...
Page is loading ...
Page is loading ...
Page is loading ...
Page is loading ...
Page is loading ...
Page is loading ...
Page is loading ...
Page is loading ...
Page is loading ...
Page is loading ...
Page is loading ...
Page is loading ...
Page is loading ...
Page is loading ...
Page is loading ...
Page is loading ...
Page is loading ...
Page is loading ...
Page is loading ...
Page is loading ...
Page is loading ...
Page is loading ...
Page is loading ...
-
 1
1
-
 2
2
-
 3
3
-
 4
4
-
 5
5
-
 6
6
-
 7
7
-
 8
8
-
 9
9
-
 10
10
-
 11
11
-
 12
12
-
 13
13
-
 14
14
-
 15
15
-
 16
16
-
 17
17
-
 18
18
-
 19
19
-
 20
20
-
 21
21
-
 22
22
-
 23
23
-
 24
24
-
 25
25
-
 26
26
-
 27
27
-
 28
28
-
 29
29
-
 30
30
-
 31
31
-
 32
32
-
 33
33
-
 34
34
-
 35
35
-
 36
36
-
 37
37
-
 38
38
-
 39
39
-
 40
40
-
 41
41
-
 42
42
-
 43
43
-
 44
44
-
 45
45
-
 46
46
-
 47
47
-
 48
48
-
 49
49
-
 50
50
-
 51
51
-
 52
52
-
 53
53
-
 54
54
-
 55
55
-
 56
56
-
 57
57
-
 58
58
-
 59
59
-
 60
60
-
 61
61
-
 62
62
-
 63
63
-
 64
64
-
 65
65
-
 66
66
-
 67
67
-
 68
68
-
 69
69
-
 70
70
-
 71
71
-
 72
72
-
 73
73
-
 74
74
-
 75
75
-
 76
76
-
 77
77
-
 78
78
-
 79
79
-
 80
80
-
 81
81
-
 82
82
-
 83
83
-
 84
84
-
 85
85
-
 86
86
-
 87
87
-
 88
88


Kenmore 587.14432 User manual
- Category
- Dishwashers
- Type
- User manual
Ask a question and I''ll find the answer in the document
Finding information in a document is now easier with AI
in other languages
- français: Kenmore 587.14432 Manuel utilisateur
- español: Kenmore 587.14432 Manual de usuario
Related papers
-
Kenmore 587.1523 User manual
-
-
-
-
-
Sears Kenmore 587.1510 User guide
-
-
-
-
Other documents
-
Frigidaire 640 User manual
-
Aeg-Electrolux 18 inch built in and portable User manual
-
Frigidaire FFPD1821MB Installation guide
-
-
Whirlpool DP1040XTXB User manual
-
Maytag DP1040XTXB Installation Instructions Manual
-
-
Whirlpool WDP370PAHB Installation guide
-
-
Aeg-Electrolux 200 Series Owner's manual