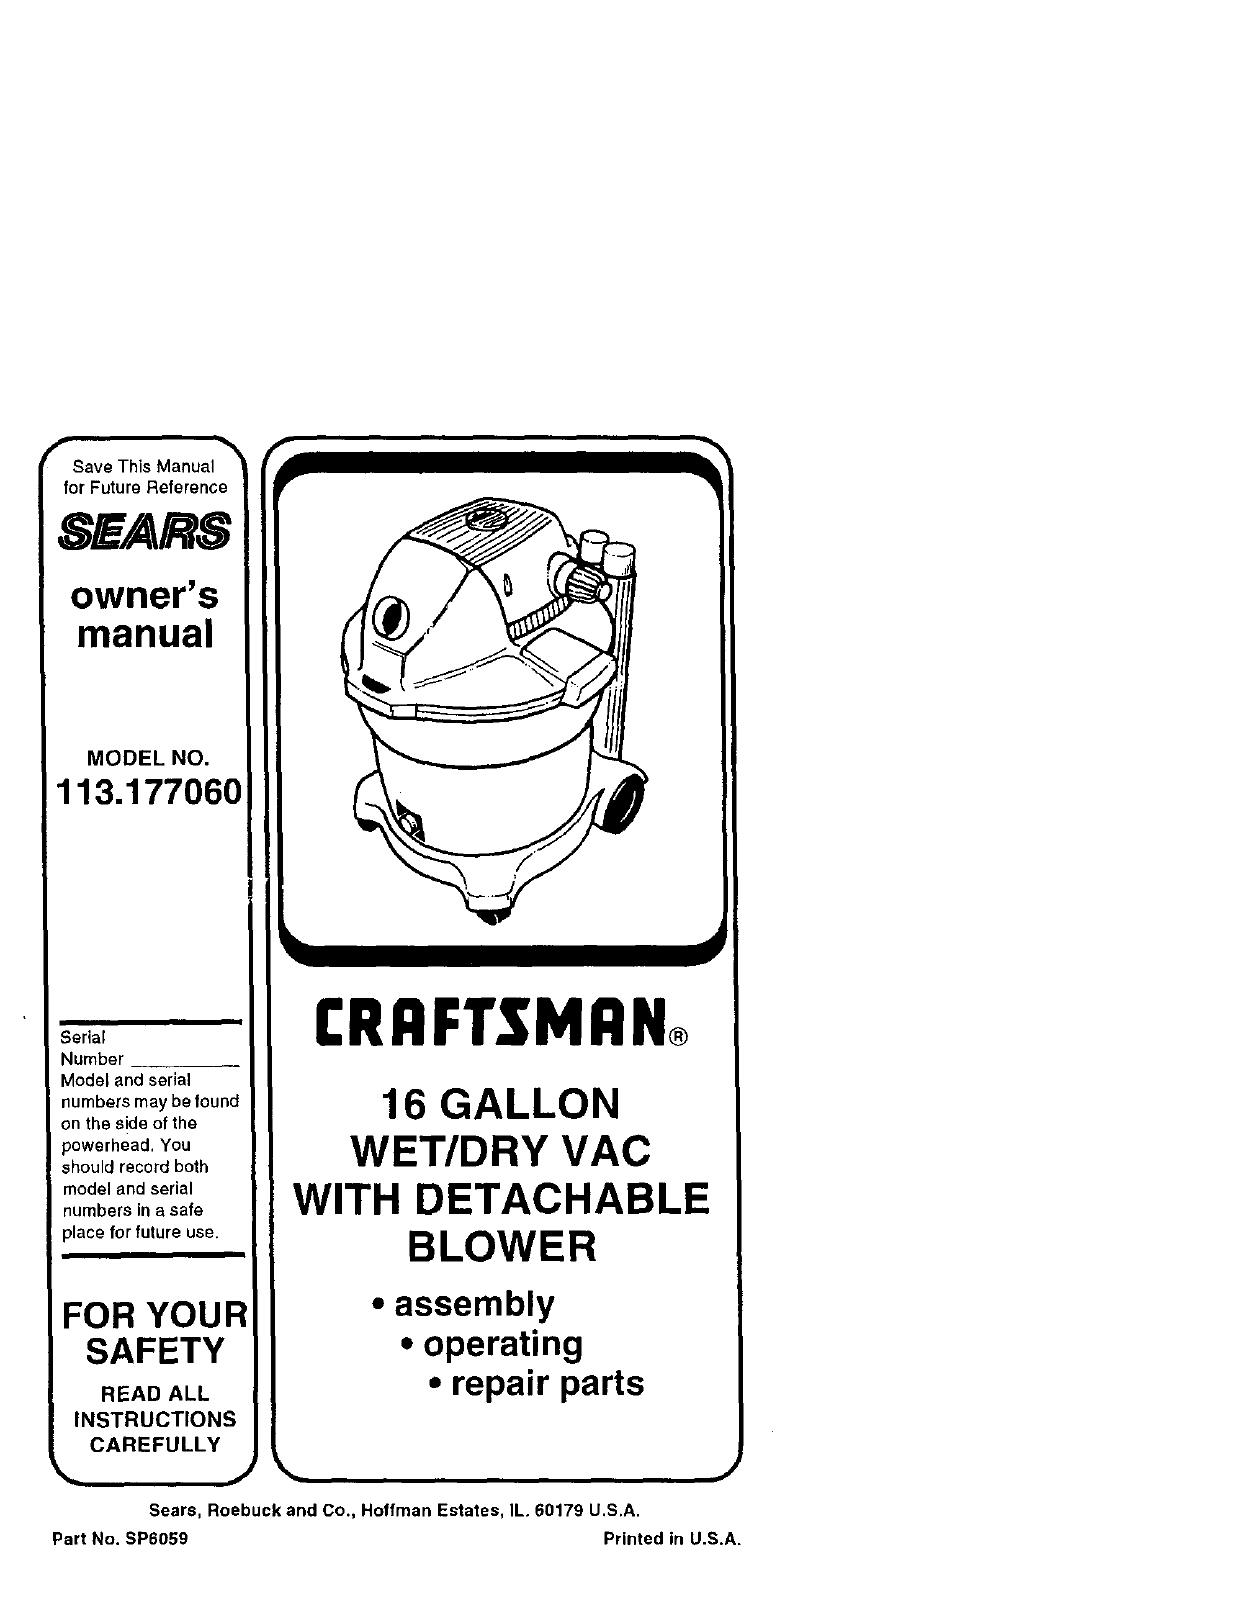
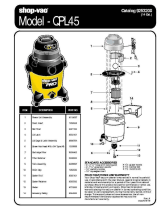
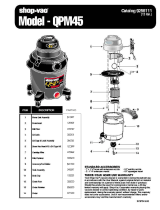
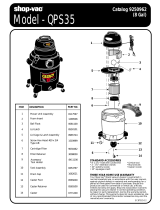
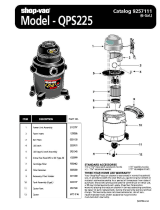
Craftsman 113177060 Owner's manual

Category
Vacuum cleaners
Type
Owner's manual
Save This Manual
for Future Reference
SEARS
owner's
manual
MODEL NO.
113.177060
Serial
',lumber
Model and serial
numbers may be found
on the side of the
powerhead, You
should record both
model and serial
numbers in a safe
place for future use.
FOR YOUR
SAFETY
READ ALL
INSTRUCTIONS
CAREFULLY
I:RRFTSMRN
16 GALLON
WET/DRY VAC
WITH DETACHABLE
BLOWER
assembly
operating
repair parts
Sears, Roebuck and Co., Hoffman Estates, IL. 60179 U.S.A.
Part No. SP6069 Printed in U.S.A.
FULL ONE YEAR WARRANTY
ON CRAFTSMAN WET/DRY VACS
If within one year from the date of purchase, this Craftsman Wet/Dry Vac tails
due to a defect in material or workmanship, Sears will repair it, free of
charge.
If this Craftsman Wet/Dry Vac is used for commercial or rental purposes,
this warranty coverage applies for only 90 days from date of purchase.
Warranty Service Is Available By Simply Contacting The Nearest Sears
Service Centerldepartment Throughout The United States.
This warranty applies only while this product is in the United States.
This warranty gives you specific legal rights, and you may also have
other rights which vary from state to state.
Sears, Roebuck and Co., DI817 WA, Hoffman Estates, IL 60179
IMPORTANT SAFETY INSTRUCTIONS
Safety is a combination of common
sense, staying alert and knowing how
your vac works. Read this manual to
understand the vac.
Safety Signal Words
DANGER: means if the safety information
is not followed someone will be seriously
injured or killed.
WARNING: means if the safety informa-
tion is not followed someone could be
seriously injured or killed.
CAUTION: means if the safety informa-
tion is not followed someone might be
injured.
When using your Wet/Dry Vac, follow
basic safety precautions including the fol-
lowing.
WARNING. Toreduce
the risk of fire, electric shock, or
injury:
Read and understand this owner's man-
ual and all labels on the Wet/Dry Vac
before operating Use only as described
in this manual. To avoid personal injury or
damage to Wet/Dry Vac, use only Sears
Craftsman recommended accessories.
Sparks inside the motor can ignite flam-
mable vapors or dusl. To avoid fire or
explosion:
Do not vacuum, or use this Wet/Dry
Vac near, flammable or combustible liq-
uids, gases, or explosive dusts like gas-
oline or other fuels, lighter fluid,
cleaners, oil- based paints, natural gas,
hydrogen, coal dust, magnesium dust,
grain dust, or gun powder.
Do not use Wet/D_/Vac as a sprayer
for any flammable or combustible liquid.
Do not vacuum anything that is burning or
smoking, such as cigarettes, matches, or
hot ashes.
Do not vacuum fireplace soot or ash. This
is avery fine dust which will not be cap-
tured by the filter and may cause damage.
To avoid health hazards from vapors or
dusts, do not vacuum toxic materials.
Do not useor store nearhazardous materials.
To avoid electric shock, do not expose to
rain. Store indoors.
Do not allow to be used as a toy. Close
attention is necessary when used by or
near children.
Do not use this Wet/Dry Vac with a torn
filter or without the filter installed except
for vacuuming liquids as described in the
operation section of this manual.
Do not leave Wet/Dry Vac when plugged
in. Unplug from outlet when not in use and
before sewicing. Turn olf Wet/Dry Vac
before unplugging.
Toavoidinjuryfromaccidentalstarting,
unplugpowercordbeforechangingor
cleaningfilter.
Donotunplugbypullingoncord.To
unplug,grasptheplug,notthecord.
Donotusewithdamagedcord,plugor
otherparts.IfyourWet/DryVacisnot
workingasitshould,hasmissingparts,
hasbeendropped,damaged,left out-
doors, or dropped into water, return it to a
Sears Service Center.
Do not pull or carry by cord, use cord as
handle, close a door on cord, or pull cord
around sharp edges or corners. Do not
run Wet/Dry Vac over cord. Keep cord
away from heated surfaces.
Do not handle plug or the Wet/Dry Vac
with wet hands.
Do not put any object into ventilation
openings. Do not vacuum with any venti-
lation openings blocked; keep free of
dust, lint, hair or anything that may reduce
air flow.
Keep hair, loose clothing, fingers, and all
parts of body away from openings and
moving parts.
To avoid falls, use extra care when clean-
ing on stairs.
This Wet/Dry Vac is double-insulated,
eliminating the need for a separate
grounding system. Use only identical
replacement parts. Read the instructions
for Servicing Double-Insulated Wet/Dry
Vacs before servicing.
Use this Wet/dry Detachable Blower Vac
as described in this manual.
When using as detached blower:
Turn unit off before setting on ground or
releasing grasp from handle.
Do not use on wet surfaces, electric
shock could occur.
• Direct air discharge only at work area.
• Do not direct air at bystanders.
• Keep children away when blowing.
• Do not use blower for any job except
blowing dirt and debris.
Observe the following warnings that
appear on the motor housing of your Wet/
Dry Vac.
'-_ OUBLE INSULATED
GROUNDINGNOTREQUIRED
WHEN SERVICING USEONLY
IDENTICALREPLACEMENTPARTS
WARNING: To avoid electric shock- i
do not expose to rain-store indoors.
I
WARNING: For your own safety,
read and understand owner's man-
ual. Do not pick up hot ashes, coals,
toxic, flammable or other hazardous
materials. Do not use around explo-
sive liquids or vapors. ..
SAVE THESE INSTRUCTIONS
The operation of any utility vac or blower
can result in foreign objects being blown
into the eyes, which can result in severe
eye damage. Always wear safety goggles
complying with ANSI Z87.1 (shown on
package) before commencing operation.
Safety Goggles are available at Sears
retail stores.
To avoid hearing damage, wear ear pro-
tectors when using the vac for extended
hours or when, using it in a noisy area.
For dust operations, wear dust mask.
Use only extension cords that are rated
for outdoor use. Extension cords in poor
condition or that are too small in wire size
can pose fire and shock hazards. When
using an extension cord, be sure it is in
good condition. Using any extension cord
will cause some loss of power. To keep
the loss to a minimum, use the following
table to choose the minimum wire size
_xtension cord.
Extension
Cord Length A.W.G.
0-50 Ft. 14
50-100 Ft. 12
Introduction
This Wet/Dry Vac is intended for house-
hold use only.
IMPORTANT NOTE
Please Read Carefully
StaticShocks Are Common - Indry
areasor when the relativehumidityofthe
air islow. To reducethe frequencyof
static shocks in your homethe best rem-
edyis to add moisturetothe airwith a
console humidilier.
Table of Contents
item Page
Warranty Information............................. 2
Safety Instructions ................................. 2
Introduction............................................ 4
Unpacking and Checking
Carton Contents ............................. 4
Assembly ............................................... 5
Operation ............................................. 10
Maintenance ........................................ 12
Repair Parts ........................................ 16
Unpacking and Checking Carton Contents ---
Remove entire contents ofcarton. Check
each item against the Carton Contents
List. Notify your Sears Store immediately
if any parts are damaged or missing.
Carton Contents List
Key Description ........................... Qty.
A 16 Gallon Wet/Dry Vac ............... 1
B Extension Wands ........................ 2
C Hose ........................................... 1
D Male-Male Adapter ...................... 1
E Male-Female Adapter ................. 1
F Utility Nozzle ............................... 1
G Blower Nozzle ............................. 1
H Car Nozzle .................................. t
J Wet Nozzle ................................. 1
K Diffuser ....................................... f
L Accessory Caddy ........................ 1
M Float ............................................ 1
__ o_)
N
0
P
Q
R
S
T
Filter Cage .................................. 1 u _
Filter (Red Stripe) ........................ 1 H _' t
Filter Plate ................................... 1
Filter Nut ..................................... 1
N
4
Float/Cage Assembly
WARNING: For your own safety,
never connect plug to power source
outlet until all assembly steps are
complete and you have read and
understood the safety and operation
instructions. Do not operate vac with
any parts damaged or missing.
1. Remove the detachable blower from
the power head assembly by unlatching
the power head latch under the carry
handle of the detachable blower. Set
the detachable blower off to the side.
2. Unlatch the drum latch holdingthe lid to
tile drum. Lift the lid off the drum. Place Drum
the lid assembly of the vac upside down Latch
into the drum or place upside down on
a clean smooth surface.
3. Locate the float. Place the float over the
opening in the center of the lid with the
words "This Side Towards Lid" laying
face down over the hole.
4. Line up filter cage tabs with the slots in
the center ring of the lid assembly.
Push on the filter cage until the tabs
snap into the slots for asecure fit.
NOTE: If filter cage needs to be removed,
because the float is placed in the wrong
way, use a slotted screwdriver and
insert the blade near one of the tabs
between the filter cage and the center
ring of the lid. Pry the tab out of the slot.
Tilt the cage and lift away from the lid.
To replace, follow float/cage assembly
instructions.
End
Detachable
Lid Asm.
Power Head Latch
Cage
mn End
Slots (3)
Filter Assembly
1. Carefully slide the filter over the tilter
cage, sliding itover the center ring cov-
ering the 3 slots until the tilter stops
against the lid.
2. Place the hole in the filter plate over
threaded screw of the fgter cage.
3, Gently push on the filter plate to seat
the rubber ring of the filter inside the cir-
cular channel of the tilter plate.
4. Place filter nut onto threaded screw and
tighten it down. Finger tighten only.
NOTE: Lever of tilter nut should be away
from plate as shown.
IMPORTANT: Do not overtighten as this
may deform or crack the tilter plate, filter
cage or the filter.
NOTE: Your filter has a red stripe that
matches an in-store displayer, When you
visit your local Sears store, just remember
the color of your stripe for the correct size
filter.
Filter
Stripe
Threaded "_ _,_,,,_
_l,Screw _ge
Accessory Caddy Assembly
Locate the two 5-1/4" wheel assemblies
and the two dual wheel casters in the car-
ton. The casters are designed to fit in the
front of your new accessory caddy and
the larger wheels fit the rear of the caddy.
To Install the Wheels/Casters
1.Place the accessory caddy upside
down on a flat surface as illustrated.
2. Insert the dual wheat casters into the
bottom of the accessory caddy as
shown (2 places).
3. Push on the caster until the flange on
the caster stem is inserted all the way
into the socket. You will be able to hear
the flange snap into the socket. The
caster will swivel easily when position-
ing is correct.
5-1/4" Wheel Assembly
Caster
Accessory Caddy
6
4.Positionthedovetailportionofoneof
thewheelassembliesintotheacces-
sorycaddyasillustrated.Tapthewheel
supportintotheaccessorycaddywitha
softmallet.Repeatforthesecond
wheelassembly.
5.Turntheaccessorycaddyupright.
Thiscompletestheassemblyofyour16
gallonweVdryvacaccessorycaddy.
Thecaddyisnowreadytoinstallthesix-
teengallondrumofyourCraftsmanwet/
dryvac.
To Install Your Vac Drum Onto
the Caddy
1. Place the caddy (now fully assembled)
inthe upright position (all four wheels
positioned on the floor).
2. Locate the drain on your wet/dry vac
drum. When the drum is positioned into
the vac caddy, the drain must be cen-
tered between the two front dual wheel
casters. There are two mounting posts
in the caddy that must press into the
mounting holes of the drum (see illus-
tration). When properly oriented, the
drum may be pressed down and a
small tab located in the caddy will snap
into the drum below the drain. Adistinct
snap will be heard indicating you have
completed the caddy assembly.
NOTE: Since your wet/dry vac caddy is
designed for permanent attachment to the
drum, it is not necessary to remove the
vac from the accessory caddy when dis-
posing of debris.
Drum
,,Drain
Mounting
Caddy ! II / Post
7
To Store Your Accessories
1.Your Sears Craftsman wet/dry vac is
designed to provide better stability,
mobility and accessory storage with the
addition of the caddy. Located at the
rear of the caddy are five storage pock-
ets. Wet/dry vac accessories may be
conveniently stored here while not in
use. The center storage pocket is spe-
cifically designed for the wet nozzle.
Vac Assembly
1.Locate the lid/float/cage and the drum/
caddy assemblies (assembled earlier).
2. Position the lid assembly with the inlet
of the unit located in line with the drain
plug on the dust drum,
3. To assemble the lid assembly to the
drum/caddy, position the lid retention
hinge to clasp the lip of the dust drum.
To ensure proper lid assembly onto the
drum/caddy assembly, angle the lid
assembly, with the drum latch up, at
45°
4. Pivot the lid assembly down until it rests
on the drum/caddy assembly,
5. Rotate the drum latch down until you
hear the latch snap over the lip of the
drum.
6.To check that the lid assembly is prop-
erly assembled to the drum/caddy, try
to lift up on the area of the lid above the
lid retention hinge. If the lid assembly
and drum/caddy assembly do not sepa-
rate with the drum latch latched, the
assembly is correct. If the assemblies
do separate, unlatch the drum latch and
try to assemble it again making sure the
lid retention hinge is located under the
lip of the dust drum.
NOTE: For best appearance of the unit,
the inlet of the vac should be located
above the drain plug.
Drain
Lid
Retention
Hinge
Lid
Retention
Hinge
8
Positioning Detachable Blower (Power Head Assembly)
1, Locate the Detachable blower o! your
Sears Craftsman vac. The top of the
detachable blower has two hinges. To
assemble the detachable blower to the
lid assembly, the two hinges need to
rest in the two hinge recesses in the lid
assembly above the Inlet port of the
vac.
2, Tilt the detachable blower up 45° and
nest the hinges into the hinge recesses
in the lid assembly.
3. Rotate the detachable blower down
45°
\
Hinge
until the downward travel stops.
4. With your right hand, place your thumb
on top of the detachable blower handle.
5.Applying pressure downward on the
handle of the blower, with your thumb;
use your fingers to lift the power head
latch.
6. Lift until the power head latch snaps
into place. This will latch your detach-
able blower to the lid assembly.
Your new wet/dry vac is ready for use.
With the wet/dry vac completely assem-
bled and ready for use. insert the soft end
of the 2-1/2" x 7' hose into the inlet of the
vac and connect the extension wands and
preferred nozzle.
NOTE: A 45" male-female adapter is
included with your wet/dry vac and may
be used to help prevent the hose from
deforming. Insert the male end of the
adapter into the inlet and connect soft end
of the hose into the female end of the
adapter and complete the assembly as
instructed above.
._rHead
Latch
Adapter
Operation
WARNING
To avoid fire or explosion, do not operate this vac in areas with flammable
gases or flammable vapors such as lighter fluid, cleaners, oil*base paints,
gasoline, alcohol or explosive dust such as coal, magnesium, grain or gun
powder in the air. Do not vacuum explosive dust, flammable or combustible
liquids or hot ashes. Do not use this vac as a sprayer for any flammable or
combustible liquid. To avoid health hazards from vapors or dusts, do not vac-
uum toxic materials. To avoid electrical shock do not expose to rain. Store vac
indoors. Unplug power cord before changing or cleaning filter or emptying the
dust drum.
CAUTION: To reduce the risk of
hearing damage wear ear protectors
when using the vac or blower for
eXtended hours or when using it in a
noisy area. The operation of any util-
ity vac or blower can result in for-
eign objects being blown into the
eyes, which can result in severe eye
damage. Always wear safety goggles
complying with ANSi Z87.1 (shown
on Package) before commencing
operation. Safety Goggles are avail-
able at Sears retail stores.
To reduce the risk of electric shock, this
appliance has a polarized plug (one blade
iswider than the other). This plug will fit in
a polarized ouget only one way. If the plug
does not fit fully in the outlet, reverse the
plug If it still does not fit, contact a quali-
fied electrician to install the proper outlet.
Do not change the plug in any way.
NOTE: When using the unit in the vacu-
uming mode, always insertthe air diffuser
in the exhaust port on the detachable
blower. This breaks up the direct flow of
air and diffuses it.
Vacuuming Dry Materials
1.The filter must be in correct positLon at
all times to avoid leaks and possible
damage to vac.
2.When using your vac to pick up very
fine dust, it will be necessary for you to
empty the drum and clean the filter at
more frequent intervals to maintain
peak vac performance.
NOTE: A dry filter is necessary to pick up
dry material. If you use your vac to pick up
dust when the filter is wet, the filter will
clog quickly and be very difficult to clean.
3. If your filter is wet but you need to use
the vac to pick up dry material, you can
quickly d.ry the filter by running the vac
without hose attached for about 10 min-
utes. The clean air rushing through the
vac will help dry the filter.
Vacuuming Liquids
1.When picking up small amounts of Liq-
uid the filter may be left in place.
2. When picking up large amounts of liq-
uid we recommend that the filter be
removed, if the filter is not removed, it
will become saturated and misting may
appear in the exhaust.
CAUTION: Do not remove the filter
cage or float. It is there to shut off air-
f ow when the drum is fu of cluds.
3. After using the vac to pick up ]]quids,
the filter must be dried to avoid possible
mildew and damage to the filter.
4.When the liquid in the drum reaches a
predetermined level, the float mecha-
nism will rise automatically to cut off air-
flow. When this happens, turn off the
vac, unplug the power cord, and empty
the drum. You will know that the float
has risen because vac aidlow ceases
and the motor noise will become higher
in pitch, due to increased motor speed.
IMPORTANT: To avoid damage to the
vac do not run motorwith float in raised
position.
t0
Emptying Dust Drum
WARNING: To avoid injury from I
accidental starting, unplug power
I
cord before emptying the drum.
I. To remove the lid to empty contents of
the dust drum, simply liftthe drum latch
holding the lid to the drum/caddy
assembly and lift the lid assembly up
and off the drum. NOTE: Do not pick up
the lid assembly by lifting on the handle
to the detachable blower. Lift the lid
assembly by the Lid.This will ensure
that the detachable blower and the lid
will not separate during removal of the
lid assembly.
2. Lay the lid assembly upside down on a
clean dry area while emptying the drum
or changing the filter.
3. Dump the drum contents intothe proper
waste disposal container.
Drum
Latch
4. If the contents Lsliquid, you may dis-
pose by using the drain provided in the
drum for easy emptying. Simply
unscrew the drain cap and tilt the drum
in a manner so the liquid flows out the
drain hole.
WARNING: avoid injury or
To back
fails, do not lift a vac heavy with liq-
uid or debris. Scoop or drain enough
contents out to make the vac light
enough to lift comfortably,
Cord Wrap
When vacuuming is complete, unplugthe
cord and wrap it around the detachable
blower and upper lid assembly.
Moving the Vac
Should it become necessary to pick the
vac up to move it, the handles may be
used on the sides of the dust drum. Do
not use the handle located on the detach-
able blower to pick up the entire wet/dry
vac or the lid assembly.
Handle
\
Handle
11
Operation (continued)
Blowing Feature
Your wet/dry vac features a "detachable
blower". It has the capability to be used as
a dedicated blower for yard work, patio
cleanup and workshop applications to
blow sawdust and other debris.
CAUTION: To reduce the risk of
hearing damage wear ear protectors
when using the vac/blower for
extended hours or when using it in a
noisy area.
WARNING: To avoid injury to
bystanders, keep them clear of blow-
ing debris.
1. Familiarize yourself with the detachable
blower portion of your wet/dry vac.
2, Removethe detachable blowerofyour vac
by pressingdown on the latch underthe
handleofthe detachable blower.This latch
holdsthe detachable blowerto the lid
assembly.
3. Lift the detachable blower up by raising
the handle upward and pulling the unit
away from the nested posi'Jon of the
hinges.
Assemble the Detachable
Blower for "Blowing".
This may be assembled two ways,
1. fnsert the small end o! one of the exten-
sion wands into the blowing port of the
detachable blower. Insert the male-
male adapter into the extension wand
and install the blower nozzle onto the
male-male adapter.
WARNING: Always wear safety gog- I
gles complying with ANSI Z87.1
I
when us ng as a blower.
Goggles
t Mask
Blowing Port
Extension
Wand
Male/Male
} Adapter Blower
Nozzle
WARNING: Wear a dust mask if
blowing creates dust which might be
nha ed.
-OR-
2. Insert the male-male adapter intothe
blowing portof the detachable blower.
Connect the large end of the extension
wand to the male-male adapter. Con-
nectthe blower nozzle to the extension
wand.
3. Turn the blower "ON" by toggling the
switch in the handle ofthe blower tothe
"ON" position.
I
Maintenance
Blower Intake
WARNING: To avoid injury from acci-
dental starting, unplug power cord
before changing or cleaning filter.
After using the detachable blower of your
wet/dry vac, examine the bottom of the
blower for dust and debris. Check to see if
the intake to the blower has debris stuck
to the plastic vents and foam pad
"_____. _ Foam Pad
_'_--- Intake Shield
Screws (3)
12
To clean the foam pad under the intake
shield of the detachable blower:
t. Remove the three screws holding the
intake shield.
2. Lift the intake shield off and set aside.
3. Lift the foam pad off and clean in warm
soapy water or brush debris away.
Allow foam pad to dry before replacing.
4. Examine foam pad for reuse. If you
need to replace it, check the service
part section ol this manual
S.Re-install foam pad into the blower,
6. Reinstall intake shield and 3 screws.
The unit is ready for use.
Cleaning Vac Filter
Your filter should be cleaned often to
maintain peak vae 9edormance.
Be sure to dry the filter before storing or
picking up dry debris.
IMPORTANT: After cleaning, check the
filter for tears or smelt holes. Do not use a
filter with holes or tears in it. Even a small
hole can cause a lot of dust to come out of
your vac. Replace it immediately.
NOTE: This filter is made of high quality
paper designed to stop very small parti-
cles of dust. The filter can be used for wet
or drypick up. Handle the filter carefully
when removing to clean or installing it.
Creases in the filter pleats may occur
from installation but creases will not affect
the performance of the filter.
Removal
To remove the filter for cleaning or
replacement, remove filter nut from the
screw on the filter cage, remove tilter
plate and lift off filter.
IMPORTANT: To avoid damage to the
blower wheel and motor, always reinstall
the filter before using the va¢ for dry
matedat pickup,
CAUTION: Do not remove the filter
cage or float. It is there to shut off air-
flow when the drum s full of liquids.
Dry Filter
1. Some removal of dry debris can be
accomplished without removing the filter
from the vac by slapping your hand on
top of the lid while the vac is turned off.
2. For best results of cleaning due to
accumulated dust, clean the filter in an
open area. Cleaning SHOULD be done
outdoors and not in the living quarters.
3,After filter removal from vac, remove the
dry debris by gentlytapping the filter
against the inside wall of your dust drum
andthe debris will loosen and fall.
4,For thorough cleaning of dry tilterwith fine
dust (nodebris) you may run water
through it as described under 'Wet Flits('.
Wet Filter
After filter isremoved, run water through
the filterfrom a hose or spigot. Take care
that water pressure from the hose is not
strong enough to damage filter. Remem-
ber: To dry afilter quickly, reinstall the fil-
ter on the vac and allow the unit to run for
approximately 10 minutes. The clean air
rushingthrough thefilterwil_dryit.
Installation
Refer to "Filter Assembly".
Allowthe tilter to dry _efore reinstalling
and storing the vac.
Wet/Dry Vac
To keep yourWet/Dry Vac lookingits
best, clean the outside with a cloth damp-
ened with warm water and mild soap.
To clean the drum:
1. Dump debris out.
2. Wash drum thoroughly.
I WARNING: To assure product
SAFETY and RELIABILITY, repairs
and adjustment should be performed
by Sears Service Centers, always
using Sears replacement parts.
3. Wipe out with dry cloth.
13
Wet Nozzle
To pick up liquids off a smooth surface,
use the 2-1/2" wet nozzle accessory sup-
plied with your wet/dry vac. To use this
nozzle, simply attach the nozzle to the
end of an extension wand.
Connect a second extension wand to the
first, and connect the 2-1/2" x 7' hose to
the extension wand.
Liquids may be picked up by dragging the
nozzle across the sudace. The squeegee
will dry the surface as you vacuum.
Replacement rubber for the squeegee
nozzle may be obtained through Sears
Parls. Ifthe rubber becomes worn, it may
be flipped over for use on the opposite
side or replaced. (Replacement service
part #822256). To reverse or replace the
squeegee:
1.Lay the wet nozzle on a flat surface with
the round inlet opening facing up and
the two latches close to you as shown.
Latches
Nozzle
;ody
Removable
Insert
2, Using both hands, position each thumb
on the removable insert, (below the
latches) and two fingers of each hand
on each latch, liftand disengage the
two latches from the tabs on the nozzle
body,
3. Gently pull the latches toward yourself
to remove the insert.
To reinstall the removable Insert correctly,
fonow these steps:
1.Place the removable insert on a flat sur-
face with the pins positioned upward
and the _atches c_oseto you as shown.
Place the rubber squeegee on the
insert, with the pins fitting through the
matching hoJes in the squeegee. (Make
sure the new working edge is located
farthest from you,)
2. Using both hands, lower the nozzle
body onto the insert and squeegee with
the round opening of the nozzle closest
to you. With fingers on the far side and
thumbs holdingthe latches of the
removable insert, flip the nozzle over so
the latches are on the top and the round
inlet opening is facing away from you.
Make sure the squeegee stays on the
insert pins.
3. Press down with each thumb below the
latching tabs until you see and hear the
removable insert snap into the nozzle
body. Snap the latches over the locking
tabs into their original position.
4. Inspect the pins of the insert to make
sure they fit through the holes of the
squeegee and fit into the matching slots
in the nozzle body.
NOTE: Ifthe pins are out position, hold
the nozzle assembly with both hands
and gently twist in opposite directions.
The insert pins should snap into proper
position.
Twist Twist
Backward Forward
The wet nozzle assembly is ready for wet
pickup use.
14
No tes
15
Repair Parts
16 Gallon Wet/Dry Vac With Detachable Blower
Model Number 113.177060
Always order by Part Number - Not by Key Number
WARNING
SERVICING OF DOUBLE-INSULATED WET/DRY VAC
In a double-insulated Wet/Dry Vac, two systems of insulation are provided
instead of grounding. No grounding means is provided on a double-insulated
appliance, nor should a means for grounding be added. Servicing a double-insu-
lated Wet/Dry Vac requires extreme care and knowledge of the system, and
should be done only by qualified service personnel. Replacement parts for a
double-insulated Wet/Dry Vac must be identical to the parts they replace. Your
double-insulated Wet/Dry Vac is marked with the words "DOUBLE INSULATED"
and the symbol [_'](square within a square) may also be marked on the appli-
ance,
Key
No. Part No.
1
2
3
4
5
6
7
8
9
10
11
12
13
14
15
16
17
19-17816
;9-16937
9-16938
509182
73185
822479
822478
822481
509238
622473
822475
822476
822442
STD611007
822459
822457
622467-1
Description
tFilter (red stripe)
"FilterPlate
tFilter Nut
Drum
Drain Cap
Wheel Assembly
Accessory Caddy
Twin Wheel Caster
Filter Cage/Float
Lid
Drum Latch
Power Head Latch
Lid Gasket
'Screw Pan Hd. Ty
AB #10 x 3/4
Intake Shield/Lid
(Includes Key
Nos 14 & 16)
Foam Pad
Cord w/Plug
Key
No.
18
19
20
21
22
23
24
25
26
27
28
29
30
31
Part No.
823871
73352
15534-1
816413
818961
822459
822460
!822480
822482
B22471
820563-7
STD610805
9-17820
824406
SP6059
Description
Sw_ch
Nut-HexFlange1/4-20
Washer
Blower Wheel
Spacer
Collector Gasket
Motor/Collector
(Includes Key Nos.
19, thru 22)
Blowing Diffuser
Male-Male Adapter
Motor Cover
Screw-Pan Ser. Hd.
Ty AB #10 x 3/4
"Screw-Pan Hd.
Ty "B" #8 x 1/2
-Hose 2 1/2" x 7'
Adapter Male/Female
Owners Manual
(Not illustrated)
1 Stock Item - May be secured through the hardware department of most Sears retail
stores.
Standard Hardware Item - May be purchased locally
16
Repair Parts
16
17
£RRFTSMRN®
Accessories and Attachments
Get more versatility fromyour Craftsman wet/dry vacuum by adding these accesso-
ries.
Additional wet/dry vac accessories may be purchased at your local Sears retail store
or Sears/Craftsman Power and Hand Tool Catalog.
17820 2-1/2"x7' Hose 16964 Extension Wands
16931116990 Caster
Feet for Storage
16922 Utility Nozzle 17817 Wet Nozzle 16925 Dry Nozzle
16978 Car Nozzle 16933 Blower Nozzle 16902 Crevice Tool
16915 Multipurpose
Floor Tool
16947, 16948
Inflator Nozzle
16926 14" Floor 16901 Dusting
Brush Brush
17916 Paper Pleated 16939 & 16940
Filter Drum Liners
NOTE: Most Accessories Are Available In 2-1/2 Inch And 1-1/4 Inch Sizes
18
16934 Hose Grip
16917 HoseJoiner 16930 Hose Lock 16936 Gutter Nozzle
Sawdust Collection Series
Whole-shop Sawdust Manifold-Type Collection System
29964
Radial Arm Saw
Dust Collection Kit
29963
Table Saw Dust
Collection Kit
29962
19
Forthe repair or replacementparts youneed
Call 7 am - 7 prn, 7 daysa week
1-800-366-PART
(1 8go 366 7278)
Forin-h0memajorbrandrepair service
Call 24 hours aday,7 days a week
1-800-4-REPAIR
(1-800-473-7247)
Forthe locationof a
SearsRepairService Centerin yourarea
Call 24 hours a day,7 days aweek
1-800-488-1222
Forinformation on purchasinga Sears
MaintenanceAgreementor to inquire
aboutanexistingAgreement
Call 9 am - 5 prn, Monday-Saturday
1-800-827-6655
SEARS
America's Re oat( $pe_:iafists
The model number will be found on the side of the power head.
When requesting service or ordering paris, always provide the following
information:
Product Type
Part Number
Model Number
Part Description
Sears, Roebuck and Co., Hoffman Estates, IL. 60179 U.S.A.
Part No. SP6059 Form No. SP6069 Printed in U.S.A. 6/97
  • Page 1 1
  • Page 2 2
  • Page 3 3
  • Page 4 4
  • Page 5 5
  • Page 6 6
  • Page 7 7
  • Page 8 8
  • Page 9 9
  • Page 10 10
  • Page 11 11
  • Page 12 12
  • Page 13 13
  • Page 14 14
  • Page 15 15
  • Page 16 16
  • Page 17 17
  • Page 18 18
  • Page 19 19
  • Page 20 20

Craftsman 113177060 Owner's manual

Category
Vacuum cleaners
Type
Owner's manual

Ask a question and I''ll find the answer in the document

Finding information in a document is now easier with AI