
II
loss) arising out of the use of or the results of use of or inability to use such
product, even if Argox Information Co., Ltd. has been advised of the possibility of
such damages.
CAUTION:
Any changes or modifications not expressly approved by the party responsible
for compliance could void the user's authority to operate the equipment.
Safety
INDUSTRY CANADA NOTICE:
This device complies with Industry Canada ICES-003 class A requirements.
Cet equipement est conforme a ICES-003 classe A de la norm Industrielle
Canadian.
Supplemental Information: This device complies with the
requirement of FCC Part 15 Rules. Operation is subject to the
following two Conditions: (1) This device may not cause harmful
interference, and (2) this device must accept any interference
received, including interference that may cause un
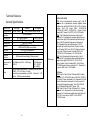
Please only use adapters with the following electrical characteristics and
are certified by current legislation. Using other adapters may damage the
device and void the warranty also cause risks to the user.
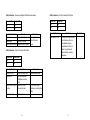
Features Output: 24VDC, 2.4A
The manufacturer declares under sole responsibility that this product
conforms to the following standards or other normative documents:
EMC: EN 55022:2006+A1:2007, class A
EN 55024:1998+A1:2001+A2:2003
Argox Information Co., Ltd certifies that the following products and/or
components are compliant with the current requirements of the European
Union Restriction on the use of Hazardous Substances (RoHS) Directive,
2002/95/EC.
III
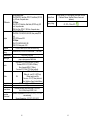
Table of Contents
Safety .................................................................................... II
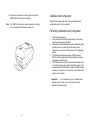
Getting Started ..................................................................5
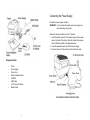
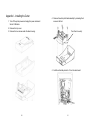
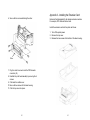
Unpacking .............................................................................. 5
Package Contents................................................................ 6
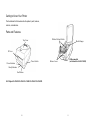
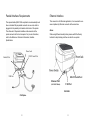
Connecting the Power Supply ................................................. 7
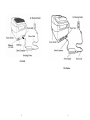
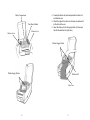
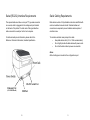
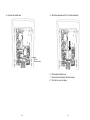
Getting to Know Your Printer .........................................10
Parts and Features ................................................................. 10
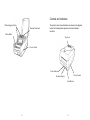
Controls and Indicators......................................................... 13
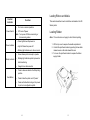
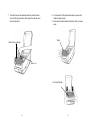
Loading Ribbon and Media ............................................15
Loading Ribbon .................................................................... 15
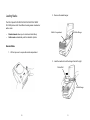
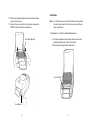
Loading Media...................................................................... 20
Standard Mode.................................................................. 20
Cutter Mode...................................................................... 25
Calibration and Configuration........................................27
Performing Calibration and Configuration ............................ 27
Resetting to Factory Default Settings .................................... 28
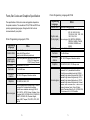
Computer Connections...................................................29
USB Interface Requirements................................................. 29
Serial (RS-232) Interface Requirements ................................ 30
Serial Cabling Requirements................................................. 31
Parallel Interface Requirements ............................................ 32
Ethernet Interface.................................................................. 33
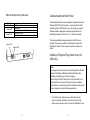
Communicating with the Printer ....................................35
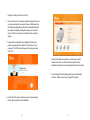
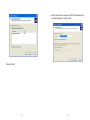
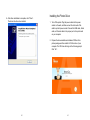
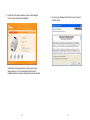
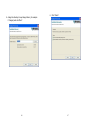
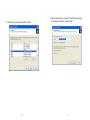
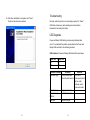
Installing a Plug and Play printer driver (for USB only) ........ 35
Installing the Printer Driver................................................... 43
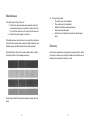
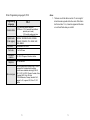
Troubleshooting ..............................................................55
LED Diagnosis ..................................................................... 55
Miscellaneous....................................................................... 58
Recovery .............................................................................. 59
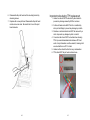
Caring for Your Printer....................................................60
Cleaning ............................................................................... 60


 1
1
 2
2
 3
3
 4
4
 5
5
 6
6
 7
7
 8
8
 9
9
 10
10
 11
11
 12
12
 13
13
 14
14
 15
15
 16
16
 17
17
 18
18
 19
19
 20
20
 21
21
 22
22
 23
23
 24
24
 25
25
 26
26
 27
27
 28
28
 29
29
 30
30
 31
31
 32
32
 33
33
 34
34
 35
35
 36
36
 37
37
 38
38
 39
39
 40
40
 41
41
 42
42
 43
43


RFI Emission OS-214 plus User manual
Argox Smart-E CP-2140E User manual
Argox F series User manual
Argox Smart-E CP-2140E User manual
Argox A-2240ZE User manual
 RFI Emission OS-204 User manual
Argox CP-2240Z User manual
Argox A-3140 User manual

Phonix GLOVERBS Datasheet
Equip 128548 Datasheet
MUNBYN MU-ITPP941-US User manual
Integral PEN-USB2.0-16GB-COU Datasheet
 Meihengtong Label Printer - High Speed Direct Thermal Desktop Printer for Labels, Barcodes, Tags - Compatible User manual
 StarTech.com C36PSM Datasheet
SYBA SD-USB-P Datasheet

