USVD-4X

EMX USVD-4X User manual

  • Hello! I'm a chat assistant that has analyzed the provided instruction manual for the EMX USVD-4X Ultrasonic Vehicle Detector. This document outlines the device's capabilities, including its ultrasonic detection technology, adjustable sensitivity, and various relay configurations. I am ready to answer your questions about the USVD-4X and its features.
  • What is the operating range of the USVD-4X?
    Does the USVD-4X require an induction loop for installation?
    What is the relay contact rating?
    What happens if a transducer is blocked?
1/3
USVD-4X
Ultrasonic Vehicle Detector
Instruction Manual
The USVD-4X uses ultrasonic to reliably detect the presence of a vehicle in a wide variety of drive-thru
applications including parking, access control, car wash, banking and fast food. The USVD-4X does not
require the installation of an induction loop. It is simply mounted on a post and aimed at the desired
location of detection. No additional set-up or functional adjustments are needed. The detection head
consists of 4 ultrasonic transducers that scan the expected location for a vehicle and activates an output.
Cautions and Warnings
This product is an accessory or part of a system. Install the USVD-4X according to
instructions from the gate or door operator manufacturer. Comply with all applicable
codes and safety regulations.
USVD-4X Ultrasonic vehicle detector, includes cable grip
Specifications
Power
12-24 VDC/AC
Standby Current
60 mA
Operating Range
1- 5 ft
Response Time
2.0 seconds
Relay Output Configuration
Form C (2 SPDT)
Relay Contact Rating
1A @ 24VDC
Operating Temperature
-40º to 182ºF (-40º to 85ºC)
Housing Material
ABS plastic
Dimensions (L x W x H)
3.6” (90 mm) x 2.3” (57 mm) x 5.7” (145 mm)
Ordering Information
2/3
Connections & Wiring
1. Transducer Status LEDs
Individual transducer status LEDs
flash when an echo from a surface is
present 1-5 feet in front of the sensor.
2. Tuning Coils
Do not adjust for any reason.
This will permanently damage the unit.
3. DIP Switch
Relay 1 & Relay 2
Delay
DIP Switch
4
3
No Delay
off
off
1 Second Delay
off
on
2 Second Delay
on
off
4 Second Delay
on
on
Relay 2
Pulse/Presence
DIP Switch
2
1
Presence
off
off
Pulse on Entry
off
on
Pulse on Exit
on
off
Pulse on Both
on
on
4. Sensitivity Adjustment
The sensitivity adjustment may be used to change the strength of the ultrasonic signal to increase or
decrease the detection response. The factory setting is fully clockwise for maximum sensitivity.
5. System Status LED
Flashes green when powered on. Solid green when detecting an object.
6. Terminal Block
*The solid-state fail output is activated when a solid object, such as ice,
is present preventing 1 or more transducers from vibrating.
Terminal
1
2
3
4
5
6
7
8
9
10
3/3
1. Knock out the PG hole that will be used to pass the wires through.
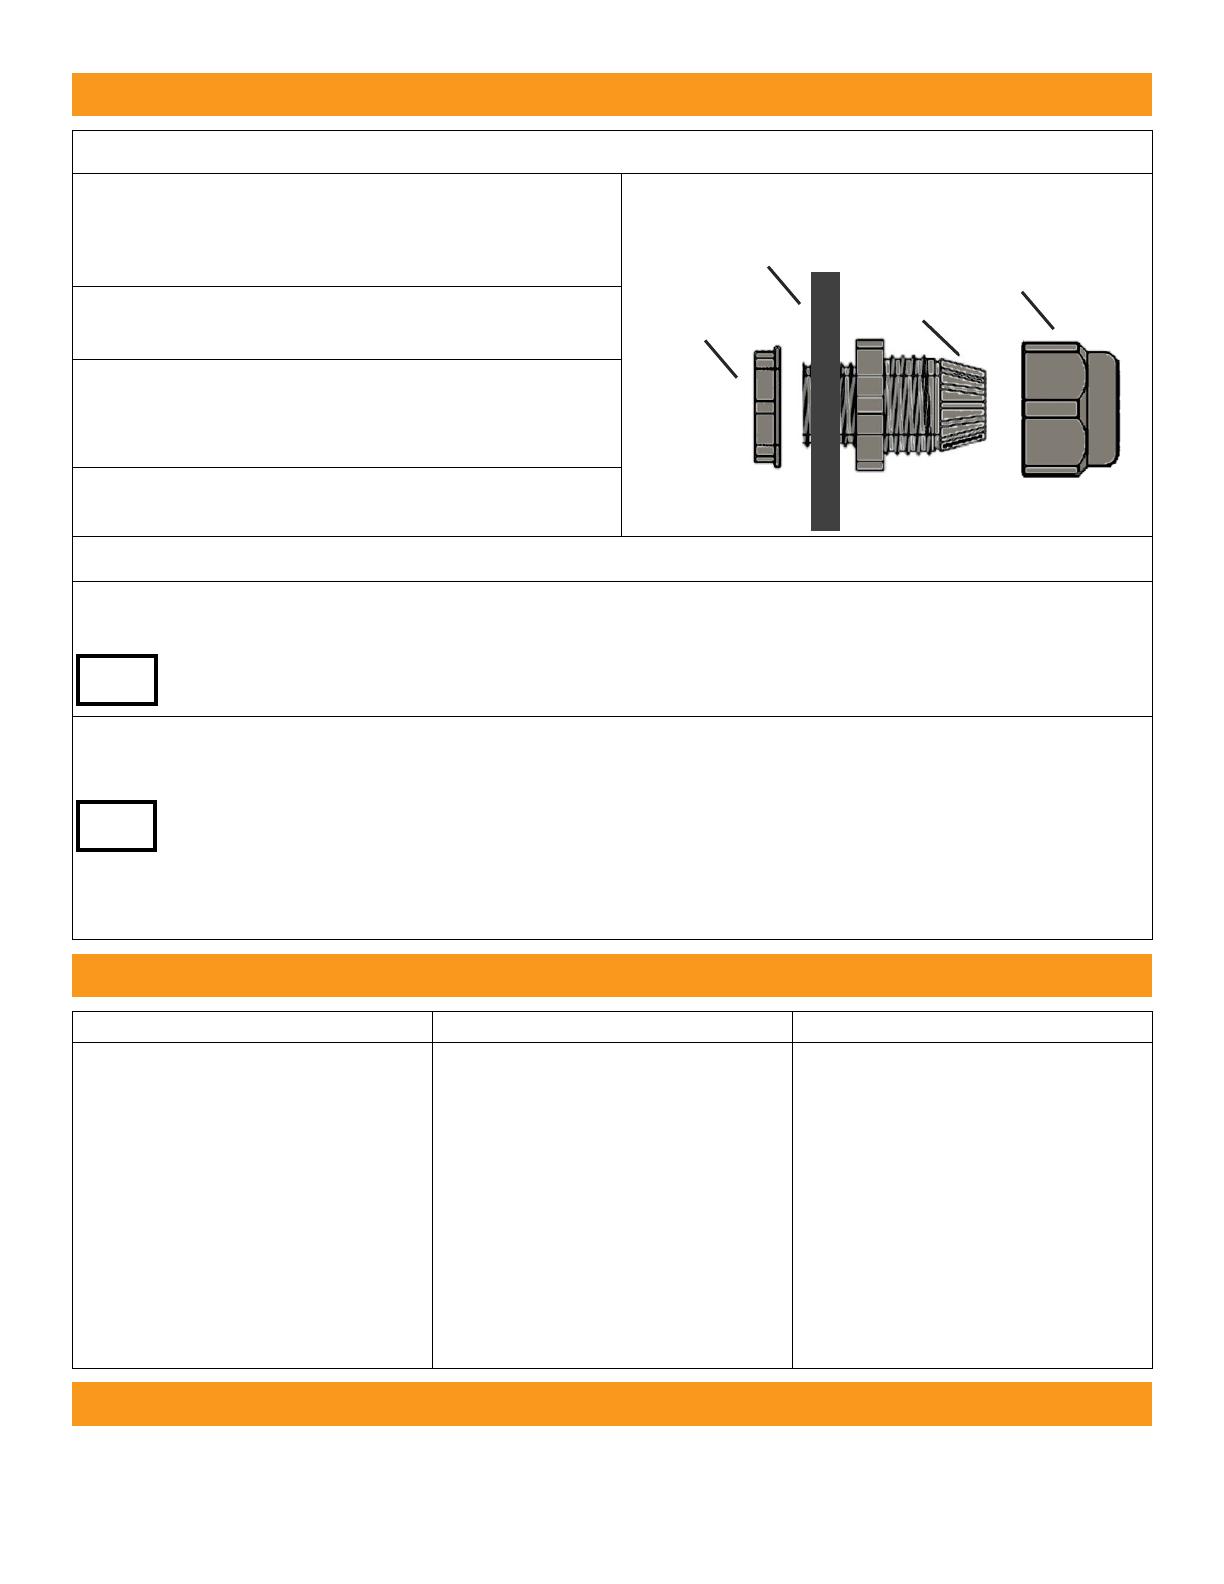
2. Pass the body of the cable grip through the
PG hole and tighten the backing to attach the
cable grip to the housing.
Cable Grip
3. Thread all wires through the cable grip and
into the housing.
4. Turn off the power supply when connecting
the USVD-4X power wires to the terminal
block. The terminals are not polarity sensitive.
5. Wire the USVD-4X according to the operator
instructions and the terminal block table.
6. Configure the DIP switch to the pulse/presence and delay mode desired.
7. Mount the USVD-4X perpendicular to the side of the vehicle at the location of desired detection
and 22-24” above the height of the pavement surface where the vehicle is located.
If using multiple USVD-4Xs it may be necessary to place a barrier up to 24x24” between the
sensors to prevent units from interacting.
8. Adjust the sensitivity by rotating the sensitivity adjustment clockwise to decrease and
counterclockwise to increase (#4 in image on previous page).
In most applications it is unnecessary to reduce sensitivity.
If using multiple USVD-4Xs, it may be useful to reduce the sensitivity to reduce crosstalk.
Two test points to the right of the sensitivity adjustment labeled GND and SENS may be
used to measure the position of the sensitivity adjustment. 5V is the maximum sensitivity.
Troubleshooting
Symptom
Cause
Solution
Constant detection
Solid material blocking
transducer
Increase the angle of the
housing to avoid detection of the
ground or other low objects.
Turn down the sensitivity by 1V
by rotating the sensitivity
adjustment counterclockwise.
Attach a multimeter to the GND
and SENS pins to the right of the
sensitivity adjustment to read
the change in voltage.
Warranty
EMX Industries, Inc. products have a warranty against defects in materials and workmanship for a period
of two years from date of sale to our customer.
Installation
TIP:
TIP:
USVD-4X Housing
Backing
Sealing Nut
Body
/