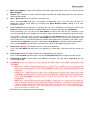
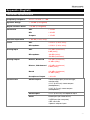
Numark NH09 is a versatile 5-inch active studio monitor that delivers accurate audio and impressive volume. Whether you're a musician, producer, or content creator, NH09 provides crystal-clear sound reproduction and a wide frequency response for monitoring your mixes, editing podcasts, or enjoying your favorite music.
Numark NH09 is a versatile 5-inch active studio monitor that delivers accurate audio and impressive volume. Whether you're a musician, producer, or content creator, NH09 provides crystal-clear sound reproduction and a wide frequency response for monitoring your mixes, editing podcasts, or enjoying your favorite music.


-
 1
1
-
 2
2
-
 3
3
-
 4
4
-
 5
5
-
 6
6
-
 7
7
-
 8
8
-
 9
9
-
 10
10
-
 11
11


Numark NH09 is a versatile 5-inch active studio monitor that delivers accurate audio and impressive volume. Whether you're a musician, producer, or content creator, NH09 provides crystal-clear sound reproduction and a wide frequency response for monitoring your mixes, editing podcasts, or enjoying your favorite music.
Ask a question and I''ll find the answer in the document
Finding information in a document is now easier with AI
Related papers
-
Numark NS7III Quick start guide
-
Numark NS6II Quick start guide
-
Numark Mixtrack Platinum FX User manual
-
-
Numark Scratch User manual
-
-
Numark NVII Quick start guide
-
-
-
Numark NV User manual
Other documents
-
Denon DJ Prime 4 White Edition User manual
-
Denon Prime 2 User manual
-
Denon DJ MCX8000 User manual
-
Denon DJ Prime GO Quick start guide
-
Denon DJ Prime 2 Quick start guide
-
Denon DJ SC6000M User guide
-
Denon MC 7000 DJ Owner's manual
-
Novation Twitch User manual
-
Pioneer OPUS-QUAD Owner's manual
-
Numark Industries DM1235 User manual