
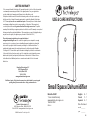
E-1
Model No. DH201
1-Year Limited Warranty
www.guardiantechnologies.com
1.866.603.5900
REV0816
USE & CARE INSTRUCTIONS
English E - 1
French F - 1
Spanish S - 1
Date Purchased
month ________
year ________
©2016 Guardian Technologies LLC
Guardian Technologies LLC
26251 Bluestone Blvd. • Euclid, OH 44132
1.866.603.5900 • www.guardiantechnologies.com
LIMITED WARRANTY
To the consumer, Guardian Technologies LLC warrants this product to be free of defects in materials
or workmanship commencing upon the date of the original purchase. Save your original sales
receipt to validate start of warranty period. W arranty is not valid without receipt.
If this product should become defective within the warranty period, we will repair or replace any
defective parts free of charge. All warranty repairs must be completed by Guardian Technologies
LLC. This warranty does not cover unauthorized repairs. The warranty does not include unusual
wear, damage resulting from accident, or unreasonable use of the product. This warranty only
covers the product when used with genuine Guardian Technologies accessories. The product
warranty will be invalid if any non-genuine parts have been fitted or used. This warranty covers product
that was purchased from authorized distributors. This warranty gives you specific legal rights and you
may also have other rights (other rights may vary from state to state in the U.S.A.)
The product warranty registration can be completed online at
www .guardiantechnologies.com. We consider the registration process important to ensuring
superior service to our customers, however submitting the warranty registration is optional and
does not affect your rights to utilize this warranty according to the conditions stated above. To
submit product under warranty the complete machine must be delivered pre-paid to Guardian
Technologies LLC. Please include complete information including: the problem, the model number
of the product, the day of purchase, and a copy of the original sales receipt along with your name,
address, and telephone (email optional). Address returns to the attention of: Customer Service,
at the address below. Additional questions or comments can be made toll free to the number
listed below.
Guardian Technologies LLC
26251 Bluestone Blvd.
Euclid, Ohio 44132
1.866.603.5900
www.guardiantechnologies.com
Additional copies of the instruction manual can be obtained by accessing and
printing directly from our website or calling customer service.
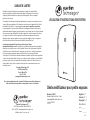
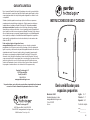
Small Space Dehumidifier

READ AND SAVE THESE INSTRUCTIONS
WARNINGS
Failure to comply with the warnings listed below may
result in electric shock or serious injury.
• Keep this product out of the reach of children and pets.
• Use this appliance only for its intended purpose as described in the instruction manual.
• Never operate this dehumidifier in an area that is likely to accumulate standing water. If this
condition develops, for your safety disconnect the power supply before stepping into the water .
• Never unplug your dehumidifier by pulling on the power cord. Always grip plug firmly and pull
straight out from the receptacle.
• Replace immediately all electric service cords that have become frayed or otherwise damaged.
A damaged power supply cord must be replaced with a new power supply cord obtained from
the manufacturer and not repaired. Do no use a cord that shows cracks or abrasion damage
along its length or at either the plug or connector end.
• Do not handle the plug with wet hands.
• If the receptacle does not match the plug, the receptacle must be changed out by
a qualified electrician.
• Turn the dehumidifier OFF and unplug it before cleaning.
• Do not submerse this product in water. Do not clean the unit or tank with detergents or chemicals
of any kind. Do not use sharp-edged objects to clean the product.
• Do not treat the tank with any chemicals, oils, fragrances, etc. They will damage the unit
and void the manufacturer’s warranty.
• Always place this dehumidifier on a firm, flat & level surface. Do not place this product directly
against a wall or underneath a wall cupboard or similar . The device needs suf ficient clearance.
• Disassembly, repair or remodeling by an unauthorized person may result in serious harm and
will void the manufactures warranty.
• For your safety, do not store or use combustible materials, gasoline or other flammable vapors
or liquids in the vicinity of this or any other appliance.
• Do not use outdoors.
• This dehumidifier is intended for indoor residential applications only. This dehumidifier should
not be used for commercial or industrial applications.
• This dehumidifier should always be plugged into its own individual electric outlet, which has
a voltage rating matching the rating plate.
• DO NOT use an extension cord with this dehumidifier.
• DO NOT use surge protectors or multi-outlet adaptors with this dehumidifier.
E-2
E-3
This product should be used only in accordance with the specifications outlined in this
manual. Usage other than what has been specified here may result in serious injury.
WARNING: The cords, wires and/or cables supplied with this product contain chemicals, including lead or
lead compounds, known to the state of California to cause cancer and birth defects or other reproductive
harm. W ash hands after using.
(California code of regulations Proposition 65)
MODEL NUMBER: DH201
DEHUMIDIFYING TECHNOLOGY: Peltier (thermo-electric)
POWER SUPPLY: 12V DC, 60Hz, 5A
POWER CONSUMPTION: 60W
DIMENSIONS: 5.24" L x 8.11" W x 13.39" H
WEIGHT: 4.15 lbs. (not including packaging)
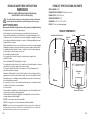
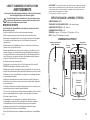
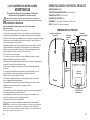
PRODUCT SPECIFICATIONS AND PARTS
Power/W ater Tank Full Indicator
Air Intake
Vents
Power Cord Connection
Handle
Power Switch
PRODUCT COMPONENTS
Air Outlet
Vents
Condensation
Tank
SAFETY PRECAUTIONS
When using this dehumidifier, always follow basic safety precautions, including the following:

E-4
E-5
DIRECTIONS FOR USE
BEFORE OPERATING THE DEHUMIDIFIER
1. Select a firm, level and flat location for the dehumidifier
CAUTION: For proper air flow, locate the unit at least 1 foot from any wall or furniture.
2. Make sure the vents on the back of the product free of dirt and are not blocked.
3. Connect the power cord to the dehumidifier then plug the power cord into a 120V AC outlet.
IMPORTANT:
Your device is fitted with an interlock and will only work properly if the condensation
tank is inserted correctly.
TIP
Best results will be obtained when the windows and doors are closed in the room
where the dehumidifier is being used.
IMPORTANT:
When moving the dehumidifier, always lift unit by the carrying handle located on the back.
OPERATING THE DEHUMIDIFIER
1. Turn the unit power ON.
2. The green power-on light shows that the device is operating.
3. To switch off the device, press the ON/OFF switch.
EMPTYING THE CONDENSATION TANK:
The green power-on light will turn to red when the condensation tank is full.
1. T urn off the device and disconnect from the power supply.
2. Remove and empty the condensation tank.
3. Replace the tank and plug it back in.
NOTE:
To prevent the water tank from becoming accidentally dislodged, once fitted into the housing,
it is secured to prevent any possible movement. When removing the tank, grip the two hand
holds provided and then pull the tank away from the body to release it from the housing.
In this way you reduce the amount of force necessary to overcome the locking device and
then you can remove the water tank in one motion.
MAINTENANCE & CLEANING
IMPORTANT:
Always turn off then disconnect the power supply when not in use or before cleaning or storing.
Allow the device to cool down to room temperature before you clean it and or/stow it away.
Always empty the condensation tank. Risk of Electric Shock!
Cleaning
1. Disconnect the power supply.
2. Allow device to cool down.
3. Use a dry cloth to remove dust on the outside of the device.
4. Clean the ventilation slots at regular intervals with vacuum or soft brush to
remove dust and dirt.
5. Make sure to remove all water from the condensation tank before storing.
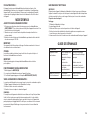
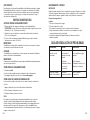
TROUBLE SHOOTING GUIDE
The device does not seem
to be working.
The main plug is not
connected with the main
power supply.
PROBLEM
CAUSE
SOLUTION
Insert the main plug into
the main power supply.
The device has switched
off during operation.
The condensation tank
is full or not inserted
correctly.
Empty the condensation
tank. Insert into the device
correctly.
The condensation tank
is full.
Empty the condensation tank.
INTENDED USE:
This device is intended for the dehumidification of small, closed rooms. Your dehumidifier
operates according to the condensation principle. A fan inside the device blow air over a
chiller, this causes the humidity contained in the air to condense and drip into the
condensation tank. Then the chilled air exits the device.
Page is loading ...
Page is loading ...
Page is loading ...
Page is loading ...
Page is loading ...

S-4
S-5
INSTRUCCIONES DE USO
ANTES DE OPERAR EL DESHUMIDIFICADOR
1. Elija una superficie firme, plana y nivelada para colocar el deshumidificador.
PRECAUCIÓN: Para que el flujo de aire sea adecuado, ubique el aparato al menos a una
distancia de 30.5 cm (1 pie) de la pared o muebles.
2. Asegúrese de que las ventilaciones en la parte trasera del producto estén libres de
polvo y no estén bloqueadas.
3. Conecte el cable de alimentación al deshumidificador y luego enchufe el cable de
alimentación a un toma de 120 V de CA.
IMPORTANTE:
Su unidad posee un dispositivo de seguridad y solo funcionará correctamente si el tanque
de condensación se inserta de manera correcta.
CONSEJO
Se obtendrán mejores resultados si se cierran las puertas y las ventanas de la habitación
donde se está usando el deshumidificador.
IMPORTANTE:
Cuando mueva el deshumidificador, siempre levante la unidad de la manija para transporte
que está en la parte posterior.
CÓMO OPERAR EL DESHUMIDIFICADOR
1. Encienda la unidad.
2. La luz verde de encendido muestra que el dispositivo está en funcionamiento.
3. Para apagar el dispositivo, presione el botón de encendido/apagado.
CÓMO VACIAR EL TANQUE DE CONDENSACIÓN:
La luz verde de encendido se volverá de color rojo cuando el tanque de condensación
esté lleno
1. Apague el dispositivo y desconéctelo del suministro de alimentación.
2. Retire el tanque de condensación y vacíelo.
3. Reemplace el tanque y vuelva a conectarlo.
NOTA:
Para evitar que el tanque de agua se desprenda accidentalmente, una vez que esté
encajado en la base, queda asegurado para evitar cualquier movimiento posible.
Al extraer el tanque, tome las dos manijas suministradas y luego extraiga el tanque de la
base para retirarlo de la carcasa. De esta manera, se reduce la cantidad de fuerza
necesaria para manejar el dispositivo de bloqueo. A continuación, podrá extraer el tanque
de agua con un movimiento.
MANTENIMIENTO Y LIMPIEZA
IMPORTANTE:
Apague la unidad y luego desconecte el suministro de energía si el dispositivo no se utiliza
o antes de su limpieza o almacenamiento. Deje que el dispositivo se enfríe a temperatura
ambiente antes de limpiarlo o guardarlo. Siempre vacíe el tanque de condensación.
Riesgo de descarga eléctrica.
Limpieza
1. Desconecte el suministro de energía.
2. Deje que el dispositivo se enfríe.
3. Use un paño seco para retirar el polvo en la parte exterior del dispositivo
4. Limpie las ranuras de ventilación con frecuencia con una aspiradora o un cepillo
suave para eliminar el polvo y la suciedad.
5. Asegúrese de eliminar toda el agua del tanque de condensación antes de
almacenar la unidad.
GUÍA DE RESOLUCIÓN DE PROBLEMAS
Aparentemente, el
dispositivo no está
funcionando.
El enchufe principal no
está conectado al
suministro de energía
principal.
PROBLEMA
CAUSA
SOLUCIÓN
Inserte el enchufe principal
en el suministro de energía
principal.
El dispositivo se apagó
durante el funcionamiento.
El tanque de
condensación está lleno
o no se insertó
correctamente.
Vacíe el tanque de
condensación. Insértelo en el
dispositivo correctamente.
El tanque de
condensación está lleno.
Vacíe el tanque de
condensación.
USO PREVISTO:
Este dispositivo se diseñó para la deshumidificación de habitaciones pequeñas y cerradas.
El deshumidificador funciona de acuerdo con el principio de condensación. Un ventilador
dentro del dispositivo sopla aire a través de un enfriador, que hace que la humedad que
se encuentra en el aire se condense y gotee en el tanque de condensación. Luego, el
aire enfriado sale del dispositivo.
-
 1
1
-
 2
2
-
 3
3
-
 4
4
-
 5
5
-
 6
6
-
 7
7
-
 8
8
-
 9
9


pureguardian DH201 User guide
- Type
- User guide
- This manual is also suitable for
Ask a question and I''ll find the answer in the document
Finding information in a document is now easier with AI
in other languages
- français: pureguardian DH201 Mode d'emploi
- español: pureguardian DH201 Guía del usuario
Related papers
-
Guardian Technologies H3200WAR User manual
-
Pure Guardian H3200WAR Owner's manual
-
-
-
Guardian Technologies H3250WCA Owner's manual
-
Sharper Image 100 Hour Ultrasonic Warm and Cool Mist Humidifier Owner's manual
-
Guardian Technologies H5450BCA Owner's manual
-
-
-
Guardian Technologies H1175WCA Owner's manual
Other documents
-
Guardian Technologies MODEL: HTR410B Owner's manual
-
-
Coopers HD-68W Operating instructions
-
ProBreeze PB-02-US User manual
-
ElectrIQ MD280 User manual
-
 ProBreeze PB-13 1500ml 2200ft3 Dehumidifier User manual
-
-
Guardian Technologies H950AR Owner's manual
-
-
