Garmin Nexus Installation guide

Type
Installation guide

Garmin Nexus: Your Gateway to Seamless Navigation and Communication

Garmin Nexus is a versatile and intuitive navigation and communication device designed to enhance your driving experience. With its user-friendly interface, advanced features, and comprehensive functionalities, Garmin Nexus will keep you connected and on track during your journeys.

Future Technology Devices International Limited (FTDI)
373 Scotland Street, Glasgow G5 8QB United Kingdom
Tel.: +44 (0) 141 429 2777 Fax: + 44 (0) 141 429 2758
E-Mail (Support): suppo[email protected] Web: http://www.ftdichip.com
Copyright © 2008 Future Technology Devices International Limited
Future Technology Devices International Ltd.
Application Note
AN_103
FTDI Drivers Installation guide
for
Windows VISTA
Document Reference No.: FT_000080
Version 1.0
Issue Date: 2008-09-23
The purpose of this document is to provide users of FTDI chips with a simple procedure for
installing FTDI drivers for their devices under Windows VISTA.
Copyright © 2008 Future Technology Devices International Limited 1
Document Reference No.: FT_000080
FTDI Drivers Installation guide
for
Windows
VISTA Application Note
AN_103 Version 1.0
Clearance No.:
FTDI# 57
Table of Contents
1
Introduction ................................................................... 2
2
Installing FTDI Device Drivers ........................................ 3
3
Installing CDM Drivers ................................................... 4
4
Uninstalling FTDI Devices ............................................. 16
5
Troubleshooting ........................................................... 17
5.1
Windows VISTA cannot find drivers for my device .................. 17
5.2
Devices not shown in Device Manager for uninstalling ............ 18
5.3
Windows Vista shows a warning that the driver is not certified
19
5.4
Driver will not install on VISTA x64 ........................................ 20
6
Contact Information ..................................................... 21
Appendix A – Revision History ........................................... 22
Copyright © 2008 Future Technology Devices International Limited 2
Document Reference No.: FT_000080
FTDI Drivers Installation guide
for
Windows
VISTA Application Note
AN_103 Version 1.0
Clearance No.:
FTDI# 57
1 Introduction
The purpose of this application note is to provide users of FTDI chips with a simple procedure for
installing FTDI drivers for their devices under Windows VISTA.
Copyright © 2008 Future Technology Devices International Limited 3
Document Reference No.: FT_000080
FTDI Drivers Installation guide
for
Windows
VISTA Application Note
AN_103 Version 1.0
Clearance No.:
FTDI# 57
2 Installing FTDI Device Drivers
FTDI have previously provided two types of driver for Windows OS: a D2XX direct driver and a virtual
COM port (VCP) driver. Previously, these drivers were mutually exclusive and could not be installed at the
same time. The new Windows combined driver model (CDM) which may be installed on Windows 2000,
XP or VISTA allows applications to access FTDI devices through either the D2XX DLL or a COM port
without having to change driver type. However, it should be noted that an application can only
communicate through one of these interfaces at a time and cannot send commands to the D2XX DLL and
the associated COM port at the same time.
The CDM driver comes in two parts. The first part is the bus layer that provides D2XX style functionality
and is always installed. The second part is the serial COM port layer and the CDM driver will determine
whether a COM port should be exposed by reading the EEPROM of FT232R, FT245R and FT2232D devices.
In the case of FT232BM, FT245BM, devices, the CDM driver will default to always installing a COM port.
This behaviour can be changed and EEPROM settings ignored by changing the driver INF files as detailed
in FTDI Application Note AN232B-10 Advanced Driver Options. Please note that modifying the INF files of
a Microsoft WHQL certified driver will invalidate the Windows certification.
The driver is downloadable from the FTDI website by clicking the word download: download.
Copyright © 2008 Future Technology Devices International Limited 4
Document Reference No.: FT_000080
FTDI Drivers Installation guide
for
Windows
VISTA Application Note
AN_103 Version 1.0
Clearance No.:
FTDI# 57
3 Installing CDM Drivers
To install CDM drivers for an FTDI device under Windows VISTA, follow the instructions below:
Connect the device to a spare USB port on your PC.
If there is an available Internet connection, Windows VISTA will silently connect to the Windows Update
website and install any suitable driver it finds for the device in preference to the driver manually selected.
If no suitable driver is automatically found then the following procedure should be followed.
If the device is based on the FT2232D, the Microsoft composite device driver is automatically loaded
silently in the background. Once the composite driver has been installed Windows Found New Hardware
Wizard will launch. If there is no available Internet connection or Windows VISTA is configured to ask
before connecting to Windows Update, the screen below is shown. Select "Locate and install driver
software (recommended)" from the options available to proceed with the installation.
Copyright © 2008 Future Technology Devices International Limited 5
Document Reference No.: FT_000080
FTDI Drivers Installation guide
for
Windows
VISTA Application Note
AN_103 Version 1.0
Clearance No.:
FTDI# 57
When Locate and install driver software (recommended)" is selected the following screen will appear.
Note: the text “TTL Tester” is replaced with the description of the customer hardware.
Select “I don’t have the disk. Show me other options”
The next screen will appear.
Copyright © 2008 Future Technology Devices International Limited 6
Document Reference No.: FT_000080
FTDI Drivers Installation guide
for
Windows
VISTA Application Note
AN_103 Version 1.0
Clearance No.:
FTDI# 57
Select “Browse my computer for driver software (advanced)”.
The next screen will appear.
Copyright © 2008 Future Technology Devices International Limited 7
Document Reference No.: FT_000080
FTDI Drivers Installation guide
for
Windows
VISTA Application Note
AN_103 Version 1.0
Clearance No.:
FTDI# 57
Browse to the folder where the CDM driver has been stored (when uncompressed) and press “Next”
The example shown above uses a folder on the desktop.
The next screen will appear.
Copyright © 2008 Future Technology Devices International Limited 8
Document Reference No.: FT_000080
FTDI Drivers Installation guide
for
Windows
VISTA Application Note
AN_103 Version 1.0
Clearance No.:
FTDI# 57
Copyright © 2008 Future Technology Devices International Limited 9
Document Reference No.: FT_000080
FTDI Drivers Installation guide
for
Windows
VISTA Application Note
AN_103 Version 1.0
Clearance No.:
FTDI# 57
This screen will automatically complete and then change to the one below:
The bus layer of the driver is now installed.
When the bus driver has completed, the process is repeated for the serial port layer of the driver. That is,
Windows will automatically detect a serial port device as a new device. It will then prompt, as before, for
the location of the device driver by displaying
the “Found new hardware” wizard again and it is necessary
to repeat the same process to install the serial port driver.
Copyright © 2008 Future Technology Devices International Limited 10
Document Reference No.: FT_000080
FTDI Drivers Installation guide
for
Windows
VISTA Application Note
AN_103 Version 1.0
Clearance No.:
FTDI# 57
Select “I don’t have the disk. Show me other options”
The next screen will appear.
Copyright © 2008 Future Technology Devices International Limited 11
Document Reference No.: FT_000080
FTDI Drivers Installation guide
for
Windows
VISTA Application Note
AN_103 Version 1.0
Clearance No.:
FTDI# 57
Select “Browse my computer for driver software (advanced)”.
The next screen will appear.
Copyright © 2008 Future Technology Devices International Limited 12
Document Reference No.: FT_000080
FTDI Drivers Installation guide
for
Windows
VISTA Application Note
AN_103 Version 1.0
Clearance No.:
FTDI# 57
Browse to the folder where the CDM driver has been stored (when uncompressed) and press “Next”
The example shown above uses a folder on the desktop.
The next screen will appear.
Copyright © 2008 Future Technology Devices International Limited 13
Document Reference No.: FT_000080
FTDI Drivers Installation guide
for
Windows
VISTA Application Note
AN_103 Version 1.0
Clearance No.:
FTDI# 57
Copyright © 2008 Future Technology Devices International Limited 14
Document Reference No.: FT_000080
FTDI Drivers Installation guide
for
Windows
VISTA Application Note
AN_103 Version 1.0
Clearance No.:
FTDI# 57
This screen will automatically complete and then the following screen will appear.
If the device is based on the FT2232D, the second port must also be installed. The procedure for
installing the second port is identical to that for installing the first port from the first screen of the Found
New Hardware Wizard for the USB Serial Port device. If the driver is Microsoft WHQL certified, this is
done automatically.
After the driver is installed it is important to determine which COM port has been assigned to the device
for configuring the application that will use the device.
Open the Device Manager (located in "Control Panel\System" then select the "Hardware" tab and click
"Device Manager") and select "View > Devices by Connection", the device appears as a" USB Serial
Converter" with an additional COM port with the label "USB Serial Port". If the device is based on the
FT2232D, two ports will be available from a composite USB device.
Copyright © 2008 Future Technology Devices International Limited 15
Document Reference No.: FT_000080
FTDI Drivers Installation guide
for
Windows
VISTA Application Note
AN_103 Version 1.0
Clearance No.:
FTDI# 57
This screen shows the device connected to COM3.
In the case of the FT2232D, port A of the FT2232D will be installed as COMX and port B will be installed
as COMX+1 where COMX is the first available COM port number.
Copyright © 2008 Future Technology Devices International Limited 16
Document Reference No.: FT_000080
FTDI Drivers Installation guide
for
Windows
VISTA Application Note
AN_103 Version 1.0
Clearance No.:
FTDI# 57
4 Uninstalling FTDI Devices
With the release of Microsoft Windows Vista, the FTDI uninstaller has been rendered unusable due to
Windows Resource Protection preventing the executable from deleting driver files and associated registry
values. Vista will only allow the system itself to modify files and registry values
in these locations.
Consequently, a new method for uninstalling is required. Devices can be removed using the Device
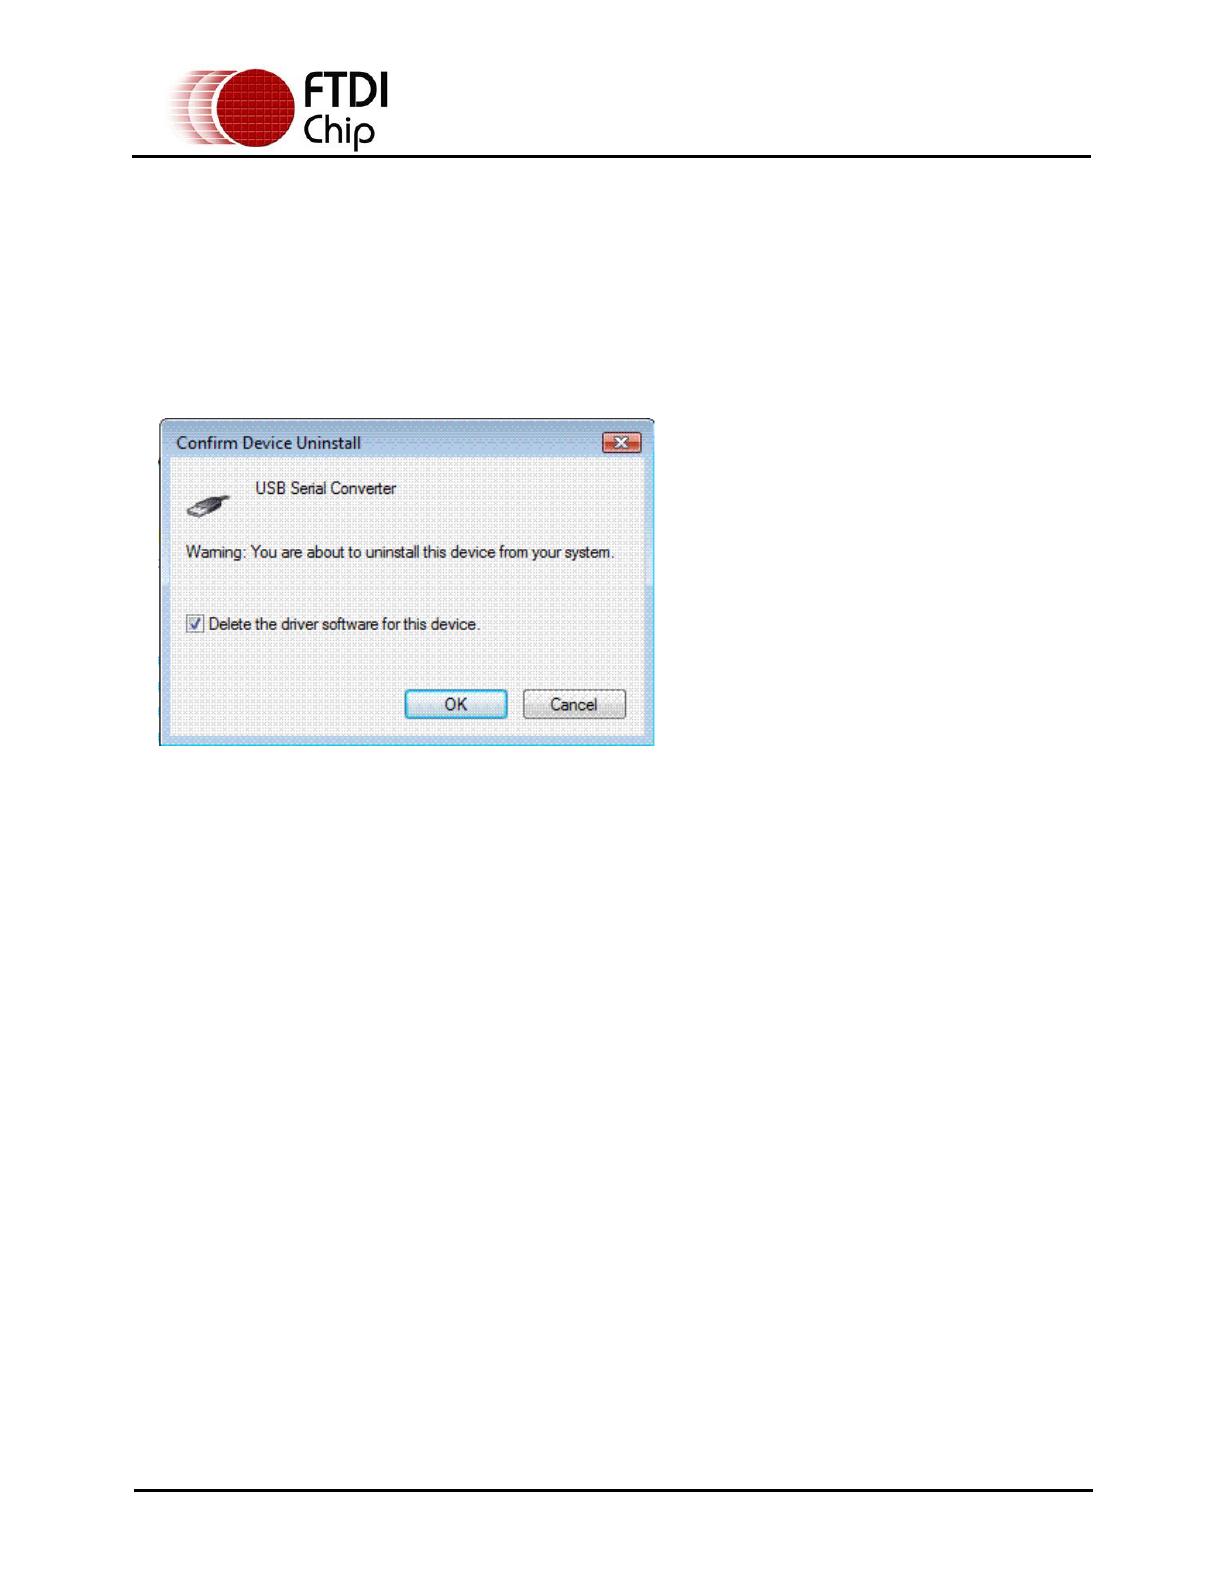
Manager by simply right-clicking on the mouse and selecting "Uninstall".This will delete the associated
registry entries for that device only. Vista provides an automatic method to delete driver files via a check
box to "Delete the driver software for this device" on the uninstall dialog box.
Windows 2000, XP and Server 2003 do not have this check box, so driver files and OEM INF and
PNF files must be removed manually or by using a custom application.
Some points to note about the new un-installation method:
In the case of FT2232 devices, a composite device is also installed. This can also be removed
by right-clicking and selecting "Uninstall". There is no option to delete the driver files when
doing this as the driver for the composite device is a native Windows driver.
If the VCP driver has been installed, the COM port driver should be uninstalled before the bus
driver. If the bus is removed first, the COM port will no longer appear in the Device Manager.
If the files are deleted while other installed devices still require them those devices will not work
correctly. This can be fixed by right clicking the device and selecting "Reinstall Driver" which will
replace the missing files.
If a device to be uninstalled is not connected to the PC, the device can still be removed by
setting the device manager to show phantom devices . This also allows a virtual COM port to be
uninstalled if the bus layer has been removed first.
Copyright © 2008 Future Technology Devices International Limited 17
Document Reference No.: FT_000080
FTDI Drivers Installation guide
for
Windows
VISTA Application Note
AN_103 Version 1.0
Clearance No.:
FTDI# 57
5 Troubleshooting
5.1 Windows VISTA cannot find drivers for my device
This error can occur if the VID and PID programmed into the device EEPROM do not match those listed in
the INF files for the driver. The VID and PID programmed into the device EEPROM may be found by using
the USBView utility from the FTDI web site. These can then be checked against the VID and PID entries
in the driver INF files. If they do not match, that driver cannot be installed for that device without either
re-programming the device EEPROM or modifying the list of VID and PID numbers in the INF files.
Please note that only your own company VID and PID or FTDI's VID (0x0403) and FTDI PID issued for
use by the customer should be used in the EEPROM and INF files.
End customers should obtain modified drivers from the OEM of the device, and not necessarily edit the
files themselves.
Copyright © 2008 Future Technology Devices International Limited 18
Document Reference No.: FT_000080
FTDI Drivers Installation guide
for
Windows
VISTA Application Note
AN_103 Version 1.0
Clearance No.:
FTDI# 57
5.2 Devices not shown in Device Manager for uninstalling
Devices that have been installed on a system but are not currently available are referred to as "phantom
devices". These devices are not usually displayed in the device manager, but can be made to be
displayed as though they are attached. This allows device properties to be changed or devices to be
uninstalled via Device Manger even though the device is not physically connected to the PC.
To display phantom devices in Device Manager, a new system variable is required. Open "Control
Panel > System" then select the "Advanced" tab and click "Environment Variables". In the System
Variables section (NOT THE USER VARIABLES SECTION), click "New..." to display the following
window:
Create a new System Variable called "DevMgr_Show_NonPresent_Devices" and set the value to
1, then click OK.
Open the Device Manager ("Control Panel > System" then select the "Hardware" tab and click
"Device Manager…", or "Control Panel > Device Manger" in Vista) and select "View > Show Hidden
Devices". Device Manager will then show all hidden and phantom devices available on that PC as shaded.
Copyright © 2008 Future Technology Devices International Limited 19
Document Reference No.: FT_000080
FTDI Drivers Installation guide
for
Windows
VISTA Application Note
AN_103 Version 1.0
Clearance No.:
FTDI# 57
5.3 Windows Vista shows a warning that the driver is not certified
If the driver is not certified then a pop up window such as shown below will be displayed.
If you are certain of the source of the driver the warning can be ignored and you can continue installation
by selecting “Install this driver software anyway”.
If you are unsure about the driver source contact your vendor.
  • Page 1 1
  • Page 2 2
  • Page 3 3
  • Page 4 4
  • Page 5 5
  • Page 6 6
  • Page 7 7
  • Page 8 8
  • Page 9 9
  • Page 10 10
  • Page 11 11
  • Page 12 12
  • Page 13 13
  • Page 14 14
  • Page 15 15
  • Page 16 16
  • Page 17 17
  • Page 18 18
  • Page 19 19
  • Page 20 20
  • Page 21 21
  • Page 22 22
  • Page 23 23

Garmin Nexus Installation guide

Type
Installation guide

Garmin Nexus: Your Gateway to Seamless Navigation and Communication

Garmin Nexus is a versatile and intuitive navigation and communication device designed to enhance your driving experience. With its user-friendly interface, advanced features, and comprehensive functionalities, Garmin Nexus will keep you connected and on track during your journeys.

Ask a question and I''ll find the answer in the document

Finding information in a document is now easier with AI