Pfaff coverlock 4.0 User manual
- Category
- Sewing machines
- Type
- User manual

coverlock
TM
4.0
Owner’s Manual

This household sewing machine is designed to comply with IEC/EN 60335-2-28 and UL1594.
IMPORTANT SAFETY INSTRUCTIONS
When using an electrical appliance, basic safety precautions should always be followed, including
the following:
Read all instructions before using this household sewing machine. Keep the instructions in a suit-
able place close to the machine. Make sure to hand them over if the machine is given to a third
party.
DANGER – To reduce the risk of electric shock:
• A sewing machine should never be left unattended when plugged in. Always unplug this sew-
ing machine from the electric outlet immediately after using and before cleaning, removing cov-
ers, lubricating or when making any other user servicing adjustments mentioned in the instruc-
tion manual.
WARNING – 7RUHGXFHWKHULVNRIEXUQVÀUHHOHFWULFVKRFNRULQMXU\WR
person:
• Do not allow to be used as a toy. Close attention is necessary when this sewing machine is used
by or near children.
• Use this sewing machine only for its intended use as described in this manual. Use only attach-
ments recommended by the manufacturer as contained in this manual.
• Never operate this sewing machine if it has a damaged cord or plug, if it is not working prop-
erly, if it has been dropped or damaged, or dropped into water. Return the sewing machine to
the nearest authorized dealer or service center for examination, repair, electrical or mechanical
adjustment.
• Never operate the sewing machine with any air openings blocked. Keep ventilation openings of
the sewing machine and foot control free from the accumulation of lint, dust, and loose cloth.
.HHSÀQJHUVDZD\IURPDOOPRYLQJSDUWV6SHFLDOFDUHLVUHTXLUHGDURXQGWKHVHZLQJPDFKLQH
needle.
• Always use the proper needle plate. The wrong plate can cause the needle to break.
• Do not use bent needles.
'RQRWSXOORUSXVKIDEULFZKLOHVWLWFKLQJ,WPD\GHÁHFWWKHQHHGOHFDXVLQJLWWREUHDN
• Wear safety glasses.
6ZLWFKWKHVHZLQJPDFKLQHRII´µZKHQPDNLQJDQ\DGMXVWPHQWLQWKHQHHGOHDUHDVXFKDV
threading needle, changing needle, threading bobbin, or changing presser foot, etc.
• Never drop or insert any object into any opening.
• Do not use outdoors.
'RQRWRSHUDWHZKHUHDHURVROVSUD\SURGXFWVDUHEHLQJXVHGRUZKHUHR[\JHQLVEHLQJDGPLQ-
istrated.
7RGLVFRQQHFWWXUQDOOFRQWUROVWRWKHRII´µSRVLWLRQWKHQUHPRYHSOXJIURPRXWOHW
• Do not unplug by pulling on cord. To unplug, grasp the plug, not the cord.
• The foot control is used to operate the machine. Avoid placing other objects on the foot control.

• Do not use the machine if it is wet.
• If the LED lamp is damaged or broken, it must be replaced by the manufacturer or its service
DJHQWRUDVLPLODUO\TXDOLÀHGSHUVRQLQRUGHUWRDYRLGDKD]DUG
• If the supply cord connected with the foot control is damaged, it must be replaced by the manu-
IDFWXUHURULWVVHUYLFHDJHQWRUDVLPLODUO\TXDOLÀHGSHUVRQLQRUGHUWRDYRLGDKD]DUG
• This sewing machine is provided with double insulation. Use only identical replacement parts.
6HHLQVWUXFWLRQVIRU6HUYLFLQJRI'RXEOH,QVXODWHG$SSOLDQFHV
SAVE THESE INSTRUCTIONS
)RU(XURSHRQO\
This appliance can be used by children aged from 8 years and above and persons with reduced
physical, sensory or mental capabilities or lack of experience and knowledge if they have been
given supervision or instruction concerning use of the appliance in a safe way and understand
the hazards involved. Children shall not play with the appliance. Cleaning and user maintenance
shall not be made by children without supervision.
7KHQRLVHOHYHOXQGHUQRUPDORSHUDWLQJFRQGLWLRQVLVOHVVWKDQG%$
7KHPDFKLQHPXVWRQO\EHXVHGZLWKIRRWFRQWURORIW\SH)5PDQXIDFWXUHGE\6KDQJKDL%LQDR
Precision Mould Co., Ltd.
For outside Europe:
7KLVVHZLQJPDFKLQHLVQRWLQWHQGHGIRUXVHE\SHUVRQVLQFOXGLQJFKLOGUHQZLWKUHGXFHGSK\VL-
cal, sensory or mental capabilities, or lack of experience and knowledge, unless they have been
given supervision or instruction concerning use of the sewing machine by a person responsible for
their safety. Children should be supervised to ensure that they do not play with the sewing ma-
chine.
7KHQRLVHOHYHOXQGHUQRUPDORSHUDWLQJFRQGLWLRQVLVOHVVWKDQG%$
7KHPDFKLQHPXVWRQO\EHXVHGZLWKIRRWFRQWURORIW\SH)5PDQXIDFWXUHGE\6KDQJKDL%LQDR
Precision Mould Co., Ltd.
SERVICING OF DOUBLE INSULATED PRODUCTS
In a double-insulated product, two systems of insulation are provided instead of grounding. No
ground means is provided on a double-insulated product, nor should a means for grounding be
DGGHGWRWKHSURGXFW6HUYLFLQJRIDGRXEOHLQVXODWHGSURGXFWUHTXLUHVH[WUHPHFDUHDQGNQRZO-
HGJHRIWKHV\VWHPDQGVKRXOGEHGRQHRQO\E\TXDOLÀHGVHUYLFHSHUVRQQHO5HSODFHPHQWSDUWVIRU
a double-insulated product must be identical to those parts in the product. A double-insulated
SURGXFWLVPDUNHGZLWKWKHZRUGV¶'28%/(,168/$7,21·RU¶'28%/(,168/$7('·
Page is loading ...

OPERATING INSTRUCTIONS
INTRODUCTION
Parts of the machine .................................................................... 4
Accessories
....................................................................................... 5
Optional accessories from INSPIRA™
.................................... 6
PREPARATIONS
Connecting the foot control and the power supply ........ 7
Setting up the spool stand
........................................................ 7
Setting up the telescopic thread stand
................................ 8
Front cover
....................................................................................... 8
Open ..............................................................................................................8
Close
.............................................................................................................. 8
Attaching the waste tray ............................................................. 8
Presser foot lift
............................................................................... 8
Changing the presser foot
......................................................... 9
Needle information
....................................................................... 9
Changing the needles
.................................................................. 9
Movable upper cutter
...............................................................10
Disengaging, position B ...................................................................... 10
Engaging, position A
............................................................................ 10
2-thread overlock converter ....................................................10
Engaging ................................................................................................... 10
Disengaging
............................................................................................. 10
Upper looper .................................................................................11
Disengaging ............................................................................................. 11
Engaging
................................................................................................... 11
Changing to coverstitch table B ............................................11
6WLWFKÀQJHUOHYHUVHWWLQJ
.........................................................11
THREADING
General threading information ..............................................12
Threading the upper looper (red)
.........................................13
Threading the lower looper (yellow)
....................................14
Threading chainstitch looper (purple)
................................15
Threading the right needle
.....................................................16
Threading the left needle
........................................................17
Threading the chainstitch needle
.........................................18
Threading the coverstitch needles
.......................................19
Threading the right coverstitch needle ........................................ 19
Threading the middle coverstitch/chainstitch needle
........... 20
Threading the coverstitch left needle
........................................... 21
Needle threader ...........................................................................22
Changing thread
..........................................................................22
TOUCH SCREEN
Touch screen overview ..............................................................23
Select a stitch
................................................................................23
Recommendations ................................................................................ 23
On-screen stitch adjustments ................................................24
Thread tension ....................................................................................... 24
Differential feed
...................................................................................... 24
Stitch length
............................................................................................ 24
Sewing speed
.......................................................................................... 24
Save Stitch ......................................................................................25
Personal Name ....................................................................................... 25
Delete personal stitch
.......................................................................... 25
Load Stitch .....................................................................................25
Settings menu
...............................................................................26
Display contrast ..................................................................................... 26
Sound
......................................................................................................... 26
Language
.................................................................................................. 26
Calibrate touch screen
........................................................................ 26
Info System ....................................................................................26
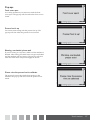
Pop-ups
...........................................................................................27
STITCHES & SEWING TECHNIQUES
Stitch overview ..............................................................................28
Start sewing
...................................................................................33
Pin Placement ........................................................................................ 33
Chain off
.................................................................................................... 33
Rolled edge sewing .....................................................................34
Coverstitch sewing
......................................................................34
Machine set up ....................................................................................... 34
Start sewing
............................................................................................. 34
Securing the coverstitch seam end
............................................... 34
Flatlock sewing .............................................................................35
6WDQGDUGÁDWORFNVWLWFK ....................................................................... 35
2UQDPHQWDOÁDWORFNVWLWFK
................................................................. 35
Ladder stitch
........................................................................................... 35
Chainstitch sewing ......................................................................36
Machine set up ....................................................................................... 36
Start and end of sewing
..................................................................... 36
Sewing hints ..................................................................................36
Pintuck sewing ....................................................................................... 36
Sew in Circles
.......................................................................................... 36
Securing the thread chain
................................................................. 36
Sewing with heavy decorative threads in the loopers
........... 36
Braiding by chaining off
..................................................................... 36
Lowering the needle(s)
....................................................................... 37
STITCH ADJUSTMENTS
Stitch width adjustment ...........................................................37
Width adjustment by changing needle position ...................... 37
Width adjustment with the cutting width dial
........................... 37
Presser foot pressure adjustment ........................................37
Stitch length adjustment
..........................................................37
Differential feed adjustment
...................................................38
Gathered overlock (stretch, knit fabrics) ..................................... 38
Stretch overlock (lightweight fabrics)
........................................... 38
7KUHDGWHQVLRQÀQHWXQLQJ ......................................................39
MAINTENANCE
Machine maintenance ...............................................................41
Cleaning .................................................................................................... 41
Cleaning the touch screen
................................................................. 41
Oiling
.......................................................................................................... 41
Replacing the movable upper cutter
............................................ 41
Storage .............................................................................................42
Servicing
..........................................................................................42
Trouble shooting
..........................................................................42
0DFKLQHVSHFLÀFDWLRQV
..............................................................43
Intellectual Property
...................................................................45

PFAFF
coverlock 4.0
german design
21
19
22
20
23
24
25
4
5
6
7
8
coverlock 4.0
2
9
10
3
1
12
11
16
17
18
15
13 14
Introduction4
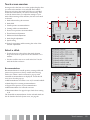
1. Telescopic thread stand
2. Handle
3. Touch screen
4. Load stitch button
6DYHVWLWFKEXWWRQ
6. Clear button
6HWWLQJVPHQXEXWWRQ
8. Info button
6WLWFKSODWH
10. Flat bed extension
11. Cutter cover A
12. Front cover
13. Power & light switch
14. Foot control/electric power cord socket
15. Handwheel
6SRROVWDQG
17. Cone holder
6SRROSLQ
19. Presser foot pressure adjusting dial
20. Thread cutter
21. Presser foot lift
22. Hole for extension table
23. Presser foot ankle
24. Presser foot
25. Cutting width dial
Parts of the machine

31
32
3334
26
2827 30
29
23 4 5 6 7 8
9
11
1
10
12
13
15
14
Introduction 5
Accessories
Accessories are contained in the accessory box.
1. Accessory box
6FUHZGULYHU
.QLIHEODGHIRUWKHPRYDEOHXSSHUFXWWHU
7KUHDGXQUHHOLQJGLVFV
7KUHDGVSRROQHWV
6. Oiler
7. Allen key
7ZHH]HUVSODFHGRQWKHLQVLGHRIWKHIURQWFRYHU
&RYHUVWLWFKWDEOH%IRU&RYHUFKDLQVWLWFK
&RQHKROGHUV
11. Lint brush
12. Dust cover
13. Waste tray
6W\OXVSODFHGRQWKHLQVLGHRIWKHIURQWFRYHU
15. Needle threader
([WHQVLRQWDEOHLQFOXGLQJIRXUOHJVDQGSXVKSLQQRW
SLFWXUHG
Assemble the extension table and legs according to the
illustrations provided with the table. The push pin is
used in the small holes in the table to hold your fabric
LQSODFHZKHQVHZLQJFLUFOHVVHHSDJH
1HHGOHSDFNQRWSLFWXUHGV\VWHP(/[LQFOXGLQJ
three needles, size #14/90 and two needles, size
#12/80. Two needles, size #14/90, are in the machine
on delivery.
26. Moveable upper cutter
6WLWFKÀQJHUOHYHU
6WDWLRQDU\ORZHUFXWWHU
29. Chainstitch/Coverstitch looper
30. Lower looper
31. Upper looper
32. 2-thread converter
33. Upper looper clutch
33. Chain/coverstitch thread guide

Introduction6
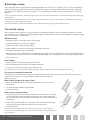
Optional accessories from INSPIRA™
Optional presser feet specially prepared for this machine are available at your PFAFF® dealer.
The snap-on type presser foot used on this machine allows easy removal and replacement.
Some fabrics have a lot of excess dye which can cause discoloration on other fabric but also
RQ\RXURYHUORFNPDFKLQH7KLVGLVFRORULQJPD\EHYHU\GLIÀFXOWRULPSRVVLEOHWRUHPRYH
)OHHFHDQGGHQLPIDEULFHVSHFLDOO\UHGDQGEOXHRIWHQFRQWDLQDORWRIH[FHVVG\H
,I\RXVXVSHFWWKDW\RXUIDEULFUHDG\WRZHDUJDUPHQWFRQWDLQVDORWRIH[FHVVG\HDOZD\V
SUHZDVKLWEHIRUHVHZLQJWRDYRLGWKHGLVFRORULQJ
Elastic Foot 620 08 65-96
7KH(ODVWLF)RRWJXLGHVDQGVWUHWFKHVQDUURZHODVWLFõôµPPDV\RXVHZLWWRIDEULF,W
LVJUHDWIRUVHZLQJIRUDFWLYHZHDUOLQJHULHDQGRWKHUHODVWLFLQVHUWLRQWHFKQLTXHV
Blindhem & Lace Foot 620 08 69-96
The Blindhem Foot is perfect for sewing invisible hems and for applying lace. The hem is
sewn, overcast and trimmed in one step.
Beading Foot 620 08 66-96
The Beading Foot smoothly guides beads and pearls through a channel on the foot for easy
application on garments or crafts.
Piping Foot 620 08 67-96
The Piping Foot is perfect for inserting packaged piping into seams and on edges for a
WDLORUHGÀQLVK7KHWULPLVVHZQEHWZHHQWKHWZROD\HUVRIIDEULFLQRQHVWHS$JURRYHXQGHU
WKHIRRWKHOSVJXLGHWKHSLSLQJ<RXFDQDOVRFUHDWH\RXURZQSLSLQJIRUDFXVWRPÀQLVK
The Piping Foot makes it fast and easy to cover cording with fabric and to insert piping into
seams for a professional look!
Taping Foot 620 08 68-96
The Taping Foot is used to apply seam tapes to seams to prevent stretching. It is especially
good for stabilizing shoulder seams. With this foot you can reinforce and construct seams in
one step.
&RUGHG:DY\(GJH)RRW
6HZLQJDGHFRUDWLYHZDY\HGJHLVHDV\ZLWKWKH&RUGHG:DY\(GJH)RRW7KHFXUY\VRIWO\
UXIÁHGHGJHLVDSHUIHFWÀQLVKIRUEULGDOYHLOVÀJXUHVNDWLQJFRVWXPHVEDOOHWVNLUWVFUDIWVDQG
more.
Gathering Foot 620 08 83-96
The Gathering Foot is perfect for gathering a single layer of fabric or simultaneously
JDWKHULQJDQGVWLWFKLQJWZROD\HUVRIIDEULF7KHERWWRPIDEULFOD\HUZLOOEHJDWKHUHGDQGWKH
WRSOD\HUUHPDLQVÁDW6XLWDEOHIRUOLJKWDQGPHGLXPZHLJKWZRYHQIDEULFV

A
B
C
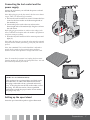
Preparations 7
Connecting the foot control and the
SRZHUVXSSO\
$PRQJWKHDFFHVVRULHV\RXZLOOÀQGWKHSRZHUFRUGDQG
the foot control.
1RWH%HIRUHSOXJJLQJLQWKHIRRWFRQWUROFKHFNWRHQVXUHWKDWLW
LVW\SHµ)5µVHHXQGHUVLGHRIIRRWFRQWURO
1. Pull out the cord from the foot control. Connect the foot
control to the front socket on the bottom right side of
WKHPDFKLQH$
2. Connect the power cord to the rear socket on the
ERWWRPULJKWVLGHRIWKHPDFKLQH%3OXJWKHFRUGLQWR
the wall socket.
%HIRUHSOXJJLQJ\RXUPDFKLQHLQPDNHVXUHWKHYROWDJHLVWKH
VDPHDVLQGLFDWHGRQWKHSODWHXQGHUWKHPDFKLQH6SHFLÀFDWLRQV
vary from country to country.
3. Press the ON/OFF switch to ON to turn on power and
OLJKW&
1RWH:KHQWKHIURQWFRYHULVRSHQWKHVDIHW\VZLWFKLVDFWLYDWHG
DQGSUHYHQWVWKHPDFKLQHIURPVHZLQJHYHQLIWKHIRRWFRQWUROLV
SUHVVHG
Note: Your coverlock™ 4.0 overlock machine is adjusted to
SURYLGHWKHEHVWVWLWFKUHVXOWDWQRUPDOURRPWHPSHUDWXUH
([WUHPHKRWDQGFROGWHPSHUDWXUHVFDQDIIHFWWKHVHZQUHVXOW
1RWH7RUHWUDFWWKHIRRWFRQWUROFRUGXQSOXJWKHIRRWFRQWURO
IURPWKHPDFKLQH$3XOOWKHFRUGJHQWO\DQGUHOHDVHWKHFRUG
will retract itself into the foot control.
POLARIZED PLUG INFORMATION
(FOR U.S.A. & CANADA ONLY)
7KLVDSSOLDQFHKDVDSRODUL]HGSOXJRQHEODGHZLGHU
WKDQWKHRWKHU7RUHGXFHWKHULVNRIHOHFWULFVKRFN
WKLVSOXJLVLQWHQGHGWRÀWLQDSRODUL]HGRXWOHWRQO\
ZD\,IWKHSOXJGRHVQRWÀWIXOO\LQWKHRXWOHWUHYHUVH
WKHSOXJ,ILWVWLOOGRHVQRWÀWFRQWDFWDTXDOLÀHG
electrician to install the proper outlet. Do not modify
the plug in any way.
Setting up the spool stand
Insert the spool stand then push to right as illustrated.

coverlock 4.0
ger
man
design
1
2
coverlock 4.0
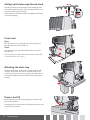
Preparations8
Setting up the telescopic thread stand
Extend the telescopic thread stand to its full height, then
turn until it clicks into place. Place the thread spools over
the cone holders on the spool pin.
If the machine is already threaded, straighten the threads
to prevent tangling.
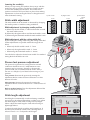
Front cover
Open
First push the cover to the right as far as it will go and
then pull it downward toward you.
Close
First pull the cover upward and then slide it to the left
until it locks.
Note: The front cover has a safety switch and the machine will
QRWVHZLIWKHIURQWFRYHULVRSHQ
$WWDFKLQJWKHZDVWHWUD\
Position the machine so the front is nearly aligned with
the edge of the table. Insert the U-shaped hooks of the
waste tray onto the two suction cups on the underside of
the machine. Make sure the trim falls into the bag while
sewing.
Presser foot lift
Raise the presser foot by lowering presser foot lift at the
back of the machine.
Pressing down on the presser foot lift puts the presser foot
in the extra lift position.

german design
A
B
E
D
C
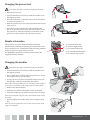
Preparations 9
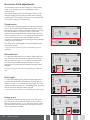
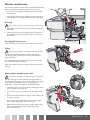
Changing the presser foot
Turn off the main power switch and unplug the machine.
• Raise the presser foot.
• Turn the handwheel toward you until the needles are at
the highest position.
• Push the red button on the back of the presser foot ankle
to release the presser foot.
• Raise the presser foot to the extra lift position and the foot
will come off.
• Place the new foot with the pin right underneath the
groove of the ankle while in the extra lift position. Lower
the presser foot. Push the red button on the back of the
presser foot ankle and the foot will snap into place.
Needle information
7KLVRYHUORFNXVHVDÁDWVKDQNLQGXVWULDOQHHGOHWKDW
eliminates the possibility of inserting the needle backwards.
Do not attempt to use a standard household sewing machine
needle of any size or type in this overlock.
Use INSPIRA™ needle EL x 705 sizes 14/90 and 12/80,
supplied with this machine.
Changing the needles
Turn off the main power switch and unplug the machine.
• Turn the handwheel toward you until the needles are at
the highest position.
• Place a thick piece of fabric under the presser foot. Lower
the needles halfway into the fabric.
• Loosen, but do not remove the needle clamp screw with
the allen key while you are holding the needles.
Note: When inserting needles into the A and/or B needle clamps it
is necessary to loosen the needle clamp screws for both A and B.
• Remove the selected needle.
+ROGWKHQHZQHHGOHZLWKWKHÁDWVXUIDFHWRWKHEDFN
• Insert the needle into the needle clamp as far as it will go.
Note: We recommend using the hole in the needle threader to hold
the needle.
• Securely tighten the needle clamp screw using the allen
key.
Note: Do not over-tighten the screw as this may cause the needle
clamp to be damaged.
A. Overlock left needle
B. Overlock right needle
C. Coverstitch left needle
D. Coverstitch middle needle
E. Coverstitch right needle

B
A
B
B
A
B
A
B
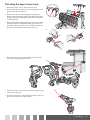
Preparations10
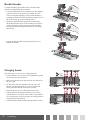
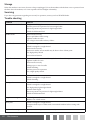
Movable upper cutter
Disengaging, position B
7XUQRIIWKHPDLQSRZHUVZLWFKDQGXQSOXJWKHPDFKLQH
• Turn the handwheel toward you until the upper cutter
is raised to the highest position.
• Open the front cover.
• Pull the movable cutter knob to the right as far as it will
go.
• Turn the knob toward you counter clockwise until the
cutter clicks into the locked position B.
Engaging, position A
• Open the front cover and pull the movable cutter knob
to the right as far as it will go.
• Turn the knob clockwise until the cutter clicks into the
cutting position A.
2-thread overlock converter
Engaging
7XUQRIIWKHPDLQSRZHUVZLWFKDQGXQSOXJWKHPDFKLQH
2-thread overlock stitches are sewn using one needle
thread and the lower looper thread. Before sewing, the
2-thread converter must be attached to the upper looper.
The 3-thread stretch overlock stitch is also sewn with the
2-thread overlock converter engaged.
• Open the front cover.
• Raise the white handle on the 2-thread converter to
LQVHUWWKHVKDUSHGJH$RIWKHFRQYHUWHULQWKHH\H%
of the upper looper.
Disengaging
7XUQRIIWKHPDLQSRZHUVZLWFKDQGXQSOXJWKHPDFKLQH
• Lower the white handle on the converter and remove
WKHVKDUSHGJH$IURPWKHH\H%RIWKHXSSHUORRSHU

B
A
1
2
3
4
R
N
N
R
N
R
Preparations 11
Upper looper
Disengaging
For coverstitch and chaintitch sewing the upper looper
needs to be disengaged.
• Turn the handwheel until the upper looper is in its
lowest position.
• Push the clutch lever to the right and back until
position B is visible from the front.
Engaging
• Turn the handwheel until the upper looper is in its
lowest position.
• Pull the clutch lever toward you until position A is
visible from the front.
Changing to coverstitch table B
For coverstitch and chainstitch sewing the coverstitch
table B should be used.
/LIWWKHKRRNWRUHOHDVHWKHFXWWHUFRYHU$DQGSXOOLW
towards you.
,QVHUWWKHFRYHUVWLWFKWDEOH%E\ÀWWLQJWKHWZRIURQW
SLQVLQWRWKHKROHVDQGPDNHVXUHWKHKRRN
clicks into place.
6WLWFKÀQJHUOHYHUVHWWLQJ
7KHVWLWFKÀQJHUOHYHUVKRXOGEHVHWWR1IRUDOOVWDQGDUG
overlock sewing. To sew rolled edge you need to retract
WKHVWLWFKÀQJHUE\VHWWLQJWKHVWLWFKÀQJHUOHYHUWR5
:KHQPRYLQJWKHVWLWFKÀQJHUOHYHUEHVXUHWRSXVKWKH
lever as far as it will go in each direction.

Threading12
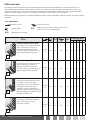
General threading information
$FRORUFRGHGGLDJUDPLVORFDWHGLQVLGHWKHIURQWFRYHUIRUTXLFNUHIHUHQFH$OZD\VVWDUWWKUHDGLQJWKHXSSHUORRSHU
followed by the lower looper and then the needles from right to left.
6HHWKHWDEOHEHORZIRUUHFRPPHQGDWLRQVRQZKDWQHHGOHVDQGWKUHDGWRXVHIRUGLIIHUHQWIDEULFZHLJKWV
7LS<RXUQHZPDFKLQHLVWKUHDGHGWRVHZDVWDQGDUGRYHUORFN7LH\RXURZQWKUHDGVWRWKHVHWKUHDGVDQGFDUHIXOO\SXOOWKHP
WKURXJKWKHPDFKLQHWRHDVLO\WKUHDG\RXUQHZRYHUORFNPDFKLQHWKHÀUVWWLPH
Re-threading if a thread breaks
If the two loopers are not threaded in the correct order they will not create a stitch. If a looper thread breaks always do
the following:
8QWKUHDGWKHQHHGOHV
2. Unthread the loopers
3. Thread the upper looper
4. Thread the lower looper
7KUHDGWKHQHHGOHVIURPULJKWWROHIW
The following pages give you detailed step by step instructions on threading.
Fabric Light fabric
YRLOFUHSHJHRUJHWWHHWF
Medium fabric
FRWWRQFKLQRZRROVDWLQ
HWF
+HDY\IDEULF
GHQLPMHUVH\WZHHGHWF
Needles
#12/80 #14/90 #14/90
Thread
Polyester
VSXQÀODPHQW
Twisted thread
#60/2 - #100/3
Twisted thread
#80/3 - #100/3
Twisted thread
#60/2
Twisted thread
#50/2 - #60/2
1RWH:KHQXVLQJVWDQGDUGWKUHDGVSRROVSODFHWKHWKUHDG
XQUHHOLQJGLVFDVVKRZQWRSUHYHQWWKHWKUHDGIURPJHWWLQJ
FDXJKWRQWKHHGJHRIWKHVSRRO

1
9
coverlock 4.0
2
3
4
5
6
7
8
9
1
2
Threading 13
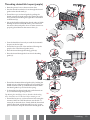
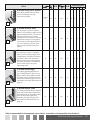
Threading the upper looper (red)
• Raise the presser foot to release tension discs.
• Pass the thread from back to front through the thread
JXLGHRQWKHWKUHDGVWDQG
• Thread the top cover thread guide by pulling the
thread towards the right until it slips under the guide.
Then pull the thread along the right side of the button
DVLOOXVWUDWHG
• Lift up the handle and bring the thread under it. While
holding the thread with both hands, pass it between
the tension discs and pull it down to make certain it is
SURSHUO\SODFHGEHWZHHQWKHWHQVLRQGLVFV
• Thread the looper area of the machine following the
UHGFRORUFRGHGWKUHDGJXLGHV
• Use the tweezers to thread the hole in the upper looper
IURPIURQWWREDFN
3XOODERXWFPµ of thread through the looper and
place it to the back of the stitch plate.

1
coverlock 4.0
1
2
3
9
4
5
6
7
8
9
10
5
2
B
A
C
Threading14
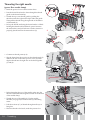
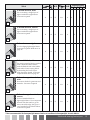
7KUHDGLQJWKHORZHUORRSHU\HOORZ
• Raise the presser foot to release tension discs.
• Pass the thread from back to front through the thread
JXLGHRQWKHWKUHDGVWDQG
• Thread the top cover thread guide by pulling the
thread towards the right until it slips under the guide.
Then pull the thread along the right side of the button
DVLOOXVWUDWHG
• Lift up the handle and bring the thread under it. While
holding the thread with both hands, pass it between
the tension discs and pull it down to make certain it is
SURSHUO\SODFHGEHWZHHQWKHWHQVLRQGLVFV
• Turn the handwheel toward you until the lower looper
H[WHQGVRXWPPµfrom the needle plate edge.
• Thread the looper area of the machine following the
\HOORZFRORUFRGHGWKUHDGJXLGHV
3ODFHWKHWKUHDGWKURXJKWKUHDGLQJJXLGH
• Place the thread through the right slot of threading
JXLGH
7RWKUHDGWKHODVWWKUHDGJXLGHSXOODERXWFP
µRIWKUHDGWKURXJKWKHJXLGH
7LS0RYLQJWKHVWLWFKÀQJHUOHYHUWR5PDNHVWKHWKUHDGLQJ
HDVLHU5HPHPEHUWRVHWLWEDFNWR1EHIRUHVWDUWLQJWRVHZ
7KUHDGWKHORRSHUH\H$IURPIURQWWREDFNXVLQJ
WKHWZHH]HUV0DNHVXUHWKHWKUHDGUXQVLQWRWKH´9µ
FXWRXWV%RQWKUHDGHUOHYHU)LUPO\KROGWKHWKUHDG
WDLOZLWKOHIWKDQGDQGSXOOWKHWKUHDGHUOHYHU&XS
into place and back to snap the thread into thread
guide 9.

coverlock 4.0
1
2
3
1
8
4
5
6
7
8
9
10
11
5
10
2
C
B
A
Threading 15
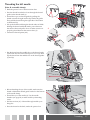
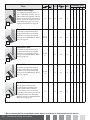
Threading chainstitch looper (purple)
• Raise the presser foot to release tension discs.
• Pass the thread from back to front through the thread
JXLGHRQWKHWKUHDGVWDQG
• Thread the top cover thread guide by pulling the
thread towards the right until it slips under the guide.
Then pull the thread along the right side of the button
DVLOOXVWUDWHG
• Lift up the handle and bring the thread under it. While
holding the thread with both hands, pass it between
the tension discs and pull it down to make certain it is
SURSHUO\SODFHGEHWZHHQWKHWHQVLRQGLVFV
• Turn the handwheel toward you until the chainstitch
looper is at the far right.
• Thread the looper area of the machine following the
SXUSOHFRORUFRGHGWKUHDGJXLGHV
3ODFHWKHWKUHDGWKURXJKWKUHDGLQJJXLGH
• Place the thread through the front slot of threading
JXLGH
7KUHDGWKHFKDLQVWLWFKWKUHDGJXLGHE\KROGLQJWKH
thread in front of the thread guide pin and pulling the
thread backward and up, until the thread rests inside
the thread guide loop and under the spring.
7RWKUHDGWKHODVWWKUHDGJXLGHSXOODERXWFP
µRIWKUHDGWKURXJKWKHJXLGH
7LS0RYLQJWKHVWLWFKÀQJHUOHYHUWR5PDNHVWKHWKUHDGLQJ
HDVLHU5HPHPEHUWRVHWLWEDFNWR1EHIRUHVWDUWLQJWRVHZ
7KUHDGWKHORRSHUH\H$IURPIURQWWREDFNXVLQJWKH
WZHH]HUV0DNHVXUHWKHWKUHDGUXQVLQWRWKHOHIW´9µ
FXWRXW%RQWKUHDGHUOHYHU)LUPO\KROGWKHWKUHDGWDLO
ZLWKOHIWKDQGDQGSXOOWKHWKUHDGHUOHYHU&XSLQWR
place and back to snap the thread into thread guide 10.

coverlock 4.0
4
5
6
7
8
9
1
2
3
1
9
2
Threading16
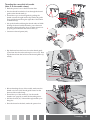
Threading the right needle
(green, B on needle clamp)
• Raise the presser foot to release tension discs.
• Pass the thread from back to front through the thread
JXLGHRQWKHWKUHDGVWDQG
• Thread the top cover thread guide by pulling the
thread towards the right until it slips under the guide.
Then pull the thread along the right side of the button
DVLOOXVWUDWHG
• Lift up the handle and bring the thread under it. While
holding the thread with both hands, pass it between
the tension discs and pull it down to make certain it is
SURSHUO\SODFHGEHWZHHQWKHWHQVLRQGLVFV
&RQWLQXHWRWKUHDGSRLQWV
6OLSWKHWKUHDGLQWRWKHUHDUVORWRQWKHWKUHDGJXLGH
DQGLQWRWKHVORWRQWKHWDNHXSOHYHUFRYHU7KHQ
slip the thread into the right slot on the thread guides
DQG
• Before threading the eye of the needle, make sure the
thread is behind the thread guide located on the bottom
of the needle clamp.
7KUHDGWKHH\HRIWKHQHHGOH8VHWKHQHHGOH
WKUHDGHUVHHSDJHWRPDNHQHHGOHH\HWKUHDGLQJ
easier.
3XOODERXWFPµRIWKUHDGWKURXJKQHHGOHH\HWR
hang free.
• Place the thread to the back, under the presser foot.

coverlock 4.0
1
2
3
1
4
5
6
7
8
9
9
2
Threading 17
Threading the left needle
(blue, A on needle clamp)
• Raise the presser foot to release tension discs.
• Pass the thread from back to front through the thread
JXLGHRQWKHWKUHDGVWDQG
• Thread the top cover thread guide by pulling the
thread towards the right until it slips under the guide.
Then pull the thread along the right side of the button
DVLOOXVWUDWHG
• Lift up the handle and bring the thread under it. While
holding the thread with both hands, pass it between
the tension discs and pull it down to make certain it is
SURSHUO\SODFHGEHWZHHQWKHWHQVLRQGLVFV
&RQWLQXHWRWKUHDGSRLQWV
6OLSWKHWKUHDGLQWRWKHPLGGOHVORWRQWKHWKUHDGJXLGH
DQGLQWRWKHVORWRQWKHWDNHXSOHYHUFRYHU7KHQ
slip the thread into the middle slot on the thread guides
DQG
• Before threading the eye of the needle, make sure the
thread is behind the thread guide located on the bottom
of the needle clamp.
7KUHDGWKHH\HRIWKHQHHGOH8VHWKHQHHGOH
WKUHDGHUVHHSDJHWRPDNHQHHGOHH\HWKUHDGLQJ
easier.
3XOODERXWFPµRIWKUHDGWKURXJKQHHGOHH\HWR
hang free.
• Place the thread to the back, under the presser foot.

5
6
7
8
9
coverlock 4.0
1
2
3
1
4
9
2
Threading18
Threading the chainstitch needle
(blue, D on needle clamp)
• Raise the presser foot to release tension discs.
• Pass the thread from back to front through the thread
JXLGHRQWKHWKUHDGVWDQG
• Thread the top cover thread guide by pulling the
thread towards the right until it slips under the guide.
Then pull the thread along the right side of the button
DVLOOXVWUDWHG
• Lift up the handle and bring the thread under it. While
holding the thread with both hands, pass it between
the tension discs and pull it down to make certain it is
SURSHUO\SODFHGEHWZHHQWKHWHQVLRQGLVFV
&RQWLQXHWRWKUHDGSRLQWV
6OLSWKHWKUHDGLQWRWKHPLGGOHVORWRQWKHWKUHDGJXLGH
DQGLQWRWKHVORWRQWKHWDNHXSOHYHUFRYHU7KHQ
slip the thread into the middle slot on the thread guides
DQG
• Before threading the eye of the needle, make sure the
thread is in front of the thread guide located on the
bottom of the needle clamp.
7KUHDGWKHH\HRIWKHQHHGOHUse the needle
threader VHHSDJHto make the threading easier.
• 3XOODERXWFPµRIWKUHDGWKURXJKQHHGOHH\HWR
hang free.
• Place the thread to the back, under the presser foot.

1
5
6
7
8
9
coverlock 4.0
2
3
1
4
9
2
Threading 19
Threading the coverstitch needles
1RWH7KUHDGWKHQHHGOHVLQWRIROORZLQJRUGHUULJKW(PLGGOH
'OHIW&
Threading the right coverstitch needle
(red, E on the needle clamp)
• Raise the presser foot to release tension discs.
• Pass the thread from back to front through the thread
JXLGHRQWKHWKUHDGVWDQG
• Thread the top cover thread guide by pulling the
thread towards the right until it slips under the guide.
Then pull the thread along the right side of the button
DVLOOXVWUDWHG
• Lift up the handle and bring the thread under it. While
holding the thread with both hands, pass it between
the tension discs and pull it down to make certain it is
SURSHUO\SODFHGEHWZHHQWKHWHQVLRQGLVFV
&RQWLQXHWRWKUHDGSRLQWV
6OLSWKHWKUHDGLQWRWKHUHDUVORWRQWKHWKUHDGJXLGH
DQGLQWRWKHVORWRQWKHWDNHXSOHYHUFRYHU7KHQ
slip the thread into the right slot on the thread guides
DQG
• Before threading the eye of the needle, make sure the
thread is in front of the thread guide located on the
bottom of the needle clamp for coverstitch.
7KUHDGWKHH\HRIWKHQHHGOHUse the needle
threader VHHSDJHto make the threading easier.
• 3XOODERXWFPµRIWKUHDGWKURXJKQHHGOHH\HWR
hang free.
• Place the thread to the back, under the presser foot.
Page is loading ...
Page is loading ...
Page is loading ...
Page is loading ...
Page is loading ...
Page is loading ...
Page is loading ...
Page is loading ...
Page is loading ...
Page is loading ...
Page is loading ...
Page is loading ...
Page is loading ...
Page is loading ...
Page is loading ...
Page is loading ...
Page is loading ...
Page is loading ...
Page is loading ...
Page is loading ...
Page is loading ...
Page is loading ...
Page is loading ...
Page is loading ...
Page is loading ...
Page is loading ...
Page is loading ...
-
 1
1
-
 2
2
-
 3
3
-
 4
4
-
 5
5
-
 6
6
-
 7
7
-
 8
8
-
 9
9
-
 10
10
-
 11
11
-
 12
12
-
 13
13
-
 14
14
-
 15
15
-
 16
16
-
 17
17
-
 18
18
-
 19
19
-
 20
20
-
 21
21
-
 22
22
-
 23
23
-
 24
24
-
 25
25
-
 26
26
-
 27
27
-
 28
28
-
 29
29
-
 30
30
-
 31
31
-
 32
32
-
 33
33
-
 34
34
-
 35
35
-
 36
36
-
 37
37
-
 38
38
-
 39
39
-
 40
40
-
 41
41
-
 42
42
-
 43
43
-
 44
44
-
 45
45
-
 46
46
-
 47
47
-
 48
48


Pfaff coverlock 4.0 User manual
- Category
- Sewing machines
- Type
- User manual
Ask a question and I''ll find the answer in the document
Finding information in a document is now easier with AI
Related papers
-
Pfaff coverlock 3.0 User manual
-
Pfaff hobbylock 2.5 Owner's manual
-
Pfaff Сoverlock 4.0 Owner's manual
-
-
Pfaff admire air 5000 User manual
-
-
-
-
-
Other documents
-
SINGER S14-78 Owner's manual
-
JANOME Cover Pro 1000CP Owner's manual
-
Juki MCS-1500 User manual
-
JANOME Cover Pro 900CP Owner's manual
-
-
White 834DW User manual
-
 Consew 14TU2345 User manual
-
 PuriSystems PuriCare 1100 Air Filtration System User manual
-
-

