Dyconn Faucet WF003-A19ORB Installation guide
- Category
- Sanitary ware
- Type
- Installation guide


2
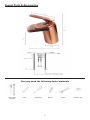
You may need the following tools/materials
Valve Hoses
(included)
Pliers Screw Driver WrenchSilicone Plumbers Tape
Faucet Parts & Accessories

3
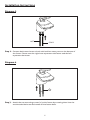
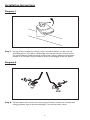
Note: Your faucet is designed for a hole with a diameter of 1 3/8” (35mm) and a deck
thickness of up to 2” (50mm).
Pleaseshutowatervalvesbeforeconductingfaucetassembly.
Step 1: Attach the O-ring within the circular recess on the bottom of the faucet.
Diagram 2
Diagram 1
InstallationInstructions
2” (50mm)
1.375” (35mm)

4
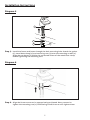
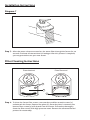
Step 2: Connect both water hoses to both cold and hot water ports on the bottom of
the faucet. Please note the right hose represents cold water and the left
represents hot water.
Step 3: Attach the two mounting screws (1) to the faucet by screwing them into the
two threaded holes on the bottom of the faucet base.
Diagram 4
Diagram 3
InstallationInstructions
HOT
COLD
1

5
Step 5: Install the faucet and hoses through the deck mounting hole. Attach the gasket
(1), metal base clamp (2) and mounting nuts (3) onto the mounting screws (4).
Align the two hoses (5) within the contoured recess of the metal base clamp
before tightening the mounting nuts.
Step 6: Align the faucet to ensure its appropriately positioned. Next, proceed to
tighten the mounting nuts (1) while being mindful not to over-tighten them.
Diagram 6
Diagram 5
InstallationInstructions
1
4
5
2
3
1

6
Step 7: During faucet installation, lings, chips, and other debris can fall into the
plumbing pipes. This debris can damage the internal faucet surfaces which
can cause leakage. Before turning on the water valves, make sure the faucet
handle is in the open (On) position in order to thoroughly ush out debris.
Step 8: Connect both water hoses onto the respective water valves (we recommend
using plumbers tape to prevent leakage). Turn on the water valves.
Diagram 8
Diagram 7
InstallationInstructions

7
Step 7: After the water valves are turned on, let water lter through the faucet for 30
seconds. Evaluate all connections for leakage. After this process is complete,
you may proceed to use your new faucet.
Diagram 7
InstallationInstructions
Step 1: To clean the faucet lter screen, unscrew the two Allen wrench screws (1)
underneath the faucet. Remove the plate (2). Once the plate is removed, the
bottom lter screen (3) will detach from the faucet. Proceed to thoroughly
clean the lter screen with high pressure water. Reverse the aforementioned
process for reassembly.
FilterCleaningInstructions
1
2
3
Plate Attached Plate Removed

All Dyconn Faucet products are manufactured and tested with the highest quality standards and rigorous quality control process.
This warranty is limited to the non-commercial use of Dyconn Faucet products purchased and installed in the United States
and Canada.
DyconnFaucetBrandLimitedWarrantyonFaucetsandKitchen/BathAccessories
Dyconn Faucet warrants its faucet products to be free from manufacturing defects in material and workmanship during the normal
non-commercial use for a period of three (3) years from the initial purchase date by the original owner/end-user for personal
household use. Dyconn Faucet also warrants its part and accessory products to be free from manufacturing defects in material
and workmanship during the normal non-commercial use for a period of one (1) year from the initial purchase date by the original
owner/end-user for personal household use. This warranty is non-transferable between homes or owners and only applicable for
residential use. Any commercial or industrial use of Dyconn Faucet products automatically voids the warranty. Any warranty claim
must include the original sales receipt as proof of purchase from an Authorized Dealer or Distributor of Dyconn Faucet products.
(Authorized Dealers can be found on the Dyconn Faucet website).
Dyconn Faucet recommends installation of all Dyconn Faucet products by a licensed professional plumber. Dyconn Faucet will
not be responsible for any damage or product failure due to improper installation, misuse or the failure to adequately utilize a
licensed professional. Proper care and maintenance for all products is standard, like any other household appliance and xtures to
ensure proper function and a lasting product. Instructions are provided in your manual on proper care and maintenance of Dyconn
Faucet products.
This warranty will not cover any damages that might be caused by the product. (In some instances States do not allow for such
limitations, so this may not apply to all owners).
Any product reported to Dyconn Faucet as defective will be repaired or replaced (with a product of equal value) at the option
of Dyconn Faucet. If Dyconn Faucet is not able to replace or repair the product, Dyconn Faucet may elect to refund the original
purchase price to the original purchaser in exchange for the return of product. Dyconn Faucet has the full rights to inspect any
Dyconn Faucet product reported as defective prior to repair or replacement. Any repair and replacement costs EXCLUDE shipping,
labor for removal or re-installation and any consequential or special damages associated with return, replacement and installation
of your product. Replacement parts may be obtained by calling 1-855-239-2666 (in the U.S. and Canada), by emailing us at
info@dyconnfaucet.com or writing to:
DyconnFaucet
382N.LemonAvenue#122
Walnut,CA91789
Dyconn Faucet reserves the rights to modify the warranty at any time, it being understood that any such modications will not
supersede warranty conditions that are applicable at the time of the original sale of products in question.
Though Dyconn Faucet products are certied by various agencies, Dyconn Faucet makes no implication that products comply with
any or all local building or plumbing codes. It is the consumer’s responsibility to determine any code compliances when installing
and using Dyconn Faucet products.
LimitationsofWarranty:
The warranty shall be not apply and be void for incorrect operating procedures, breakages and/or damages caused by fault
through improper installation, carelessness, abuse, misuse, misapplication, improper maintenance and alteration of product;
damages caused by chemicals, natural corrosion, accident, re, ood, an act of God, or any casualty. Avoid abrasive cleaners,
materials, steel wools and harsh chemicals as these will scratch, damage, and/or dull the products and/or nish of the products
and void the warranty. The proper installation of product covered is the responsibility of the original owner/purchaser of the
product. Dyconn Faucet neither installs nor supervises the installation nor hires contractors for this purpose; consequently
Dyconn Faucet cannot be held responsible for any default breakage, or damages caused thereby or resulting thereof, either
directly or indirectly.
This warranty does not apply to Products that have not been installed or operated in accordance with instructions supplied by
Dyconn Faucet and all applicable rules, regulations, and legislation pertaining to such installations.
This warranty does not apply to Commercial or Industrial applications of Dyconn Faucet products.
Dyconn Faucet is not responsible or liable for personal injuries or deaths to any person for any direct, special, incidental, or
consequential damage, loss of time, loss of prots, inconvenience, incidental expenses, labor or material charges, or any other
cost resulting from the use of the product or equipment or pertaining to the application of the presen t warranty, or resulting from
the removal or replacement of any product or element or part covered by this warranty.
In any case, Dyconn Faucet is not liable for any amount over and above the purchase price paid for the Product by the original
owner/end-user.
CleaningandCare
Care should be exercised when cleaning this product. Although its nish is extremely durable, it can be damaged by harsh
abrasives and cleaning pads. To clean, use a light, non-abrasive cleaning solution or cleaning polish.
ManufacturerLimitedWarranty
-
 1
1
-
 2
2
-
 3
3
-
 4
4
-
 5
5
-
 6
6
-
 7
7
-
 8
8


Dyconn Faucet WF003-A19ORB Installation guide
- Category
- Sanitary ware
- Type
- Installation guide
Ask a question and I''ll find the answer in the document
Finding information in a document is now easier with AI
Related papers
-
Dyconn VS1H08-BN Installation guide
-
Dyconn PUD-BN User manual
-
Dyconn HF1H23-BN Installation guide
-
-
-
-
-
Dyconn M13AT1216T User manual
-
Dyconn Faucet M09AT3036W User manual
-
 Dyconn Faucet WTM02849L Installation guide

Other documents
-
-
-
-
-
-
-
-
-
-