OWNER’S MANUAL

Congratulations!
You have made the right choice by choosing the Powerhouse XM-100 Chainsaw Winch!
Before you do anything else, read the XM-100 Owner’s Manual from cover to cover to learn
how to operate your new Chainsaw Winch safely and eciently.
If you have any photos, movies and comments that you would like to share regarding your
experience with the Powerhouse Chainsaw winch, please feel free to send them to us. If
you have any questions about your new Powerhouse Chainsaw Winch, its accessories and
anchoring systems, denitely get in touch and we will help you with any issues or concerns
you may have.
One of the rst things you should do is to choose the right chainsaw for your intended
purpose:
• In general, a chainsaw should have a minimum of 3 horsepower (with 48 cc’s, 18”+ bar
w/ 3/8” chain). It has a commercial-grade clutch, and though it may sometimes slip, it
will not burn up under heavy loads.
• You can make do with electric and gas chainsaws with less than 3 HP if you only work
with lighter loads.
• Like any tool, chainsaws must be maintained and serviced regularly. Consult your chain
saw owners’ manual or check with your local chainsaw dealer for the best way to care
for your chainsaw.
Servicing & maintaining your Powerhouse Winch
• For optimal performance and your safety, always check to make sure that your Powerhouse
Chainsaw Winch’s throttle and clutch are in proper working order.
• Maintain 5 oz of oil in the Powerhouse Chainsaw Winch gearbox at all times.
• To check oil level in the gearbox, stand your winch vertically on its spool. Remove the oil ll-
plug. Oil level must be the level of the ll-plug.
• Re-ll oil if necessary. Do not overll.
• Never let the gearbox run dry. Nearly all gear damage occurs due to a dry gearbox.
• The gearbox has been pre-lled at the factory with 5 oz. of 80/90 weight gear oil.
• Make sure that the chain-guard is in place before operating the Powerhouse Chainsaw Winch.
• Check that all nuts, bolts and set screws tight before using the Powerhouse Chainsaw Winch.
2
GENERAL PERFORMANCE CHART
* THE OPERATOR ACCEPTS ALL RISK WHEN USING AN ENGINE WITH MORE THAN 100 cc’s OR 7 bhp
Expected Use
Light Duty
General Duty
Heavy Duty
Engine Size (bhp)
3-4
5-6
7*
Pulling Capacity (lbs)
Straight-Line
2,000-2,500
3,000- 3,500
Up to 4,000
Pulling Capacity (lbs)
Using 1 Snatch Block
4,000 -5,000
6,000- 7,000
Up to 8,000

Cable Management
• Replace cable when it shows signs of wear (frays, bends, kinks, etc.).
• Use either 1/8” or 3/16” cables. Your new Powerhouse Chainsaw Winch comes with 150
feet of 3/16” aircraft cable.
• For safety reasons, keep at least 10-20 wraps on the drum at all times.
• Ensure that there is no slack on the cable before starting up your chainsaw. This prevents
sudden jerking on the cable that could break the shear-pins of your Powerhouse Chainsaw
Winch. This can cause the spool to free wheel.
• If your load comes up against an obstacle, do not force the winch to pull it free. This can
damage the winch, especially if you are using the larger chainsaw engines. Instead, stop
the engine, and check on the unknown load. Remove it if possible before you start pulling
again.
Out of the Box
3
Powerhouse
Chainsaw Winch
150 ft Cable
Wrench
Brake Handle
Bar Adaptor
Cutterless Chain
Direct Adaptor Kit

Operating Tips
• You have to make sure that the Powerhouse Chainsaw Winch is anchored to something
heavier and more solid than the object that you are trying to move.
• To anchor your Powerhouse Chainsaw Winch to a tree, use a belt. Connect it directly to
the winch, or use another cable or chain, as needed.
• You can also use a vehicle as an anchor. Attach a cable or chain attached securely
to the vehicle’s frame. If your vehicle happens to have a 2” receiver hitch, you can use a
trailer-hitch mount (not included).
• If you have a hard time releasing the clutch because there is still a lot of tension on the
cable, try using a chain-binder in your anchor set-up. This will let you to release the cable
tension easily.
WARNING: Always engage the hand brake before releasing the clutch under load.
• Use a bungee cord on the brake handle to keep tension on the brake when unspooling
the cable to prevent “birdnesting.”
4
BE SAFE
This Powerhouse Chainsaw Winch owners’ manual serves only as a general guide. If you
have any questions or concerns, call us for more information.
Do not take chances with your safety!
NOISE LEVELS
The sound level produced by a Powerhouse Chainsaw Winch is very low. Most of the
noise and vibrations come from the chainsaw itself. In some instances, the Powerhouse
Chainsaw Winch may even help to reduce noise and vibration levels. To nd out how
much noise you can expect while operating the winch, consult your chainsaw’s
owner’s manual.

5
Using a Peavey Hook (not included) to anchoring your Powerhouse Chainsaw Winch
Using a Tree-Saver Belt to anchor your Powerhouse Chainsaw Winch
Find a secure tree stump and put the Powerhouse Chainsaw Winch on top. Make sure the
Peavey Hook can get a good grip on the tree stump. As soon as you operate the Powerhouse
Chainsaw Winch, the load will generate an increase in tension on the cable and will result
in a stronger anchoring of the Peavey Hook on the stump.
You can also use a tree saver belt to anchor the Powerhouse Chainsaw Winch. For safe
operation, make sure that the winch is put on a solidly anchored object. Also, make sure to
set the anchor points on the trees lower than the position of the winch. This is to ensure
that winch will not be lifted up into the air when the cable is under tension when throttling
the engine.

ASSEMBLY & MOUNTING INSTRUCTIONS
DIRECT MOUNT
1. Detach the bar and chain from the chain saw, leave the bar-mounting nuts.
2. Detach the spring-clip from the output shaft of the chainsaw
3. Detach the large washer from the output shaft of the chainsaw. If the chainsaw has a
rim-sprocket, this must also be removed.
4. Re-attach the spring-clip, but do not re-attach the large washer.
5. Detach the washer from the input shaft of the Powerhouse Chainsaw Winch. Failure to
do so when using the “direct mount” method could result in gear damage. Locate the
appropriate adaptor for the chain saw. Bolt and screw the 1/2” thick master-disk to the
corresponding 3/8” disk for your chain saw using the supplied 3 screws.
TIP : To make sure the screws stay tight, we recommend using “Loctite”. Slip the
assembled adaptor onto the input shaft of the Powerhouse Chainsaw Winch.
Make sure that the studs of the chainsaw and the slot in the winch are aligned.
This is to make sure that the adaptor is fully engaged and set straight with the
output shaft of the chainsaw. The Direct Drive Adaptor must have a back-and-
forth oat of about 3/8”.
TIP : Make sure that the bar-adjustment stud on the chainsaw ts snugly into the
lower slot of the Powerhouse Chainsaw Winch. To adjust the position, turn the
bar-adjustment screw of the chainsaw until aligned.
6. Re-attach the bar-mounting nuts on the bar studs of the chainsaw, then tighten the nuts.
(use Loctite)
TIP : We recommend emptying the chain-oiler tank of the chainsaw if you will
use the Direct Mount Method.
6

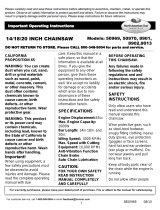
Alternate UNIVERSAL MOUNT
Detach the bar and chain of the chain saw.
Leave the bar-mounting nuts.
Using 5/16” cap screws and washers, attach
the universal adaptor to the Powerhouse
Chainsaw Winch.
Slip the rim-sprocket onto the output shaft
of the Powerhouse Chainsaw Winch. Do not
remove the orange cup washer.
Using the retained bar mounting nuts, attach
the Powerhouse Chainsaw Winch Adaptor to
the bar studs of the chainsaw.
7
1
1
1
2

8
Attach the supplied cutter-less chain around
the sprocket of the chainsaw and the winch.
Attach the chain using the supplied connect-
ing link.
Hammer pins or attach spring clips to
securely install side-plate.
1
3
1
4

Use the chain adjustment screw on the chain
saw to adjust the chain tension.
9
1
5
CABLE INSTALLATION
1. Using a gloved hand, rmly press the clutch handle then turn counter-clockwise to disengage
the clutch. This will let the spool free wheel. Fully unwind the cable.
2. Pass the end of the cable through the fair lead then the hole in the spool. Wind the cable
manually.
TIP : For added safety, wrap a few coils of cable around the spool with duct-tape.
3. Turn the clutch handle clockwise to re connect the clutch.
TIP : Make sure the clutch shaft is connected and fully engaged to the drive sprocket.
4. Turn on the chainsaw to wind up the remaining cable back to the spool.
TIP : Attach a fairly heavy weight at the other end of the cable to keep it taut. This
is to make sure the cable winds tightly on the spool.
5. To prevent the cable from creating a “bird’s nest” when unspooling, use a bungee cord to
maintain a constant pressure on the brake.
BRAKE HANDLE INSTALLATION
• Level the brake handle attachment bolt with the brake handle by pulling it back using a
5/16” Hex key.
• Slip the brake handle on top of the brake drum. Align the attachment bolt with the
threaded hole on the Powerhouse Chainsaw Winch. Tighten the bolt with a hex key while
tightly holding the brake-handle.
TIP : To avoid having a stiff brake handle, do not over tighten the attachment bolt.

Cable Care
Purchase and use of wire rope and aircraft cable
WARNING
Please take note that the Breaking Strength indicated for wire ropes or aircraft cables
apply only to brand new and unused products. To nd out the Maximum Working Load of
a product, check the CAUTION section below. Also, take note that these products must be
used only for what they were designed for and for equipment they were built for. They must
be used only under normal working conditions and within OSHA safety standards. Always
follow the instructions indicated regarding their use in terms of design, maintenance, and
operation. Aircraft cables are not rated to be used with aircraft controls.
Denitions
Breaking Strength - Is the minimum pressure exerted on a product that will cause it to
break. The amount of pressure is based on test results made using standard testing
machine. The testing machine applies direct tension to the product at a constant rate of
speed. The products used for the tests must be in the same condition as it left the manu-
facturer.
Kinking – This is a condition of the rope or wire where in the strands and bers are skewed
from their normal twist. This occurs when the rope or wire takes on a spiral shape. This
condition
compromises the strength and integrity of the product. It causes uneven tension and
excessive wear on the affected area. Kinking usually occurs when the wire or rope is reeled,
rolled or coiled improperly. To avoid kinking, always reel, coil or roll the wire or rope prop-
erly. Once kinking occurs, it can no longer be xed or undone. Unrolling and straightening
the kinked area cannot undo the damage. Because of this, kinked wires or ropes must not
be used and must be replaced immediately.
10

11
CAUTION
It is very important to note that there are several factors that need to be considered in
determining the maximum working load for every application. These factors include but are
not limited to the following:
• Applied Load
• Operating Speed
• Acceleration/Deceleration
• Cable Length
• Shock Load
• Abrasion
• Corrosion
• Quantity, quality, design, and location of drums and sheaves
• Inspection Facilities
• Safety Risks to life and property
During coiling or winding of the cable onto the spool, make sure that tightness of the layers
is consistent all throughout the coiling or winding. Do not coil a tight layer of cable over a
loose layer. This may cause the outer tight layers to exert additional force between the layers
and cause a jam. When unspooling the cable, put tension on the brake to make sure the
spool speed is lower than the cable speed.
Always store, maintain and handle the products properly before and after each use. Do not use
linked or knotted cable. Regularly inspect your product and its parts.

12
POWERHOUSE XM-100 WINCH PARTS LIST
1
2
3
4
5
6
7
8
9
10
11
12
13
14
15
16
17
18
19
20
21
22
23
24
25
26
27
28
29
30
31
32
34
33
35
36
9
37
38
39
40
41

13
# PART DESCRIPTION
1 L906 Direct Drive Adaptor Kit 4 pcs c/w 3 screws
1 L906A 3/16” Spacer for Adaptor Kit c/w 3 longer screws
1 L906B 7 Tooth Mini Spline Adaptor for small Stihl saw
1 L906D 6 Tooth Adaptor for Electric saw & small Stihl
1 L906E * Master Adaptor for Powerhouse Winch 1/2” thick w 3 screws
1 L906F * 7 Tooth Standard Spline Adaptor
1 L906G * 7 Tooth Spur Adaptor 3/8” pitch
1 L906H * 7 Tooth Small Spline Adaptor
1 L906J 3 Adaptor screws (std length)
1 L906M Special 1 pc Adaptor 1” long std spline to 8 tooth .325
2 not in parts list Orange Cup Washer
3 E504C * Rim Sprocket 3/8” Pitch
4 E504B Adaptor
5 L902 * Cutterless Chain 3/8” Pitch c/w Connector
6 L901 * Bar Adaptor (mounting bar) c/w 2 Bolts & Lock Washers
7 A401 Brake Handle
8 A400 Brake Drum (complete)
9 B402 Bearing (2)
10 B403A Main Handle
11 B403 Drum Housing c/w Gearbox (1 casting)
12 B404A Retainer Pins (2)
13 B404 Cable Drum
14 E506 Bearing
15 E507 Bearing
16 E508 Bearing
17 E506A Oil Seal for Input Shaft (units 2004 & later)
18 E601 Gear 1st Shaft small (input shaft)
19 E602 Gear 2nd Shaft small
20 E600 Gear 3rd Shaft Large
21 E509 Gear 2nd Shaft Large
22 G700 Shaft Gearbox (output shaft)
23 F606 Bearing
24 F607 Bearing
25 F608 Bearing
26 E605 Gasket
27 E604 Gearbox Cover
28 E605A Socket Head Cap Screws 1/4” (6)
29 H702 Sprocket 40 Pitch
30 C501 Bolt c/w Spacer (2)
31 B409 Shackle & Bolt c/w Locknut
32 B409B Hardened Shoulder Bolt c/w Locknut (2)
33 B409A Cable Roller & Bolt c/w Locknut
34 B407 Retainer Pin (1)
35 B406 Drum Shaft (pre-drilled)
36 B407A Hardened Dowel Pin (for clutch)
37 C409 40 Pitch Chain c/w Connector
38 D503 Sprocket with 6 Holes (for clutch units 2003 & later)
39 D503A Bronze Bushing
40 D502 Clutch c/w Handle (for new sprocket #15)
41 C500 Chain Guard

14
WARRANTY
Limited Warranty for the Powerhouse XM-100
What is covered
Your Chainsaw Winch is warranted against original defects in material and workmanship
for a period of one (1) year from the date of purchase, when used for purposes in accordance
with this User’s Guide. This warranty provides for the repair or replacement of the unit.
Replacement product or parts may include re-manufactured or refurbished parts or
components.
Effectivity
The one (1) year warranty for all parts and labor applies to the date of rst purchase. This
is valid only for the rst purchaser.
What is not covered
• Units purchased from unauthorized dealers.
• Units with defaced, modied, or removed serial numbers.
• Damage, deterioration, or malfunction due to:
a. Accident, misuse, neglect, re, water, lightning, or other acts of nature.
b. Unauthorized modication of unit.
c. External sources such as power uctuation and weather.
d. Repair or attempted repair and alteration by unauthorized parties.
e. Any damage to product due to shipment.
f. Removal or installation of product.
g. Use of parts and supplies other than those produced or recommended by
Powerhouse Chainsaw Winch.
• Removal, installation, and set-up service charges.
Warranty Service
• Contact Powerhouse. the helpline for more information regarding obtaining warranty
service 503.575.9407.
• To obtain warranty service, be ready to provide the following: serial number, date and
place of purchase, original dated sales slip, your name and address, and a description
of the problem.
• All repair work will be done by Powerhouse or its authorized agents.
• Any replaced defective parts will not extend this warranty period.
• Service under warranty will not extend this warranty period.
Warranty Limitations and Exclusions
• There are no warranties, express or implied, which extend beyond the description
contained herein including the implied warranty of merchantability and tness for a
particular purpose.

15
• Powerhouse’ liability is limited to the cost of repair or replacement of the product.
Powerhouse’, Inc. will not be liable for any consequential damages or incidental
damages you incur in connection with your purchase and use of your unit. This
limitation is not allowed by some states and so this limitation may not apply to you.
• This warranty gives you specic legal right. You may also have other rights that vary
by state.
Sales outside the U.S.A.
For Powerhouse’ products sold outside the U.S.A, contact your dealer for warranty
information and service.
Powerhouse Logsplitters
16520 SW 72nd Ave.
Portland, OR 97224
Phone: 503.575.9407
Fax: 503.296.2865
E-mail: [email protected]

/