Asus 4G-AC86U User manual
- Category
- Cellular wireless network equipment
- Type
- User manual

User Guide
4G-AC86U4G-AC86U
Wireless-AC2600 Cat.12 LTE Router

2
Copyright © 2021 ASUSTeK Computer Inc. All Rights Reserved.
No part of this manual, including the products and software described
in it, may be reproduced, transmitted, transcribed, stored in a retrieval
system, or translated into any language in any form or by any means, except
documentation kept by the purchaser for backup purposes, without the
express written permission of ASUSTeK Computer Inc. (“ASUS”).
Product warranty or service will not be extended if: (1) the product is repaired,
modified or altered, unless such repair, modification of alteration is authorized
in writing by ASUS; or (2) the serial number of the product is defaced or
missing.
ASUS PROVIDES THIS MANUAL “AS IS” WITHOUT WARRANTY OF ANY KIND,
EITHER EXPRESS OR IMPLIED, INCLUDING BUT NOT LIMITED TO THE IMPLIED
WARRANTIES OR CONDITIONS OF MERCHANTABILITY OR FITNESS FOR A
PARTICULAR PURPOSE. IN NO EVENT SHALL ASUS, ITS DIRECTORS, OFFICERS,
EMPLOYEES OR AGENTS BE LIABLE FOR ANY INDIRECT, SPECIAL, INCIDENTAL,
OR CONSEQUENTIAL DAMAGES (INCLUDING DAMAGES FOR LOSS OF PROFITS,
LOSS OF BUSINESS, LOSS OF USE OR DATA, INTERRUPTION OF BUSINESS
AND THE LIKE), EVEN IF ASUS HAS BEEN ADVISED OF THE POSSIBILITY OF
SUCH DAMAGES ARISING FROM ANY DEFECT OR ERROR IN THIS MANUAL OR
PRODUCT.
SPECIFICATIONS AND INFORMATION CONTAINED IN THIS MANUAL ARE
FURNISHED FOR INFORMATIONAL USE ONLY, AND ARE SUBJECT TO CHANGE
AT ANY TIME WITHOUT NOTICE, AND SHOULD NOT BE CONSTRUED AS A
COMMITMENT BY ASUS. ASUS ASSUMES NO RESPONSIBILITY OR LIABILITY
FOR ANY ERRORS OR INACCURACIES THAT MAY APPEAR IN THIS MANUAL,
INCLUDING THE PRODUCTS AND SOFTWARE DESCRIBED IN IT.
Products and corporate names appearing in this manual may or may not be
registered trademarks or copyrights of their respective companies, and are used
only for identification or explanation and to the owners’ benefit, without intent
to infringe.
E18231
First Edition
April 2021

3
Table of contents
1 Getting to know your wireless router
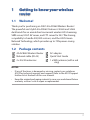
1.1 Welcome! ...........................................................................................7
1.2 Package contents ............................................................................7
1.3 Your wireless router .......................................................................8
1.4 Positioning your router .............................................................. 10
1.5 Installing a Nano SIM card into your router ....................... 11
2 Getting started
2.1 Router setup .................................................................................. 12
A. Wired connection ..................................................................13
B. Wireless connection ............................................................. 14
2.2 Quick Internet Setup (QIS) with Auto- detection ............. 16
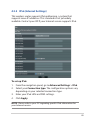
3 Configuring the General Settings
3.1 Using the Network Map ........................................................... 21
3.1.1 Setting up the wireless security settings ......................22
3.1.2 System Status .........................................................................23
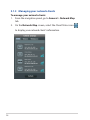
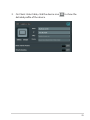
3.1.3 Managing your network clients ....................................... 24
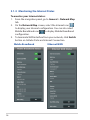
3.1.4 Monitoring the Internet Status ........................................26
3.1.5 Monitoring your USB device .............................................27
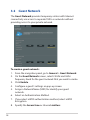
3.2 Guest Network .............................................................................. 28
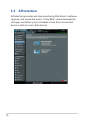
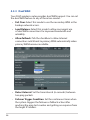
3.3 AiProtection ................................................................................... 30
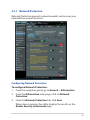
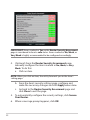
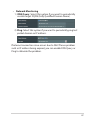
3.3.1 Network Protection .............................................................. 31
3.3.2 Setting up Parental Controls ............................................. 35
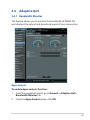
3.4 Adaptive QoS ................................................................................ 39
3.4.1 Bandwidth Monitor ..............................................................39
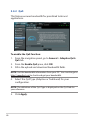
3.4.2 QoS ............................................................................................. 40
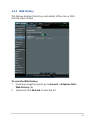
3.4.3 Web History .............................................................................41

4
Table of contents
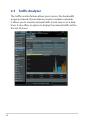
3.5 Traffic Analyzer ............................................................................. 42
3.6 Using the USB Application ....................................................... 43
3.6.1 Using AiDisk ............................................................................43
3.6.2 Using Servers Center ............................................................46
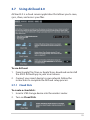
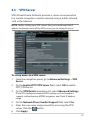
3.7 Using AiCloud 2.0 ........................................................................ 51
3.7.1 Cloud Disk ................................................................................51
3.7.2 Smart Access ........................................................................... 53
3.7.3 Smart Sync ............................................................................... 53
3.7.4 Sync Server ..............................................................................55
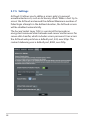
3.7.5 Settings ..................................................................................... 58
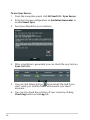
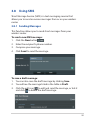
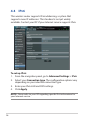
3.8 Using SMS ....................................................................................... 59
3.8.1 Sending Messages ................................................................ 59
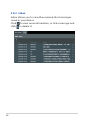
3.8.2 Inbox .......................................................................................... 60
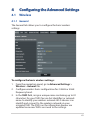
4 Configuring the Advanced Settings
4.1 Wireless............................................................................................ 61
4.1.1 General ......................................................................................61
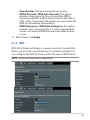
4.1.2 WPS ............................................................................................63
4.1.3 WDS ............................................................................................65
4.1.4 Wireless MAC Filter ...............................................................67
4.1.5 RADIUS Setting .....................................................................68
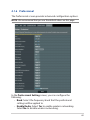
4.1.6 Professional ............................................................................69
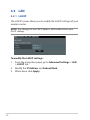
4.2 LAN .................................................................................................... 72
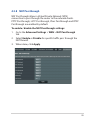
4.2.1 LAN IP ........................................................................................72
4.2.2 DHCP Server ............................................................................73
4.2.3 Route .........................................................................................75
4.2.4 IPTV ............................................................................................76
4.2.5 Switch Control ........................................................................ 76
4.3 WAN .................................................................................................. 77
4.3.1 Internet Connection .............................................................77

5
Table of contents
4.3.2 IPv6 (Internet Settings) .......................................................85
4.3.3 Dual WAN .................................................................................86
4.3.4 Port Trigger ..............................................................................88
4.3.5 Virtual Server/Port Forwarding ........................................90
4.3.6 DMZ............................................................................................93
4.3.7 DDNS .........................................................................................94
4.3.8 NAT Passthrough ................................................................... 95
4.4 IPv6 ................................................................................................... 96
4.5 VPN Server ...................................................................................... 97
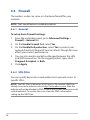
4.6 Firewall ............................................................................................. 98
4.6.1 General ......................................................................................98
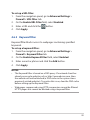
4.6.2 URL Filter ..................................................................................98
4.6.3 Keyword filter .........................................................................99
4.6.4 Network Services Filter .................................................... 100
4.6.5 IPv6 Firewall ......................................................................... 100
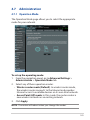
4.7 Administration ............................................................................ 101
4.7.1 Operation Mode ................................................................. 101
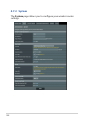
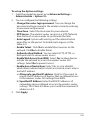
4.7.2 System .................................................................................... 102
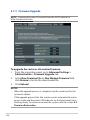
4.7.3 Firmware Upgrade ............................................................. 104
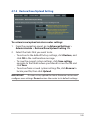
4.7.4 Restore/Save/Upload Setting ........................................ 105
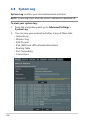
4.8 System Log ................................................................................... 106
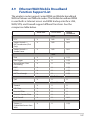
4.9 Ethernet WAN Mobile Broadband Function Support List 107
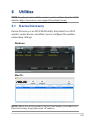
5 Utilities
5.1 Device Discovery ........................................................................109
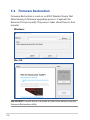
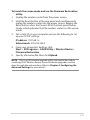
5.2 Firmware Restoration ...............................................................110
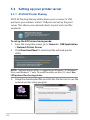
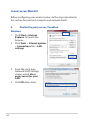
5.3 Setting up your printer server ............................................... 112
5.3.1 ASUS EZ Printer Sharing .................................................. 112
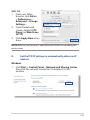
5.3.2 Using LPR to Share Printer .............................................. 115
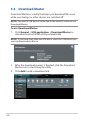
5.4 Download Master ......................................................................120
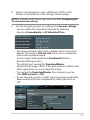
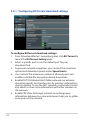
5.4.1 Configuring Bit Torrent download settings .............. 122

6
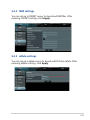
5.4.2 NZB settings ......................................................................... 123
5.4.3 eMule settings ..................................................................... 123
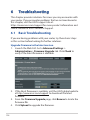
6 Troubleshooting
6.1 Basic Troubleshooting ..............................................................124
6.2 Frequently Asked Questions (FAQs) ...................................127
Appendices
Notices .....................................................................................................136
ASUS Contact information ..................................................................150

7
1 Getting to know your wireless 1 Getting to know your wireless
routerrouter
1.1 Welcome!
Thank you for purchasing an ASUS 4G-AC86U Wireless Router!
The powerful and stylish 4G-AC86U features 2.4GHz and 5GHz
dual bands for an unmatched concurrent wireless HD streaming;
SMB server, UPnP AV server, and FTP server for 24/7 file sharing;
a capability to handle 300,000 sessions; and the ASUS Green
Network Technology, which provides up to 70% power-saving
solution.
1.2 Package contents
NOTES:
• If any of the items is damaged or missing, contact your retailer or
ASUS for technical inquiries and support, Refer to the ASUS Support
Hotline list at the back of this user manual.
• Keep the original packaging material in case you would need future
warranty services such as repair or replacement.
4G-AC86U Wireless Router AC adapter
Network cable (RJ-45) Quick Start Guide
2 x 3G/4G antennas 1 x WiFi antenna (with a red
ring)

8
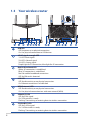
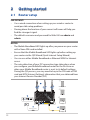
1.3 Your wireless router
USB LED
Off: No power or no physical connection.
On: Has physical connection to USB devices.
3G/4G signal strength LED
1 lit LED: Weak signal
2 lit LEDs: Normal signal
3 lit LEDs: Strong signal
Purple light for 3G connection, blue light for 4G connection
Mobile Broadband LED
White: 4G connection is established.
Blue: 3G connection is established.
Red: No mobile broadband connection.
Off: No SIM card is detected.
LAN LED
Off: No data activity or no physical connection.
On: Ethernet connection is established.
WAN (Internet) LED
Off: No data activity or no physical connection.
On: Has physical connection to a wide area network (WAN).
5GHz Wi-Fi LED
Off: No 5GHz signal.
On: 5GHz wireless is ready.
Flashing: Transmitting or receiving data via wireless connection.
2.4GHz Wi-Fi LED
Off: No 2.4GHz signal.
On: 2.4GHz wireless is ready.
Flashing: Transmitting or receiving data via wireless connection.

9
Power LED
Off: No power.
On: Device is ready.
Flashing slow: Rescue mode
Flashing quick: WPS is processing.
Nano SIM card slot
Install a Nano SIM card into this slot to establish a Mobile Broadband Internet
connection.
Power (DCIN) port
Insert the bundled AC adapter into this port and connect your router to a
power source.
Power button
Press this button to power on or off the system.
USB 2.0 port
Insert USB 2.0 compatible devices such as USB hard disks or USB flash drives
into this port.
WAN (Internet) port
Connect a network cable into this port to establish WAN connection.
LAN (1~4) ports
Connect network cables into these ports to establish LAN connection.
Reset button
This button resets or restores the system to its factory default settings.
16
WPS button
Long press the button to launch the WPS Wizard.
17
Detachable LTE antennas
18
Detachable Wi-Fi antenna
NOTES:
• Use only the adapter that came with your package. Using other
adapters may damage the device.
• Ensure to insert the Nano SIM card into the card slot before powering
on the router.
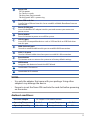
Ambient conditions:
DC Power adapter DC Output: +12V with 3A current
Operating Temperature 0~40oCStorage Temperature -40~70oC
Operating Humidity 10 ~ 95% Storage Humidity 5 ~ 95%

10
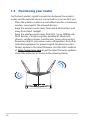
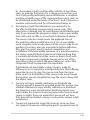
1.4 Positioning your router
For the best wireless signal transmission between the wireless
router and the network devices connected to it, ensure that you:
• Place the wireless router in a centralized area for a maximum
wireless coverage for the network devices.
• Keep the wireless router away from metal obstructions and
away from direct sunlight.
• Keep the wireless router away from 802.11g or 20MHz only
Wi-Fi devices, 2.4GHz computer peripherals, Bluetooth
devices, cordless phones, transformers, heavy-duty motors,
fluorescent lights, microwave ovens, refrigerators, and other
industrial equipment to prevent signal interference or loss.
• Always update to the latest firmware. Visit the ASUS website
at http://www.asus.com to get the latest firmware updates.
• Orient the antennas as shown in the drawing below.
45°
45°

11
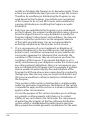
1.5 Installing a Nano SIM card into your
router
1. Remove the cover from the Nano SIM card slot at the right
side of your router.
2. Push a pin into the hole on the Nano SIM card tray to eject it.
3. Place a Nano SIM card on the tray.
4. Push the tray to close it.
1
2
3
4

12
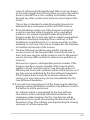
2.1 Router setup
IMPORTANT!
• Use a wired connection when setting up your wireless router to
avoid possible setup problems.
• Pinning down the location of your nearest cell tower will help you
find the strongest signal.
• The default username and password for Web GUI are admin and
admin.
SIM Card Slot
Nano SIM
LAN
4
3
2
5
1
Wall Power Outlet
Power
Laptop
Laptop
Tablet
Smart phone
2 Getting started2 Getting started
NOTES:
• The Mobile Broadband LED lights up after you power on your router
with a Nano SIM card installed.
• Ensure that the Mobile Broadband LED lights up before setting up
your router via the QIS Wizard (Quick Internet Setup Wizard).
• You can use either Mobile Broadband or Ethernet WAN for Internet
access.
• The auto-detection of your ISP connection type takes place when
you configure your Mobile Broadband router for the first time or
when your Mobile Broadband router is reset to its default settings.
During the QIS process, you may need to key in the PIN code of SIM
card and APN (Internet Settings) information that you obtained from
your Internet Service Provider (ISP).

13
ASUS Router
ASUS
Router
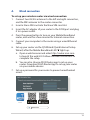
A. Wired connection
To set up your wireless router via wired connection:
1. Connect two 3G/4G antennas to the left and right connectors,
and the WiFi antenna to the center connector.
2. Insert a Nano SIM card into the Nano SIM card slot.
3. Insert the AC adapter of your router to the DCIN port and plug
it to a power outlet.
4. Press the power button to turn on your Mobile Broadband
router, and wait for a few minutes for Internet connection.
5. Connect your computer to the router using a wired Ethernet
cable.
6. Set up your router via the QIS Wizard (Quick Internet Setup
Wizard) after the Mobile Broadband LED lights up.
a. Open a web browser and enter http://router.asus.com
to launch the web GUI. Follow onscreen instructions to
complete the setup.
b. You can also choose ASUS Router app to set up your
router. Download ASUS Router App to set up your router
via your mobile devices.
7. Set up a password for your router to prevent unauthorized
access.

14
B. Wireless connection
To set up your wireless router via wireless connection:
1. Connect two 3G/4G antennas to the left and right connectors,
and the WiFi antenna to the center connector.
2. Insert a Nano SIM card into the Nano SIM card slot.
3. Insert the AC adapter of your router to the DCIN port and plug
it to a power outlet.
4. Press the power button to turn on your Mobile Broadband
router, and wait for a few minutes for Internet connection.
5. Connect to the wireless network with SSID shown on the
product label on the back side of the router. You can connect
by searching the SSID list or scanning the QR code to for quick
connection.
6. Set up your router via the QIS Wizard (Quick Internet Setup
Wizard) after the Mobile Broadband LED lights up.
a. Open a web browser and enter http://router.asus.com
to launch the web GUI. Follow onscreen instructions to
complete the setup.
b. You can also choose ASUS Router app to set up your
router. Download ASUS Router App to set up your router
via your mobile devices.
7. Set up a password for your router to prevent unauthorized
access.
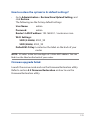
F/W Ver.:x.x.x.x H/W Ver.:A
PIN Code: XXXXXXXX
MAC: XXXXXXXXXXXX
SN: YMIO84XXXXXX
IMEI: 35521911XXXXXXX
Quick Wi-Fi
Connect
SSID: ASUS_XX Password: WWWWWWWW
PN:90IG05R0-BM9100
* XX refers to the last two digits of 2.4GHz MAC address. You can find it on the
label on the back side of your router.

15
NOTES:
• For details on connecting to a wireless network, refer to the WLAN
adapter’s user manual.
• To set up the security settings for your network, refer to 3.1.1
Setting up the wireless security settings of this user manual.
ASUS Router
ASUS
Router

16
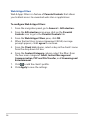
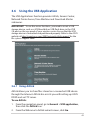
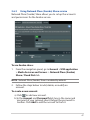
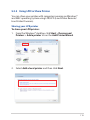
2.2 Quick Internet Setup (QIS) with Auto-
detection
To set up your router using QIS (Quick Internet Setup):
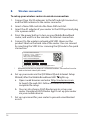
1. Ensure that the following LEDs light up:
• Power LED • 2.4GHz Wi-Fi LED
• WAN or Mobile
Broadband LED • 5GHz Wi-Fi LED
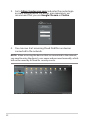
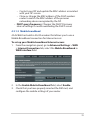
2. Launch your web browser such as Internet Explorer, Firefox,
Google Chrome, or Safari.
NOTE: If QIS does not launch automatically, enter
http://router.asus.com in the address bar and refresh the browser again.
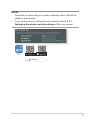
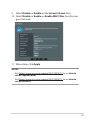
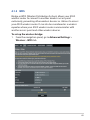
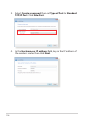
3. Log into the Web GUI. The QIS page launches automatically.
By default, the login username and password for your router’s
Web GUI is “admin”.
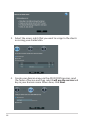
4. Assign your router login name and password and click Next.
You need this login name and password to log into ASUS
router to view or change the router settings. You can take
note of your router login name and password for future use.

17
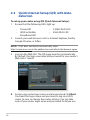
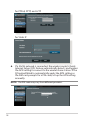
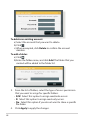
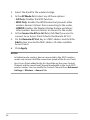
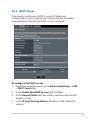
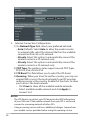
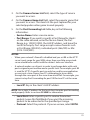
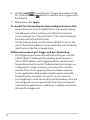
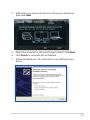
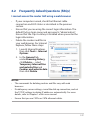
5. If the WAN port is connected, the wireless router’s Quick
Internet Setup (QIS) feature automatically detects if your ISP
connection type is Dynamic IP, PPPoE, PPTP, L2TP, and
Static IP. Please obtain the necessary information from your
Internet Service Provider (ISP). If your connection type is
Dynamic IP (DHCP), QIS wizard will automatically direct you to
the next step.
for Automatic IP (DHCP)

18
for PPPoE, PPTP, and L2TP
for Static IP
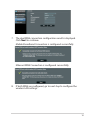
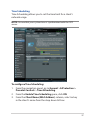
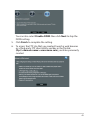
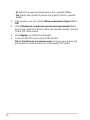
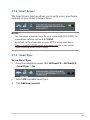
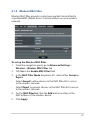
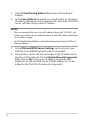
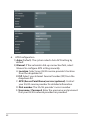
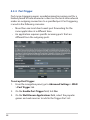
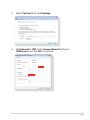
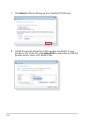
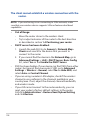
6. If a 3G/4G network is connected, the wireless router’s Quick
Internet Setup (QIS) feature automatically detects and applies
the APN setting to connect to the wireless base station. If the
QIS wizard failed to automatically apply the APN setting or
the SIM card prompts for a PIN code, set up the APN setting
manually.
NOTE: The PIN code may vary from different providers.

19
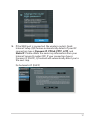
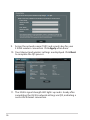
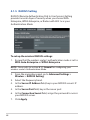
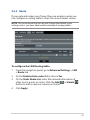
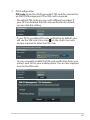
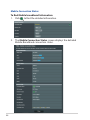
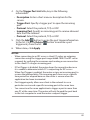
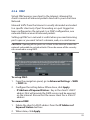
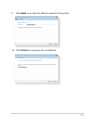
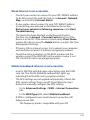
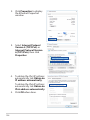
7. The dual WAN connection configuration result is displayed.
Click Next to continue.
Mobile Broadband Connection is configured successfully
Ethernet WAN Connection is configured successfully
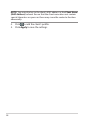
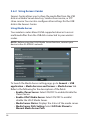
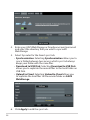
8. If both WAN are configured, go to next step to configure the
wireless LAN settings.

20
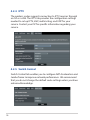
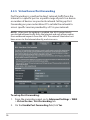
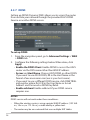
9. Assign the network name (SSID) and security key for your
2.4GHz wireless connection. Click Apply when done.
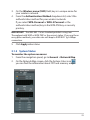
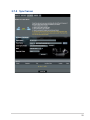
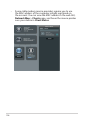
10. Your Internet and wireless settings are displayed. Click Next
to complete the QIS process.
11. The 3G/4G signal strength LED lights up and is steady after
completing the 3G/4G network settings via QIS, indicating a
successful Internet connection.
Page is loading ...
Page is loading ...
Page is loading ...
Page is loading ...
Page is loading ...
Page is loading ...
Page is loading ...
Page is loading ...
Page is loading ...
Page is loading ...
Page is loading ...
Page is loading ...
Page is loading ...
Page is loading ...
Page is loading ...
Page is loading ...
Page is loading ...
Page is loading ...
Page is loading ...
Page is loading ...
Page is loading ...
Page is loading ...
Page is loading ...
Page is loading ...
Page is loading ...
Page is loading ...
Page is loading ...
Page is loading ...
Page is loading ...
Page is loading ...
Page is loading ...
Page is loading ...
Page is loading ...
Page is loading ...
Page is loading ...
Page is loading ...
Page is loading ...
Page is loading ...
Page is loading ...
Page is loading ...
Page is loading ...
Page is loading ...
Page is loading ...
Page is loading ...
Page is loading ...
Page is loading ...
Page is loading ...
Page is loading ...
Page is loading ...
Page is loading ...
Page is loading ...
Page is loading ...
Page is loading ...
Page is loading ...
Page is loading ...
Page is loading ...
Page is loading ...
Page is loading ...
Page is loading ...
Page is loading ...
Page is loading ...
Page is loading ...
Page is loading ...
Page is loading ...
Page is loading ...
Page is loading ...
Page is loading ...
Page is loading ...
Page is loading ...
Page is loading ...
Page is loading ...
Page is loading ...
Page is loading ...
Page is loading ...
Page is loading ...
Page is loading ...
Page is loading ...
Page is loading ...
Page is loading ...
Page is loading ...
Page is loading ...
Page is loading ...
Page is loading ...
Page is loading ...
Page is loading ...
Page is loading ...
Page is loading ...
Page is loading ...
Page is loading ...
Page is loading ...
Page is loading ...
Page is loading ...
Page is loading ...
Page is loading ...
Page is loading ...
Page is loading ...
Page is loading ...
Page is loading ...
Page is loading ...
Page is loading ...
Page is loading ...
Page is loading ...
Page is loading ...
Page is loading ...
Page is loading ...
Page is loading ...
Page is loading ...
Page is loading ...
Page is loading ...
Page is loading ...
Page is loading ...
Page is loading ...
Page is loading ...
Page is loading ...
Page is loading ...
Page is loading ...
Page is loading ...
Page is loading ...
Page is loading ...
Page is loading ...
Page is loading ...
Page is loading ...
Page is loading ...
Page is loading ...
Page is loading ...
Page is loading ...
Page is loading ...
Page is loading ...
Page is loading ...
Page is loading ...
-
 1
1
-
 2
2
-
 3
3
-
 4
4
-
 5
5
-
 6
6
-
 7
7
-
 8
8
-
 9
9
-
 10
10
-
 11
11
-
 12
12
-
 13
13
-
 14
14
-
 15
15
-
 16
16
-
 17
17
-
 18
18
-
 19
19
-
 20
20
-
 21
21
-
 22
22
-
 23
23
-
 24
24
-
 25
25
-
 26
26
-
 27
27
-
 28
28
-
 29
29
-
 30
30
-
 31
31
-
 32
32
-
 33
33
-
 34
34
-
 35
35
-
 36
36
-
 37
37
-
 38
38
-
 39
39
-
 40
40
-
 41
41
-
 42
42
-
 43
43
-
 44
44
-
 45
45
-
 46
46
-
 47
47
-
 48
48
-
 49
49
-
 50
50
-
 51
51
-
 52
52
-
 53
53
-
 54
54
-
 55
55
-
 56
56
-
 57
57
-
 58
58
-
 59
59
-
 60
60
-
 61
61
-
 62
62
-
 63
63
-
 64
64
-
 65
65
-
 66
66
-
 67
67
-
 68
68
-
 69
69
-
 70
70
-
 71
71
-
 72
72
-
 73
73
-
 74
74
-
 75
75
-
 76
76
-
 77
77
-
 78
78
-
 79
79
-
 80
80
-
 81
81
-
 82
82
-
 83
83
-
 84
84
-
 85
85
-
 86
86
-
 87
87
-
 88
88
-
 89
89
-
 90
90
-
 91
91
-
 92
92
-
 93
93
-
 94
94
-
 95
95
-
 96
96
-
 97
97
-
 98
98
-
 99
99
-
 100
100
-
 101
101
-
 102
102
-
 103
103
-
 104
104
-
 105
105
-
 106
106
-
 107
107
-
 108
108
-
 109
109
-
 110
110
-
 111
111
-
 112
112
-
 113
113
-
 114
114
-
 115
115
-
 116
116
-
 117
117
-
 118
118
-
 119
119
-
 120
120
-
 121
121
-
 122
122
-
 123
123
-
 124
124
-
 125
125
-
 126
126
-
 127
127
-
 128
128
-
 129
129
-
 130
130
-
 131
131
-
 132
132
-
 133
133
-
 134
134
-
 135
135
-
 136
136
-
 137
137
-
 138
138
-
 139
139
-
 140
140
-
 141
141
-
 142
142
-
 143
143
-
 144
144
-
 145
145
-
 146
146
-
 147
147
-
 148
148
-
 149
149
-
 150
150


Asus 4G-AC86U User manual
- Category
- Cellular wireless network equipment
- Type
- User manual
Ask a question and I''ll find the answer in the document
Finding information in a document is now easier with AI
Related papers
Other documents
-
Verizon Internet Gateway (ASK-NCQ1338) User guide
-
CP Plus DN211-S Installation guide
-
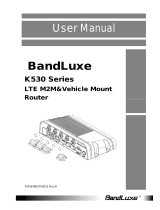 BandLuxe K530 Series User manual
-
 SKYBOXE 5G Fixed Wireless Access Router User guide
-
TP-LINK Archer MR200 - AC750 Owner's manual
-
Dovado USB Mobile Broadband Router Reference guide
-
TCL HH130VM User guide
-
 IMO Go Quick Setup Manual
-
Dusun DSGW-210 User manual
-
LocknCharge FUYL Tower 15 User guide


