Page is loading ...

1
1900S BLACK EDITION
1-DOG SYSTEM ONLY
Owner's Manual
Please read this manual
thoroughly before operating the
1900S BLACK EDITION training e-collar.

2
IMPORTANT SAFETY AND PRODUCT
INFORMATION
WARNING
Please read all safety and product information below
before using your Dogtra product. Failure to follow
these safety instructions could result in injury to you,
your dog and others, or it could result in damage to your
Dogtra product or other property.
PRODUCT SAFETY
Training Methods
Dogtra products may be used with a variety of training
methods. However, each dog may have a different reaction
to training methods and to Dogtra products. Closely
observe your dog when determining the right training
method to use with your Dogtra product.
Aggressive Dogs
Do not use Dogtra products with aggressive dogs as such
dogs may react adversely and cause injury to people or
other dogs. Seek the assistance of a dog-training specialist
or veterinarian when dealing with aggressive dogs.
Children
Dogtra products are not toys. Adult supervision and close
attention are necessary when Dogtra products are used by
or near children.
PRODUCT DAMAGE
Electrical Product
Your Dogtra product contains electrical components and
batteries. Do not use or keep your product near heat or
flammable sources. Such use or storage may damage your

3
product and/or cause fire, explosion, injury, or property
damage.
Medical Device Interference
Dogtra products contain electrical and magnetic
components that emit low level electromagnetic waves and
radio frequencies. These electromagnetic waves or radio
frequencies may interfere with pacemakers, defibrillators,
or other medical devices. Consult your physician or
medical device maker before using your medical device
with a Dogtra product. If you think that your Dogtra
product is interfering with your pacemaker, defibrillator,
or other medical device, stop using the Dogtra product.
Inadvertent Activation
The digital microprocessor offers thousands of unique
codes to eliminate frequency match-up with other Dogtra
e-collars. The Constant button will automatically shut
down after being held down for 12 seconds or more as a
safety feature.
UNAUTHORIZED USE
Your Dogtra product should be used only in a humane
manner to train and educate your dog. Dogtra products
are not intended for use in any other manner nor are they
intended for use with other animals or with humans.
BATTERY
Your Dogtra product contains batteries. Take care when
removing and installing batteries as your fingers may get
caught. Dispose of batteries as provided by your local
regulations. Do not disassemble, crush, heat, or otherwise
alter the battery as it may cause fire, injury or property
damage.

4
CONTENTS
AT A GLANCE
..................................................................
MAIN FEATURES
............................................................
OVERVIEW
......................................................................
UNDERSTANDING YOUR TRAINING SYSTEM
TURNING THE 1900S BLACK ON/OFF
.............
TRANSMITTER BUTTON FUNCTION
..................
RECEIVER FITTING
.................................................
FINDING THE RIGHT STIMULATION
...................
MAXIMIZING THE DISTANCE
..............................
LED INDICATOR
.......................................................
CHARGING THE BATTERY
....................................
HANDHELD TRANSMITTER LCD
.........................
ATTACHING THE BELT CLIP
..................................
USING THE TEST LIGHT
.........................................
GENERAL TRAINING TIPS
...........................................
MAINTENANCE
...............................................................
TROUBLESHOOTING GUIDE
.......................................
WARRANTY AND REPAIR INFORMATION
..............
5
6
7
9
10
11
12
13
14
15
18
19
20
21
23
24
26
1.
2.
3.
4.
5.
6.
7.
8.
9.
10.

5
AT A GLANCE
Owner's
Manual
Belt
Clip
Test
Light
ReceiverTransmitter Battery
Charger
Splitter
Cable
Optional Accessories
Auto Charger
Dogtra's auto chargers are designed for use with a 10 volt
car outlet.
European Charger
Dogtra’s European chargers are designed for use with a
230 volt AC electrical outlet.
To purchase accessories, please visit www.dogtra.com or
call customer service at (888) 811-9111.

6
MAIN FEATURES
• 1-mile range
• IPX9K waterproof certified - the highest heat and
water pressure test
• High output receiver
• Rheostat Dial that allows gradual adjustments in
stimulation intensity with no jumps between levels
(0-127)
• LCD screen
• Two stimulation types: Nick and Constant stimulation
• HPP (High Performance Pager) vibration
• Blue LED & matte finish
• Ergonomic slim receiver design
• Belt clip for transmitter
• For dogs as small as 35 lbs
• 2-hour rapid charge lithium polymer batteries

7
OVERVIEW
Antenna
Rheostat Dial
On/Off
Button
Belt Clip
Battery
Charging
Receptacle &
Rubber Plug
LCD
Screen
Pager
Nick
LED
Indicator
Light
Constant
1900S BLACK EDITION
Transmitter

8
Contact Points
Collar Strap
Battery Charging
Receptacle &
Rubber Plug
LED Indicator Light
On/Off
Button
1900S BLACK EDITION
Receiver

9
1. Turning the 1900S BLACK On/Off
To turn the handheld transmitter on, hold down the button
on the right side of the transmitter until the LCD screen
illuminates. To turn the transmitter off, hold down the
same button on the right side of the transmitter until the
LCD screen shuts off.
On/Off
Button
On/Off Button
UNDERSTANDING YOUR TRAINING
SYSTEM
To turn the receiver on, hold down the on/off button until
the LED indicator turns green. To turn the receiver off,
hold down the on/off button until the LED indicator turns
red.

10
Nick Button
The Nick button is located on the top of the left side of the
handheld transmitter. When the Nick button is pressed, the
receiver emits a single rapid pulse of electrical stimulation.
Constant Button
The Constant button is located on the bottom of the left
side of the handheld transmitter. Pressing the Constant
button gives continuous stimulation as long as the button
is pushed, for up to 12 seconds. If the button is not released
after 12 seconds, the stimulation will automatically turn
off as a safety feature. The receiver will be ready to be
reactivated once the button has been released.
Pager Button
The Pager button is located on the face of the transmitter.
Pressing it will give a vibration for as long as the button is
pressed, for up to 12 seconds.
On/Off
Button
Pager
Nick
Constant
2. Transmitter Button Function
The 1900S BLACK EDITION has four buttons on the
handheld transmitter (one on the face of the transmitter,
two on the left side, and one on the right side).

11
On/Off Button
The on/off button is located on the right side of the
transmitter. To turn the transmitter on, hold the button
until the LCD screen illuminates. To turn the transmitter
off, press the button until the screen is off. To turn the LCD
back light on and off, shortly press the on/off button.
3. Receiver Fitting
Proper Fit
The receiver should be fitted so that the surgical stainless
steel contact points press firmly against the dog’s skin.
You should be able to fit two fingers underneath the
collar strap. The best location is on either side of the dog’s
windpipe.
Improper Fit
A loose fit can allow the receiver to move around on the
dog’s neck. When this happens, the contact points may
rub against the skin and cause irritation. If the receiver
is too loose, the contact will not be consistent and cause
the corrections to be inconsistent. Dogtra uses surgical
stainless steel contact points and anti-microbial plastic to
protect the dog’s skin.

12
Attention!
Leaving the receiver in the same location on the dog’s
neck for an extended period of time can cause skin
irritation. If the dog is to wear the receiver for long
periods, occasionally reposition the receiver so that
the contact points are moved to a different location
on the dog’s neck. Make sure you check for skin
irritation each time you use the unit.
4. Finding the Right Stimulation
The 1900S BLACK EDITION has a Rheostat Dial on the top
of the transmitter (0 is the lowest and 127 is the highest).
Remember that you will need to adjust the setting (upward
or downward) depending on your dog’s temperament and
threshold for stimulation. Always start at the lowest level
and work your way up. The appropriate level can be found
when the dog responds to the stimulation with a mild
reaction. Also, as the dog’s attitude changes, especially
during times of increased excitement or distraction, you
may need to adjust the intensity level.
NOTE: The stimulation intensity can be adjusted even
while the stimulation is in use.

13
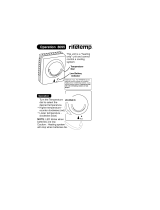
5. Maximizing the Distance
The 1900S BLACK EDITION has a 1-mile range. Depending
on the way you use your transmitter, the transmitter range
may vary.
To get the greatest range, hold the transmitter away from
your body and avoid touching the antenna. Keep your unit
properly charged for maximum signal strength.
Typical range
Maximum range
Minimum range

14
6. LED Indicator
The LED indicator flashes every 4 seconds when the
receiver is on and ready for use. The LED indicator will
blink on both the transmitter and the receiver when the
transmitter buttons are pressed.
The LED indicator color indicates the battery life level.
Blue = Full charge
Purple = Medium charge
Red = Needs charge
If the unit is used while the LED indicator is red, it may
shut down automatically.
Receiver Indicator Light
When the Constant button on the transmitter is pressed,
the receiver indicator light will glow steadily (either blue,
purple, or red based on the remaining battery life), as
long as you hold the button down, for up to 12 seconds.
When the Nick button is pressed, the light comes on for a
fraction of a second.

15
7. Charging the Battery
Charging Cable
120 Volt
Charger
Wall Outlet
The Dogtra 1900S BLACK EDITION uses a lithium polymer
battery. Recharge the unit if the indicator light is red or
does not come on, the transmitter LCD shows only 1 bar
on the indicator, or the system will not stay on when any
button is pressed.
Note 1: Only use Dogtra-approved batteries, chargers, and
accessories for your Dogtra e-collars. This will prevent any
damage that can be incurred from attempting to use a
different charger.
Note 2: The unit has a partial charge when it leaves the
Dogtra facility. Upon receipt of the system, be sure to give
it a full 2-hour initial charge before the first use away from
any flammable substances.
Note 3: When a charger is not in use, disconnect it from
the power source. Fully charge the batteries if the unit is
to be stored without use for a period of 3 months or more.

16
Follow the steps below to charge your system:
1. Open the rubber plugs on the battery charging
receptacles and plug in the charging cable.
2. Plug the charger into a 120-volt wall outlet or, if using
the auto charger, plug into a cigarette lighter only for
lithium polymer batteries (use a 220 volt European
charger for Europe). All indicator lights should glow red
when properly plugged in and the unit will automatically
shut off during the charging process. You will need to
turn the unit on again before use once the unit is fully
charged and unplugged from the battery cable.
3. The lithium polymer battery is fully charged within
2 hours. The lights will stay red during the charging
process and turn green once the unit is fully charged.
4. After charging, cover the battery charging receptacles
with the rubber plugs.

17
The LCD screen indicates the stimulation level on the
screen ranging from (0-127). The battery life indicator
shows:
3 bars = full charge
2 bars = medium charge
1 bar = needs charge
The battery life indicator only shows the remaining charge
of your transmitter. To find the remaining charge for your
receiver, observe the LED indicator light on the receiver.
Care for LCD Transmitters in Cold Temperature
In cold temperatures (10°F or below), the Liquid Crystal
Display (LCD) on your transmitter may be dim or slow to
respond. Wait until the display becomes visible before
selecting any training level. Even though the LCD screen
might be dim or slow to respond when you push the
Nick or Constant button, the transmitter will still function
properly. In the occurrence of extremely cold weather, the
LCD screen might take a moment to respond causing the
intensity level to freeze at that current level. If you turn
the Rheostat Dial, the level on the screen may not change
but the actual intensity from the receiver will change in
agreement with the dial. In this situation, it is ideal to
8. Handheld Transmitter LCD

18
either wait until your transmitter is back in working order
before emitting a correction or while holding the Constant
button down, slowly turn the Rheostat Dial while watching
your dog’s reaction. Do not turn the Rheostat Dial rapidly,
because the receiver will emit a static correction based on
the level of the Rheostat Dial, which might not be correctly
reflected on the LCD screen.
Follow the instructions below to attach the included belt
clip to the transmitter.
1. Align the belt clip to the grooves on the back of the
transmitter.
2. With a firm grip, screw on the belt clip's Phillips head
screws with a screwdriver.
9. Attaching the Belt Clip
Caution! Tighten until firmly in place. Be careful not to
over tighten.

19
1. Turn on the receiver by pressing the on/off button. The
indicator light will come on for a moment then blink
once every 4 seconds, showing that the receiver is
ready to use (the receiver needs to be charged if the
indicator light is red).
2. Turn the transmitter on by holding down the on/off
button on the right side of the transmitter. The LED will
blink every 4 seconds and the LCD screen will show the
remaining battery life.
3. Place the test light, included in the package contents,
on the contact points as shown in the diagram.
4. Watch the test light as you push the Nick button on the
transmitter. It should light up for just a moment. The
higher the intensity, the brighter the test light will be.
5. Watch the test light as you push the Constant button on
the transmitter. It should light up as long as the button
is pressed. However, as a safety feature, the receiver
will automatically stop the stimulation if the Constant
button is pressed for 12 seconds or longer.
10. Using the Test Light

20
6. Turn the Rheostat Dial on the transmitter clockwise
and then counterclockwise. The test light should glow
brighter with higher levels of stimulation and dimmer
with lower levels.
Note: The test light may not be visible if the intensity level
is set below level ten.
/