Page is loading ...

Blower Package PLC
Operation manual


i
Blower Package PLC Operation Manual •Vilter/Emerson • 35391BLP
Seller warrants all new assembled equipment manufactured by it and supplied to Buyer to be free from defects in
materials and workmanship for a period of (a) eighteen (18) months from the date of shipment or (b) twelve (12)
months from the date of installation at the end user’s location, whichever occurs fi rst.
If within such period any such product shall be proved to Seller’s satisfaction to be defective, such product shall be
repaired or replaced at Seller’s option. Such repair or replacement shall be Seller’s sole obligation and Buyer’s ex-
clusive remedy hereunder and shall be conditioned upon (a) Seller’s receiving written notice of any alleged defect
within ten (10) days after its discovery, (b) payment in full of all amounts owed by Buyer to Seller and (c) at Seller’s
option, Buyer shall have delivered such products to Seller, all expenses prepaid to its factory. Expenses incurred
by Buyer in repairing or replacing any defective product (including, without limitation, labor, lost refrigerant or
gas and freight costs) will not be allowed except by written permission of Seller. Further, Seller shall not be liable
for any other direct, indirect, consequential, incidental, or special damages arising out of a breach of warranty.
This warranty is only applicable to products properly maintained and used according to Seller’s instructions. This
warranty does not apply (i) to ordinary wear and tear, damage caused by corrosion, misuse, overloading, neglect,
improper use or operation (including, without limitation, operation beyond rated capacity), substitution of parts
not approved by Seller, accident or alteration, as determined by Seller or (ii) if the product is operated on a gas
with an H2S level not approved by Seller. In addition, Seller does not warrant that any equipment and features
meet the requirements of any local, state or federal laws or regulations. Products supplied by Seller hereunder
which are manufactured by someone else are not warranted by Seller in any way, but Seller agrees to assign to
Buyer any warranty rights in such products that Seller may have from the original manufacturer. Labor and ex-
penses for repair are not covered by warranty.
THE WARRANTY CONTAINED HEREIN IS EXCLUSIVE AND IN LIEU OF ALL OTHER REPRESENTATIONS AND
WARRANTIES, EXPRESS OR IMPLIED, AND SELLER EXPRESSLY DISCLAIMS AND EXCLUDES ANY IMPLIED WARRANTY
OF MERCHANTABILITY OR IMPLIED WARRANTY OF FITNESS FOR A PARTICULAR PURPOSE.
Any description of the products, whether in writing or made orally by Seller or Seller’s agents, specifi cations,
samples, models, bulletins, drawings, diagrams, engineering sheets or similar materials used in connection with
Buyer’s order are for the sole purpose of identifying the products and shall not be construed as an express war-
ranty. Any suggestions by Seller or Seller’s agents regarding use, application or suitability of the products shall not
be construed as an express warranty unless confi rmed to be such in writing by Seller.
Blower Packages - Standard Vilter Warranty Statement

ii
Blower Package PLC Operation Manual •Vilter/Emerson • 35391BLP
READ CAREFULLY BEFORE INSTALLING AND STARTING YOUR BLOWER.
The following instructions have been prepared to assist in installation, operation and maintenance of Vilter blower
packages. Following these instructions will result in a long life of the package with satisfactory operation.
The entire manual should be reviewed before attempting to install, operate, service or repair any part of the
package.
A blower is a positive displacement machine. It is designed to compress gas. The blower must not be
subjected to liquid carry over. Care must be exercised in properly designing and maintaining the system
to prevent conditions that could lead to liquid carry over. Vilter Manufacturing is not responsible for the
system or the controls needed to prevent liquid carry over and as such Vilter Manufacturing cannot warrant
equipment damaged by improperly protected or operating systems.
Vilter components are thoroughly inspected at the factory. However, damage can occur in shipment. For
this reason, the equipment should be thoroughly inspected upon arrival. Any damage noted should be re-
ported immediately to the Transportation Company. This way, an authorized agent can examine the unit,
determine the extent of damage and take necessary steps to rectify the claim with no serious or costly delays.
At the same time, the local Vilter representative or the home office should be notified of any claim made.
All inquires should include the Vilter sales order number, serial and model number. These can be found on the
nameplate on the blower.
All requests for information, services or parts should be directed to:
Vilter Manufacturing LLC
Customer Service Department
P.O. Box 8904
5555 South Packard Ave
Cudahy, WI 53110-8904 USA
Telephone: 1-414-744-0111
Fax:1-414-744-3483
E-mail: info.vilter@emerson.com
Equipment Identification Numbers:
Vilter Order Number: _______________________Blower Serial Number: _________________
Vilter Order Number: _______________________Blower Serial Number: _________________
Vilter Order Number: _______________________Blower Serial Number: _________________
Vilter Order Number: _______________________Blower Serial Number: _________________
Important Message

TOC - 1
Blower Package PLC Operation Manual •Vilter/Emerson • 35391BLP
Table of Contents
Section Title Section Number
Blower Packages - Standard Vilter Warranty Statement ..........................................................................i
Important Message................................................................................................................................ii
Section 1 • General Information
How To Use This Manual .........................................................................................................................1-1
Glossary of Terms ...................................................................................................................................1-2
Hardware Components ..........................................................................................................................1-4
Wiring Requirements .............................................................................................................................1-6
VFD Installation Recommendations .......................................................................................................1-7
Section 2 • Operation Descriptions
Overview ...............................................................................................................................................2-1
Operational Descriptions and Diagrams .................................................................................................2-2
Configuration of the Blower Package .........................................................................................2-2
Starting of the Blower/Permissives .............................................................................................2-2
Anti-Recycle ..............................................................................................................................2-2
Automatic Speed Control ...........................................................................................................2-2
Operating Modes .......................................................................................................................2-3
Load Limits and Forced Unloading..............................................................................................2-3
Safeties ......................................................................................................................................2-3
Emergency Stop ........................................................................................................................2-5
Supplemental Blower Motor Protection .....................................................................................2-5
Air Cooled Oil Cooler Fan ............................................................................................................2-6
External Electric Oil Pump ..........................................................................................................2-6
Oil Pressure Safety Switch ..........................................................................................................2-6
Air Cooled Aftercooler - Step Type ..............................................................................................2-6
Air Cooled Aftercooler - VFD Type ..............................................................................................2-7
Water Cooled Gas Aftercooler ....................................................................................................2-8
Gas Scrubbers ............................................................................................................................2-9
Discharge Recycle Valve .............................................................................................................2-10
Section 3 • Overview Screens
Blower and System Overview Screens ....................................................................................................3-1
Section 4 • HMI Navigation
Main Menu Screen .................................................................................................................................4-1
HMI Security ..........................................................................................................................................4-2
Default .................................................................................................................................................4-2
OP1, OP2, OP3, OP4, OP5 (Operators) ...................................................................................................4-2
Super (Supervisor) .................................................................................................................................4-2
Logging In ..............................................................................................................................................4-2
Section 5 • Configuration - Supervisor Level
Configuration Screen - Supervisor (SUPER) Level ....................................................................................5-1
Editing Device Names ............................................................................................................................5-4

TOC - 2
Blower Package PLC Operation Manual •Vilter/Emerson • 35391BLP
Table of Contents
Section Title Section Number
Section 6 • Instrument Calibration
Calibration Main Screen .........................................................................................................................6-1
Pressure Calibration Screen ....................................................................................................................6-2
Calibrate Pressure Instrument ....................................................................................................6-3
Calibrate Transducer to a Known Pressure ..................................................................................6-3
Temperature Calibration Screen .............................................................................................................6-4
Calibrate Temperature Instrument .............................................................................................6-4
Other Analog Calibration Screen ............................................................................................................6-5
Calibrate an Additional Instrument ............................................................................................6-5
Section 7 • Blower Configuration and Control Setpoints
Setpoints and Control Screens ...............................................................................................................7-1
Changing Setpoints ...................................................................................................................7-1
Blower Configuration Screen ..................................................................................................................7-2
Blower Control Setpoints - Suction Pressure ...........................................................................................7-3
Blower Control Setpoints - Discharge Pressure .......................................................................................7-5
Section 8 • Alarm and Trip Setpoints
Alarm and Trip Setpoints ........................................................................................................................8-1
Alarm and Trip Setpoints - Page 1 ...........................................................................................................8-1
Alarm and Trip Setpoints - Page 2 ...........................................................................................................8-2
Section 9 • Step and PID Device Control Screens
Aftercooler Screens ................................................................................................................................9-1
Aftercooler (VFD Type) Setpoints ...............................................................................................9-1
Aftercooler (Step Type) Setpoints ..............................................................................................9-2
Water Cooled Aftercooler Setpoints ...........................................................................................9-3
Discharge Recycle Valve Screen ..............................................................................................................9-4
Discharge Recycle Valve Setpoints .............................................................................................9-4
Start Menu Popup Screen .......................................................................................................................9-5
Section 10 • Diagnostic Screens
IO/Comms Diagnostics Screen ...............................................................................................................10-1
Event List Screen ....................................................................................................................................10-2
Diagnostics Forced Outputs Screen ........................................................................................................10-3
Captured Data at Shutdown Screen .......................................................................................................10-4
Initial Baseline Running Data Screen .......................................................................................................10-5

TOC - 3
Blower Package PLC Operation Manual •Vilter/Emerson • 35391BLP
Section 11 • Alarms, Trips, Status Information
and Troubleshooting
Alarm and Trips ......................................................................................................................................11-1
Alarm Listing ..........................................................................................................................................11-2
Trip Listing .............................................................................................................................................11-9
Status Messages and Blower State Indicator ...........................................................................................11-18
Troubleshooting ....................................................................................................................................11-22
If the Blower Will Not Start .........................................................................................................11-22
If Control Power Will Not Turn On ..............................................................................................11-22
Section 12 • Central Controller Communications
Communication with a Central Controller/DCS ......................................................................................12-1
VPN Access ................................................................................................................................12-1
Setting Up Communications ......................................................................................................12-1
Watchdog Timer ........................................................................................................................12-1
Data that can be Read from the Blower PLC ............................................................................................12-1
Live Instrument Data .................................................................................................................12-1
Alarm and Trip Data ...............................................................................................................................12-8
Status Data ............................................................................................................................................12-17
States of Discrete I/O .............................................................................................................................12-21
Blower State Indicator ............................................................................................................................12-25
Data that can be Written to the Blower PLC ............................................................................................12-26
Discrete Blower Commands .......................................................................................................12-26
Section Title Section Number
Table of Contents

TOC - 4
Blower Package PLC Operation Manual •Vilter/Emerson • 35391BLP
List of Tables and Figures
Table/Figure Section Number
Tables
Table 11-1. Alarm Listing ........................................................................................................................11-2
Table 11-2. Trip Listing ...........................................................................................................................11-9
Table 11-3. Status Listing .......................................................................................................................11-16
Table 12-1. Engineered Units Value Interpretation (INT_OUT[x]) ...........................................................12-2
Table 12-2. Live Instrument Data ............................................................................................................12-2
Table 12-3. Alarm Data ...........................................................................................................................12-8
Table 12-4. Trip Data ..............................................................................................................................12-12
Table 12-5. Status Data ..........................................................................................................................12-17
Table 12-6. Discrete Input States ............................................................................................................12-21
Table 12-7. Discrete Output States .........................................................................................................12-23
Table 12-8. State Indicator .....................................................................................................................12-25
Table 12-9. Blower Command (Real).......................................................................................................12-26
Table 12-10. Blower Command (Double Integer) ....................................................................................12-26
Figures
Figure 2-1. Operational Diagram - Load Limits / Forced Unloading (Example) ......................................... 2-4
Figure 2-2. Control Panel Master Power and Emergency Stop Electrical Circuit .......................................2-5
Figure 2-3. Operational Diagram - Air Cooled Aftercooler (Step Type) .....................................................2-6
Figure 2-4. Operational Diagram - Air Cooled Aftercooler (VFD Type) ..................................................... 2-7
Figure 2-5. Operational Diagram - Water Cooled Gas Aftercooler ...........................................................2-8
Figure 2-6. Operational Diagram - Discharge Recycle Valve ....................................................................2-10
Figure 3-1. Basic Blower Package Screen ................................................................................................3-1
Figure 4-1. Main Menu Screen ................................................................................................................4-1
Figure 4-3. Login Popup Screen ..............................................................................................................4-2
Figure 4-4. Login Screen Keyboard .........................................................................................................4-3
Figure 5-1. Configuration Screen - All Options Shown (Supervisor Level) ................................................5-1
Figure 5-2. Set Date/Time Pop-Up Screen - Supervisor Level ...................................................................5-2
Figure 5-3. Change Password Pop-Up Screen - Supervisor Level .............................................................. 5-3
Figure 5-4. Define Device Names - Devices and Vessels (Supervisor Level) ..............................................5-4
Figure 5-5. Define Device Names - Instrumentation (Supervisor Level) ...................................................5-5
Figure 5-6. Define Device Names - Alarm and Trip 1 (Supervisor Level) (1 of 2) ....................................... 5-6
Figure 5-7. Define Device Names - Alarm and Trip 2 (Supervisor Level) (2 of 2) ....................................... 5-7
Figure 6-1. Instrument Calibration Overview Screen ..............................................................................6-1
Figure 6-2. Pressure Calibration Screen - 1 of 3 .......................................................................................6-2
Figure 6-3. Pressure Calibration Screen - 3 of 3 .......................................................................................6-3
Figure 6-4. Temperature Calibration Screen ...........................................................................................6-4
Figure 6-5. Other Analog Calibration Screen ..........................................................................................6-5
Figure 7-1. Numeric Entry Pop-up Screen ...............................................................................................7-1
Figure 7-2. Blower Configuration Screen ................................................................................................7-2
Figure 7-3. Blower Control Screen - Suction Pressure .............................................................................. 7-4
Figure 7-4. Blower Control Screen - Discharge Pressure ..........................................................................7-5

TOC - 5
Blower Package PLC Operation Manual •Vilter/Emerson • 35391BLP
Figure 8-1. Alarm and Trip Setpoints Screen - 1 of 2 ................................................................................8-1
Figure 8-2. Alarm and Trip Setpoints Screen - 2 of 2 ................................................................................8-2
Figure 9-1. Aftercooler (VFD Type) Screen ..............................................................................................9-1
Figure 9-2. Aftercooler (Step Type) Screen .............................................................................................9-2
Figure 9-3. Water Cooled Aftercooler Screen ..........................................................................................9-3
Figure 9-4. Discharge Recycle Valve Screen ............................................................................................9-4
Figure 9-5. Start Menu ...........................................................................................................................9-5
Figure 10-1. IO/Comms Diagnostics Screen ...........................................................................................10-1
Figure 10-2. Event List Screen .................................................................................................................10-2
Figure 10-3. Diagnostics Forced Output Screen ......................................................................................10-3
Figure 10-4. Captured Data at Shutdown Screen ....................................................................................10-4
Figure 10-5. Initial Baseline Running Data Screen ...................................................................................10-5
Figure 11-1. Alarm/Trip/Status Bars (Main Menu Screen) ........................................................................11-1
Figure 11-2. Alarm Popup Screen ...........................................................................................................11-1
Figure 11-3. Alarm/Trip/Status Bars (Main Menu Screen) ........................................................................11-18
List of Tables and Figures
Table/Figure Section Number

Blank / TOC
Blower Package PLC Operation Manual •Vilter/Emerson • 35391BLP

1 – 1
Blower Package PLC Operation Manual •Vilter/Emerson • 35391BLP
Section 1 • General Information
HOW TO USE THIS MANUAL
This manual contains instructions for the PLC. It has
been divided into 12 sections:
Section 1: General Information
Section 2: Sequence of Operation
Section 3: Overview Screens
Section 4: HMI Navigation
Section 5: Confi guration - Supervisor Level
Section 6: Instrument Calibration
Section 7: Blower Confi guration and Control Setpoints
Section 8: Alarms and Trips Setpoints
Section 9: Step and PID Device Control Screens
Section 10: Diagnostics Screens
Section 11: Alarms, Trips, Status Information and
Troubleshooting
Section 12: Communications with a Central
Controller/DCS
It is highly recommended that the manual be reviewed
prior to servicing system parts.
Figures and tables are included to illustrate key concepts.
Safety precautions are shown throughout the manual.
They are defi ned as the following:
NOTICE - Notice statements are shown when there are
important information that shall be followed. Not fol-
lowing such notices may result in void of warranty, seri-
ous fi nes, serious injury and/or death.
WARNING - Warning statements are shown when there
are hazardous situations, if not avoided, will result in se-
rious injury and/or death.
CAUTION - Caution statements are shown when there
are potentially hazardous situations, if not avoided, will
result in damage to equipment.
NOTE - Notes are shown when there are additional infor-
mation pertaining to the instructions explained.
ADDITIONAL IMPORTANT NOTES
• Due to continuing changes and unit updates, always
refer to the Vilter.com website to make sure you have
the latest manual.
• Any suggestions of manual improvements can be
made to Vilter Manufacturing at the contact informa-
tion on page ii.

1 – 2
Blower Package PLC Operation Manual •Vilter/Emerson • 35391BLP
Section 1 • General Information
Discharge Recycle Control Pressure
Pressure of discharge gas measured at the Discharge
Recycle Valve. Used to control the Discharge Recycle
Valve.
Discharge Recycle Valve
Motorized or Air Actuated Valve that recycles discharge
gas back to the suction side of the blower package.
Discharge Pressure
Pressure of the refrigerant or gas measured at the outlet
of the blower.
Discharge Temperature
Temperature of the refrigerant or gas measured at the
outlet of the blower.
Ethernet IP
Communication protocol used to communicate to the
blower PLC.
General Trip
Shutdown condition that applies to the entire blower
package. If active, will shut down the entire package.
HMI
HMI stands for “Human-Machine Interface.” The blower
HMI is a touchscreen terminal mounted in the door of
the blower control enclosure.
Inlet Scrubber
Vessel located on the inlet side of gas blower or gas chill-
er to remove moisture and/or contaminants.
Inlet Scrubber Inlet Pressure
Pressure of gas measured at the inlet of the inlet
scrubber.
Inlet Scrubber Outlet Pressure
Pressure of gas measured at the outlet of the inlet
scrubber.
Inlet Scrubber Pressure Drop
Pressure differential between inlet and outlet of the in-
let scrubber. Calculated: Scrubber Inlet Pressure minus
Scrubber Outlet Pressure.
Main Motor
AC induction motor that is coupled to and drives the
blower.
Aftercooler Heat Exchanger
Used to cool discharge gas from the blower package.
Aftercooler Outlet Temperature
Temperature of gas measured at the outlet of the
Aftercooler.
Alarm Warning
Annunciated by the blower PLC that an operational or
process condition is abnormal. When active, alarms will
be displayed but will not shut down the blower package.
Bearing Temperature
Temperature of the bearings of the blower main motor
measured by an RTD.
Blower
Positive displacement rotary compressor intended to
move high volume of gas at relatively low pressure.
Blower Offset Dwell Time
Amount of time between starting individual blowers.
Used in applications where all blowers on a package
starting at the same time would put too great of a bur-
den on the electrical infrastructure.
Blower Package
Arrangement of up to 4 blowers controlled by a com-
mon PLC controller.
Blower-Specifi c Trip
A shutdown condition that applies to a specifi c blower.
Differential Pressure
The difference between two pressures.
Discharge Recycle Control Pressure
Pressure of discharge gas measured at the Discharge
Recycle Valve. Used to control the Discharge Recycle
Valve.
Glossary of Terms

1 – 3
Blower Package PLC Operation Manual •Vilter/Emerson • 35391BLP
Section 1 • General Information
Oil Cooler
Heat Exchanger where hot oil from the blower is cooled.
Oil Pressure Safety Switch
Pressure switch that shuts down blower on low oil pres-
sure, if installed.
Outlet Scrubber
Vessel located on the outlet side of gas blower or gas
chiller to remove moisture, oil, and/or contaminants.
Outlet Scrubber Inlet Pressure
Pressure of gas measured at the inlet of the outlet
scrubber.
Outlet Scrubber Outlet Pressure
Pressure of gas measured at the outlet of the outlet
scrubber.
Outlet Scrubber Pressure Drop
Pressure differential between inlet and outlet of the out-
let scrubber. Calculated: Scrubber Inlet Pressure minus
Scrubber Outlet Pressure.
PID Controller
PID stands for “Proportional Integral Derivative.” A PID
controller manipulates a control variable (example: valve
position or fan/pump speed) to maintain a process vari-
able (example: process temperature or pressure) at a de-
sired value (setpoint). The controller is driven by math-
ematical calculations that tell the control variable how to
react to changes in the process variable.
PLC
PLC stands for “Programmable Logic Controller.” The
Blower PLC is an industrial computer that controls and
monitors the blower package.
Pressure Transducer or Transmitter
Device that measures pressure and transmits the pres-
sure reading as a 4-20mA signal. This 4-20mA signal is
read by the PLC and displayed as a pressure.
RTD
RTD stands for “Resistance Temperature Detector.”
RTDs use electrical resistance to measure temperature.
This resistance is read by the PLC and displayed as a
temperature.
Silencer
Vessel located on the outlet of the blower.
Suction Pressure
Pressure of the refrigerant or gas measured at the inlet
of the blower.
Suction Temperature
Temperature of the refrigerant or gas measured at the
inlet of the blower.
Temperature Transmitter
Device that measures temperature and transmits the
temperature reading as a 4-20mA signal. This 4-20mA
signal is read by the PLC and displayed as a temperature.
Trip
Blower shutdown due to an abnormal process or opera-
tional condition.
VFD
VFD stands for “Variable Frequency Drive.” A VFD is a
motor control device that can vary the speed of an AC
induction motor.
VPN
VPN stands for “Virtual Private Network.” A VPN con-
nection allows remote access to the blower PLC.
Winding Temperature
Internal winding temperature of the blower main motor
measured by an RTD.

1 – 4
Blower Package PLC Operation Manual •Vilter/Emerson • 35391BLP
Section 1 • General Information
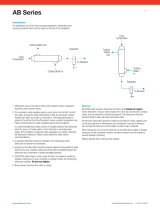
Hardware Components - PLC Exterior
Each Blower Package PLC may differ, but below are typical components that can found in each PLC. For specifi c PLC
layout, refer to supplied electrical drawings.
1 - HMI Cover
2 - Enclosure Door
3 - Door Latch
4 - Main Enclosure
5 - HMI (Panel View Plus 6)
6 - Panel Heater & Mounting (Field Installed)
7 - Emergency Stop Button
8 - Blower Control Reset Button
9 - Master Power
1
2
4
3
7
8
9
5
6

1 – 5
Blower Package PLC Operation Manual •Vilter/Emerson • 35391BLP
Section 1 • General Information
N1
1111
1112
1113
1114
1115
2051
2071
2091
2111
2131
2151
2171
2191
2211
2231
2251
2271
2291
2311
2331
2531
2551
2831
N1
N1
N1
N1
N1
N1
N1
N1
N1
1081
1081
1081
1081
1081
2591
1081
2571
10011
10012
10031
10072
10091
10131
10151
10152
10171
10172
10191
10192
10211
10212
10231
10251
10111
10112
10252
10291
10292
10311
10312
10331
2611
2631
2651
2671
2691
2711
2731
2751
2771
2791
2811
3231
3031
3051
3071
3091
3111
3131
3151
3171
3191
3211
3271
3251
3291
3311
3331
4181
4321
4341
4681
4701
4721
4741
4761
10332
10352
10371
10391
10392
10351
10511
10531
10532
10571
10572
10591
10611
10512
10612
10651
10652
10671
10672
10691
10692
10712
10731
10751
10752
10711
11011
11031
11032
11051
11052
11012
11131
11132
11151
11152
11171
11172
11242
11262
4781
4801
N1
GND
1281
1282
N1
N1
GND
1011
5071
5101
5131
5161
5661
5601
SH
SH
SH
SH
5191
5631
6051
5751
5781
SH
6111
6061
6141
SH
5691
5721
SH
6211
6201
SH
5221
5251
SH
5281
5571
SH
6121
SH
6151
1584
6551
6561
SH
6581
6591
SH
6641
6651
6701
6711
SH
6731
6741
6761
6771
SH
SH
SH
SH
SH
SH
SH
6081
6091
SH
SH
SH
SH
6241
6231
SH
6271
6261
SH
6301
6291
SH
SH
6611
6621
SH
SH
6791
6801
SH
SH
SH
4821
4841
1584
1584
1584
1584
1584
1584
1584
1584
1584
1584
1584
1584
1584
1584
1584
11342
GND
10032
10051
10071
1081
1081
1081
1081
1081
1081
1081
11612
11632
GND
1583
GND
10 - Terminal Blocks (AC Connections)
11 - Relays
12 - Fuses
13 - DC Power Supplies
14 - UPS
15 - CompactLogix Processor with Ethernet, and
Memory Card
16 - Modules
17 - Compact Logix Power Supply
19 - Terminal Blocks (DC Low Voltage Connections)
20 - Terminal Blocks (Main Power Connections)
21 - Terminal Blocks (Customer Connections)
22 - Ethernet Switch, 5 Port RJ45
Hardware Components - Main Enclosure Interior
10 11 12 13
22
21
20
19 17
16
16
14
15

1 – 6
Blower Package PLC Operation Manual •Vilter/Emerson • 35391BLP
Section 1 • General Information
• Incoming power enters on the left bottom wall of the
PLC control enclosure. Route these conductors in the
space between the sub-panel and inside wall of the
enclosure.
• DC control, analog and communications or network
wiring enters on the right bottom wall of the PLC con-
trol enclosure.
• Wiring external to the panel per NEC (NFPA 70), ANSI
12.12.01 and UL-598A.
• Panel construction and wiring per UL-508A for all
panels and ANSI 12.12.01 and UL-698A for hazardous
locations.
• Electrical transmission, control, and alarm wiring
shall be stranded copper no smaller than #14 AWG.
Use JIC color code, unless otherwise noted.
• All control circuits from a source outside of this panel
are to be #14 AWG Orange.
• All control circuit neutrals from a source outside of
this panel are to be no smaller than #14 AWG White/
Orange Tracer.
• All analog inputs are to be connected with shielded
cable. Shield terminated at panel side and isolated at
device side.
• All shielding is to be grounded at a single point on the
chassis.
• Analog wiring must be run separate from AC wiring
and kept separate within the enclosure.
• All analog signal wiring shall be grounded at one end
only. Ground shield of signal cables.
• Use alpha P/N 2423C, 3 Cond, 18 AWG, shielded or
approved equal.
• Only one customer network cable to switch.
• Unused defi ned as having a previous assignment.
Spare defi ned as no previous assignment.
• Where applicable, remove jumper between connec-
tions if used.
• All power circuits from a source outside of this panel
are to be no smaller than #12 AWG Orange.
• All power circuit neutrals from a source outside of
this panel are to be no smaller than #12 AWG White/
Orange Tracer.
• All equipment grounds must be Green/Yellow. For
ground conductors larger than #6 AWG, apply Green/
Yellow heat shrink or color conductor with marker at
both ends.
• All power sources for heating devices shall be sup-
plied by others.
• Designated for a trip function (i.e. limit trip, se-
quence shutdown, etc.). Recommended hard wire
connection.
• Use alpha P/N 2422C, 2 Cond, 18 AWG, shielded or
approved equal.
• Category 6 Ethernet cable is recommended for all of
our equipment.
SEPARATION OF INTRINSICALLY SAFE CIRCUITS (IF
USED)
The intrinsically safe wiring enters on the bottom-left
wall of the PLC control enclosure.
To reduce the possibility of interconnection, additional
requirements exist for the separation of intrinsically safe
and non-intrinsically safe circuits. Exceptions to this rule
may be found in NEC Section 504-30(A)(1) and (2).
Separation by distance:
• The distance between intrinsically safe fi eld wiring
terminals and non-intrinsically safe fi eld wiring termi-
nals shall be a minimum 8 inches.
• The distance between intrinsically safe fi eld wiring
terminals and non-intrinsically safe fi eld circuits shall
be a minimum 5 inches.
• The distance between intrinsically safe fi eld wiring
terminals and non-intrinsically safe fi eld circuits and
wiring shall be a minimum 5 inches.
• The distance between intrinsically safe fi eld wiring
terminals and non-intrinsically safe internal wiring
shall be a minimum 2 inches.
Wiring Requirements

1 – 7
Blower Package PLC Operation Manual •Vilter/Emerson • 35391BLP
Section 1 • General Information
• All wiring to and from the Variable Frequency Drive
(VFD) starter shall conform to the National Fire
Protetcion Association 70 (NFPA-70), local codes and
the manufacturer’s guidelines and specifi cations.
• Thoroughly read the manufacturer’s VFD installation
and instruction manuals.
• In the event of a code and manufacturer recom-
mendation confl ict, always use the more stringent
standard.
• Only use an inverter duty rated motor built to NEMA
MG1 PART 30 & 31.
• Always used copper conductors to feed the VFD
starter and motor. Use cable with thermoset insula-
tion such as XLPE or XHHW-2 from the VFD to motor.
• It is preferred to use VFD cable, service wire company
or equal, between the VFD and the motor per manu-
facturer’s instructions.
• It is preferred to use continuous metal conduit to the
VFD starter to the motor.
• If non-metallic conduit is used, VFD cable must be
used.
• If using VFD cable in metal conduit, the metal con-
duit must be insulated at the motor, so that the metal
conduit is not a continuous run.
• Always use fl exible metallic liquid-tight conduit to
feed the motor from metallic conduit.
• Grounding conductor must run from the VFD ground
terminals directly to the motor conduit box. Always
use proper grounding techniques (Star Method) and
sized according to the NFPA 70 NEC.
• Always use bonding bushings on all conduit ends,
• Always use bonding bushings on all conduit ends,
with proper size braided copper cable bonded to the
starter panel.
• All grounding and bonding conductors and lugs must
terminate on bare metal and not to painted surfaces.
• Always use a minimum of 3% impedance line reactor
such as MTE or equal.
• Where the cables to the motor are longer than 50’,
always use a load reactor (customer must provide
Vilter with cable lengths from feeder to starter and
from starter to motor).
• Where the cables to the motor are longer than 500’,
always use a DV/DT load fi lter (customer must pro-
vide Vilter with cable lengths from feeder to starter
and from starter to motor).
• Where the cables to the motor are longer than 1000’,
always use a sine fi lter (customer must provide Vilter
with cable lengths from feeder to starter and from
starter to motor).
• Line and load conductors must be separated, as
much as the starter cabinet will allow, and cannot be
in the same conduit or cable chase.
• By no means shall power and control cables run in
parallel - cables must be separated, as much as the
starter cabinet will allow, and cannot be in the same
conduit or cable chase.
• For analog signals, use twisted shielded control cable
rated for 600V.
• When a generator is feeding a VFD starter, use a 5%
line reactor.
• Some countries require RFI/EMI fi lters -- please con-
sult country codes and standards.
• As an insurance policy against motor shaft currents,
use a split ring bearing protection ring on the motor
shaft with the non-load bearing insulated.
VFD Installation Recommendations

1 – 8 / Blank
Blower Package PLC Operation Manual •Vilter/Emerson • 35391BLP

2 – 1
Section 2 • Operational Descriptions
Blower Package PLC Operation Manual •Vilter/Emerson • 35391BLP
Overview
The following are typically controlled and monitored on
all blower packages:
• Suction Pressure (Blower) – Pressure of the gas mea-
sured at the inlet of the blower.
• Discharge Pressure (Blower) – Pressure of the gas at
the outlet of the blower.
• Suction Temperature – Temperature of the gas mea-
sured at the inlet of the blower.
• Discharge Temperature – Temperature of the gas at
the outlet of the blower.
• Main Motor Amperage – Current draw by the main
motor.
• Blower Motor Speed (Can control up to 4 blowers)
• Selectable groups of setpoints for varying operating
conditions
The following are additional software controls available
that are native to most blower packages controlled by
the PLC:
• Monitoring of Instrument Data, Alarms, Trips, and
Machine Status by DCS/Central Controller
• Blower Capacity suction or discharge pressure con-
trol setpoint from DCS/Central Controller
• Control of Individual Blower speeds from DCS/Central
Controller
• Capacity pressure control on External Pressure
Transducer data from DCS/Central Controller
• Control of Local/Remote from DCS/Central Controller
• Local and Remote Starting and Stopping of the
Individual Blower Units
The following are optional blower unit-specifi c items
that can be controlled or monitored:
• Main Motor Winding Temperatures
• Main Motor Bearing Temperatures
• Oil Pressure Safety Switch
• Air Cooled Oil Cooler Fan
• External Electric Oil Pump
The following are optional blower unit and package
items that can be controlled or monitored:
• Aftercooler
• Air Cooled Step Type
• Air Cooled VFD Type
• Water Cooled
• Inlet Scrubber
• Pressure Drop across vessel
• Condensate Drain
• Low/High Level Safety Switches
• Outlet Scrubber
• Pressure Drop across vessel
• Condensate Drain
• Low/High Level Safety Switches
• Discharge Recycle Valve

2 – 2
Section 2 • Operational Descriptions
Blower Package PLC Operation Manual •Vilter/Emerson • 35391BLP
Operational Descriptions and
Diagrams
CONFIGURATION OF THE BLOWER PACKAGE
The Blower package PLC can control up to 4 blowers.
The blowers can be independently confi gured to run on
a fi xed speed setpoint, PID Control (variable speed), or
taken out of service:
• Fixed Speed: In auto mode, individual blowers can be
confi gured to run on 1 of 4 fi xed speeds.
• Variable Speed: The individual blower’s speed will
be controlled by a PID controller to hold a suction or
discharge pressure setpoint. If multiple blowers are
confi gured to run on PID control, all will run off of a
common speed command from the PID controller.
• Out of Service: Individual blowers may be taken out
of service for demand considerations or mainte-
nance. When a blower is out of service, alarms, trips,
and status messages specifi c to that blower will not
be generated.
Additionally, individual blowers may be enabled and dis-
abled “on the fl y,” either locally or remotely (by commu-
nications) without having to take them out of service.
Functions such as anti-recycle, and selected alarms and
trips are blower specifi c, meaning if active, they apply
only to the affected blower. This way if one blower trips
or is in anti-recycle, the other blowers are allowed to run.
At start, the blowers may be confi gured to start offset
from each other, to lessen the burden on the electrical
infrastructure due to motor inrush.
STARTING OF THE BLOWER/PERMISSIVES
To run the blower package, it must me started from the
“Start Menu” screen on the control panel HMI. Pressing
“Unit Start” in the “Start Menu” screen will initiate a start
if all permissives to initiate a start are met. To initiate a
start, the following conditions must be met:
• Control Power is ON (Emergency Stop button is not
pressed and Master Control Relay is energized, indi-
cated by pilot light on front of panel)
• Blower Confi guration is valid
• No Active General Trips (trips that apply to the whole
blower package)
NOTE
If an individual blower trips, in order to restart blower, it
must fi rst clear trip condition and be re-enabled locally
at the control panel.
When a start is initiated, the blower package will start if
all permissives to run are met. If all permissives to run
are not met, the control will wait in a “standby” mode
until all conditions to run are satisfi ed. Any condition
that the control is waiting on is annunciated on the over-
view and menu screens and logged in the Event List. For
the blowers to start running, the following must be met:
• Control Power is ON (Emergency Stop button is not
pressed and Master Control Relay is energized, indi-
cated by pilot light on front of panel)
• No Active General Trips
• Blower Package start has been initiated by pressing
“Unit Start” in the “Start Menu” screen.
• Remote Permissive input is ON
• Soft run permissive from the DCS/Central Controller
is ON (if control by communications selected)
• Blower Anti-Recycle Timer is not active (specifi c to
each blower – each blower has its own anti-recycle
function.)
• No Blower-Specifi c Trips Active (specifi c to each
blower)
ANTI-RECYCLE
After a blower motor stops, it is not allowed to re-start
again for a settable time. This is to protect the blower
motor. If the Anti-Recycle timer is active, a banner will
appear next to the specifi c blower on the main screen
that shows the remaining time. If a start is initiated,
the blower state indicator will indicate “Standby” until
the Anti-Recycle timer is done. If all other permissives
are met, the blower will re-start when its anti-recycle
timer expires. In multiple-blower applications, the anti-
recycle function is blower specifi c – one or more blowers
may be in anti-recycle without affecting the operation of
other blowers on the package.
AUTOMATIC SPEED CONTROL
For blowers that are confi gured to run on PID speed con-
trol, a PID controller will adjust the speed of the blowers
to hold a pressure set point. Two control methods are
available:
• Discharge Pressure Control: Blower increases speed
to increase discharge Pressure to desired setpoint
• Suction Pressure Control: Blower increases speed to
lower suction pressure to desired setpoint
Any blowers confi gured to run on PID speed control re-
ceive the same speed command from the PID control-
ler. Blowers confi gured to run on fi xed speed control will
maintain their fi xed speed set point. Variables that fac-
tor in to the automatic speed control are the following:
• Target pressure – the desired suction or discharge
pressure the blower package will try to maintain.
/