Menu
Weight Limit Utensil Instructions
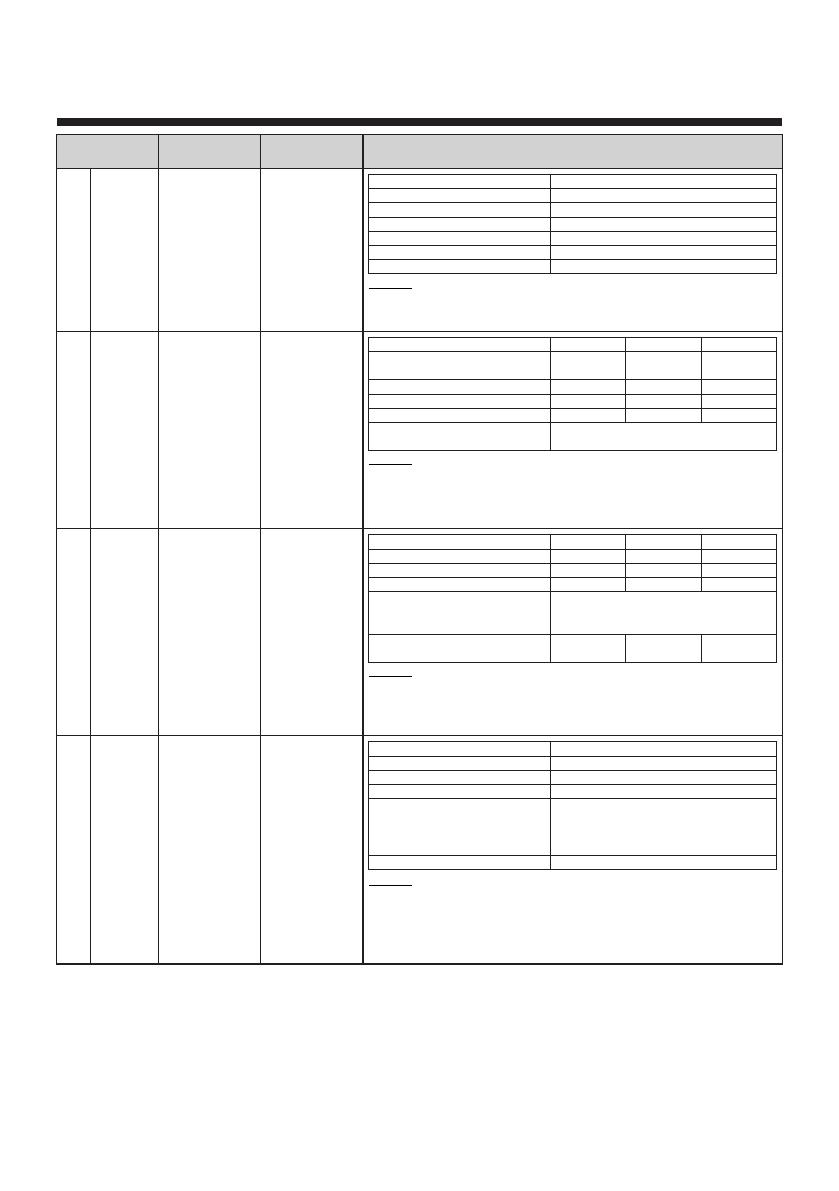
Indian Cuisine
IC-1
Gajar Ka
Halwa
0.3 kg
Microwave Safe
(MWS) Glass Bowl
&
Microwave Safe
(MWS) bowl
1. In MWS glass bowl take all the ingredients and mix well. Add ½ cup water to
bowl. Put the MWS glass bowl inside the MWS bowl. Cover. Select menu &
press start.
Method :
For
Grated Gajar
Ghee
Milk Powder
Khoa
Sugar
Elaichi Powder and Dry Fruits
IC-2
Mix Veg
0.1 ~ 0.3 kg
Microwave safe
(MWS) bowl
1. In a MWS bowl add oil, onion, tomato and all spices. Mix well, select menu
and weight and press start.
2. When beeps, remove and mix well. Add vegetable and some water. Cover
and press start.
3. When beeps, mix well. Cover and press start. Garnish with coriander leaves.
Method :
For
Mix Veg. (Carrot, Cauliflower, peas,
beans, potato)
Oil
Onion (chopped)
Tomato (chopped)
Salt, Cumin powder, Garam masala,
Red Chilli powder, Coriander powder
0.3 kg
300 g
2 tbsp
5 tbsp
6 tbsp
5 tbsp
As per taste
0.1 kg
100 g (Total)
¼ tbsp
½ cup
¼ cup
As per taste
0.2 kg
200 g (Total)
½ tbsp
1 cup
1 cup
0.3 kg
300 g (Total)
1 tbsp
1½ cup
1½ cup
IC-3
Veg
Biryani
0.1 ~ 0.3 kg
Microwave safe
(MWS) bowl
1. In MWS bowl put oil add cloves, cinnamon, elaichi, bay leaf and pepper
corns, add mix vegetables, select menu and weight and press Start.
2. When beeps, add rice, water, salt and all spices. Mix well, cover it and press
start. Stand in 5 minutes after cook ends. Serve hot with raita and salad.
Method :
Basmati Rice (soaked for 1 hour)
For
Water
Oil
Cloves, Elaichi, Cinnamon, Pepper
corns, Bay leaf, Salt, Garam masala
& Red chilli powder
Mix Vegetables - (Gobhi, Mutter,
Gajar, French Beans etc.)
100 g
0.1 kg
200 mL
1 tbsp
As per taste
½ cup
200 g
0.2 kg
400 mL
2 tbsp
1 cup
300 g
0.3 kg
600 mL
3 tbsp
1½ cups
Indian Rasoi
18
1. Take dal in MWS bowl, add water, turmeric and asafoetida.
2. Select menu and press start to cook.
3. When beeps, take another bowl add oil, roasted cumin, green chilli, curry
leaves, add dal, salt, coriander powder, cumin powder, coriander leaves,
kasuri methi (optional), water (if required). Press start.
4. When beeps, mix well and again press start.
Method :
300 g
600 mL
2½ tbsp
As per taste
As per taste
IC-4
Dal Tadka
0.3 kg
Microwave safe
(MWS) bowl
Dal (soaked for 2 hours)
Water
Oil
Rai, Roasted cumin, Kasuri methi, Cumin
powder, Coriander leaves, Asafoetida,
Coriander powder, Turmeric, Green Chilli,
Curry leaves
Salt
0.3 kg
For


