Page is loading ...

chrome decal
chrome decal
A
OK
B
!
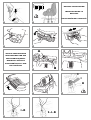
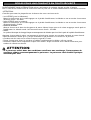
INITIAL BATTERY CHARGE
PREMIÈRE CHARGE DE
BATTERIE
PRIMERA CARGA DE LA
BATERÍA
ASSEMBLY
MONTAGE
MONTAJE
1 2 3
4 5 6
7 8 9
10 11
12

INITIAL BATTERY CHARGE
!• Connect battery charger to a 120vac wall
recepticle. Connect battery charger to
battery.
CAUTION:
ADULT ASSEMBLY REQUIRED.
USE CARE WHEN UNPACKING AS
COMPONENTS TO BE ASSEMBLED
MAY POSE A SMALL PARTS/SHARP
EDGE HAZARD.
IF THE PRODUCT IS DAMAGED
WHEN YOU OPEN THE
PACKAGING, CONTACT THE
SERVICE CENTER AND DO NOT
USE THE PRODUCT.
BATTERY IS INCLUDED
AND MUST BE INSTALLED;
see instructions 30-32
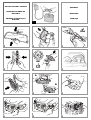
1 •Insert black windshield frame onto the
clear windshield until the clear center pin
snaps into the hole.
2 •Place windshield on the hood as shown.
3 •Attach windshield to hood with 2 screws.
(Install dash decals before installing
steering wheel).
4 •Assemble the 2 steering wheel
components and press firmly together.
5 •Place steering wheel onto steering column
tube and align bolt holes.
6 •Insert bolt into round hole and locknut
into hexagon shaped hole. Tighten bolt
with screwdriver.
7 •Install the front grill into hood until it
snaps into place.
8 •Attach front bumper - battery cover; (A)
place lower bumper holes onto chassis
pins and (B) rotate up until it snaps closed.
9 •Secure with screw (after battery is
charged) to keep children away from
battery.
10 •Headlight lens; apply chrome decals, then
press amber lens into sockets.
11 •Headlight lens; apply chrome decals, then
press clear lens into sockets.
12 •Screw the brush guard with the four
screws.
ENGLISH FRANÇAIS ESPAÑOL
ASSEMBLY INSTRUCTIONS
PREMIERE CHARGE DE BATTERIE
!• Reliez le chargeur de batterie à une prise
domestique. Reliez le chargeur de batterie
à la batterie.
ATTENTION:
ASSEMBLAGE PAR UN ADULTE
REQUIS.
OUVRIR LES EMBALLAGES AVEC
PRÉCAUTION CAR LES PIÈCES À
ASSEMBLER PEUVENT
COMPORTER DES RISQUES DE
COUPURES OU DE BLESSURES.
SI LE PRODUIT EST ENDOMMAGÉ
LORSQUE VOUS OUVREZ
L’EMBALLAGE, CONTACTEZ LE
SERVICE APRÈS-VENTE ET
N’UTILISEZ PAS LE PRODUIT.
LA BATTERIE EST INCLUSE
ET DOIT ETRE
CONNECTÉE; voir les
instructions 30-32
1 •Insérer le cadre noir du pare-brise sur le
pare-brise en veillant à ce que l’élément
central s’enclenche dans le trou
correspondant.
2 •Positionner le pare-brise sur le capot
comme indiqué sur la figure.
3 •Fixer le pare-brise au capot avec 2 vis
(appliquer les autocollants du tableau de
bord avant d’installer le volant).
4 •Assembler les 2 éléments du volant et
presser avec vigueur.
5 •Positionner le volant sur le tube de la
colonne de direction en alignant les trous
de fixation.
6 •Insérer la vis dans le trou arrondi et le
boulon dans le trou hexagonal. Serrer la vis
à l’aide du tournevis.
7 •Installer la calandre sur le capot en
l’enclenchant dans les logements
correspondants.
8 •Fixation du pare-chocs avant / cache-
batterie ; (A) veiller à bien positionner les
trous inférieurs du pare-chocs sur les
pivots du châssis et (B) le basculer vers le
haut jusqu’au déclic de fermeture.
9 •Le fixer avec une vis (après avoir chargé la
batterie) pour que les enfants ne puissent
avoir accès à la batterie.
10 •Lentilles de phare : appliquer les
autocollants chromés puis enfoncer les
lentilles orange dans leur logement.
11 •Lentilles de phare : appliquer les
autocollants chromés puis enfoncer les
lentilles transparentes dans leur logement.
12 •Vissez le pare-chocs avant garde avec 4 vis.
INSTRUCTIONS D'ASSEMBLAGE
PRIMERA CARGA DE LA BATERÍA
!• Conecte el cargador de la batería con un
socket doméstico. Conecte el cargador de
batería con la batería.
PRECAUTION:
REQUIERE MONTAJE DE UN
ADULTO. ALGUNOS
COMPONENTES AL SER
ENSAMBLADOS PODRÍAN TENER
PARTES PEQUEÑAS/RIESGO POR
BORDES CONTANTES.
SI AL ABRIR EL PAQUETE SE
NOTASEN DAÑOS EN EL
PRODUCTO, CONTACTE CON EL
CENTRO DE ASISTENCIA. NO
UTILICE EL PRODUCTO.
LA BATERÍA VIENE
INCLUIDA, SOLO NECESITA
INSTALARSE. Vea
instrucciónes 30-32
1 •Deslizar el bastidor negro del parabrisas
sobre la luna del parabrisas hasta que el
pasador central de la luna encaje en el
orificio.
2 •Colocar el parabrisas en el capó como se
indica.
3 •Fijar el parabrisas al capó con 2 tornillos.
(Aplicar los adhesivos del salpicadero antes
de montar el volante).
4 •Montar los 2 componentes del volante
uniéndolos con una presión firme.
5 •Situar el volante en el tubo de la columna
de dirección alineando los orificios de los
pernos.
6 •Introducir el perno en el orificio redondo
y la tuerca en el orificio hexagonal. Apretar
el perno con un destornillador.
7 •Acoplar la parrilla frontal al capó.
8 •Colocar el parachoques delantero – tapa
de la batería; (A) situar los orificios
inferiores del parachoques sobre los
pasadores del chasis y (B) girar hacia arriba
hasta que encajen y la pieza quede fija.
9 •Asegurar apretando el tornillo (una vez
cargada la batería) para que los niños no
puedan tener acceso a la batería.
10 •Focos de los faros delanteros; aplicar los
cromados adhesivos y aplicar los focos
ámbar en los huecos correspondientes.
11 •Focos de los faros delanteros; aplicar los
cromados adhesivos y aplicar los focos
claros en los huecos correspondientes.
12 •Tornillo la guarda defensa delantera con
los 4 tornillos.
INSTRUCCIONES DE MONTAJE
Page is loading ...

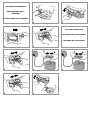
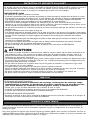
13 •Press 4 small hubcaps into wheels.
14 •Install black trim to dump bed (both sides).
15 •Assemble roll-bar mesh to roll-bar and
secure with the small screw provided.
16 •Place roll-bar ends into the holes at the
front of the dump bed and push down.
17 •Secure it with the 2 screws provided.
18 •Install tailgate; insert tailgate left pin into
left hole in bed; gently but firmly press
down on right side until right pin enters
right hole.
19 •Install bed: Forcefully remove the 2 oval
pins from the 2 black rear dump bed hinge
brackets.
20 •Place the round hole end of the black
bracket into the hinge flange on the
chassis; the oval hole to the rear and the
¼” flat extrusion pointing down into the
chassis slot.
21 •Align the holes and insert the round black
plastic pins (both sides).
22 •Set the bed on the chassis; align the oval
bracket holes with the round bed flange
holes (both sides).
23 •Insert oval plastic pins to secure the bed
to the chassis (both sides).
24 •Connect the spring and the red fastener as
shown in the figure. Lift up the piston and
insert the red fastener into the upper part
as shown in the figure.
25 •Keep the piston up. Align the piston hole
with the FRONT hole of the bed flange
(see figure).
26 •Secure it with the red plastic pin.
27 •Apply the two armrests to the sides of the
double seat.
ENGLISH
FRANÇAIS ESPAÑOL
13 •Insérer les 4 petits chapeaux de roue.
14 •Installer la barre de finition noire des deux
côtés de la benne.
15 •Monter le treillis sur l’arceau de sécurité
et fixer avec la petite vis fournie.
16 •Introduire les montants de l’arceau dans
les trous situés à l’avant de la benne et les
enfoncer.
17 •Fixer avec les 2 vis fournies.
18 •Installation du hayon : introduire le pivot
gauche du hayon dans le trou de gauche de
la benne, puis presser délicatement vers le
bas le pivot droit jusqu’à ce qu’il entre
dans le trou correspondant.
19 •Installation de la benne : pousser les 2
goupilles ovales hors des 2 articulations
noires à l’arrière de la benne.
20 •Positionner l’extrémité arrondie de la
patte de fixation noire dans l’articulation
du châssis, avec le trou ovale à l’arrière et
la partie plate insérée dans l’emplacement
du châssis.
21 •Aligner les trous et insérer les goupilles
plastique noires (des deux côtés).
22 •Positionner la benne sur le châssis en
alignant les trous ovales de la patte de
fixation et les trous arrondis de
l’articulation (des deux côtés).
23 •Insérer les goupilles plastique ovales pour
fixer la benne au châssis (des deux côtés).
24 •Raccorder le ressort et l’élément de
fixation rouge comme indiqué sur la figure.
Relever le piston et insérer l’élément de
fixation rouge dans la partie supérieure,
comme indiqué sur la figure.
25 •Maintenir le piston dans cette position.
Aligner le trou du piston et le trou AVANT
de l’articulation de la benne (voir figure).
26 •Fixer avec la goupille plastique rouge.
27 •Monter les accoudoirs des deux côtés de
la banquette.
13 •Acoplar los 4 pequeños embellecedores a
las ruedas.
14 •Instalar el borde negro del volquete por
ambos lados.
15 •Montar la malla de soporte a soporte y
asegurar con los pequeños tornillos
incluidos.
16 •Situar los extremos de los soportes en los
agujeros en la parte frontal del volquete y
presionar hacia abajo.
17 •Fijar con los 2 tornillos incluidos.
18 •Montar la compuerta trasera; introducir el
pasador izquierdo de la misma en el
orificio izquierdo del volquete; suavemente
pero con firmeza presionar hacia abajo en
el lado derecho hasta que el pasador
derecho entre en el orificio derecho.
19 •Montar el volquete: Hacer salir los 2
pasadores ovalados de las dos bisagras
negras del volquete.
20 •Situar el extremo con agujero redondo de
la bisagra en el asiento de bisagra del
chasis: el agujero ovalado queda hacia atrás
y la extrusión plana de ¼” hacia abajo en
la ranura del chasis.
21 •Alinear los orificios e introducir los
pasadores redondos de plástico negro (en
los dos lados).
22 •Situar la plataforma sobre el chasis; alinear
los agujeros ovalados de la bisagra con los
agujeros redondos del asiento de bisagra
de la plataforma (en los dos lados).
23 •Introducir pasadores ovalados de plástico
para fijar la plataforma al chasis (en los dos
lados).
24 •Conectar el muelle y el elemento de unión
rojo como se muestra en la figura.
Levantar el pistón e introducir el elemento
de unión en la parte superior como se
muestra en la figura.
25 •Mantener el pistón hacia arriba. Alinear el
agujero del pistón con el orificio
FRONTAL de la plataforma (ver figura).
26 •Asegurarlo con el pasador rojo de plástico.
27 •Aplicar los apoyabrazos en ambos lados
del asiento doble.

2-1-R
1-R
1
2
R
1
2
3
2
3
1/4
4
A
B
BATTERY INSTALLATION
INSTALLATION DE LA
BATTERIE
INSTALACIÓN DE LA BATERÍA
28 29
30 31 32
VEHICLE FEATURES AND
INSTRUCTIONS FOR USE
CARACTERISTIQUES ET
EMPLOI DU VEHICULE
CARACTERÍSTICAS Y USO
DEL VEHÍCULO
33 34
35 36 37
38 39

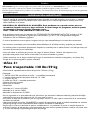
28 •Secure both armrests with the three
screws provided.
29 •Place the double seat in line with the
appropriate holes, depending on the height
of the child, and secure it from underneath
with the four knobs. The Gator can be set
up in 4 positions (see diagram).
BATTERY INSTALLATION
WARNING:
WARNING: BATTERY CHARGING
AND ANY OTHER OPERATION
ON THE ELECTRICAL SYSTEM
MUST BE CARRIED OUT BY
ADULTS ONLY. THE BATTERY
CAN ALSO BE CHARGED
WITHOUT REMOVING IT FROM
THE VEHICLE.
30 •Unscrew the battery cover.
31 •Unfasten the battery cover and open it.
32 •Connect the battery plug to the electrical
system. The vehicle is ready to use.
FEATURES and
INSTRUCTIONS FOR USE
33 •A - DRINK HOLDER: a conveniently
placed drink holder is located on the
dashboard.
B - HAND GRIP: passengers can hold onto
the hand grip for maximum safety while
using the vehicle.
34 •ELECTRIC ACCELERATOR & BRAKE
PEDAL : when accelerator is pressed
completely down, forward motion is
activated. Brake activates automatically
when the child takes his foot off the
accelerator.
35 •TAILGATE: The load box is supplied with a
tailgate with drop-down opening. To lower
the tailgate, pull it up and roll it outwards.
36 •DUMP BED:The dump bed can carry
objects for a maximum of 22 lbs.To
operate the dump bed, pull upward on red
latch and unlock it as shown in the figure.
37 •GEARSHIFT POSITIONS: 3 positions;
Center; 2¼ mph forward, Up; 4 ½ mph
(NOTE: vehicle is shipped with 4 ½ mph
speed LOCKED-OUT for SAFETY. Parents
must follow instructions 38 and 39 to
activate high speed. Down; reverse
(gearshift must be held in the down
position for safety; we never want a child
to step on the accelerator and go in
reverse when they think they will go
forward).
38 •Unscrew safety screw to release the high
speed lockout pin.
39 •Secure the high speed lockout pin in the
second hole as shown in the figure. The
vehicle can now be shifted to 2nd speed. If
you do not want your child to use the
second speed, secure the high speed
lockout pin in the first hole.
ENGLISH FRANÇAIS ESPAÑOL
28 •Fixer les deux accoudoirs à l’aide des trois
vis fournies.
29 •Positionner la banquette de sorte qu’elle
coïncide avec les trous appropriés, en
fonction de la taille de l’enfant, et la fixer
par en dessous au moyen des quatre
molettes. 4 positions de réglage sont
possibles sur le Gator (voir schéma).
INSTALLATION DE LA BATTERIE
ATTENTION:
L'OPÉRATION DE CHARGE DES
BATTERIES ET TOUTES AUTRES
INTERVENTIONS SUR
L'ÉQUIPEMENT ÉLECTRIQUE
DOIVENT ÊTRE EFFECTUÉES
EXCLUSIVEMENT PAR DES
ADULTES. IL EST POSSIBLE DE
CHARGER LA BATTERIE SANS LA
DÉMONTER DU JOUET.
30 •Dévisser le cache-batterie.
31 •Défaire le cache-batterie et l’ouvrir.
32 •Brancher la prise de la batterie à celle du
système électrique. Le véhicule est prêt à
être utilisé.
CARACTERISTIQUES ET MODE
D’EMPLOI DU VEHICULE
33 •A - PORTE-BOISSONS : le tableau de bord
est muni d’un porte-boissons pratique.
B - POIGNÉE : pour une sécurité maximale
pendant l’utilisation du véhicule, les
passagers peuvent se tenir à la poignée.
34 •ACCÉLÉRATEUR et PÉDALE DE FREIN.
Dès que l'accélérateur est complètement
enfoncé, le mouvement vers l'avant
s'amorce. Le frein s'active
automatiquement dès que l'enfant lève son
pied de l'accélérateur.
35 •HAYON : la benne possède un hayon à
ouverture rabattable. Pour abaisser le
hayon, le tirer vers le haut et le faire
basculer vers l’arrière.
36 •BENNE : la benne peut transporter des
objets de 10 kg (22 livres) maximum. Pour
actionner la benne, tirer le loquet rouge
vers le haut et le déverrouiller comme
indiqué sur la figure.
37 •POSITIONS DU LEVIER DE VITESSE : 3
positions ; au centre : 3,5 km/h vers
l’avant (2¼ mi/h) ; en haut : 7 km/h (4½
mi/h) (REMARQUE : pour plus de
SÉCURITÉ, la vitesse supérieure du
véhicule est VERROUILLÉE au moment de
sa livraison. Les parents doivent suivre les
instructions 38 et 39 pour activer la
vitesse supérieure) ; en bas : marche
arrière (pour plus de sécurité, le levier de
vitesse doit être maintenu dans cette
position ; nous ne voulons pas qu’un
enfant, en appuyant sur l’accélérateur, aille
en arrière en pensant aller en avant).
38 •Dévisser la vis de sécurité pour défaire la
goupille de verrouillage de la vitesse
supérieure.
39 •Insérer la goupille de verrouillage de la
vitesse supérieure dans le deuxième trou,
comme indiqué sur la figure. Il est
maintenant possible d’actionner la 2
nde
vitesse du véhicule. Si vous préférez que
votre enfant n’utilise pas la 2
nde
vitesse,
montez la goupille de verrouillage de la
vitesse supérieure dans le premier trou.
28 •Asegurar los apoyabrazos con los tres
tornillos incluidos.
29 •Alinear el asiento doble con los agujeros
correspondientes, en función de la altura
del niño, y asegurarlo por debajo con los
cuatro pomos de cierre. El Gator tiene 4
posiciones de montaje (ver diagrama).
INSTALACIÓN DE LA BATERÍA
ATENCIÓN:
LA OPERACIÓN DE CARGA DE
LA BATERÍA ASÍ COMO
CUALQUIER INTERVENCIÓN
ELÉCTRICA, DEBEN SER
REALIZADAS ÚNICAMENTE POR
ADULTOS. LA BATERÍA TAMBIÉN
SE PUEDE CARGAR SIN
QUITARLA DEL JUGUETE.
SÓLO PARA EL BRASIL: TENSIÓN DEL
CARGADOR: 127V - 60 HZ. OBSERVACIÓN: NO
UTILIZAR EL CARGADOR DE LA BATERÍA CON
UNA TENSIÓN DE 220V.
30 •Destornillar la tapa de la batería.
31 •Soltar la tapa de la batería y abrirla.
32 •Conectar el enchufe de la batería al
sistema eléctrico. El vehículo está listo para
su uso.
CARACTERÍSTICAS DEL VEHÍCULO
33 •A - PORTA-BEBIDAS: en el salpicadero hay
un porta-bebidas en posición muy cómoda.
B - AGARRADERO: los pasajeros pueden
sujetarse al agarradero para gozar de la
máxima seguridad al usar el vehículo.
34 •PEDAL DE ACELERADOR y DE FRENO.
Cuando el acelerador se pisa a fondo, se
activa el movimiento hacia adelante. El
freno se activa automáticamente cuando el
niño levanta el pie del acelerador.
35 •COMPUERTA TRASERA: El volquete lleva
una compuerta trasera con apertura
basculante. Para bajar la compuerta, tirar
de ella hacia arriba y hacerla oscilar hacia
fuera.
36 •VOLQUETE: El volquete puede llevar
objetos con un peso máximo de 22 lbs/10
kg. Para accionar el volquete, tirar hacia
arriba de la anilla roja y soltarlo, como
muestra la figura.
37 •POSICIONES DE LAS MARCHAS: 3
posiciones; Centro; 2¼ mph - 3,5 km/h
hacia delante, Arriba; 4½ mph - 7,2 km/h
(NOTA: el vehículo se envía con la
velocidad de 4½ mph - 7,2 km/h
BLOQUEADA por motivos de
SEGURIDAD. Los padres deben seguir las
instrucciones 38 y 39 para activar esa
velocidad. Abajo; marcha atrás (la palanca
de cambios debe mantenerse en la
posición baja por seguridad; en ningún caso
queremos que un niño pise el acelerador y
vaya marcha atrás pensando que va a
avanzar hacia delante).
38 •Desatornillar el tornillo de seguridad para
soltar el pasador de bloqueo de la marcha
rápida.
39 •Fijar el pasador de la marcha rápida en el
segundo agujero, como muestra la figura. El
vehículo admite ahora la segunda marcha.
Si no quiere que el niño use la segunda
marcha, asegure el pasador de bloqueo de
la marcha rápida en el primer agujero.
Page is loading ...

BATTERY REPLACEMENT
PLEASE NOTE: THE PICTURES OF THE
BATTERIES ARE FOR ILLUSTRATIVE
PURPOSES ONLY. YOUR BATTERY MAY BE
DIFFERENT FROM THE MODEL SHOWN.
THIS DOES NOT AFFECT THE
REPLACEMENT AND CHARGING
PROCEDURES DESCRIBED.
40 •Unscrew the battery cover.
41 •Unfasten the battery cover and open it.
42 •Release the battery lock
43 •Disconnect the plugs and remove the
discharged battery. Insert a fully charged
battery and repeat the procedure in
reverse order.
BATTERY RECHARGE
44 •Unfasten the battery cover and open the
battery compartment. Disconnect the
electrical system plug (A) from the battery
plug (B) by pressing on the sides of the
plugs and pulling apart.
45 •Plug the battery charger into a household
electrical outlet. Connect battery plug (B)
to charger plug C. NOTE: Press firmly until
it snaps into place.
46 •After battery has finished charging (full
charge takes 18-24 hours), disconnect
battery charger from the electrical outlet
and then disconnect the battery plug (B)
from the charger plug (C).
47 •Reconnect electrical system plug (A) to
battery plug (B). NOTE: Press firmly until
it snaps into place.
48 •Close the battery compartment, fastening
the battery cover shut. ATTENTION:
Always make sure that the battery
compartment is closed and locked after
carrying out any operations inside it.
ENGLISH FRANÇAIS ESPAÑOL
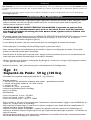
SUSTITUCIÓN DE LA BATERÍA
ATENCIÓN: LOS DIBUJOS DE LAS
BATERÍAS SON ÚNICAMENTE
INDICATIVOS. SU BATERÍA PODRÍA SER
DIFERENTE CON RESPECTO AL MODELO
REPRESENTADO. NO OBSTANTE, DEBERÁN
SEGUIRSE LAS SECUENCIAS DE
SUSTITUCIÓN Y DE CARGA ILUSTRADAS.
40 •Destornillar la tapa de la batería.
41 •Soltar la tapa de la batería y abrirla.
42 •Soltar el cierre de la batería
43 •Desconectar los enchufes y quitar la
batería descargada. Introduzca una batería
a plena carga y repita el procedimiento en
orden inverso.
CARGA DE LA BATERÍA
44 •Soltar la tapa de la batería y abrir el
compartimento. Desconectar el enchufe
del sistema eléctrico (A) del enchufe de la
batería (B) haciendo presión en los lados
de los enchufes y tirando de ellos para
separarlos.
45 •Enchufar el cargador de la batería en una
toma eléctrica de casa. Conectar el
enchufe de la batería (B) al enchufe del
cargador C. NOTA: Presionar con firmeza
hasta que se acople perfectamente.
46 •Una vez que la batería ha terminado de
cargarse (recarga completa en 18-24
horas), desconectar el cargador de la
batería de la toma eléctrica y,
seguidamente, desconectar el enchufe de la
batería (B) del enchufe del cargador (C).
47 •Conectar de nuevo el enchufe del sistema
eléctrico (A) al enchufe de la batería (B).
NOTA: Presionar con firmeza hasta que se
acople perfectamente.
48 •Cerrar el compartimento de la batería,
apretando la tapa de cierre de la batería.
ATENCIÓN: Asegúrese siempre de que el
compartimento de la batería está cerrado
y bloqueado después de realizar alguna
operación en su interior.
REMPLACEMENT DE LA BATTERIE
ATTENTION : LES DESSINS DES BATTERIES
SONT DONNÉS PUREMENT À TITRE
INDICATIF. LA BATTERIE EN VOTRE
POSSESSION POURRAIT ÊTRE DIFFÉRENTE
DU MODÈLE REPRÉSENTÉ. LES SÉQUENCES
DE REMPLACEMENT ET DE CHARGE
REPRÉSENTÉES N’EN RESTENT PAS MOINS
VALABLES.
40 •Dévisser le cache-batterie.
41 •Défaire le cache-batterie et l’ouvrir.
42 •Enlever le verrou de la batterie.
43 •Débrancher les fiches et enlever la batterie
déchargée. Installer une batterie
complètement chargée et répéter cette
procédure à l’inverse.
CHARGE DE LA BATTERIE
44 •Défaire le cache-batterie et ouvrir le
compartiment de la batterie. Débrancher
la fiche du système électrique (A) de celle
de la batterie (B) en appuyant sur les
côtés des fiches et en les séparant.
45 •Brancher le chargeur de batterie à une
prise électrique de la maison. Brancher la
fiche de la batterie (B) à celle du chargeur
(C). REMARQUE : enfoncer avec vigueur
jusqu’à l’enclenchement des fiches.
46 •Une fois la batterie chargée (prévoir de 18
à 24 heures pour la pleine charge),
débrancher le chargeur de la prise
électrique puis débrancher la fiche de la
batterie (B) de celle du chargeur (C).
47 •Rebrancher la fiche du système électrique
(A) à celle de la batterie (B). REMARQUE
: enfoncer avec vigueur jusqu’à
l’enclenchement des fiches.
48 •Fermer le compartiment de la batterie et
fixer le cache-batterie. ATTENTION :
toujours s’assurer que le compartiment de
la batterie est fermé et verrouillé après
toute opération sur celui-ci.

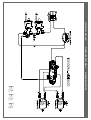
B = blue
BK = black
R = red
W = white
B = azul
BK = negro
R = rojo
W = blanco
B = bleu
BK = noir
R = rouge
W = blanc
ELECTRICAL DIAGRAM DIAGRAMME ÉLECTRIQUE DIAGRAMA ELÉCTRICO
Page is loading ...

BATTERY CHARGER
CHARGEUR DE BATTERIE
CARGADOR DE BATERIA
DECAL
DECALCOMANIES
CALCOMANIAS
ELECTRIC SYSTEM
CIRCUIT ÉLECTRIQUE
INSTALACIÓN ELÉCTRICA
1
3
4
2
5
6
7
9
10
11
12
13
14
15
16
18
19
20
21
22
23
24
25
26
27
28
29
30
31
BATTERY
BATTERIE
BATERIA
33
34
35
36
37
39
38
40
41
42
43
44
45
46
8
32
L
L
L
L
L
17
USA
Call toll free:
1-800-728-2108
Llame gratis:
1-800-225-1558
www.pegperego.com
CANADA
Call toll free:
Appelez le péage
libre:
1-800-661-5050
Model Number IGOD0083
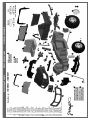
REPLACEMENT PARTS PIÈCES DE RECHANGE PIEZAS DE RECAMBIO
1 SPST9251N
2 SPST9250
3 SPST8211Y
4 ASGI0217NY
5 SARP8093GP-A
6 SPST9249N
7R SAGI8122DN
7L SAGI8122SN
8 SPMV9252N
9 SPST9240N
10 SPST9239N
11R SPST9241DN
11L SPST9241SN
12 SPST8100KN
13R SARP9254DNN
13L SARP9254SNN
14 SPST9236N
15 SPST8398N
16R SARP9253DNN
16L SARP9253SNN
17 IAKB0501
18 SPST9231GP
19 SOFF0300L30
20 SAGI9950XW
21 ASGI0230N
22 MEIE0500
23 SPST9235Y
24 SOTF0087L30
25 SPST8119R
26 SPST9234N
27 SPST8091JWN
28 SPST9033A
29 SPST9248
30R SPST9233DN
30L SPST9233SN
31 SPST9232JN
32 SPST9352N
33 SPST8105N
34 SPST8106N
35 ASGI0136VBN
36 SPST8147N
37 SAGI8862Y
38 SPST9230N
39 ASGI0231NYN
40 SPST8207R
41 SAGI8217R
42 SPST8126R
43 SPST8202N
44 SPST8108N
45 MMEV1128
46 MECB0086U

ENGLISH
PEG PEREGO
®
thanks you for choosing this product. For more than 60 years, PEG PEREGO have been taking children for an outing: first with its
famous baby carriages and strollers, later with its pedal and battery operated toy vehicles.
Discover our complete range of products, news and other information about the Peg Perego world on our web site www.pegperego.com
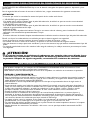
IMPORTANT INFORMATION
•Read this instruction manual carefully to learn the use of the vehicle and to teach your child safe and enjoyable
driving. Please keep this manual (with your original sales receipt) for use as a reference in the future.
•DO NOT RETURN YOUR VEHICLE TO THE STORE. This product cannot be returned for
a refund after it has been used. If you have ANY questions, need replacement parts or
need assistance, call us toll-free; U.S.A. , call 1-800-728-2108 / CANADA, call 1-800-661-
5050
•This product meets and/or exceeds all ASTM (American Society for Testing and Materials) TOY SAFETY
STANDARDS, including F 963, Consumer Toy Safety Specifications as well as C.R.C, c.931, the Canadian
Hazardous Products (Toys) Regulations.
•If you give away the product to third parties, make sure that it is accompanied by the instruction manual.
•Tools needed for assembly: Phillips screwdriver medium and small (not included).
•Your new vehicle is partially pre-assembled. It will require adult assembly. Please set aside at 60 minutes for
assembly.
•Before the vehicle is used for the first time, charge the battery for 18 hours to initiate it. Failure to do this can
result in permanent battery damage.
•Use only with the included Peg Perego 12 Volt lead-acid, rechargeable battery and a Peg Perego 12 Volt Charger
(both included).
•Year 3+
•Weight capacity 130 lbs
•Do not exceed the maximum total weight capacity of 130 lbs (59 kg).
Contents:
•1 GATOR XUV 550 riding vehicle -- partially assembled
•1 Rechargeable 12V 12Ah sealed lead-acid battery
•1 Charger 12V
•two 170 W motors -- pre installed
•assembly hardware
•parts to be assembled
•decals
•Speed in 1st gear 2,5 MPH
•Speed in 2nd gear 5 MPH
•Speed in reverse gear 2,5 MPH
•For safety, this vehicle has been pre-set so it will only operate in LOW speed. See steps 38 - 39 to remove the
HIGH speed lock-out.
•To prevent damaging the motor and gears, teach your child to stop the vehicle before switching directions.
•Use this vehicle ONLY outdoors. Most interior flooring can be damaged by riding this vehicle indoors. Peg Perego
will not be responsible for damage to the floor if the vehicle is used indoors.
•Peg Perego reserves the right to modify or change its products. Price, literature, manufacturing processes or
locations or any combination of the above mentioned entities may change at any time for any reason without
notice with impunity.

CAUTION:
Only adults should recharge batteries never children.
Never allow children to handle batteries.
Only use the batteries specified by the manufacturer. Only use the charger specified by the manufacturer.
Do not mix old and new batteries.
Do not mix alkaline, standard (carbon-zinc), or rechargeable (nickel-cadmium) batteries.
CHARGING THE BATTERY
•Charge the batteries no longer than 24 hours, following the instructions enclosed with the battery charger.
•Charge the battery, as the vehicle shows low power, in this way you will avoid damage to the battery.
•If you don’t use your vehicle for a long period of time unplug the battery from the main wire harness of the
vehicle. Remember to charge the battery at least every three months.
•Never charge the battery upside down.
•Do not forget batteries during charging! Check them periodically.
•Never use a replacement recharger or batteries unless they are approved by PEG PEREGO.
•Batteries are sealed and maintenance free.
•Battery polarity must be observed when connecting battery to wiring.
WARNING:
• BATTERIES CONTAIN TOXIC AND CORROSIVE SUBSTANCES. DO NOT TAMPER WITH THEM.
•Batteries contain an acid-based electrolyte.
•Do not make direct contact between battery terminals, as this can cause an explosion or fire.
•Charging produces explosive gases. Charge batteries in a well ventilated area away from sources of heat and
flammable materials.
•Exhausted batteries are to be removed from the vehicle.
•Do not place the batteries near clothing to avoid damage.
IF A LEAK DEVELOPS
Shield your eyes. Avoid direct contact with the electrolyte, protect your hands.
Place battery in a plastic bag and follow directions listed below.
IF ELECTROLYTE COMES IN CONTACT WITH SKIN OR CLOTHING
Flush with cool water for at least 15 minutes.
See a physician at once.
IF ELECTROLYTE IS INJESTED
Give tap water, milk of magnesia or egg whites at once.
Do not induce vomiting.
See a physician at once.
DISPOSAL OF BATTERIES; CONTAINS SEALED LEAD ACID BATTERY. BATTERY MUST BE RECYCLED.
Help protect the environment!
Do not throw used batteries in your regular, household trash.
Dispose old batteries at an approved battery dumping station; contact your local Environmental Protection Agency
office or call Peg Perego Customer Service for additional information.
BATTERY MAINTENANCE AND SAFETY
CAUTION:
ELECTRIC VEHICLE NOT RECOMMENDED FOR CHILDREN UNDER 3 YEARS OF AGE. AS WITH ALL ELECTRIC
PRODUCTS, PRECAUTIONS SHOULD BE OBSERVED DURING HANDLING AND USE TO PREVENT ELECTRIC
SHOCK. RECHARGER INCLUDED. 120Vac 60Hz 16W INPUT - 12Vdc 12W OUTPUT

DON'T STOP THE FUN: purchase a spare battery to have a freshly charged back-up available.
For your child’s safety: please read and follow all instructions below before operating.
•ATTENTION:
Check the fastening retainers to be sure they are tight.
•1st SPEED slow speed (beginner drivers):
With both hands on the steering wheel, press down on the accelerator pedal; the vehicle goes forward at 2
1
/4 mph.
•2nd SPEED: fast speed (experienced drivers):
With both hands on steering wheel press down on the accelerator pedal; the vehicle goes forward at 4
1
/2 mph.
•REVERSE:
Place the left hand on steering wheel. With the right hand holding the gearshift in reverse, press your foot down on
the accelerator; the vehicle reverses at 2
1
/4 mph. (Reverse is spring-loaded for safety).
•BRAKE:
The electric braking system stops the vehicle automatically when your child lifts his foot off the pedal.
Teach your child the proper use of this vehicle for a safe and fun play time.
•Before starting be sure that the way is free from people and objects.
•Drive with both hands on the steering wheel and keep your eyes on the road at all times.
•Stop in time to avoid accidents and immediately release pedal when stuck.
•Use the 2nd speed only after your child has the maturity and the reflexes to operate the vehicle safely.
CAUTION:
•In low speed, the vehicle has a differential effect like real cars; on smooth terrain and with
one child, the two wheels may turn at different speeds, resulting in possible
sliding/deceleration.
•If the vehicle is overloaded, as can happen on soft sand, mud, or very uneven ground, the
overload switch will immediately disconnect the power. The power supply will be restored
after a few seconds.
RULES FOR SAFETY DRIVING
This product meets and/or exceeds all ASTM (American Society for Testing and Materials) TOY SAFETY
STANDARDS, including F 963, Consumer Toy Safety Specification.
This vehicle is not intended for use on streets, around traffic or parked cars.
MAINTENANCE AND CARE
•Do not try to repair the vehicle by yourself.
•Regularly check the conditions of the vehicle, particularly the electrical system, the plug connections, the
covering caps and the charger. In case of fault, do not try to use the vehicle and the charger. For repair use only
original PEG PEREGO’s spare parts.
•PEG PEREGO assumes no liability if the electrical system is tampered with.
•Take care with the battery charger cable. For example, do not pull it to remove the plug, do not pull the vehicle
along on its wheels using the cable, do not cover the cable because it may overheat, do not leave it on hot
surfaces and be careful about where and how you roll it up.
•Do not leave vehicle or batteries near sources of heat such as radiators, stoves, fireplaces, etc.
•Protect vehicle from water, rain, snow, etc.
•When operating in overload conditions, such as soft deep sand, mud or rough uneven terrain, the overload
circuit breaker will automatically disconnect the power. After 30 or more seconds, the circuit breaker will
automatically reset, however you must eliminate overload conditions to resume normal driving.
•Periodically lubricate (with a light weight oil) moving parts, such as wheel bearings, steering linkages, where they
rotate or touch one another.
•The vehicle’s surfaces can be cleaned with a damp cloth. Do not use abrasive cleaners. The cleaning must be
carried out by adults only.
•Never disassemble the vehicle mechanisms or motor unless authorized by PEG PEREGO.
SAFETY
WARNING:
•To reduce the risk of injury, adult supervision is required. Never use in roadways, near motor vehicles, on or
near steep inclines or steps, swimming pools or other bodies of water; always wear shoes, and never allow more
than two riders.
•Surfaces that are appropriate for use: grass, dirt or hard surfaces with slopes not to exceed 10%.
•A child must be 3 years of age or older for the necessary coordination and maturation to operate this
motorized vehicle safely.
VEHICLE MAINTENANCE AND SAFETY

For your convience, PEG PEREGO offers after-sales service, directly or through a network of authorized service
centers for repairs or replacement parts.
If you have any questions about your Peg Perego vehicle, please call our toll-free service lines at;
U.S.A , call 1-800-728-2108
CANADA, call 1-800-661-5050
Trained customer service representatives are available to take your call in English or Spanish.
CUSTOMER SERVICE
IF THE VEHICLE DOES NOT OPERATE?
•When operating in overload conditions, such as running the vehicle against a fixed object,
through soft deep sand or mud, or over rough or uneven terrain, the overload circuit
breaker will automatically disconnect the power. After 10 or more seconds, the circuit
breaker will automatically reset, however-you must eliminate overload conditions to
resume normal driving.
•Check that all plugs are properly connected.
•Check electrical switches. Replace if necessary.
•Check that the battery is connected to the electrical system.
IF THERE IS NO POWER?
•Fully recharge the battery. If the problem persist, check with an Authorised PEG PEREGO Service Center.
PROBLEMS?
•Never use the vehicle on steep slopes or near steps or stairs. This vehicle is not suitable for use on public
highways.
•Children should always wear shoes when riding in or driving a riding vehicle.
•Do not allow children to place their hands, feet or any part of their body, clothing or other articles near the
moving parts while vehicle is in operation.
•Do not allow the electrical components, motors, wiring, switches of your motorized vehicle to become wet and
never wash it with a hose.
•NEVER STORE GASOLINE OR ANY FLAMMABLE SUBSTANCE WHERE A CHILD CAN ACCESS IT.
AND NEVER ALLOW GASOLINE OR ANY FLAMMABLE SUBSTANCE TO BE NEAR A BATTERY POWERED
CHILDREN'S VEHICLE WHEN IT IS BEING RIDDEN.
Page is loading ...
Page is loading ...
Page is loading ...
Page is loading ...
Page is loading ...
Page is loading ...
Page is loading ...
Page is loading ...
Page is loading ...
Page is loading ...
Page is loading ...

STOP!
Do not return your vehicle to the store!
We’re a toll-free phone call away and we can help.
If you are missing parts or need assistance, please see the contact information below.
¡ALTO!
¡No vuelva su vehículo al almacén!
Somos una llamada telefónica gratis lejos y podemos ayudar.
Si usted es piezas que falta o necesita ayuda, vea por favor la información del contacto abajo.
ARRÊTEZ!
Ne retournez pas votre véhicule au magasin !
Nous offrons un service d'appel téléphonique sans frais et nous pouvons aider. Si vous avez des pièces
manquantes ou avez besoin d'aide, voir s'il vous plaît l'information de contact ci-dessous.
Model Number
IGOD0063 - IGOD0067 - IGOD0083
PEG PEREGO U.S.A Inc.
3625 INDEPENDENCE Dr. FORT WAYNE IN 46808
fax 260·484·2940
call us toll free 1·800·728·2108
llame USA gratis 1·800·225·1558
PEG PEREGO CANADA Inc.
585 GRANITE COURT PICKERING ONT. CANADA L1W3K1
fax 905·839·9542
call us toll free 1·800·661·5050
PEG PEREGO S.p.A.
via A. De Gasperi, 50 20862 ARCORE (MB) ITALIA
www.pegperego.com
-
 1
1
-
 2
2
-
 3
3
-
 4
4
-
 5
5
-
 6
6
-
 7
7
-
 8
8
-
 9
9
-
 10
10
-
 11
11
-
 12
12
-
 13
13
-
 14
14
-
 15
15
-
 16
16
-
 17
17
-
 18
18
-
 19
19
-
 20
20
-
 21
21
-
 22
22
-
 23
23
-
 24
24
-
 25
25
-
 26
26
-
 27
27
-
 28
28


Peg-Perego IGOD0083 User guide
- Type
- User guide
- This manual is also suitable for
Ask a question and I''ll find the answer in the document
Finding information in a document is now easier with AI
in other languages
- français: Peg-Perego IGOD0083 Mode d'emploi
- español: Peg-Perego IGOD0083 Guía del usuario
Related papers
-
Peg-Perego IGOD0515 User manual
-
-
-
-
-
-
-
-
-
Peg-Perego Polaris RZR 900 Camo User guide
Other documents
-
Peg Perego 550 Gator XUV IGOD0063 User manual
-
-
-
-
-
-
-
-
-