Page is loading ...

Rev. 12/21/2015
30-10-033
™
LANGSTON DEEP BOWL FIRE PIT
MODEL #OFW821RC
Questions, problems, missing parts? Before returning to your retailer, call our customer
service department at 1-877-447-4768, 8:30 a.m. – 4:30 p.m. CST, Monday – Friday, or
log on to [email protected]
ATTACH YOUR RECEIPT HERE
Serial Number Purchase Date
Español p.9
Français p.17
1

F
G
D
B
A
H
E
C
E
G
C
B
A
F
D
H
PART DESCRIPTION QUANTITY
A Handle 1
B Mesh Cover 1
C Cooking Grid 1
D Air Vents 3
E Fire Bowl 1
F Legs with rings 2
G Legs 2
H Poker 1
PACKAGE CONTENTS
2

AA
BB
CC
DD
HARDWARE LIST
M6 x 12mm
Bolt
Qty. 14
M6 Nut
Qty. 1
Threaded
Peg
Qty. 4
M6 Wrench
Qty. 1
SAFETY INFORMATION
3
Please read and understand this entire manual before attempting to assemble, operate or install the product.
If you have any questions regarding the product, please call customer service at 1-877-447-4768, 8:30 a.m. –
4:30 p.m. CST, Monday – Friday.
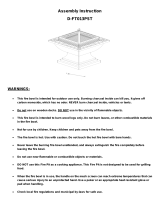
WARNINGS:
• DO NOT allow children or pets near the re pit without supervision.
• DO NOT touch surface of re pit while in use.
• FOR OUTDOOR USE ONLY! Burning wood and charcoal indoors can kill you. It gives off carbon
monoxide, which has no odor.
• NEVER burn in vehicles, tents or indoors. CARBON MONOXIDE HAZARD.
• NEVER LEAVE FIRE UNATTENDED!
• NEVER place a cover on re pit when in use. Ensure the re pit and mesh cover have cooled before
placing a cover over the re pit.
• When the re pit is in use, the handle on the mesh cover can reach extreme temperatures that can
cause serious injury to an unprotected hand. Use a poker when handling.
CAUTIONS:
• Adequate re extinguishing material should be readily available.
• Always ensure that the mesh cover is secured over re bowl while in use.
• Burn only charcoal, wood or re logs in the re pit.
• DO NOT attempt to move the re pit while it is hot or in use.
• DO NOT place or use re pit under a canopy of trees.
• DO NOT use gasoline or kerosene to start the re in your re pit.
• DO NOT use this unit on a wood deck, long or dry grass and/or leaves, or on combustible surfaces.
• Place the re pit no closer than 8 feet/2.4 meters from walls or combustibles during use.
• Poker handle may become hot during and after use.
• Use heat-resistant gloves to handle hot tools.
California Proposition 65 Warning: Fuels used in wood or charcoal burning appliances and the
products of combustion of such fuels, contain chemicals known to cause cancer, birth defects or other
reproductive harm.
Consumers should check State and Provincial, in addition to local codes and regulations regarding the
use of the product.

BB
1
DD
B
A
BB
PREPARATION
Before beginning assembly of product, make sure all parts are present. Compare parts with package
contents list and hardware contents above. If any part is missing or damaged, do not attempt to
assemble the product. Contact customer service for replacement parts.
Estimated Assembly Time: 25 minutes
Tools Required for Assembly:
Phillips Screwdriver (Not Included) and Wrench (Included)
ASSEMBLY INSTRUCTIONS
1. Insert Handle (A) into hole in mesh cover (B)
and secure with M6 nut (BB). Tighten nut
with wrench (DD)
Hardware Used
M6 Nut
x 1
M6 Wrench
x 1
4

CC
E
G
F
AA
E
E
D
AA
2
G
AA
E
F
3
4
E
D
AA
E
CC
ASSEMBLY INSTRUCTIONS
Hardware Used
x 6
Hardware Used
M6 x 12mm Bolt
x 8
M6 x 12mm Bolt
2. Place rebowl (E) on its side on a smooth,
clean surface. Attach one air vent (D) by
inserting two M6 x 12mm bolts (AA) through
pre-drilled holes in rebowl (E) and air vents
(D) as illustrated. Repeat with remaining air
vents (D). Tighten all bolts with a screwdriver.
3. Attach Legs (F and G) to the rebowl (E) by
inserting M6 x 12mm bolts (AA) through
pre-drilled holes in rebowl (E) and legs (F and
G) as illustrated. Tighten all bolts with a screwdriver.
5
4. Insert the threaded pegs (CC) into the rebowl(E)
as illustrated and hand tighten.
Hardware Used
Threaded Peg
x 4
AA
AA
CC

5
6
B
C
B
C
H
H
ASSEMBLY INSTRUCTIONS
5. For re pit use, top with cooking grid (C) and
mesh cover (B).
6. Your re pit is now ready for use. Keep the
poker (H) near the re pit for use as needed.
6

GHP Group, Inc.
6440 W. Howard St.
Niles, IL 60714-3302
877-447-4768
CARE AND MAINTENANCE
• To protect re pit nish, use a soft cloth in lieu of bare hands while handling.
• Use a soft cloth to wipe re pit and poker.
• Do not attempt to clean while hot.
• Store in a cool, clean, dry place.
1-YEAR LIMITED FRAME WARRANTY
If within one year from the date of original purchase, this item fails due to a defect in material or
workmanship, we will replace or repair at our option, free of charge. To order parts or to obtain
warranty service, call 1-877-447-4786, Monday - Friday, 8:30 a.m. - 4:30 p.m. CST. This warranty
does not cover defects resulting from improper or abnormal use, misuse, accident, or alteration.
Failure to follow all instructions in the owner's manual will also void this warrranty. The
manufacturer will not be liable for incidental or consequential damages, or common erosion of
outdoor products. Some states do not allow the exclusion or limitation of incidental or
consequential damages, so the above limitation may not apply to you. This warranty gives you
specic legal rights, and you may also have other rights which vary from state to state.
7

#30-09-114
DD
AA
BB
CC
Model/Modelo/Modèle
#OFW821RC, OFW110CR-GHP,
OFW111R-HD
F
G
D
B
A
H
E
C
E
G
C
B
A
F
D
H
REPLACEMENT PARTS LIST
For replacement parts, call our customer service department at 1-877-447-4768, 8:30 a.m. – 4:30 p.m.,
CST, Monday – Friday.
PART DESCRIPTION PART #
A Handle 40-07-453
B Mesh Cover 30-06-174
C Cooking Grid 30-06-223
D Air Vents 30-06-177
E Fire Bowl 30-06-308
F Legs w/ring 30-06-257
G Legs 30-06-258
H Poker 40-04-409
DESCRIPTION PART #
Hardware Pack 30-09-114
Printed in China
8

Rev. 12/21/2015
30-10-033
™
¿Preguntas, problemas, piezas faltantes?
Antes de volver a la tienda, llame a nuestro departamento de servicio al cliente al 1-877-447-4768,
de lunes a viernes de 8:30 a.m. a 4:30 p.m., hora central estándar o envíenos un correo electrónico
English p. 1
Français p.17
POZO DE FUEGO DE TAZON
PROFUNDO LANGSTON
MODELO #OFW821RC
ADJUNTE SU RECIBO AQUÍ
Número de serie Fecha de compra
9

F
G
D
B
A
H
E
C
E
G
C
B
A
F
D
H
CONTENIDO DEL PAQUETE
PIEZA DESCRIPCION CANTIDAD
A Mango 1
B Funda de malla metálica 1
C La parrilla 1
D Respiradero 3
E Caldero 1
F Pata 2
G Pata 2
H Atizador 1
10

AA
BB
CC
DD
Lea y comprenda completamente este manual antes de intentar ensamblar, usar o instalar el producto.
Si tiene alguna pregunta con respecto al producto, llame a nuestro Departamento de Servicio al Cliente
al 1-877-447-4768, de lunes a viernes de 8:30 a.m. a 4:30 p.m., hora central estándar.
ADVERTENCIAS:
•NO permita que los niños o a las mascotas se acerquen al fogón sin su supervisión.
•NOtoquelasuperciedelarejilladehierrooeltazóndurantesuuso.
•SÓLOPARAUSOENEXTERIORES.Quemarmaderaocarbóndentrodeunlugarpuedematarlo.
Expulsamonóxidodecarbón,elcualnotieneolor.
•NUNCAenciendaelfogónenvehículos,carpasoenespaciosinteriores.RIESGODEMONÓXIDO
DE CARBONO.
•NUNCADEJEELFUEGODESATENDIDO!
•NUNCAcubraelfuegomientrasestaenuso.Aseguresedequelaparrillaylatapademalla
metalicasehayanenfriadoantesdecubrirlaparrilla.
•Cuandoelpozodefuegoestásiendoutilizado,elasadelacubiertademallapuedellegara
temperaturasextremasquepuedencausarlesionesgravesaunamanoquenotengaprotección.
Utiliceunatizadorapropiadocuandoloutilice.
PRECAUCIONES:
• Tenga a su alcance materiales para la extinción del fuego adecuados.
• Siempre asegurese de que la tapa de malla metalica este bien cerrada mientras la parrilla esta en
uso.
• Queme solamente carbón, madera o leños en el pozo de fuego.
• NO intente mover el fogón mientras está caliente o durante su uso.
• NO UTILIZAR el pozo de fuego debajo de un grupo de arboles.
• NO utilice gasolina ni queroseno para prender el fuego en el fogón.
• NO utilice esta unidad sobre un piso de Madera, pasto o gramilla altos o secos y/u hojas, o sobre
superciesinamables.
•Coloquelaparrillaaunadistanciaminimade2,44mdelasparedesodeobjetosinamables
durante su uso.
• Las manijas del atizador pueden calentarse durante y después del uso.
• Utilice guantes resistentes al calor para manipular las herramientas calientes.
Proposición 65 de California: Los combustibles utilizados en los aparatos que queman madera
y carbón, y los subproductos del empleo de tales combustibles, contienen químicos reconocidos
causantes de cáncer, defectos de nacimiento u otros perjuicios reproductivos.
Además de chequear las normas y regulaciones a nivel local acerca del uso del producto, los
consumidoresdeberánvericarlasexistentesanivelestatalyprovincial.
ADITAMENTOS
M6
Tuerca
Cant. 1
M6 x 12mm
Perno
Cant. 14
Clavija
enroscada
Cant. 4
M6 Llave
Cant. 1
INFORMACIÓN DE SEGURIDAD
11

BB
1
DD
B
A
BB
x 1
x 1
PREPARACIÓN
INSTRUCCIONES DE ENSAMBLAJE
Antes de comenzar a ensamblar el producto, asegúrese de tener todas las piezas. Compare las
piezas con la lista del contenido del paquete y los aditamentos anteriores. No intente ensamblar el
producto si falta alguna pieza o si éstas están dañadas. Póngase en contacto con el departamento
de servicio al cliente para obtener piezas de repuesto.
Tiempo estimado de ensamblaje: 25 minutos
Herramientas necesarias para el ensamblaje:
Destornillador Phillips (no se incluye) y Llave (se incluye)
Aditamentos utilizados
Tuerca M6
Llave
1.Insertelamanija(A)eneloriciodeltapade
malla metalica (B). Use la llave (DD) para
asegurar la tuerca M6 (BB) en el lado inferior
del costado del tapa de malla metalica.
12

CC
E
G
F
AA
E
E
D
AA
2
G
AA
E
F
3
4
E
D
AA
E
CC
Aditamentos utilizados
M6 x 12mm Perno
x 6
AA
2. Coloque el tazón de fuego (E) a su lado
(posiciónhorizontal)sobreunasupercielisa
y limpia. Conecte un conducto de aire (D) insertando
dos perno (AA) M6 x 12mm a través de los agujeros
previamente perforados en el tazón de fuego (E)
y los conductos de aire (D), tal como se ve en la
ilustración. Repita las mismas instrucciones con los
conducto de aires restantes (D). Ajuste todos los
tornillos con un destornillador.
3. Coloque la pierna (F y G) al fuego
tazón (E) mediante la inserción de tornillos M6
x 12mm (AA) a través de los agujeros previamente
perforados en cuenco de fuego (E) y las piernas
(F y G) , como se ilustra. Apriete todos los tornillos
con el destornillador.
Aditamentos utilizados
Aditamentos utilizados
M6 x 12mm Perno
x 8
INSTRUCCIONES DE ENSAMBLAJE
13
Clavija enroscada
CC
x 4
AA
4. Inserte las clavijas roscadas (CC) en el cuenco de
fuego (E) como se ilustra y apriete a mano.

5
6
B
C
B
C
H
H
INSTRUCCIONES DE ENSAMBLAJE
5. Para uso pozo de fuego, superior con rejilla de
cocción (C) y cubierta ( B) de malla.
6. Coloque el poker (H) al lado de la fogata para
utilizar cuando sea necesario.
14

GHP Group, Inc.
6440 W. Howard St.
Niles, IL 60714-3302
877-447-4768
CUIDADO Y MANTENIMIENTO
• Para proteger el acabado del pozo de fuego, utilice un paño suave en lugar de las manos des
protegidas durante su uso.
• Use un paño suave para limpiar el fogón y el atizador.
• No intente limpiar el fogón cuando esté caliente.
• Almacénelo en un lugar fresco, limpio y seco.
GARANTÍA LIMITADA DE UN AÑO PARA LA ESTRUCTURA
Si en el lapso de un año a partir de la fecha de compra original este artículo falla debido a un defecto
en el material o la mano de obra, lo reemplazaremos o repararemos sin cargos a nuestra discreción.
Para hacer un pedido de las piezas o para obtener el servicio de garantía, llame al 1-877-447-
4768, de lunes a viernes, de 8:30 a.m. a 4:30 p.m., hora central estándar. Esta garantía no cubre
defectos que sean producto de un uso incorrecto o anormal, uso indebido, accidente o alteración.
No seguir todas las instrucciones del manual del propietario también anulará esta garantía. El
fabricante no es responsable por daños indirectos, accidentales o fortuitos o por la erosion comun
del medio ambiente. Algunos estados no permiten la exclusión o limitación de los daños accidentales
o resultantes, de modo que las limitaciones anteriores pueden no aplicarse en su caso.
Esta garantía le otorga derechos legales especícos, pero podría tener también otros derechos
que varían según el estado.
15

#30-09-114
DD
AA
BB
CC
Model/Modelo/Modèle
#OFW821RC, OFW110CR-GHP,
OFW111R-HD
F
G
D
B
A
H
E
C
E
G
C
B
A
F
D
H
LISTA DE PIEZAS DE REPUESTO
Para obtener piezas de repuesto, llame a nuestro Departamento de Servicio al Cliente al
1-877-447-4768, de lunes a viernes de 8:30 a.m. a 4:30 p.m., hora central estándar.
PIEZA
DESCRIPCIÓN
PIEZA#
A Mango 40-07-453
B Funda de malla metálica 30-06-174
C La parrilla 30-06-223
D Respiradero 30-06-177
E Manija exterior 30-06-308
F Caldero 30-06-257
G Pata 30-06-258
H Atizador 40-04-409
Impreso en China
DESCRIPTION PIEZA #
Paquete de ferreteria 30-09-114
16

Rev. 12/21/2015
30-10-033
™
LANGSTON FOYER BOL PROFOND
MODÈLE #OFW821RC
English p. 1
Español p.9
JOIGNEZ VOTRE REÇU ICI
Numéro de série Date d’achat
Des questions, des problèmes, des pièces manquantes? Avant de retourner l’article
au détaillant, appelez notre service à la clientèle au 1-877-447-4768, entre 8:30 h et 16:30 h
(HNC), du lundi au vendredi, ou contacter [email protected]
17

F
G
D
B
A
H
E
C
E
G
C
B
A
F
D
H
CONTENU DE L’EMBALLAGE
PIÈCE
DESCRIPTION QUANTITÉ
A Poignee 1
B Couvercle en grillage 1
C Grille de cuisson 1
D Air des évents 3
E Cuve de combustion 1
F La patte 2
G La patte 2
H Tisonnier 1
18

AA
BB
CC
DD
QUINCAILLERIE INCLUSE
CONSIGNES DE SÉCURITÉ
M6 écrou
Qty. 1
M6 x 12mm
écrou
Qty. 14
Patère
letée
Qty. 4
M6 Clé
Qty. 1
19
Assurez-vous de lire et de comprendre l’intégralité de ce manuel avant de tenter d’assembler, d’installer
ou d’utiliser le produit. Pour des question, communiquez avec notre service à la clientèle au
1 877- 447-4768, entre 8 h 30 et 16 h 30 (HNC), du lundi au vendredi.
AVERTISSEMENTS :
• NE permettez PAS aux enfants et aux animaux domestiques de s’approcher du foyer sans surveillance.
NE PAS toucher la surface de la fosse de feu en cours d’utilisation.
• CONÇU POUR L’USAGE A L’EXTERIEUR UNIQUEMENT! La combustion du charbon de bois à l’intérieur
peut vous tuer. Il s’en dégage du monoxyde de carbone, un gaz qui n’a pas d’odeur.
• NE faites JAMAIS fonctionner un foyer dans des véhicules, tentes ou à l’intérieur. MONOXYDE DE
CARBONE DANGER
• NE JAMAIS LAISSER UN FEU BRULER SANS SURVEILLANCE!
• NE placez JAMAIS une couverture en vinyl sur le foyer lors de son utilisation. Bien s’assurer que le foyer
ainsi que son grillage pare-feu soient bien refroidi avant de placer la couverture sur le foyer.
• Quand le foyer est en cours d’utilisation, la poignée du grillage pare-feu peut atteindre des températures
extrêmes qui peuvent causer des blessures graves si votre main n’est pas protégé. Un poker recommened
feu lors de la manipulation.
PRÉCAUTION
• Gardez du matériel d’extinction d’incendie approprié à portée de la main.
• Pendant l’utilisation, toujours s’assurer que le couvercle en grillage soit fermé sur le bol du foyer.
• Ne faites brûler que du bois ou bûches régulières dans le foyer.
• Ne tentez PAS de déplacer le foyer lorsqu’il est chaud ou qu’un feu y brûle.
• NE PAS placer ou utiliser la fosse a feu sous une canopee d’arbres.
• N’utilisez PAS d’essence ni de kérosène pour allumer un feu dans le foyer.
• N’utilisez cet appareil sur une terrasse en bois, sur de la pelouse longue ou sèche, sur des feuilles
ou sur des surfaces combustibles.
• Pendant l’utilisation, ne pas placer le foyer plus près que 2,44m des murs ou combustibles.
• La poignée du tisonnier peut devenir brûlante.
• Utilisez des gants résistant à la chaleur pour manipuler les outils lorsqu’ils sont chauds.
Avertissement – Proposition 65 de Californie :
Les combustibles utilisés dans les appareils de chauage à bois et à charbon et les produits de la
combustion de ces carburants contiennent des produits chimiques reconnus comme étant la cause de
cancers, de malformations congénitales ou d’autres problèmes liés aux fonctions reproductrices.
En plus de vérier les codes et règlements locaux concernant l’utilisation du produit, les consommateurs
devraient examiner ceux de de leur État ou province.

BB
1
DD
B
A
BB
PRÉPARATION
INSTRUCTIONS POUR L’ASSEMBLAGE
1. Insérez la poignée (A) dans le trou du
couvercle en grillage (B). Fixez l'écrou M6
(BB) au côté inférieur du couvercle en grillage
à l'aide de la clé (DD).
Avant de commencer l’assemblage du produit, assurez-vous d’avoir toutes les pièces. Comparez
les pièces avec la liste du contenu de l’emballage et celle de la quincaillerie ci-dessus. S’il y a des
pièces manquantes ou endommagées, ne tentez pas d’assembler le produit. Communiquez avec le
service à la clientèle pour obtenir des pièces de rechange.
Temps d’assemblage approximatif : 25 minutes
Outils nécessaires pour l’assemblage: Clé (incluse) et tournevis cruciforme (non inclus)
Matériel utilisé
M6 Écrou
x 1
M6 Clé
x 1
20
/