
SKYRC Q200neo Instruction Manual
1. SKYRC Q200neo
AC/DC Multi-Function Smart Charger
Instruction Manual
SK-100197
V1.0

SKYRC Q200neo Instruction Manual
SKYRC Q200neo 2.
Introduction
Package
Meet Q200neo
Specification
Warning
Standard Battery Parameters
Explanation of Buttons
Program Flow Chart
Power and Battery Connection
Charging
Lithium Battery Program(LiPo/LiFe/Lilon/LiHV)
NiMH/NiCd Battery Program
Pb Lead-Acid Battery Program
Charger Master
SkyCharger app Control
DC Power
USB Type-C PD/QC3.0 Output
Voltage Calibration (For expert user only)
Charge Settings
System Setting
Firmware Upgrade
Errors and Warnings
Conformity Declaration
Warranty and Service
1
1
2
3
5
6
7
8
10
11
13
14
15
16
16
17
18
19
19
20
21
22
23
24

SKYRC Q200neo Instruction Manual
1. SKYRC Q200neo
Introduction
Package
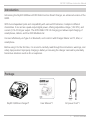
Introducing the SkyRC Q200neo AC/DC Multi-Function Smart Charger, an enhanced version of the
Q200.
With four independent ports and compatibility with various RC batteries, it adapts to different
chemistries. It can act as a quad-output digital power, offering adjustable voltage (1.0V-30V), and
current (0.1A-10.0A) per output. The 20W USB-C PD 3.0 charging port allows rapid charging of
smartphones, tablets, and the 2020 MacBook Air.
Connect effortlessly via Type-C or Bluetooth, and control it with Charger Master on PC, Mac, or
smartphone.
Before using it for the first time, it is crucial to carefully read through the instructions, warnings, and
safety tips provided. Improperly charging a battery or misusing the charger can lead to potentially
hazardous situations such as fire or explosion.
SkyRC Q200neo charger*1 User Manual*1 AC power Cord*1

SKYRC Q200neo Instruction Manual
SKYRC Q200neo 2.
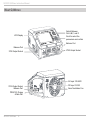
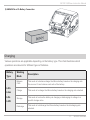
Meet Q200neo
AC Input 100-240V
DC Input 10-30V
Smart Ventilation Fan
XT60 Output Socket
Balance Port
PD/QC3.0 Charge
& Data Port
LCD Display
Switch Between
Port A,B,C, and D
Scroll to select the
parameters and conrm
Balance Port
XT60 Output Socket
XT60 Output Socket
Balance Port

SKYRC Q200neo Instruction Manual
3. SKYRC Q200neo
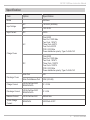
Specification
Item Option Specication
Model Q200neo
Input Voltage
AC 100-240V (50/60Hz)
DC 10.0-30.0V
Input Current DC 30.0A
Charge Power
AC
Total 200W
One Port: 100W Max
Two Ports: 100W*2
Three Ports: 66W*3
Four Ports: 50W*4
PD3.0: 20W Max
Power distribution priority: Type-C>A>B>C>D
DC
Total 400W
One Port: 100W Max
Two Ports: 100W*2
Three Ports: 100W*3
Four Ports: 100W*4
PD3.0: 20W Max
Power distribution priority: Type-C>A>B>C>D
Discharge Power
Main Port 5W
Main Port+Balance Port 25W (LiPo/6S)
Charge Current LiPo/LiFe/LiIon/LiHV/
NiMH/NiCd/Pb 0.1-10.0A
Discharge Current LiPo/LiFe/LiIon/LiHV/
NiMH/NiCd/Pb 0.1-2.0A
Balance Current LiPo/LiFe/LiIon/LiHV 800mA Max
Trickle Charge
Current NiMH/NiCd 50-300mA & OFF

SKYRC Q200neo Instruction Manual
SKYRC Q200neo 4.
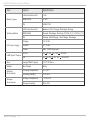
Item Option Specication
Battery Types
LiPo/LiFe/LiIon/LiHV 1-6S
NiMH/NiCd 2-15S
Pb 3S/6S/12S
Working Modes
LiPo/LiFe/LiIon/LiHV Balance CHG, Charge, Discharge, Storage
NiMH/NiCd Normal, Discharge, Re-Peak, CYCLE_D_C, CYCLE_C_D
Pb Charge, AGM Charge, Cold Charge, Discharge
DC Power Supply
Voltage 1.0-30.0V
Current 0.1-10.0A
Power Max. 100W single port
USB Type-C Output
QC3.0 5V 3A, 9V 2A, 12V 1.5A 18W
PD 5V 3A, 9V 2.2A, 12V 1.67A 20W
Size Length*Width*Height 123*119*78mm
Weight Net Weight 680g
Working
Environment
Working Temperature 0°C-40°C
Working Humidity 10%-80%
Storage
Environment
Storage Temperature -10°C-60°C
Storage Humidity 20%-70%

SKYRC Q200neo Instruction Manual
5. SKYRC Q200neo
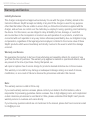
Warning
Q200neo is not intended for use by persons with reduced physical, sensory or mental
capabilities, or lack of experience and knowledge, unless they have been given supervision
or instruction concerning the use of the charger by a person responsible for their safety.
Failure to exercise caution while using this product and comply with the following warnings
could result in a product malfunction, electrical issues, excessive heat, FIRE, and ultimately
injury and property damage.
Never leave charging batteries unattended during use.
Never charge batteries overnight.
Never attempt to charge dead, damaged, or wet battery packs.
Never attempt to charge a battery pack containing different types of batteries.
Never charge batteries in extremely hot or cold places or place in direct sunlight.
Never charge a battery if the cable has been pinched or shorted.
Never connect the charger if the power cord has been pinched or shorted.
Never attempt to dismantle the charger or use a damaged charger.
Never attach your charger to both an AC and a DC power source at the same time.
Always use the charger with the correct charging and discharging program.
Always use only rechargeable batteries designed for use with this type of charger.
Never use the charger on car seats, carpets, or similar surfaces.
Always operate the charger away from flammable and explosive materials.

SKYRC Q200neo Instruction Manual
SKYRC Q200neo 6.
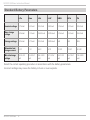
Standard Battery Parameters
Select the correct operating procedure in accordance with the battery parameters.
Incorrect settings may cause the battery to burn or even explode.
LiPo Lilon LiFe LiHV NiMH NiCd Pb
Nominal voltage 3.7V/cell 3.6V/cell 3.3V/cell 3.8V/cell 1.2V/cell 1.2V/cell 2.0V/cell
Max. charge
voltage 4.2V/cell 4.1V/cell 3.65V/cell 4.35V/cell 1.5V/cell 1.5V/cell 2.4V/cell
Storage voltage 3.8V/cell 3.7V/cell 3.3V/cell 3.85V/cell N/A N/A N/A
Allowable fast
charge current ≦1C ≦1C ≦4C ≦1C 1C-2C 1C-2C ≦0.4C
Min. discharge
voltage
3.0-3.4V/
cell
2.9-3.3V/
cell
2.6-3.0V/
cell
3.1-3.5V/
cell
0.6-1.0V/
cell
0.6-1.0V/
cell
1.8-2.0V/
cell

SKYRC Q200neo Instruction Manual
7. SKYRC Q200neo
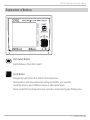
Explanation of Buttons
Switch Between Ports A,B,C,and D
Navigate through Ports A,B,C,and D in the home menu
Short-press to enter into parameters setting and confirm your selection.
Scroll the wheel to select different menus or adjust parameters.
Press and hold the scroll wheel for two seconds to access the System Setting menu.
Port Swtich Button
Scroll Button

SKYRC Q200neo Instruction Manual
SKYRC Q200neo 8.
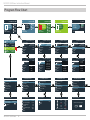
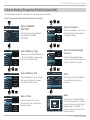
Program Flow Chart
Language
Max. Input Power
Min. Input Voltage
LCD Backlight
Volume
Completion Signal
Back
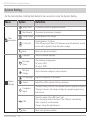
> System Settings
English
200W
11.0V
Low
Low
Once
Data
USB
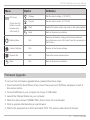
Safety Timer
Max. Capacity
Trickle Charge
Li VoltHold
Back
> Task Parameters
240 Minute
12000 mAh
OFF
> Factory Settings
Restore Factory Settings?
YES NO
> System Info
Hardware Version: 1.00
Firmware Version: 1.59
Blue Addr: 1A2B
SN:3130303138320100001000013b010086
Battery Type
Condition
Battery Cell
Task
Start
Back
CHARGE SETTING
LiPo
4.2V
6S(22.2V)
Balance CHG
A
Current 10.0A
Battery Type
Condition
Battery Cell
Task
Start
Back
CHARGE SETTING
LiPo
4.2V
6S(22.2V)
Balance CHG
A
Current 10.0A
Battery Type
Condition
Battery Cell
Task
Start
Back
CHARGE SETTING
LiPo
4.2V
6S(22.2V)
Balance CHG
A
Current 10.0A
Battery Type
Condition
Battery Cell
Task
Start
Back
CHARGE SETTING
LiPo
4.2V
6S(22.2V)
Balance CHG
A
Current 10.0A
Battery Type
Condition
Battery Cell
Task
Start
Back
CHARGE SETTING
LiPo
4.2V
6S(22.2V)
Balance CHG
A
Current 10.0A
Battery Type
Condition
Battery Cell
Task
Start
Back
CHARGE SETTING
LiPo
4.2V
6S(22.2V)
Balance CHG
A
Current 10.0A
Battery Type
Condition
Battery Cell
Task
Start
Back
CHARGE SETTING
LiPo
4.2V
6S(22.2V)
Balance CHG
A
Current 10.0A
Battery Type
Condition
Battery Cell
Task
Start
Back
CHARGE SETTING
LiPo
4.2V
3S(11.1V)
Balance CHG
A
Current 20.0A
Voltage
Current
Start
Back
20.0V
5.0A
> DC Power A
1
2
3
4
5
4.15V
4.17V
4.18V
4.20V
4.19V
4.15V
6
5 m
6 m
10 m
8 m
11
m
12 m
25.13V 28m
Total
> Battery Meter A
SYSTEM SETTING
>
>
>
>
>
>
Task Parameters
System Settings
DC Power
Battery Meter
Factory Settings
System Info
Back
SYSTEM SETTING
>
>
>
>
>
>
Task Parameters
System Settings
DC Power
Battery Meter
Factory Settings
System Info
Back
SYSTEM SETTING
>
>
>
>
>
>
Task Parameters
System Settings
DC Power
Battery Meter
Factory Settings
System Info
Back
SYSTEM SETTING
>
>
>
>
>
>
Task Parameters
System Settings
DC Power
Battery Meter
Factory Settings
System Info
Back
SYSTEM SETTING
>
>
>
>
>
>
Task Parameters
System Settings
DC Power
Battery Meter
Factory Settings
System Info
Back
SYSTEM SETTING
>
>
>
>
>
>
Task Parameters
System Settings
DC Power
Battery Meter
Factory Settings
System Info
Back
SYSTEM SETTING
>
>
>
>
>
>
Task Parameters
System Settings
DC Power
Battery Meter
Factory Settings
System Info
Back
Pb AGM
LiPo
Lilo
LiFe
LiHV
Battery Type
Condition
Battery Cell
Task
Start
Back
CHARGE SETTING
LiPo
4.2V
2S(7.4V)
Balance CHG
A
Current 20.0A
Battery Type
Condition
Battery Cell
Task
Start
Back
CHARGE SETTING
LiPo
4.2V
2S(7.4V)
Balance CHG
A
Current 20.0A
Battery Type
Condition
Battery Cell
Task
Start
Back
CHARGE SETTING
LiPo
4.2V
2S(7.4V)
Balance CHG
A
Current 20.0A
Battery Type
Condition
Battery Cell
Task
Start
Back
CHARGE SETTING
LiPo
4.2V
3S(11.1V)
Balance CHG
A
Current 20.0A
2S(7.4V)
3S(11.1V)
1S(3.7V)
4S(14.8V)
6S(22.2V)
5S(18.5V)
Balance CHG
Charge
Storage
Discharge
4.21V
4.22V
4.19V
4.18V
4.23V
4.24V
10.0A
9.9A
9.8A
LiPo
Discharge 567mAh
0.92A 22.06V
LiPo
Balance CHG596mAh
4.43A 22.40V
LiFe
Charge 1125mAh
5.98A 14.11V
NiMH
Normal 1329mAh
5.21A 23.81V
LiPo
Discharge567mAh
0.92A 22.06V
LiPo
Balance CHG 596mAh
4.43A 22.40V
LiFe
Charge 1125mAh
5.98A 14.11V
NiMH
Normal 1329mAh
5.21A 23.81V
LiPo
Discharge 567mAh
0.92A 22.06V
LiPo
Balance CHG 596mAh
4.43A 22.40V
LiFe
Charge 1125mAh
5.98A 14.11V
NiMH
Normal 1329mAh
5.21A 23.81V
596mAh
100W 00:30:25
4.05V
4.05V
4.05V
4.05V
4.05V
4.05V
ALiPo/6S/Balance CHG
22.42 V
4.43 A
1
2
3
4
5
6
596mAh
100W 00:30:25
4.05V
4.05V
4.05V
4.05V
4.05V
4.05V
ALiPo/6S/Balance CHG
22.42 V
4.43 A
1
2
3
4
5
6
1125mAh
84W 00:46:25
3.43V
3.42V
3.42V
3.42V
BLiFe/4S/Charge
14.11 V
5.98 A
1
2
3
4
1329mAh
100W 00:21:32
DNiMH/8S/Normal
23.81 V
4.21 A
567mAh
20W 00:38:25
3.51V
3.52V
3.56V
3.56V
3.56V
3.56V
CLiPo/6S/Discharge
22.06 V
0.92 A
1
2
3
4
5
6
ADC Power
19.57
96.8
Set:
V
w
20.00 V 5.00 V
4.95 A
CV

SKYRC Q200neo Instruction Manual
9. SKYRC Q200neo
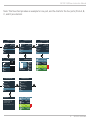
Note: This flow chart provides an example for one port, and the charts for the four ports (Ports A, B,
C, and D) are identical
Language
Max. Input Power
Min. Input Voltage
LCD Backlight
Volume
Completion Signal
Back
> System Settings
English
200W
11.0V
Low
Low
Once
Data
USB
Safety Timer
Max. Capacity
Trickle Charge
Li VoltHold
Back
> Task Parameters
240 Minute
12000 mAh
OFF
> Factory Settings
Restore Factory Settings?
YES NO
> System Info
Hardware Version: 1.00
Firmware Version: 1.59
Blue Addr: 1A2B
SN:3130303138320100001000013b010086
Battery Type
Condition
Battery Cell
Task
Start
Back
CHARGE SETTING
LiPo
4.2V
6S(22.2V)
Balance CHG
A
Current 10.0A
Battery Type
Condition
Battery Cell
Task
Start
Back
CHARGE SETTING
LiPo
4.2V
6S(22.2V)
Balance CHG
A
Current 10.0A
Battery Type
Condition
Battery Cell
Task
Start
Back
CHARGE SETTING
LiPo
4.2V
6S(22.2V)
Balance CHG
A
Current 10.0A
Battery Type
Condition
Battery Cell
Task
Start
Back
CHARGE SETTING
LiPo
4.2V
6S(22.2V)
Balance CHG
A
Current 10.0A
Battery Type
Condition
Battery Cell
Task
Start
Back
CHARGE SETTING
LiPo
4.2V
6S(22.2V)
Balance CHG
A
Current 10.0A
Battery Type
Condition
Battery Cell
Task
Start
Back
CHARGE SETTING
LiPo
4.2V
6S(22.2V)
Balance CHG
A
Current 10.0A
Battery Type
Condition
Battery Cell
Task
Start
Back
CHARGE SETTING
LiPo
4.2V
6S(22.2V)
Balance CHG
A
Current 10.0A
Battery Type
Condition
Battery Cell
Task
Start
Back
CHARGE SETTING
LiPo
4.2V
3S(11.1V)
Balance CHG
A
Current 20.0A
Voltage
Current
Start
Back
20.0V
5.0A
> DC Power A
1
2
3
4
5
4.15V
4.17V
4.18V
4.20V
4.19V
4.15V
6
5 m
6 m
10 m
8 m
11
m
12 m
25.13V 28m
Total
> Battery Meter A
SYSTEM SETTING
>
>
>
>
>
>
Task Parameters
System Settings
DC Power
Battery Meter
Factory Settings
System Info
Back
SYSTEM SETTING
>
>
>
>
>
>
Task Parameters
System Settings
DC Power
Battery Meter
Factory Settings
System Info
Back
SYSTEM SETTING
>
>
>
>
>
>
Task Parameters
System Settings
DC Power
Battery Meter
Factory Settings
System Info
Back
SYSTEM SETTING
>
>
>
>
>
>
Task Parameters
System Settings
DC Power
Battery Meter
Factory Settings
System Info
Back
SYSTEM SETTING
>
>
>
>
>
>
Task Parameters
System Settings
DC Power
Battery Meter
Factory Settings
System Info
Back
SYSTEM SETTING
>
>
>
>
>
>
Task Parameters
System Settings
DC Power
Battery Meter
Factory Settings
System Info
Back
SYSTEM SETTING
>
>
>
>
>
>
Task Parameters
System Settings
DC Power
Battery Meter
Factory Settings
System Info
Back
Pb AGM
LiPo
Lilo
LiFe
LiHV
Battery Type
Condition
Battery Cell
Task
Start
Back
CHARGE SETTING
LiPo
4.2V
2S(7.4V)
Balance CHG
A
Current 20.0A
Battery Type
Condition
Battery Cell
Task
Start
Back
CHARGE SETTING
LiPo
4.2V
2S(7.4V)
Balance CHG
A
Current 20.0A
Battery Type
Condition
Battery Cell
Task
Start
Back
CHARGE SETTING
LiPo
4.2V
2S(7.4V)
Balance CHG
A
Current 20.0A
Battery Type
Condition
Battery Cell
Task
Start
Back
CHARGE SETTING
LiPo
4.2V
3S(11.1V)
Balance CHG
A
Current 20.0A
2S(7.4V)
3S(11.1V)
1S(3.7V)
4S(14.8V)
6S(22.2V)
5S(18.5V)
Balance CHG
Charge
Storage
Discharge
4.21V
4.22V
4.19V
4.18V
4.23V
4.24V
10.0A
9.9A
9.8A
LiPo
Discharge 567mAh
0.92A 22.06V
LiPo
Balance CHG596mAh
4.43A 22.40V
LiFe
Charge 1125mAh
5.98A 14.11V
NiMH
Normal 1329mAh
5.21A 23.81V
LiPo
Discharge567mAh
0.92A 22.06V
LiPo
Balance CHG 596mAh
4.43A 22.40V
LiFe
Charge 1125mAh
5.98A 14.11V
NiMH
Normal 1329mAh
5.21A 23.81V
LiPo
Discharge 567mAh
0.92A 22.06V
LiPo
Balance CHG 596mAh
4.43A 22.40V
LiFe
Charge 1125mAh
5.98A 14.11V
NiMH
Normal 1329mAh
5.21A 23.81V
596mAh
100W 00:30:25
4.05V
4.05V
4.05V
4.05V
4.05V
4.05V
ALiPo/6S/Balance CHG
22.42 V
4.43 A
1
2
3
4
5
6
596mAh
100W 00:30:25
4.05V
4.05V
4.05V
4.05V
4.05V
4.05V
ALiPo/6S/Balance CHG
22.42 V
4.43 A
1
2
3
4
5
6
1125mAh
84W 00:46:25
3.43V
3.42V
3.42V
3.42V
BLiFe/4S/Charge
14.11 V
5.98 A
1
2
3
4
1329mAh
100W 00:21:32
DNiMH/8S/Normal
23.81 V
4.21 A
567mAh
20W 00:38:25
3.51V
3.52V
3.56V
3.56V
3.56V
3.56V
CLiPo/6S/Discharge
22.06 V
0.92 A
1
2
3
4
5
6
ADC Power
19.57
96.8
Set:
V
w
20.00 V 5.00 V
4.95 A
CV

SKYRC Q200neo Instruction Manual
SKYRC Q200neo 10.
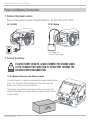
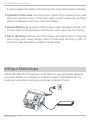
Power and Battery Connection
1. Connect to power source
There are two options of inputs for SkyRC Q200neo: AC 100-240V or DC 10-30V.
*12V DC Battery or
10-30V DC Power Supply
AC 100-240V 12V DC Battery
2. Connect the battery
For safety reasons, it is highly recommended to charge Lithium batteries
(LiPo, Lilon, LiFe and LiHV) using Balance CHG mode unless the
battery comes without a balance connector.
The balance wire attached to the battery must be connected to the
charger with the black wire aligned with the negative marking. Ensure
correct polarity!
1) LiPo Battery Connection with Balance Adapter
TO AVOID SHORT CIRCUITS, ALWAYS CONNECT THE CHARGE LEADS
TO THE CHARGER FIRST AND THEN TO THE BATTERY. REVERSE THE
SEQUENCE WHEN DISCONNECTING.

SKYRC Q200neo Instruction Manual
11. SKYRC Q200neo
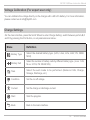
Charging
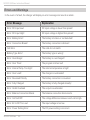
Various operations are applicable depending on the battery type. This chart illustrates which
operations are relevant for different types of batteries.
Battery
Type
Working
Mode Description
LiPo
LiIon
LiFe
LiHV
Balance
CHG
This mode is to balance charge the lithium battery based on the charging rate
the user set. It can balance each cells of the battery.
Charge This mode is to charge the lithium battery based on the charging rate selected.
Storage This mode is to store the battery via charging or discharging its votlage to a
specic storage value.
Discharge This mode is to dishcarge the lithium battery based on the discharging rate
selected.
2) NiMH/NiCd or Pb Battery Connection

SKYRC Q200neo Instruction Manual
SKYRC Q200neo 12.
Battery
Type
Working
Mode Description
NiMH
NiCd
Charge This mode is to charge the NiMH/NiCd battery based on the charging rate
selected.
Discharge This mode is to discharge the NiMH/NiCd battery based on the discharging rate
selected.
Re-Peak In re-peak charge mode, the charger can peak charge the battery twice in a row
automatically. This is good for conrming the battery is fully charged.
Cycle_D_C 1 to 3 cyclic and continuous process of discharge>charge is operable for
refreshing and restoring the performance of NiMH/NiCd batteries.
Cycle_C_D 1 to 3 cyclic and continuous process of charge>discharge is operable for
refreshing and restoring the performance of NiMH/NiCd batteries.
Pb
Normal This mode is to charge the Pb battery based on the charging rate selected.
AGM
Charge This mode is to charge the AGM battery based on the charging rate selected.
Cold
Charge
This mode is to charge the Pb battery under a low temperature based on the
charging rate selected.
Discharge This mode is to discharge the Pb battery based on the discharging rate selected.

SKYRC Q200neo Instruction Manual
13. SKYRC Q200neo
Lithium Battery Program(LiPo/LiFe/Lilon/LiHV)
Battery Type
Condition
Battery Cell
Task
Start
Back
CHARGE SETTING
LiPo
4.2V
3S(11.1V)
Balance CHG
CH A
Current 20.0A
LiPo
Lilo
LiFe
LiHV
Battery Type
Condition
Battery Cell
Task
Start
Back
CHARGE SETTING
LiPo
4.2V
2S(7.4V)
Balance CHG
CH A
Current 20.0A
Balance CHG
Charge
Storage
Discharge
The following flowchart is a reference to set the program manually.
Enter CHARGE
SETTING
Short-press the Scroll Wheel
to enter the CHARGE
SETTING.
Select Condition
Scroll to Condition, call out the
menu and select the terminal
charging voltage.
Select Battery Type
Short-press the Scroll Wheel to
call out the Battery Type menu,
and scroll to select LiPo.
Set Charge/Discharge
Current
Scroll to Charge/Discharge
Current, call out the menu and
scroll to select the current.
Select Battery Cell
Scroll to Battery Cell to call out
the menu and scroll to select
the correct battery cells.
Start
Short-press the Scroll Wheel
to confirm and initiate the
program.
Stop
Short-press the Scroll Wheel
to stop the program. If confirm
to stop, short-press the Scroll
Wheel again to confirm. If
not stop, short-press the Port
button to back.
Select Task
Scroll to Task, call out the
menu and scroll to select the
working mode.
Battery Type
Condition
Battery Cell
Task
Start
Back
CHARGE SETTING
LiPo
4.2V
2S(7.4V)
Balance CHG
CH A
Current 20.0A
4.21V
4.22V
4.19V
4.18V
4.23V
4.24V
Battery Type
Condition
Battery Cell
Task
Start
Back
CHARGE SETTING
LiPo
4.2V
6S(22.2V)
Balance CHG
CH A
Current 10.0A
Scroll to select the port and short-press to confirm.
Battery Type
Condition
Battery Cell
Task
Start
Back
CHARGE SETTING
LiPo
4.2V
2S(7.4V)
Balance CHG
CH A
Current 20.0A
10.0A
9.9A
9.8A
Battery Type
Condition
Battery Cell
Task
Start
Back
CHARGE SETTING
LiPo
4.2V
2S(7.4V)
Balance CHG
CH A
Current 20.0A
596mAh
100W 00:30:25
4.05V
4.05V
4.05V
4.05V
4.05V
4.05V
AL iPo/6S/Balance CHG
22.42 V
4.43A
1
2
3
4
5
6
5
96mA
h
100
W
00
:
30
:
25
4
.
0
5
V
4
.
05V
4
.
05V
4
.
0
5
V
4
.
05V
4
.05
V
A
L
iPo
/
6
S/
Balance
C
H
G
22
.4
2
V
4
.4
3
A
1
2
3
4
5
6
Stop Working?
PORT
Press Back
OK
Battery Type
Condition
Battery Cell
Task
Start
Back
CHARGE SETTING
LiPo
4.2V
3S(11.1V)
Balance CHG
A
Current 20.0A
2S(7.4V)
3S(11.1V)
1S(3.7V)
4S(14.8V)
6S(22.2V)
5S(18.5V)

SKYRC Q200neo Instruction Manual
SKYRC Q200neo 14.
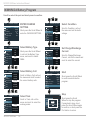
NiMH/NiCd Battery Program
ENTER CHARGE
SETTING
Short-press the Scroll Wheel to
enter the CHARGE SETTING.
Select Condition
Scroll to Condition, call out
the menu and set the delta
voltage.
Select Battery Type
Short-press the Scroll Wheel
to call out the Battery Type
menu, and scroll to select
NiMH.
Set Charge/Discharge
Current
Scroll to Charge/Discharge
Current, call out the menu and
scroll to select the current
Select Battery Cell
Scroll to Battery Cell, call out
the menu and scroll to select
the correct battery cells.
Start
Short-press the Scroll Wheel
to confirm and initiate the
program.
Stop
Short-press the Scroll
Wheel to stop the program.
If prompted to stop, short-
press the Scroll Wheel again
to confirm, or short-press the
Port button to return.
Select Task
Scroll to Task, call out the
menu and scroll to select the
working mode.
Battery Type
Condition
Battery Cell
Task
Charge Current
Temp Cut-off
Start
Back
CHARGE SETTING
NiMH
-6 mV
6S(7.2V)
Charge
3.0A
50°C
CH A
Battery Type
Condition
Battery Cell
Task
Charge Current
Temp Cut-off
Start
Back
CHARGE SETTING
NiMH
-6 mV
6S(7.2V)
Charge
3.0A
50°C
CH A
LiHV
LiFe
Lilo
NiMH
NiCd
PB
Battery Type
Condition
Battery Cell
Task
Charge Current
Temp Cut-off
Start
Back
CHARGE SETTING
NiMH
-6 mV
6S(7.2V)
Charge
3.0A
50°C
CH A
Charge
Re-Peak
CYCLE_C_D
CYCLE_D_C
Battery Type
Condition
Battery Cell
Task
Charge Current
Temp Cut-off
Start
Back
CHARGE SETTING
NiMH
-6 mV
6S(7.2V)
Charge
3.0A
50°C
CH A
-5mV
-4mV
-3mV
-6mV
-7mV
-8mV
-9mV
Battery Type
Condition
Battery Cell
Task
Charge Current
Temp Cut-off
Start
Back
CHARGE SETTING
NiMH
-6 mV
6S(7.2V)
Charge
3.0A
50°C
CH A
2.9A
2.8A
2.7A
3.0A
3.1A
3.2A
3.3A
Battery Type
Condition
Battery Cell
Task
Charge Current
Temp Cut-off
Start
Back
CHARGE SETTING
NiMH
-6 mV
6S(7.2V)
Charge
3.0A
50°C
CH A
Scroll to select the port and short-press to confirm.
Battery Type
Condition
Battery Cell
Task
Charge Current
Temp Cut-off
Start
Back
CHARGE SETTING
NiMH
-6 mV
6S(7.2V)
Charge
3.0A
50°C
CH A
5S(6.0V)
4S(4.8V)
3S(3.6V)
6S(7.2V)
7S(8.4V)
8S(9.6V)
9S(10.8V)
596mAh
100W 00:30:25
4.05V
4.05V
4.05V
4.05V
4.05V
4.05V
AL iPo/6S/Balance CHG
22.42 V
4.43A
1
2
3
4
5
6
5
96mA
h
100
W
00
:
30
:
25
4
.
0
5
V
4
.
05V
4
.
05V
4
.
0
5
V
4
.
05V
4
.05
V
A
22
.4
2
V
4
.4
3
A
1
2
3
4
5
6
Stop Working?
PORT
Press Back
OK
NiMH/6S/Charge

SKYRC Q200neo Instruction Manual
15. SKYRC Q200neo
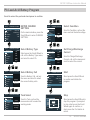
Pb Lead-Acid Battery Program
ENTER CHARGE
SETTING
On the main interface, press the
Scroll Wheel to enter CHARGE
SETTING.
Select Condition
Scroll to Condition, call out the
menu and set the delta voltage.
Select Battery Type
Short-press the Scroll Wheel to
call out the Battery Type menu,
and scroll to select Pb.
Set Charge/Discharge
Current
Scroll to Charge/Discharge
Current, call out the menu and
scroll to select the current.
Select Battery Cell
Scroll to Battery Cell, call out
the menu and scroll to select
the correct battery cells.
Start
Short-press the Scroll Wheel
to confirm and initiate the
program.
Stop
Short-press the Scroll Wheel to
stop the program. If prompted
to stop, short-press the Scroll
Wheel again to confirm, or
short-press the Port button to
return.
Task Select
Scroll to Task, call out the
menu and scroll to select the
working mode.
Battery Type
Condition
Battery Cell
Task
Current
Start
Back
CHARGE SETTING
PB
2.45V
6S(12.0V)
AGM Charge
5.0A
CH A
Battery Type
Condition
Battery Cell
Task
Current
Start
Back
CHARGE SETTING
NiMH
2.45V
6S(12.0V)
AGM Charge
5.0A
CH A
LiHV
LiFe
Lilo
NiMH
NiCd
PB
Battery Type
Condition
Battery Cell
Task
Current
Start
Back
CHARGE SETTING
NiMH
2.45V
6S(12.0V)
AGM Charge
5.0A
CH A
Normal
AGM Charge
Cold Charge
Discharge
Battery Type
Condition
Battery Cell
Task
Current
Start
Back
CHARGE SETTING
NiMH
2.45V
6S(12.0V)
AGM Charge
5.0A
CH A
1.80V
1.90V
2.00V
Battery Type
Condition
Battery Cell
Task
Current
Start
Back
CHARGE SETTING
NiMH
2.45V
6S(12.0V)
AGM Charge
5.0A
CH A
4.9A
4.8A
4.7A
5.0A
5.1A
5.2A
Battery Type
Condition
Battery Cell
Task
Current
Start
Back
CHARGE SETTING
PB
2.45V
6S(12.0V)
AGM Charge
5.0A
CH A
Scroll to select the port and short-press to confirm.
Battery Type
Condition
Battery Cell
Task
Current
Start
Back
CHARGE SETTING
NiMH
2.45V
6S(12.0V)
AGM Charge
5.0A
CH A
3S(6.0V)
6S(12.0V)
12S(24.0V)
596mAh
100W 00:30:25
4.05
4.05
4.05
4.05
4.05
4.05
AL iPo/6S/Balance CHG
22.42 V
4.43A
1
2
3
4
5
6
5
96mA
h
100
W
00
:
30
:
25
4
.
0
5
V
4
.
05V
4
.
05V
4
.
0
5
V
4
.
05V
4
.05
V
A
22
.4
2
V
4
.4
3
A
1
2
3
4
5
6
Stop Working?
PORT
Press Back
OK
PB/6S/Charge

SKYRC Q200neo Instruction Manual
SKYRC Q200neo 16.
Charger Master
The Q200neo offers the convenience of charging and discharging directly from your computer,
whether you're using Windows or MacOS. It provides a visual display of various parameters, such
as charge time, capacity, charge current, and voltage, presented in a curve format.
1. Download the latest Charger Master onto your desktop. Unzip and open it;
2. Choose Data for USB work mode in System Setting>USB;
3. Connect Q200neo to your computer via a USB type-C cable;
On the top left panel, choose the expected work mode to initiate the program.
4.
PC Interface
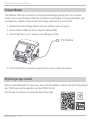
SkyCharger app Control
With the built-in Bluetooth 5.0, Users can easily control the Q200neo charger through the SkyCharger
app. The firmware can be upgraded over the OTA(On the Air).
Scan the QR code below to download the SkyCharger app!
SkyCharger

SKYRC Q200neo Instruction Manual
17. SKYRC Q200neo
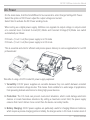
DC Power
On the main menu, hold the Scroll Wheel for two seconds to enter Charger Setting>DC Power.
Select the options of DC Power: adjust the output voltage and current.
Select Start to activate the DC Power working mode.
When acting as a digital power supply, Q200neo can regulate its output voltage or output current
at a constant level. Constant Current(CC) Mode and Constant Voltage(CV) Mode can switch
automatically as follows:
If R load > (V out / I out) then power supply is in CV mode
If R load < (V out / I out) then power supply is in CC mode
This is essential and vital for efficient and precise power delivery in various applications for our RC
professionals!
Versatility: CC/CV power supplies are versatile because they can switch between constant
current and constant voltage modes. This makes them suitable for a wide range of applications,
from powering delicate electronics to driving high-power devices.
Protection: The CC mode can prevent overcurrent situations, which could damage electronic
devices or create hazardous situations. By setting a maximum current limit, the power supply
ensures that it won't deliver more current than the device can safely handle.
Battery Charging: CC/CV power supplies are particularly useful for charging lithium-ion batteries,
which require a precise charging protocol. Initially, the charger works in CC mode to restore most of
*Benefits of using a CC/CV mode DC power supply explained:
1.
2.
3.

SKYRC Q200neo Instruction Manual
SKYRC Q200neo 18.
USB Type-C PD/QC3.0 Output
With the 20W USB-C PD 3.0 charging port, our RC players can enjoy rapid charging speeds like
never before. Whether you're charging your smartphones, tablets, or 2020 MacBook Airs, this
powerful port ensures that you can fuel up your devices in a fraction of the time.
the battery's capacity, then switches to CV mode to top off the charge while preventing overcharging.
Optimized for Various Loads: Some loads require a specific voltage to operate correctly, while
others need a particular current. A CC/CV power supply can adapt to these needs, providing a
stable and suitable power output under various load conditions.
Improved Efficiency: By dynamically switching between modes depending on the load, a CC/
CV power supply can often operate more efficiently than a power supply using only one mode.
Safe for LED Driving: LEDs are current-driven devices, and a slight increase in voltage can
lead to a high current, causing damage to LEDs. CC mode allows safe driving of LEDs. CV
mode can be useful when LEDs are configured in parallel strings.
4.
5.
6.
Page is loading ...
Page is loading ...
Page is loading ...
Page is loading ...
Page is loading ...
Page is loading ...
Page is loading ...
Page is loading ...
-
 1
1
-
 2
2
-
 3
3
-
 4
4
-
 5
5
-
 6
6
-
 7
7
-
 8
8
-
 9
9
-
 10
10
-
 11
11
-
 12
12
-
 13
13
-
 14
14
-
 15
15
-
 16
16
-
 17
17
-
 18
18
-
 19
19
-
 20
20
-
 21
21
-
 22
22
-
 23
23
-
 24
24
-
 25
25
-
 26
26
-
 27
27
-
 28
28


Ask a question and I''ll find the answer in the document
Finding information in a document is now easier with AI
Related papers
-
Skyrc S100neo AC/DC Smart Balance Charger User manual
-
-
-
-
-
Skyrc S60 User manual
-
-
-
Skyrc Ultimate 1000W User manual
-
Other documents
-
HiTEC RDX4 AC/DC Multi-Function Smart Charger User manual
-
Satechi S09OJ3J24Z Operating instructions
-
-
MASCOT 205110 User manual
-
-
banggood H52V215 User guide
-
EcoFlow WAVE 2 User guide
-
V TAC V-TAC VT-1001 Energy Storage Power Supply User manual
-
ToolKitRC Q4AC User manual
-
Turnigy T240 Reactor User manual