Page is loading ...

Stalker 360 – User’s Manual
V1.0
1
The following is a guide to assist you with the operations & trouble shooting of your new Western Rivers MP 3
electronic game caller. We appreciate you as our customer and wish you the best of success. Good luck and happy
hunting!
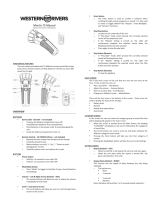
STALKER 360 BUTTON PAD & REMOTE BUTTON OPERATIONS
POWER BUTTON: The “Power” button on the game caller is designed to manually turn your game
caller to ON or OFF status. By pressing and holding the button down for a few seconds you will turn the
unit on. The Western Rivers welcome screen with come up and then go to your library list. If you want
to turn the unit off, you must press & hold down this button until the display goes to a blank screen and is no
longer illuminated. The power button on the remote control functions the same way as the game caller. This
button is designed to put the caller into a “Standby Mode” while in use! This button will not power off the
game caller. The battery will discharge if you fail to manually turn unit off on the main button pad. (See Battery
Maintenance) The game caller must be turned on before you can control it with the remote.
The “Power” button on the Remote Control unit is designed to remotely turn the game caller to the ON or
STANDBY status only from a remote location. Press the button on the remote once to turn unit ON, press & hold
to power game caller OFF. When game caller is in a standby mode, it is operating on minimum battery
consumption. If power button doesn’t appear to work on either unit, please check the battery and replace. Low
battery level will also affect the operation of the button pad. Make sure that game caller is showing a full to half
battery cycle life before taking it to the field. (See Battery Maintenance).
IMPORTANT NOTE: The game caller will need to be connected to the remote after you upload or delete
ANY sounds into the systems hard drive so that the remote can recognize the new order of the playlist
selections (See Downloads & Uploads).
PLAY / ENTER BUTTON: The “Play” button on both units will start the pre-selected sound you have
chosen. The “Play” button on either unit can be activated by firmly pressing the button. Press & hold is
not required. You can also play two different sounds out of the speakers. In order to do this you need to
choose your first selected sound. Once sound is playing press the Previous button to go back to the playlist and
select and play your second sound. This icon also acts as the “Enter” button, so if you want to go back or make a
selection choice you’d press this button. If either “Play” button on either unit appears not to work, check the
battery for status. If you use the button pad on the game caller to operate the functions of the caller, the LCD on the
remote control will not show the same information. Requests transmitted from the remote control will be shown on
the game caller’s LCD.
PAUSE BUTTON: The “Pause” button on both units will pause the play of the current sound selected.
If the “Pause” button appears not to work on either unit, check the battery for status. By pressing the
PLAY button will restart the paused sound at the exact same location it was paused at.
The volume of the unit will automatically resume at the same level as previous setting when this function is
activated. If you use the button pad on the game caller to operate the functions of the caller, the LCD on the remote
control will not show the same information. Requests transmitted from the remote control will be shown on the
game caller’s LCD.
NEXT BUTTON: The “Next” button on both units allows the user to scan in a downward motion to
arrive at the desired sound to play that is seen on the LCD. To activate, firmly press and release for each
scan to the next selection. Press & hold will scan the entire selection. For best results rename and reload
sounds in your special grouping. If the “Next” button appears not to work on either unit, check the battery for
status. If you use the button pad on the game caller to operate the functions of the caller, the LCD on the remote
control will not show the same information. Requests transmitted from the remote control will be shown on the
game caller’s LCD.
PREVIOUS BUTTON: The “Previous” button on both units allows the user to scan in a upward
motion to arrive at the desired sound to play that is seen on the LCD. To activate, firmly press and
release for each scan to the previous selection. Press & hold will scan the entire selection. For best
results rename and reload sounds in your special grouping. If the “Previous” button appears not to work on either
unit, check the battery for status. If you use the button pad on the game caller to operate the functions of the caller,
the LCD on the remote control will not show the same information. Requests transmitted from the remote control
will be shown on the game caller’s LCD.
NEXT 10 BUTTON: The “Next 10” button recalls ten (10) sounds at once thus allowing you to
instantly scan through your entire library of sounds in the order they were loaded very quickly. The

Stalker 360 – User’s Manual
V1.0
2
button function is the same on both the game caller and the remote. If the “Next 10” button appears not to work on
either unit, check the battery for status. If you use the button pad on the game caller to operate the functions of the
caller, the LCD on the remote control will not show the same information. Requests transmitted from the remote
control will be shown on the game caller’s LCD.
PREVIOUS 10 BUTTON: The “Previous 10” button recalls ten (10) sounds at once, thus allowing you
to instantly scan through your entire library of sounds in the order they were loaded very quickly. The
button function is the same on both the game caller and the remote. If the “Previous 10” button appears
not to work on either unit, check the battery for status. If you use the button pad on the game caller to operate the
functions of the caller, the LCD on the remote control will not show the same information. Requests transmitted
from the remote control will be shown on the game caller’s LCD.
VOLUME UP BUTTON: The “Volume Up” button adjusts the volume upward from the current
setting on the game caller to the desired level. Press to increase volume step by step OR press & hold to
increase quickly. Remote button provides the same function. The LCD bar volume bar will display the
current level of sound on the game caller and the remote. If you use the button pad on the game caller to operate
the functions of the caller, the LCD on the remote control will not show the same information. Requests
transmitted from the remote control will be shown on the game caller’s LCD.
VOLUME DOWN BUTTON: The “Volume Down” button adjusts the volume downward from the
current setting on the game caller to the desired level. Press to decrease volume step by step OR press
& hold to decrease quickly. Remote button provides the same function. The LCD bar volume bar will
display the current level of sound on the game caller and the remote. If you use the button pad on the game caller to
operate the functions of the caller, the LCD on the remote control will not show the same information. Requests
transmitted from the remote control will be shown on the game caller’s LCD.
DECOY BUTTON: The “Decoy” button allows the user to power on/off any motion device plugged in
to simulate a live animal. (#174 Deceptor Rabbit) You must have the 2.5mm / 2.5mm power cord
adapter for this function to work properly. Simply hook the power cord adapter to the units decoy
auxiliary port & then to the Deceptor Rabbit.
IMPORTANT NOTE: DO NOT install any batteries into the decoy if using power from the game caller.
Once this is done you now have control of the motion for the decoy with the “Decoy” button on the unit or the
remote. Press firmly once to activate & press again to deactivate. If you use the button pad on the game caller to
operate the functions of the caller, the LCD on the remote control will not show the same information. Requests
transmitted from the remote control will be shown on the game caller’s LCD. Decoy available at
www.gsmoutdoors.com.
SINGLE/DUAL SPEAKER: The game caller features Dual Hi-output swivel speakers for increased
volume and high performance sound clarity. This button will allow you to select if you’d like to play
the sound from the one right side speaker or both speakers instantly. The icon on the LCD will denote
how many speakers are in use.
Simply press the button once to select the opposite. Use of both speakers at the same
time will greatly reduce operating time. If you use the button pad on the game caller to
operate the functions of the caller, the LCD on the remote control will not show the
same information. Requests transmitted from the
remote control will be shown on the game caller’s LCD.
SPEAKER SELECTION: The game caller also allows you the ability to select which speaker you
would like to rotate. By pressing the icon you will switch from left to right to both speakers. The icon on
the LCD will denote which speaker(s) you chose.
(Speaker Selection -L/R) (Rotating Icon)
Remote button provides the same function. If you use the button pad on the game caller to operate the functions of
the caller, the LCD on the remote control will not show the same information. Requests transmitted from the
remote control will be shown on the game caller’s LCD.

Stalker 360 – User’s Manual
V1.0
3
SPEAKER ROTATION: The game caller features two swivel speakers that can independently
rotate 180° together or separately. Depending on which icon you press will determine which
direction the speaker(s) will turn. Remote button provides the same function. If you use the
button pad on the game caller to operate the functions of the caller, the LCD on the remote control will not show
the same information. Requests transmitted from the remote control will be shown on the game caller’s LCD.
ADD/REMOVE TO FAVORITES: The game caller allows you to create and store your
favorite sounds into a Favorites folder on the main menu, giving you access to it the moment
you turn the caller on. This can “only” be done from the remote control unit. To “Add” a sound
to the favorites list, simply go to the sound you want to add and start playing it and then press the icon with the “+”
on it. To remove the sound from the favorites list you need to first go to the list itself. Highlight the sound you
want to remove and press the icon with the “-“ on it. If the buttons appears not to be working properly, check the
battery for status.
UPLOADING /DOWNLOADING SOUNDS (PC VERSION)
The game caller comes with a 4GB SD card loaded with sounds that can be linked to your home’s personal
computer via the USB Type B cable and allows you to save the pre-loaded sounds to your computer’s hard drive.
You will need a personal computer that’s running Windows XP or newer.
There are two ways to activate this procedure, first way is if your computer has a built-in SD card slot, you can
remove the SD card from the caller and plug it OR if it doesn’t then you will need to connect the USB/DATA cable
to your computer, then power on your game caller, open auxiliary cover located on top of the game caller, then
insert USB/DATA cable into caller USB port.
A successful USB connection will display the USB Icon on the game caller LCD. If you run into an error of it not
recognizing the drive, follow the instructions on the screen. Once the corrections have been made move to the next
paragraph.
Once either method is done, go to the “My Computer” icon on your personal computer’s main screen & click on it.
The SD card or game caller should be recognized as a removable drive. Click on this drive and it should display the
sounds.
NOTE: At this time we recommend that you save all the sounds to your PC before proceeding. This can
be done by selecting” EDIT” from the tool bar and then clicking “SELECT ALL”. Once this is completed
choose the file location in which you wish to save them. After you have stored your sounds successfully then
you are ready to update the sounds and load any additional sounds that you may want.
NOTE: Any sound loaded must be formatted to .mp3 or .wav before the game caller will recognize it.
Simply locate the sound that you wish to load and right click on the computer mouse. You should see a “Send
or Send To” option. Click on this option and send the sound desired to the designated drive that represents the
game caller on your computer. The 4GB of memory, allows for approximately 2000 minutes of recorded .mp3
& .wav sounds. The game caller has the ability to go up to a 16GB SD card (sold separately) which would hold
a lot more.
NOTE: You should not unplug the USB/DATA cable form the personal computer or the game caller
without ejecting the unit FIRST. This can be done by selecting the “My Computer” option on your desktop
and then choosing the appropriate “removable drive” that symbolizes the game caller unit. Next step is to right
click on the mouse and a dialog box should drop down. Select the “Eject” option. You should then be advised
that it is safe to remove or unplug the game caller at this time.
UPLOADING PLAYLIST TO REMOTE CONTROL: To update the remote control’s playlist with the new
selection that you have added or deleted from the game caller, simply turn on or leave the power on the game caller
after the selection update, then power on the remote control. Plug the Uplink Auxiliary cord into the game caller’s
Uplink port and then into the remote. The update should automatically start. The LCD will prompt you when the
task has been completed.
NOTE: All sounds will automatically repeat/loop at the end and start over without hesitation.
BATTERY POWER PORT: This port is for powering the game caller from a 12-volt auxiliary power supply.
Recommended battery is a 12-volt (7 to 9 amp) sealed lead acid. NO CAR BATTERY. Hooking up automotive
battery will void your warranty.

Stalker 360 – User’s Manual
V1.0
4
DECOY POWER PORT: When connected to the caller, caller provides power and remote control capabilities for
the decoy.
REMOTE CONTROL UPLINK PORT: This port is for allowing the uploading of data (play list) from the game
caller to the remote control. If any changes are made to main calling system you must sync your remote each time.
(Uplink cable supplied with game caller)
USB PORT (Type B): This port will allow you to connect your game caller directly into a personal computer that
contains a USB port to add or remove sounds.
SD MEMORY CARD SLOT: Utilize this port to add or play sounds.
EXTREME CLIMATE CONDITIONS & OPERATION CONDITIONS
Your new Western Rivers MP3 Game Caller is designed to withstand most rugged Field Use conditions. However,
we highly recommend that you never leave your unit in a place where the temperature exceeds 110 degrees for a
prolonged period of time as this may cause damage to your unit.
When using your Game Caller in extreme cold weather conditions, place some form of warming device around the
unit to achieve normal operation conditions. Place remote control unit close to your body as to keep the remote
warm as well. Notes: The game caller is designed to operate outdoors at operation conditions of -13oF to 110oF in
most all weather conditions. However, extreme conditions in the climate can alter the operation conditions of the
unit and the above may vary pending the extremity of your outdoor use. You may experience shorter remote
control distances, decreased operational time, slower button pad response, and minimum sound variances pending
your conditions.
Altitude, weather & foliage are major factors in the remote range. Any visual obstructions between the remote and
the game caller unit can decrease the operational range of the unit. The yardage range quote is based on ideal
operational conditions in a line of sight situation at a temperature of 70 degrees with a fully charged battery in the
unit & a new battery in the remote. Other conditions may cause the results to vary.

Stalker 360 – User’s Manual
V1.0
5
BATTERY MAINTENANCE
STALKER 360 UNIT: The units are designed to operate on 8 AA alkaline batteries. The LCD on the game caller
will denote the level of the batteries. It is best to replace the batteries as the LCD graph bar displays 25% battery
level. This will assure you that you have optimal battery level to make the hunt successful. Batteries must be
removed from game caller when not in use. Failure to the game caller caused by defective batteries will void
your one-year warranty.
BATTERY RUN TIME: 2.5 – 5.0 hrs. This time may vary depending on the temperature and the quality of
batteries you have purchased. Always take a spare set of batteries with you on the hunt.
REMOTE CONTROL: To change the battery in the remote control, simply pull outward on the lower back part
of the remote. Battery is a nine (9) volt alkaline. Battery should be changed at the beginning of each season. If you
notice that the range of your remote has decreased it is suggested that you replace the battery at this time. Batteries
must be removed from game caller when not in use.
Failure to the game caller caused by defective batteries will void your one-year warranty
NOTE: Should you leave your caller remote on for ten (10) minutes without use; the remote will automatically
turn off. The normal operating battery life for the caller remote is approximately
BACKLIGHT (LCD): The backlight on the LCD will turn off automatically after 5 second of on time without
being used. Any touch of the button will cause the LCD backlight to re-illuminate.
OPERATING SYSTEMS REQUIRED
• Windows Vista or above.
• Mac OS 10.6 or above.
OPERATIONS
Once you have charged the unit & familiarized yourself with all the features, then it is time for the field test. Place
the unit out in an outdoor setting and position the unit in a desired location that is natural to the area for the type of
calling that you are attempting.
Check the volume settings, selected sounds, direction of speaker & step off various distances to check to unit vs.
your own abilities of sight & hearing. Run different tests from sound selection, pause-play to volume levels to
better understands the unit. After this is done start scouting different area for signs and try your unit in the field.
Remember that the more sets that you make in a day the more opportunity that you will have to take your desired
game. (Not necessary when whitetail hunting)
DOWNLOADING FROM WEBSITE
To download sounds from our website, you must go to www.gsmoutdoors.com, and then go to Western Rivers.
Select any sound at this point that you may wish and choose the download option.
PLEASE BROWSE THE OTHER AREAS OF OUR WEBSITE TO LOCATE VARIOUS
ACCESSORIES FOR YOUR NEW UNIT AS WELL AS HUNDREDS OF OTHER HIGH
QUALITY HUNTING EQUIPMENT & SUPPLIES!

Stalker 360 – User’s Manual
V1.0
6
CUSTOMER WARRANTY
GSM OUTDOORS guarantees the satisfactory operation of our STALKER 360 for one year from the date
of purchase. If one should ever fail to operate, we will repair or replace it at no cost.
Upon inspection of the caller, GSM OUTDOORS will either repair or replace any unit or part found to be
defective. The decision to repair or replace material is solely at our discretion. If product is obsolete and
beyond repair at the time of return, we will replace it with the closest similar product available.
GSM OUTDOORS is not responsible for incoming freight charges. Components damaged by any use of the
product other than for its intended function, or by the owner’s failure to maintain the unit in the manner
and frequency prescribed by the instructions supplied at the time of purchase are not covered. Repair or
replacement costs associated with such issues of the product will be based on GSM OUTDOORS net prices
at the time of the work performed.
GSM OUTDOORS will not be held responsible, or assume any liability, for product damaged in transit,
caused by acts of God; rework or repairs performed on product without our prior, written consent; damage
to associated equipment; loss of profit; or any other damages and claims.
EXCEPTIONS
Battery Holder (1 Year)
Unit is not warranted for defects or damages incurred from the leakage of batteries. If the cause of damage
or if a defect is determined to have been caused by a battery leakage, the one year warranty is voided. If unit
is submerged underwater warranty will be voided. All repairs will be billed at GSM OUTDOORS net prices
for labor and repair items. Batteries must be removed when unit is stored and not in use.
CUSTOMER SERVICE
Should a malfunction occur, first check to see that some simple, obvious, or routine step in the normal operating
procedure has not been overlooked – remote battery, main unit battery, sounds loaded properly, etc.
If problems continue, please feel free to contact our Customer Service dept. at (877-269-8490).
Information for FCC:
NOTE1: Changes or Modifications not expressly approved by the party responsible could void the user’s authority
to operate this device.
NOTE2: This equipment has been tested and found to comply with the limits for a Class B digital device, pursuant
to Part 15 of the FCC Rules. These limits are designed to provide reasonable protection against harmful
interference in a residential installation. This equipment generates, uses and can radiate radio frequency energy and,
if not installed and used in accordance with the instructions, may cause harmful interference to radio
communications. However, there is no guarantee that interference will not occur in a particular installation. If this
equipment does cause harmful interference to radio or television reception, which can be determined by turning the
equipment off and on, the user is encouraged to try to correct the interference by one or more of the following
measures: Reorient or relocate the receiving antenna. Increase the separation between the equipment and receiver. -
Connect the equipment into an outlet on a circuit different from that to which the receiver is connected. Consult the
dealer or an experienced radio/TV technician for help.
MP3 and WAV format that are supported
For MP3:
Sample rate /Hz Bitrate / Kbit/s
32 40 48 56 64 80 96 112 128 160 192 224 256 320
48000 + + + + + + + + + + + + + +
44100 + + + + + + + + + + + + + +
32000 + + + + + + + + + + + + + +
For WAV:
PCM: 16 and 8 bits, any sample rate<=44k Hz
IMA_ADPCM: Any sample rate<=44k Hz

/