Page is loading ...

1
PRO LINE
™
WAFFLE BAKER
SERVICE MANUAL
Model: KPWB100
8204590
Table of Contents .........................................................................2
®

2
You can be killed or seriously injured if you don't immediately
You
can be killed or seriously injured if you don't
follow
All safety messages will tell you what the potential hazard is, tell you how to reduce the chance of injury, and tell you what can
happen if the instructions are not followed.
Your safety and the safety of others are very important.
We have provided many important safety messages in this manual and on your appliance. Always read and obey all safety
messages.
This is the safety alert symbol.
This symbol alerts you to potential hazards that can kill or hurt you and others.
All safety messages will follow the safety alert symbol and either the word “DANGER” or “WARNING.”
These words mean:
follow instructions.
instructions.
DANGER
WARNING
KPWB100 Pro Line
™
Waffl e Baker Features
Table of Contents
Waffl e Bake Features .................................................................. 2
Safety Recommendations ........................................................... 3
Tool Recommendations ............................................................... 3
Electrical Requirements ............................................................... 4
Service Preparation ..................................................................... 4
Service Procedures ..................................................................4-6
Component Access ..................................................................... 5
Problem Guide ......................................................................... 7-8
Waffl e Baker Parts Drawings .................................................. 9-10
Commercial Design Clamshell Baking Unit
Non-stick Waffl e Plates
Die Cast Metal Cradle & Base
Dial Thermometer
Power On/Off Button
Timer Adjustment Knob
Pre-heat indicator
Baker Timer Display
Start Button
Reset Button

3
IMPORTANT SERVICE WORKPLACE SAFETY
RECOMMENDATIONS
This Waffl e Baker Service Manual is written for the professional
service technician who has familiarity with KitchenAid®
Pro Line™ Appliances.
The purpose of this service manual is to familiarize the
professional house wares technician with the techniques
required to repair the KPWB100 KitchenAid Pro Line Waffl e
Baker.
The following safety guidelines should be adhered to when
servicing the waffl e baker:
■ Ensure the workplace is dry and sanitary at all times.
■ Ensure that your hands are clean at all times during the
service procedure.
■ Ensure the workplace has properly polarized AC outlets that
adhere to all local electrical codes applicable at the time of
repair.
■ Conduct all disassembly and assembly procedures with the
waffl e baker switched off and disconnected from the AC
supply or mains.
■ Do not immerse the waffl e baker in water. Do not use abrasive
cleansers or scouring pads to clean it.
■ In a well-lit area, visually inspect the waffl e baker for
cleanliness before starting work. Open the baker lids and
wipe the waffl e plates clean with paper towels or a damp
cloth.
■ Wipe the exterior of the waffl e baker with a warm, sudsy
cloth; then wipe the exterior of the baker clean with a damp
cloth and dry with a soft cloth.
■ Inspect the power cord before testing the waffl e baker’s
operation.
■ Do not run the waffl e baker if the power cord is damaged.
Replace with a new cord assembly.
■ Do not leave the waffl e baker unattended while operating
during testing.
IMPORTANT SAFEGUARDS
Ensure the KitchenAid service technician is aware of the
operating safeguards recommended to the customer:
1. Read the Pro Line™ Series Waffl e Baker Instructions and
Recipes booklet.
2. Do not touch hot surfaces. Use handles or knobs.
3. To protect against electrical shock, do not immerse cord,
plugs, or waffl e baker in water or other liquids.
4. Close supervision is necessary when any appliance is used
by or near children.
5. Unplug waffl e baker from outlet when not in use and before
cleaning. Allow it to cool before putting on or taking off
parts.
6. Do not operate any appliance with a damaged cord or plug,
or after the appliance malfunctions or has been damaged in
any manner.
7. The use of accessory attachments not recommended by
KitchenAid may cause fi re, shock or injuries. There are no
accessories for the waffl e baker.
8. Do not use the waffl e baker outdoors.
9. Do not let cord hang over edge of table or counter, or touch
hot surfaces.
10. Do not place on or near a hot gas or electric burner, or in a
heated oven.
11. When fi nished baking waffl es, press the On/Off Button to
turn the waffl e baker off, then remove plug from outlet.
12. Do not use appliance for other than intended use.
13. This product is UL Listed for household and commercial
use.
14. This product is cUL Listed for household use only in
Canada.
TOOL RECOMMENDATIONS
The following tools are necessary to service the KitchenAid
Pro Line Waffl e Baker:
■ Phillips Screwdriver Set
■ Straight Screwdriver
■ Needle Nose Pliers
■ Super Glue or Soldering Iron
■ Hot Glue and Gun
■ Tape
The following equipment will greatly assist you:
■ Power Phillips Screwdriver
■ Thermometer
WARNING
Electrical Shock Hazard
Disconnect power before servicing.
Replace all parts and panels before operating.
Failure to do so can result in death or electrical shock.

4
Electrical Shock Hazard
Plug into a grounded 3 prong outlet.
Do not remove ground prong.
Do not use an adapter.
Do not use an extension cord.
Failure to follow these instructions can result in death,
fire, or electrical shock.
WARNING
Electrical Requirements
This waffl e maker is designed for use with 120 V, 60 Hz only. It
has a 3-prong grounded plug. To reduce the risk of electrical
shock, this plug will fi t in an outlet only one way. If the plug does
not fi t in the outlet, contact a qualifi ed electrician. Do not modify
the plug in any way.
A short power-supply cord is provided to reduce the risk
resulting from becoming entangled in or tripping over a longer
cord. Do not use an extension cord. If the power supply cord is
too short, have a qualifi ed electrician or service technician install
an outlet near the appliance.
Service Preparation
Cushion the service area to keep from scratching the waffl e
baker or damaging the controls and display surfaces. A clean
folded towel will usually work well for this purpose.
TESTING THE WAFFLE BAKER
In some situations you will have to test the performance of the
waffl e baker to identify and diagnose the problem.
PERFORMANCE
You can observe the performance of a waffl e baker by
establishing benchmarks on the performance seen on prior
waffl e bakers. Here is a list of performance parameters to
observe.
EXAMPLE: Bake time: 3 minutes 30 seconds (3:30)
Bake temperature: 350º F
■ Time to Bake Two Waffl es – Measure the time needed to bake
two waffl es (one cup batter each) on the two waffl e plates.
Longer baking times will produce darker, crispier waffl es.
For your fi rst waffl es, a good starting time is 3 minutes, 30
seconds. The baking time can be set in 15-second increments
from a minimum of 2 minutes, 30 seconds to maximum of 5
minutes, 30 seconds.
■ Waffl e Plate Temperature – Pre-heat waffl e baker, then
measure the temperature on each waffl e plate.
Service Procedures
Perform all service on the Pro Line™ Waffl e Baker with the unit
disconnected from the AC mains.
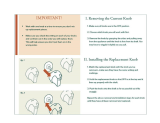
CLAMSHELL BAKING UNIT REPLACEMENT
The clamshell unit is not replaceable – we do not replace top or
bottom lids, waffl e plates or heating elements.
TIMER ADJUSTMENT KNOB REPLACEMENT
The timer adjustment knob sets the baking time in 15-second
increments from 2 minutes and 30 seconds (2:30) to 5 minutes
and 30 seconds (5:30). Turn knob clockwise to increase baking
time; turn counter-clockwise to decrease baking time.
1. Unplug the waffl e baker.
2. Place the waffl e baker upside down on a cushioned surface.
3. Remove four (4) recessed Phillips screws from feet and two
(2) recessed Phillips screws from base cover.
4. Remove one Phillips screw from the ferrite bead fastener.
Then remove the 5-pin connector from the power PCB. This
will allow for easy access to the control PCB.
5. LIft off base.
WARNING
Electrical Shock Hazard
Disconnect power before servicing.
Replace all parts and panels before operating.
Failure to do so can result in death or electrical shock.
WARNING
Electrical Shock Hazard
Disconnect power before servicing.
Replace all parts and panels before operating.
Failure to do so can result in death or electrical shock.

5
3. Remove two (2) Phillips screws and lift metal cover.
4. Replace the dial thermometer and reassemble. (See Figure 3)
RUBBER FEET REPLACEMENT
Check the four (4) rubber feet on the bottom of the waffl e baker
when servicing.
1. Remove the screw from each foot.
2. Remove each rubber foot and replace.
Figure 2
Figure 3
Figure 4
6. Remove MOV power board and cord assembly.
7. Hot glue new MOV board to base. Reassemble leads. Be
sure that the green lead terminals are connected securely to
ground lug. Be sure AC leads are connected securely to PCB.
The black lead goes to the ACL terminal and the white lead
goes to the ACN terminal.
Figure 1
POWER CORD REPLACEMENT
Do not run the waffl e baker if the power cord is damaged.
Replace with a new cord assembly immediately.
1. Unplug the waffl e baker.
2. Remove base, see Component Access.
3. Remove two (2) Phillips screws from power cord wire clamp.
4. Remove the power cord ground wire terminal (green) and the
MOV board ground wire terminal from the ground lug.
5. Remove two (2) power cord MOV blue-capped AC leads [one
(1) black and one (1) white] from printed circuit board (PCB)
located on base. (See Figure 4)
DIAL THERMOSTAT REPLACEMENT
A properly working dial thermometer will indicate:
■ Cool Temperature – ambient temperature
■ Preheat Temperature – ambient temperature to 350º F
■ Ready – 350º F
If the dial thermometer is warped or the needle does not move
to indicate waffl e plate temperature changes, replace the dial
thermometer.
1. Unplug the waffl e baker.
2. Remove black screw
cover located left of the
unit’s top hinge. (See Figure 2)
Component Access
Access the waffl e baker’s power supply cord, power supply PCB
board, control PCB board and button covers from the bottom of
the unit.
1. Unplug the waffl e baker.
2. Place the waffl e baker upside down on a cushioned surface.
3. Remove four (4) recessed Phillips screws from feet and two
(2) recessed Phillips screws from base cover.
4. Lift off base.
WARNING
Electrical Shock Hazard
Disconnect power before servicing.
Replace all parts and panels before operating.
Failure to do so can result in death or electrical shock.
6. Using thumbs, push down on control PCB board (located in
cradle arm) until clamps release. (See Figure 1).
7. Reach inside the waffl e baker cradle and squeeze the timer
adjustment knob’s three slips and pull out knob from bezel.
8. Push timer adjustment knob through bezel hole until it locks
into place. Be sure the timer adjustment knob location is
rotated correctly with the control board. If the alignment is
not correct the Max and Min time will be incorrect.

6
13. Be sure the timer start and timer reset button covers align
with contact points on control board.
14. Be sure the LED lens and digital display line up with holes in
bezel.
15. Using thumbs, press control PCB board until it clamps
securely into cradle.
16. Reassemble the ferrite bead fastener with one Phillips screw.
Be sure 5-pin connector is securely connected to power
supply PCB. Reassemble base to cradle.
Button Replacement
There are three (3) push buttons on the control bezel: power
on/off, timer start and timer reset:
1. Unplug the waffl e baker.
2. Remove the base; see Component Access.
3. Remove one screw from the ferrite bead fastener.
2. Using thumbs, push down on control PCB board (located in
cradle arm) until clamps release.(See Figure 1)
3. Place tape over button front. This will help prevent losing the
button’s small spring.
4. Reach inside the waffl e baker cradle and grasp the button
cover sleeve with needle nose pliers. Pull straight back to
release the sleeve.
5. Remove tape and pull out button cover and shaft from bezel,
being careful not to lose small spring.
6. Insert new button shaft through bezel hole. Be sure spring is
between button top and outer bezel. (See Figure 6)
7. Slide button cover over shaft. Add a small drop of super glue
or solder into the cover hole. (See Figure 7)
8. Be sure button cover lines up with contact point on control
PCB board.
9. Using thumbs, press control PCB board until it clamps
securely into cradle. Reassemble.
10. Check each button and the timer adjustment knob to make
sure each works properly.
Figure 6
Figure 7
CONTROL PCB BOARD REPLACEMENT
The control board regulates the light, timer and power on/off
button. It is located in the cradle.
1. Unplug the waffl e baker.
2. Remove the base; see Component Access.
3. Remove one Phillips screw from the ferrite bead fastener.
Then remove the white, 5-pin connector from the power
PCB. This will allow for easy access to the control PCB.
4. Remove the timer adjustment knob; see Timer Adjustment
Knob Replacement instructions.
5. Remove the start and reset buttons; see Button Replacement
instructions.
6. Remove the control PCB from the cradle. Remove (4) four
Phillips screws from the control PCB plastic cover.
7. Remove three (3) white pin connectors from bottom of
control board; two (2), 2-pin connectors and one (1), 5-pin
connector.
8. Replace the old control PCB with the new control PCB. Be
sure three white (3) pin connectors are connected securely
to board; two (2), 2-pin connectors and one (1), 5-pin
connector.
9. Reassemble with new control PCB board to the plastic cover
with 4 Phillips screws. Slide control board into cradle.
10. Reassemble the timer adjustment knob; see Timer
Adjustment Knob Replacement instructions.
12. Slide button cover over shaft. Add a
small drop of super glue or solder into
the cover hole. (See Figure 7)
11. Insert button shaft through bezel hole. Be sure spring is
between button top and outer bezel. (See Figure 6)
POWER SUPPLY PCB REPLACEMENT
The power supply printed circuit board (PCB) provides DC voltage
to power the control PCB located in the cradle arm and AC
voltage to the heating elements in the waffl e plates. (See Figure 5)
1. Unplug the waffl e baker.
2. Remove base; see Component Access.
3. Remove six (6) blue-capped black and white AC leads from
the power supply PCB located in the base.
4. Remove white, 5-pin connector from the PCB.
5. Remove four (4) Phillips screws from PCB; remove board
from base.
6. Reassemble with new board. Be sure six (6) blue-capped
leads and white 5-pin connector are connected securely in
their proper positions. Replace base cover.
Figure 5

7
■ PROBLEM: Waffl e baker emits smoke and odor the fi rst time it is used.
■ CAUSE: Normal result of manufacturing process. The smoke is harmless and will dissipate.
■ SOLUTION: Discard fi rst waffl es made on each side of clamshell unit.
■ PROBLEM: Excessive steam or condensation on and/or around the base of the unit.
■ CAUSE: Steam is a natural byproduct of baking waffl es. Different recipes create different amounts of steam while baking.
Occasionally the steam will condense and form puddles.
■ SOLUTION: Steam cannot be eliminated.
■ PROBLEM: Sticky or gummy waffl e plates.
■ CAUSE: The waffl e baker plates have a non-stick surface. Coating the plates with oil or cooking spray will eventually cause the
plates to become gummy.
■ SOLUTION: Do not coat or spray the plates with oil. To clean, be sure the waffl e baker is switched off, unplugged and cool. Wipe
the waffl e plates with a clean, damp cloth or paper towels. Suggest that the owner use a little more butter/oil in the recipe to prevent
sticking.
■ PROBLEM: Waffl es are thin or uneven, with gaps and spaces.
■ CAUSE: Uneven coating of waffl e plates with batter.
■ SOLUTION: Always rotate the baking unit after fi lling the waffl e plate with batter. This coats the upper and lower plates with batter
and ensures the fi nest consistency.
■ PROBLEM: Clamshell unit tilts or will not stay horizontal.
■ CAUSE: Overspray or worn paint on the axle’s mating surface. Wires may be bunched in cradle base.
■ SOLUTION: Check for overspray paint and remove excess. If there is no overspray or worn paint surfaces, open base and gently
jiggle or reposition wires in cradle arm so they set evenly.
■ PROBLEM: Uneven heat; waffl es are too light or too dark.
■ CAUSE: There are many factors that affect waffl e baking including improper baking time setting, recipe ingredients, batter
temperature and ambient humidity. Mechanically, the cause may be pinched or worn out wires, a defective or worn out thermistor or
defective or worn out heating element. If waffl es are heating or burning on one side, there is 75% probability that the thermistor is
defective or worn out.
■ SOLUTION: First, adjust baking time. If too light, increase the baking time; if too dark, decrease baking time. If the problem persists:
The wires, thermistor and heating elements in the clamshell unit cannot be repaired or replaced. Replace unit according to warranty.
■ PROBLEM: Waffl e baker will not turn on, display remains dark, will not heat.
■ CAUSE: The waffl e baker uses 1400 watts total with all three heating elements (one in each lid and one in the center) when in use.
This wattage level may cause the circuit breaker to trip if other appliances are drawing power from the same circuit (not just the same
outlet).
■ SOLUTION: Be sure that the waffl e baker is plugged into a 3-prong grounded outlet.
Unplug and re-plug back into a live, separate outlet. You cannot have any other appliance drawing from the same circuit. Another
appliance may draw enough power to shut off the waffl e baker but not trip the circuit breaker.
If the baking unit display remains unlit, check the fuse or circuit breaker that the unit is connected to and make sure the circuit is
closed.
Check power PCB board located inside base for damage. Replace damaged power PCB board.
If the unit still does not turn on, check the power on/off button on the control cradle for damage. Look inside cradle to be sure the
button cover lines up with contact on control board. Replace damaged button. If button is not damaged, replace control PCB board.
If waffl e baker still will not turn on, replace the unit according to warranty.
■ PROBLEM: Resets or turns off frequently.
■ CAUSE: Faulty or damaged control PCB board.
■ SOLUTION: Replace control PCB board.
■ PROBLEM: No audible preheat tone or countdown tone.
■ CAUSE: Defective or damaged control PCB board.
■ SOLUTION: If lights work, but tone does not sound, replace control PCB board located in cradle. If lights and tone do not work,
replace power PCB board in base.
■ PROBLEM: Timer does not count down.
■ CAUSE: Defective or damaged control PCB board.
■ SOLUTION: Replace control PCB board located in cradle.
■ PROBLEM: Ready light does not turn on.
■ CAUSE: Defective or damaged LED lens or power PCB board.
■ SOLUTION: If waffl e plates still heat, replace control PCB board. If there is no heat or lights, replace power PCB board.
Problem Guide

8
■ PROBLEM: Ready light does not stop fl ashing.
■ CAUSE: Damaged or defective control PCB board or thermistor.
■ SOLUTION: Check control PCB board located in cradle for damage. If the control board is not damaged, then it is the thermistor.
The thermistor cannot be repaired or replaced. Replace unit according to warranty.
■ PROBLEM: Thermometer warps or needle does not indicate preheat, ready or cool.
■ CAUSE: Thermometer casing leaks and condensation gets inside.
■ SOLUTION: Replace thermometer.
■ PROBLEM: LCD timer fades.
■ CAUSE: Wears out over time.
■ SOLUTION: Replace control PCB board.
■ PROBLEM: Rotating handle turns white.
■ CAUSE: Handle rubbing on the base each time it rotates. The handle material is Phenolic and discoloration occurs naturally over
time.
■ SOLUTION: Rub a little vegetable or mineral oil with a paper towel on the discolored area. The normal color will return.
■ PROBLEM: One or more of the four black clips on the back of the waffl e baker break.
■ CAUSE: Defective material or user damage.
■ SOLUTION: The black clip that holds the stainless steel cover in place may be replaced. The clips that hold the clamshell together
are not replaceable.
■ PROBLEM: Owner upset about formaldehyde used in insulation.
■ CAUSE: Formaldehyde is used in the manufacturing of the insulation in the clamshell unit lids so that the lids will not become
excessively hot even after extended use. Proposition 65 in California requires that KitchenAid® put a warning on the waffl e baker for
this reason. In testing, no amounts of formaldehyde release were found.
■ SOLUTION: Let owner know that there is no risk associated with using the unit. If they are not convinced, instruct owner to return
the waffl e baker to the place where it was purchased for a full refund.

9
Control Panel Parts
For Models: KPWB100
FOR ORDERING INFORMATION REFER TO PARTS PRICE LIST
Illus. Part
No. No. DESCRIPTION
1 Literature Parts
8204569 Guide, Use & Care
8204590 Repair Parts List
8204592 Wiring Diagram
2 8211486 Button, Start
3 8211487 Button, Power
4 8211489 Lens, LED
5 8211485 Knob
6 8211488 Bezel
7 8211490 Screw
8 8211491 MCU PCB Assembly
9 8211513 Bracket, Knob
10 8211508 Cover, Button
11 8211492 Nameplate
12 8211493 Holder, PCB
13 8211514 Spring

10
Cradle Parts
For Models: KPWB100
FOR ORDERING INFORMATION REFER TO PARTS PRICE LIST
Illus. Part
No. No. DESCRIPTION
1 8211498 Clamp
2 Cap
8211497 Pearl Metallic
8212149 Nickel Pearl
3 8211499 Holder, Axle
4 Base
8211496 Pearl Metallic
8212148 Nickel Pearl
5 8211494 Bracket
6 8211495 Screw
7 8211500 Power Supply
8 8211505 Cover, Bottom
9 8211503 Clamp, Cord
10 8211501 Feet
11 8211502 Screw
12 8211504 Cover, Spring
13 8212256 Cord, Power
(Incl. MOV Board)

11
Notes

12
FOR THE WAY IT’S MADE.™
BIEN PENSÉ. BIEN FABRIQUÉ.™
® Registered trademark/Marque déposée/Marca registrada KitchenAid, U.S.A.
™ Trademark/Marque de commerce/Marca de comercio KitchenAid, U.S.A.
KitchenAid Canada licensee in Canada/Emploi sous licence par KitchenAid Canada au Canada.
© 2008. All rights reserved. Tous droits reserves. Todos los derecchos reservados.
Specifi cations subject to change without notice. / Les specifi cations sont sujettes à changement
sans préavis. / Especifi caciones sujetas a cambio sin previo aviso.
8204590
Printed in U.S.A.
02-2008
™
/