Page is loading ...

04201101
WARNING
Improper installation, adjustment,
alteration, service or maintenance can
cause injury or property damage. Read the
installation, operating and maintenance
instructions thoroughly before installing
or servicing this equipment.
Combustion by-products produced when
using this product contain chemicals
known to the State of California to cause
cancer, birth defects, or other
reproductive harm.
California Proposition 65
WARNING
WARNING
1. Do not store or use gasoline or other flammable liquids or
vapors in the vicinity of this or any other appliance.
2. An LP cylinder not connected for use shall not be stored in
the vicinity of this or any other appliance.
To installer or assembler:
Leave this manual with consumer
for future reference.
FOR OUTDOOR USE ONLY.
If you have any questions or need assistance during assembly, please call 1-800-232-3398.
To insure your satisfaction and for follow-up service, register your product online at www.grillregistration.com
05101194 • 42804116 • 07-14-05
To consumer:
Keep this manual for future reference.
OUTDOOR
STOVE TOP
MODEL
05101194
DANGER
If you smell gas:
1. Shut off gas to the appliance.
2. Extinguish any open flame.
3. Open lid.
4. If odor continues, keep away from the appliance and
immediately call your gas supplier or your fire department.

2
Installation Safety Precautions
•
•
National Fuel Gas Code, NFPA
54 / ANSI Z223.1
NFPA/ANSI 58.
National Electrical Code, ANSI / NFPA 70.
Use appliance only with LP (propane) gas and the
regulator/valve assembly supplied.
Appliance installation must conform with local codes, or
in their absence with
. Handling and storage of LP cylinders
must conform to LP Gas Code
Appliance is not for use in or on recreational vehicles
and/or boats.
• All electrical accessories (such as rotisserie) must be
electrically grounded in accordance with local codes, or
Keep any
electrical cords and/or fuel supply hoses away from any
hot surfaces.
• This appliance is safety certified for use in the United
States only. Do not modify for use in any other location.
Modification will result in a safety hazard.
DANGER
Safety Symbols
The symbols and boxes shown below explain what each
heading means. Read and follow all of the messages
found throughout the manual.
DANGER: Indicates an imminently hazardous
situation which, if not avoided, will result in death or
serious injury.
WARNING
WARNING: Indicates a potentially hazardous situation
which, if not avoided, could result in death or serious
injury.
CAUTION
CAUTION: Indicates a potentially hazardous situation
or unsafe practice which, if not avoided, may result in
minor or moderate injury.
Limited Warranty
The manufacturer warrants the product for replacement or
repair of parts and/or workmanship for a period of 90 days.
Paint is not warranted and will require touchup.
These limited warranties are made exclusively to the original
customer presenting proof of purchase. These warranties are
limited to non-commercial residential use only. Any returned
goods must be shipped prepaid. These warranties do not
cover normal wear and tear or damages resulting from abuse
or misuse. This warranty excludes incidental or
consequential cost due to damages or losses or property of
any nature.
NOTICE: Some states do not allow the exclusion or limitation
of incidental or consequential damages or limitations on how
long an implied warranty lasts, so the above limitations or
exclusions may not apply to you. This warranty gives you
specific legal rights and you may also have other legal rights
which may vary from state to state.
For further information, contact the manufacturer, toll free at
1-800-232-3398.
CAUTION
Some parts may contain sharp edges. Wear
protective gloves if necessary.
Use and Care
Char-Broil® Outdoor Stove Top
Thank you for your purchase. The Outdoor Stove Top
was designed to take the cooking of many of you favorite
foods from your INDOOR stove top TO THE
OUTDOORS. The Outdoor Stove Top can use many of
your indoor stock pots, griddles, and woks. Also, look for
cooking accessories from Char-Broil at the store where
you purchased the Outdoor Stove Top.
CAUTION
• Never use a cooking pot or vessel larger than 12
quarts or 12.5” in diameter.
• Read and follow the instructions included with
any cooking accessory before using with this
appliance.
WARNING
NEVER USE THIS APPLIANCE AS A
TURKEY FRYER! Use as a turkey fryer may
result in a hazardous situation causing property
damage, personal injury, or loss of life.

3
To insure your satisfaction and for follow-up service,
register your product online at:
www.grillregistration.com
Table of Contents
Use and Care ....................................2-10
Safety Symbols...............................2
Cylinder
Cylinder
Cylinder
Cylinder
Cylinder
Installation Safety Precautions ...................2
Limited Warranty .............................2
LP Cylinder Removal, Transport, and Storage.......4
LP ..................................4
LP (Liquefied Petroleum Gas) ...................4
LP Filling.............................4
LP Exchange .........................5
LP Leak Test..........................5
Connecting Regulator to the LP .........5-6
Leak Testing Valve, Hose, and Regulator...........6
Safety Tips ..................................6
Ignitor Lighting ...............................7
Match Lighting ...............................7
Burner Flame Check...........................7
Burner Check ................................7
Turning Appliance Off ..........................7
Ignitor Check ................................7
Valve Check .................................7
Hose Check .................................7
Natural Hazard • Spiders .......................8
Care and Cleaning of Stainless Steel..............9
Troubleshooting .............................10
Parts List ..........................................11
Parts Diagram......................................12
Assembly .......................................13-17
Registration Card ...................................19

DANGER
• NEVER store a spare LP cylinder under or near
the appliance or in an enclosed area.
• Never fill a cylinder beyond 80% full.
• An over filled or improperly stored cylinder is a
hazard due to possible gas release from the
safety relief valve. This could cause an intense
fire with risk of property damage, serious injury
or death.
• If you see, smell or hear gas escaping,
immediately get away from the LP
cylinder/appliance and call your fire department.
LP Cylinder Removal, Transport and Storage
•
Failure to use safety cap as directed
may result in serious personal injury and/or
property damage.
Turn OFF control knob and LP cylinder valve. Turn
coupling nut counterclockwise by hand only - do not
use tools to disconnect. Install safety cap onto LP
cylinder valve. Always use cap and strap supplied
with valve.
LP Cylinder
Valve
Retainer
Strap
Safety
Cap
• A disconnected LP cylinder in storage or being
transported must have a safety cap installed (as
shown). Do not store an LP in enclosed
spaces such as a carport, garage, porch, covered
patio or other building. Never leave an LP
inside a vehicle which may become overheated by
the sun.
cylinder
cylinder
• Do not store LP cylinder in an area where children
play.
• Always keep new and exchanged LP cylinders in
upright position during use, transit or storage.
• Storage of appliance indoors is permissible only if the
cylinder is disconnected and removed from the
appliance.
LP Cylinder
LP (Liquefied Petroleum Gas)
LP Cylinder Filling
•
• Purchase LP cylinders only with these required
measurements: 12” (30.5cm) (diameter) x 18” (45.7
cm) (tall) with 20 lb. (9 kg.) Capacity maximum.
• Be constructed and marked in accordance with
specifications for LP cylinder of the U.S. Department of
Transportation (DOT). See LP cylinder collar for
marking.
• LP valve must have:
• Type 1 outlet compatible with regulator.
• Safety relief valve.
• UL listed Overfill Protection Device (OPD).
This OPD safety feature is identified by a
unique triangular hand wheel.
• LP must be arranged for vapor withdrawal and
include collar to protect LP valve.
• LP gas is nontoxic, odorless and colorless when
produced. , LP gas has been given an
odor (similar to rotten cabbage) so that it can be
smelled.
• LP gas is highly flammable and may ignite
unexpectedly when mixed with air.
• Use only licensed and experienced dealers.
• LP dealer must purge before filling.
• Dealer should NEVER fill LP more than 80% of
LP volume. Volume of propane in will
vary by temperature.
The LP cylinder used with your Outdoor Stove Top
must meet the following requirements:
Use only
cylinders equipped with this type of valve.
For your safety
cylinder
cylinder
cylinder
cylinder
cylinder
cylinder cylinder
4

• A frosty regulator indicates gas overfill. Immediately
close LP cylinder valve and call local LP gas dealer
for assistance.
• Do not release liquid propane (LP) gas into the
atmosphere. This is a hazardous practice.
• To remove gas from LP , contact an LP dealer
or call a local fire department for assistance. Check
the telephone directory under “Gas Companies” for
nearest certified LP dealers.
• Many retailers that sell grills offer you the option of
replacing your empty LP through an
exchange service. Use only those reputable
exchange companies that inspect, precision fill, test
and certify their cylinders.
• Always keep new and exchanged LP cylinders in
upright position during use, transit or storage.
•
• Leak test must be repeated each time LP cylinder is
exchanged or refilled.
• Do not smoke during leak test.
• Do not use an open flame to check for gas leaks.
• Appliance must be leak checked outdoors in a well
ventilated area, away from ignition sources such as
gas fired or electrical appliances. During leak test,
keep appliance away from open flames or sparks.
Use a clean paint brush and 50/50 soap and water
solution. Use mild soap and water. Do not use
Household cleaning agents. Damage to gas train
components can result.
cylinder
cylinder
LP Cylinder Exchange
LP Cylinder Leak Test
Exchange your cylinder
only for an OPD safety feature-equipped
as described in the “LP Cylinder” section of this
manual.
Leak test new and exchanged LP cylinders
BEFORE connecting to appliance.
For your safety
cylinder
s
WARNING
If “growing” bubbles appear do not use or
move the LP cylinder. Contact an LP gas
supplier or your fire department!
Connecting Regulator To The LP Cylinder
1.
2.
3.
4.
LP cylinder must be properly secured onto appliance.
Turn control knob to OFF position.
Turn LP cylinder OFF by turning hand-wheel
clockwise to a full stop.
Remove protective cap from LP cylinder valve. Always
use cap and strap supplied with valve.
Safety Relief
Valve
OPD Hand Wheel
Type 1 outlet with
thread on outside
Strap and Cap
O
f
f
C
l
o
c
k
w
i
s
e
Do not use a POL transport plug (A)
(plastic part with external threads)! It
will defeat the safety feature of the
valve.
5. Hold regulator, insert nipple (B) into LP cylinder valve.
Hand tighten coupling nut, holding regulator in a
straight line (C) with LP cylinder valve so as not to
cross thread the connection.
Nipple has to be centered
into the LP cylinder valve.
A
B
Brush soapy solution onto the shaded areas.
5

Hold coupling nut and regulator
as shown for proper connection
to LP cylinder valve.
C
Straight
6.
An additional one-half to three
quarters turn is required to complete connection.
Tighten by hand only - do not use tools.
NOTE:
do not use this
Regulator!
Turn the coupling nut clockwise to tighten to a full
solid stop. The regulator will seal on the back-check
feature in LP cylinder valve, resulting in some
resistance.
If you cannot complete connection, disconnect
regulator and repeat steps 5 and 6. If you are still
unable to complete the connection,
WARNING
• Do not insert any foreign objects into the
valve outlet. You may damage the valve
and cause a leak. Leaking propane may
result in explosion, fire, severe personal
injury or death.
• Never attempt to attach this appliance to
the self-contained LP gas system of a
camper trailer or motor home.
WARNING
• Do not use appliance until leak checked.
• If leak is detected at any time, STOP and
call your fire department.
• If you cannot stop a gas leak,
close LP cylinder valve and call a LP gas
supplier or your fire department!
immediately
Leak Testing Valve, Hose and Regulator
1. Turn control knob to OFF.
2.
3.
Correct before proceeding
4.
Be sure regulator is tightly connected to LP cylinder.
Completely open LP cylinder valve by turning hand
wheel counter clockwise. If you hear a ,
turn gas off immediately. There is a major leak at the
connection. .
Brush soapy solution on areas where bubbles are
shown.
rushing sound
5. “If growing”
If leaks cannot be stopped “do not try
to repair”.
6.
Check appliance before each use for buildup of
any leaves or other material that will burn or block
the burner ports. Clean when needed before
using. Have appliance inspected annually by a
qualified service person.
bubbles appear, there is a leak. Close
LP cylinder valve immediately and re-tighten
connections.
Call for replacement parts. Order new
parts by giving the part number from the parts list to
the Service Center at 1-800-232-3398.
Always close LP cylinder valve after performing leak
test by turning hand wheel clockwise.
Before opening LP cylinder valve, check the coupling
nut for tightness.
When appliance is not in use, turn off control knob
and LP cylinder valve.
Never move appliance while in operation or still hot.
The regulator may make a humming or whistling
noise during operation. This will not affect safety or
use of fireplace.
Safety Tips
s
s
s
s
s
6

WARNING
Ignitor Lighting
1. Open lid during lighting.
2. Press and turn the control knob to the position.
3. Turn knob rapidly.
4. If ignition does not occur in 5 seconds, turn the burner
control knob , wait 5 minutes, and repeat lighting
procedure. If ignition still does not occur, follow
instructions.
HI
ROTARY IGNITOR
OFF
“Match
Lighting”
CAUTION
If burner does not light turn knob to OFF, wait 5
minutes, try again. If the burner does not ignite with
valve open, gas will continue to flow out of the burner
and could accidentally ignite with risk of injury.
Match Lighting
Burner Flame Check
Burner Check
Turning Appliance Off
Ignitor Check
Valve Check
Hose Check
Do not lean over appliance while lighting. Use a large
kitchen match or fireplace match to light the
appliance.
1.
2.
HI
HI LOW
LOW
HI
OFF OFF
OFF
OFF
OFF
MED
OFF
Place a lit match to burner.
Press and turn control knob
To .
• Light burner, rotate knob
from to . You
should see a smaller
flame in position
than seen on . Always check flame prior to each use.
• Inspect burner prior to each use. If burner is damaged
do not use. Call manufacturer at 1-800-232-3398 to
obtain a replacement.
• Turn knob to position. Turn LP cylinder by
turning handwheel clockwise to a full stop.
• Turn gas at LP cylinder. Turn ignitor knob rapidly.
“Click” should be heard and spark seen each time
between burner and electrode. See “Troubleshooting” if
no click or spark.
• Important: Make sure gas is at LP cylinder before
checking valves. Knob locks in position. To check
valve, first push in knob and release, knob should
spring back. If knob does not spring back, replace valve
assembly before using appliance. Turn knob to
position then turn back to position. Valve should
turn smoothly.
• Before each use, check to see if hose is cut or worn.
Replace damaged hose before using appliance. Use
only hose/valve/regulator specified by manufacturer.
HI
LOW
7
For Safe Use of Your Outdoor Stove Top and to
Avoid Serious Injury:
•
•
•
•
•
•
• Use appliance at least 3 ft.
from any wall or surface.
• Apartment Dwellers:
• NEVER attempt to light burner with lid closed. A
buildup of non-ignited gas inside a closed
appliance is hazardous.
• Never operate appliance with LP cylinder out of
correct position specified in assembly
instructions.
• Always close LP cylinder valve and remove
coupling nut before moving LP cylinder from
specified operation position.
Do not let children operate or play near appliance.
Keep appliance area clear and free from materials that
burn.
Do not block holes in sides or back of appliance.
Check burner flames regularly.
Use appliance only in a well-ventilated space. NEVER
use in enclosed space such as carport, garage, porch,
covered patio, or under an overhead structure of any
kind.
Do not use charcoal or ceramic briquets in a gas
appliance. (
Maintain 10 ft. clearance to
objects that can catch fire or
sources of ignition such as
pilot lights on water heaters,
live electrical appliances, etc..
Check with management to learn the requirements
and fire codes for using an LP gas appliance in your
apartment complex. If allowed, use outside on the
ground floor with a three (3) foot clearance from walls
or rails. Do not use on or under balconies.
Unless briquets are supplied with your
appliance.)

SOLUTION: Wait for appliance to cool.
Clean burner often. Spiders and insects
don’t care if your appliance is brand new
or you just cleaned it. Use a hose with a
nozzle attached. Forced water will wash
out the web.
Natural Hazard • Spiders
CAUTION
FACT: Sometimes spiders and other
small insects climb into the burner tube.
The spiders spin webs, build nests and
lay eggs. The webs or nests can be very
small, but they are very strong and can
block the flow of gas. Clean burner prior to
use after storing, or after a period of one
Month not being used.
Typical spider webs inside burner
An obstruction can result in a “flashback” (a fire in the
burner tube). The appliance may still light, but the
obstruction does not allow full gas flow to the burner.
1. Smell gas.
2. Burner will not light.
3. Fire coming from around or behind control knob.
If you experience the following:
STOP! Immediately turn off gas at LP
cylinder.
8
For residential use only. Do not use for commercial
cooking.
CAUTION
General Cleaning
• Do not mistake brown or black accumulation of grease and
smoke for paint. Interiors of gas appliances are not painted
at the factory . Apply a strong
solution of detergent and water or use a grill cleaner with
scrub brush on insides of lid and bottom. Rinse and allow to
completely air dry.
• Wash with warm soapy water and wipe dry.
Do not use citrisol, abrasive cleaners, degreasers or a
concentrated grill cleaner on plastic parts. Damage to and
failure of parts can result.
Because of glass-like composition, most
residue can be wiped away with baking soda/water solution
or specially formulated cleaner. Use nonabrasive scouring
powder for stubborn stains.
Wash with mild detergent or nonabrasive
cleaner and warm soapy water. Wipe dry with a soft
nonabrasive cloth.
To maintain your appliance’s high
quality appearance, wash with mild detergent and warm
soapy water and wipe dry with a soft cloth after each use.
Baked-on grease deposits may require the use of an abrasive
plastic cleaning pad. Use only in direction of brushed finish to
avoid damage. Do not use abrasive pad on areas with
graphics.
• Coating the cooking grate with spray-on
cooking oil will keep the food from sticking and make clean
up easier. After cooking, scrape the grates with a long
handled, brass wire bristle brush.
(and should never be painted)
Do not apply a caustic grill/oven
cleaner to painted surfaces.
Plastic parts:
• Porcelain surfaces:
• Painted surfaces:
• Stainless steel surfaces:
Cooking grate:
s

Job
Routine Cleaning
Fingerprints and Smears
Stubborn Stains
and Discoloration
Grease and Blood
Burnt-on or
Baked-on Foods
Grease and Oil
Cleaning Agents*
Warm Water, Soap, Ammonia, Detergent
3M Stainless Steel Cleaner and Polish, Arcal 20, Lac-O-Nu,
Lumin Wash, O’Cedar Cream Polish, Stainless Shine
3M Stainless Steel Cleaner and Polish, All chem Concentrated
Cleaner, Samae, Twinkle, Cameo Copper Cleaner, Grade FFF
or Grade F Italian Pumice, Whiting or Talc, Liquid Nu Steel,
Copper’s or Revere Stainless Steel Cleaner, Household
Cleaners, Lumin Cleaner, Zud Restoro, Sta-Clean, Highlite,
Allen Polish, Penny-Brite, Copper-Brite
Scotch-Brite Power Pad 2001, Easy-Off, De-Grease-It, 4% to
6% hot solution of such agents as tri-sodium polyphosphate,
5% to 15% caustic soda solution
Any good commercial detergent or caustic cleanser.
Comments
Apply with sponge or soft cloth.
Can be used on all finishes.
Provides barrier film to minimize
fingerprints. Can be used on all finishes.
Rub lightly, using dry damp cloth, in
the direction of polish lines on the
stainless steel.
Excellent removal on acids, all finishes.
Particularly useful where rubbing
is not practical.
Apply with sponge or soft cloth in
direction of polish lines.
*NOTE: Use of proprietary names is intended only to indicate a type of cleaner and does not constitute an endorsement. Omission of
any proprietary cleanser does not imply its inadequacy. All products should be used in strict accordance with instructions on package.
CARE AND CLEANING OF STAINLESS STEEL
Extreme temperatures from charcoal or wood fires will cause discoloration of stainless steel surfaces. Routine cleaning is necessary
to preserve the appearance and corrosion resistance of Stainless Steel. The methods below are suggestions for cleaning stainless
steel surfaces. Choose a cleaning method appropriate to the requirement. If you choose to use scouring powder or solvents, consult
with the solvent manufacturer or supplier before use.
Before cleaning, first test any cleaning product in an inconspicuous location and consider the possibility of scratching and the
potential for corrosion caused by not completely removing cleaners. Never use brushes or steel wool as they will scratch and leave
particles embedded on stainless steel surfaces, which can lead to rusting. Always rub or wipe in the direction of the polish lines in
the stainless steel surface, not across them. Thorough rinsing with clean water is recommended after all cleaning procedures. Dry
all surfaces completely after rinsing. Be careful not to let any stainless steel cleaner come in contact with painted or plastic
components as damage may occur.
The Char-Broil® Stainless Steel Grill Cleaner and the Thermos® Stainless Steel Grill Cleaner are good choices for routine cleaning
of stainless steel surfaces. Mild stains and loose dirt and soil can also be removed with a soft cloth and clean warm water. Rinse
with clean water and wipe dry.
Stubborn stains, discoloration and possibly rust and rust pitting can occur from cooking, exposure to harsh outdoor conditions, or
extreme cooking temperatures. There are many cleaning agents commercially available formulated to restore the finish of stainless
steel. Obtain advice from the solvent manufacturer or supplier when choosing the appropriate cleaner for your requirement. These
cleaners can be acidic. Care should be taken to avoid contact with eyes or mouth. Be careful not let any powder or solvent come in
contact with painted or plastic components as damage may occur.
The chart below has been reproduced with permission from the Specialty Steel Institute of North America. For additional details
regarding the care and cleaning of stainless steel, visit their website at www.ssina.com for more information. For the latest new
products for the care and cleaning of stainless steel go to www.charbroil.com.
Routine Care
Stubborn Stains
9

Problem
Burner will not light
using ignitor.
Burner will not match-
light.
Sudden drop in gas
flow or low flame.
Flames blow out.
Flashback... (fire in
burner tube).
Unable to fill LP
cylinder
Possible Cause
— Electrode and burner are wet.
— Electrode is cracked or broken,
“sparks at crack”.
— Wire is loose or disconnected.
— Wire is shorting (sparking)
between ignitor and electrode.
— Bad ignitor.
— No gas flow.
— Coupling nut and regulator not
fully connected.
— Obstruction of gas flow.
— Disengagement of burner to
valve.
— Is appliance assembled
correctly?
— Out of gas.
— Excess flow valve tripped.
— High or gusting winds.
— Low on LP gas
— Excess flow valve tripped.
— Burner is blocked.
— Some dealers have older fill
nozzles with worn threads.
Prevention/Cure
— Wipe dry with cloth.
— Replace electrode.
— Reconnect or replace ignitor wire.
— Replace
— Replace ignitor.
— Check to see if LP cylinder is empty. If LP cylinder is
not empty, refer to “Sudden drop in gas flow”.
— Turn the coupling nut about one-half to three quarters
additional turn until solid stop. Tighten by hand only—
do not use tools.
— Clear burner tube.
— Re-engage burner and valve.
— Check assembly instruction steps.
— Check for gas in LP cylinder.
— Turn off knob, wait 30 seconds and light appliance. If
flames are still low, turn off knob and LP cylinder
valve. Disconnect regulator. Reconnect regulator and
leak check. Turn on LP cylinder valve, wait 30
seconds and then light appliance.
— Increase flame height.
— Refill LP cylinder.
— Refer to “Sudden drop in gas flow” above.
— Turn knob to OFF and clean burner.
— The worn nozzles don’t have enough “bite” to engage
the valve. Try a second LP dealer.
ignitor wire.
Troubleshooting
10

STOP!
Missing a part?
No need to go back to the store!
The store where you made your purchase
does not stock parts for this item. If you
need parts, whether they are missing or
damaged, call the Customer Service toll
free Help Line.
Call us and we will gladly ship
the part you need
FREE OF CHARGE.
Call Our Help Line
Tools required for assembly: Phillips screwdriver (not provided) • Adjustable wrench (not provided)
Estimated assembly time: 30 – 45 minutes
Key Qty. Description Part No.
A......1 ....Cover Assembly.....................29100873
B......1 ....Cast Iron Grate .....................29100874
C......1....Burner Assembly Kit..................55700664
D......1....Hose/Valve/Regulator Kit ..............55700665
E......1 ....Ignitor Kit ..........................55700666
F......1 ....Towel Bar Kit .......................55700667
G .....1....Stainless Steel Top Kit ................55700668
H......1....Heat Shield Kit ......................55700669
I......1 ....Wrap(Body) Kit .....................55700670
J......1 ....Control Panel Kit ....................55700671
K......1 ....Base Kit ...........................55700672
L......1 ....Caster Kit (Locking) ..................55700673
M .....1....Caster Kit (Non-Locking) ..............55700674
N......1....Rotary Ignition Knob .................29000950
O .....1....Control Knob .......................29000951
1 ....Hardware Bag ......................42000138
1 ....Assembly Instructions ................42804116
Parts List
11

Parts Diagram
A
B
C
C
D
E
F
F
G
H
I
J
K
L
L
M
M
F
NO
12

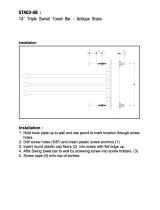
Assembly
Step 1
Slide tool hooks onto one of the towel bars prior to assembly.
Attach each towel bar using two .1/4-20x3/4” machine screws
DO NOT LIFT UNIT USING TOWEL BARS.
1/4-20x3/4”
Machine Screw
Qty: 4
Wrap/Body
55700670
Towel bar
55700667
Tool hook
1/4-20x3/4”
Machine Screw
Step 2
Feed burner tube through center hole of heat shield. Align the three threaded studs on bottom of burner
with small holes in heat shield. Make sure electrode passes through electrode hole. Secure burner
beneath heat shield using three . Attach ignitor wire to electrode.#10-24 hex/keps nuts
#10-24
Hex/Keps Nut
Qty: 3
Burner assembly
55700664
Ignitor Wire
55700664
Electrode
#10-24 Hex/Keps Nut
Rear View
13

Step 3
Position rotary ignitor as shown below. Attach ignitor behind
control panel using two .#8x1/2” self-tap screws
#8x1/2”
Self-Tap Screw
Qty: 2
Rotary ignitor
55700666
#8x1/2” Self-Tap Screw
Control panel
55700671
Step 4
Insert valve/hose through front
opening and attach to control
panel using two
Screws may already be
installed in valve and must be
removed to attach valve to
control panel.
#8-32x3/8”
machine screws.
NOTE:
#8-32x3/8”
Machine Screw
Qty: 2
#8-32x3/8”
Machine Screw
Hose/Valve/Regulator assembly
55700665
14

Step 5
Align valve with burner tube. Figure A
#10-
24x3/8” machine screws #10-24 hex/keps nuts
#10x1/2” self-tap screw
See for proper valve-to-burner
engagement. Secure control panel to body at each end using two
and two . Inside body,
insert one through body into panel. It is helpful to
have someone hold panel in position while attaching hardware.
#10x1/2”
Self-Tap Screw
Qty: 1
#10-24x3/8”
Machine Screw
Qty: 2
#10-24
Hex/Keps Nut
Qty: 2
Figure A
Valve
Burner
Tube
Beneath control panel
#10-24
Hex/Keps Nut
inside body.
#10-24x3/8”
Machine Screw
#10x1/2”
Self-Tap Screw
from inside body
#10-24x3/8”
Machine Screw
from inside body
#10-24
Hex/Keps Nut
Step 6
Feed ignitor wire from electrode through opening beneath control panel and
attach to ignitor. Press rotary ignitor knob (smaller knob) onto ignitor stem
and control knob onto valve stem.
Ignitor wire
Beneath control panel
Rotary
ignitor knob
29000950
Control
knob
29000951
15

Step 8
Step 7
Lift body assembly and place onto
base. Back/open-end of body
assembly should face back of base.
Back of base has locking casters,
front has non-locking casters. Attach
body assembly to base using nine
and
nine .
#10-24x1/2” machine screws
#10-24 hex/keps nuts
#10-24x1/2”
Machine Screw
Qty: 9
#10-24
Hex/Keps Nut
Qty: 9
#10-24x1/2”
Machine Screw
#10-24
Hex/Keps Nut
Base
55700672
Locking
caster
55700673
Locking
caster
55700673
Place cast iron grate onto top. Align grate
legs with slots in top.
Cast iron grate
29100874
16

Cylinder valve must face to rear of cart once
cylinder is attached. Failure to install cylinder
correctly may allow gas hose to be damaged in
operation, resulting in the risk of fire.
CAUTION
Step 9
Place cover assembly onto top. Align lower hinge
holes with holes on back side of top. Secure using
two .#8x1/2” self-tap screws
#8x1/2”
Self-Tap Screw
Qty: 2
Cover assembly
29100873
#8x1/2”
Self-Tap Screw
Step 10
LP GAS CYLINDER IS SOLD SEPARATELY.
Make sure cylinder valve is
facing to the rear.
Read “ ” in
the Use and Care section of this manual.
See Use & Care section of this manual to perform the
“Burner Flame Check” and for important safety
instructions before using.
Fill and
leak check the cylinder before attaching to Outdoor Stove
Top and regulator (see Use & Care section). Once
cylinder has been filled and leak checked, place cylinder
into cylinder hole in base.
Secure cylinder with cylinder screw
under base.
Connecting Regulator to the LP Cylinder
LP gas cylinder
(not included)
Always keep LP cylinders in upright position
during use, transit or storage.
Cylinder screw
17

18

Please register your product online at:
(If you register online, you do not need to send in this registration card.)
WWW.GRILLREGISTRATION.COM
19

Char-Broil, LLC • Columbus, GA 31902 • Assembly Instructions © 2005
/