Page is loading ...

2
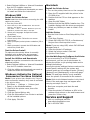
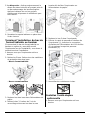
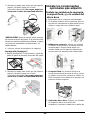
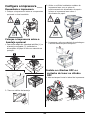
Check components_______
1 Printer
2 CD
3 Image Drum Cartridge
4 Toner Cartridge
5 Power cable
6 Documentation: (this Setup Guide, Handy
Reference Guide, Safety, Warranty, and
Regulatory Information booklet)
Installation Overview ____
• Space Requirements (see page 2)
• Set up the printer:
- Unpack the printer (see page 3
- If applicable, install the printer on one of the
optional trays (see page 3)
- Install the image drum and the toner
cartridge (see page 3)
- Load paper (see page 4)
• Install the options you purchased:
- Memory Modules (see page 5)
- Compact Flash (see page 5)
- Hard Disk Drive,(see page 5
- Tabloid Tray (see page 6)
- Tandem Tray (see page 6)
- Duplexer (see page 6)
- finisher (see page 8)
- High Capacity Feeder (see page 10)
• Make Computer Connections (see
page 11)
•Power up (see page 12)
• Print the Demo page (see page 12)
•Load software (see page 12 [Windows] or
13 [Macintosh])
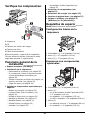
Space Requirements _____
Note: Space requirements are approximate.
Basic Printer
• Depth (1) = 46 inches (118 cm)
• Width (2) = 47 inches (120 cm)
• Height (3) = 27 inches (69 cm)
Printer with Options
• Depth (1): 46 inches (118 cm)
•Width (2):
- with High Capacity Feeder (HCF) = 47 inches
(118 cm)
- with finisher = 60 inches (153 cm)
- with HCF and finisher = 86 inches (218 cm)
• Height (3):
- with optional tray = 35 inches (89 cm)
- with finisher = 47 inches (119 cm)

3
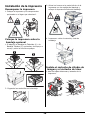
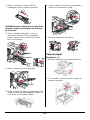
Set Up the Printer _______
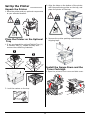
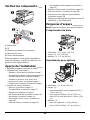
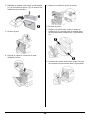
Unpack the Printer
1.Place the printer and any optional components
at your selected location.
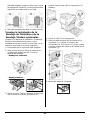
Place the Printer on the Optional
Tray
1.If you purchased the optional Tabloid Tray (1)
or Tandem Tray (2), unpack the tray and
remove the cushioning materials.
2. Lock the casters on the tray.
3. Align the holes on the bottom of the printer
with the positioning guides on the tray, and
place the printer on the tray.
4. Remove the printer packing materials and
shipping tape.
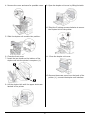
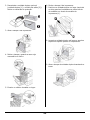
Install the Image Drum and the
Toner Cartridge
1.Open the printer’s front cover and side cover.

4
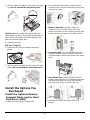
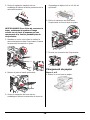
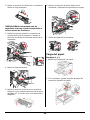
2. Remove the image drum cartridge from the
package, then remove the protective sheet.
CAUTION! Avoid contact with internal
surfaces. Do not let the drum sit in room
light for more than 5 minutes.
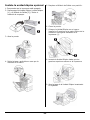
3. Fold the handle (3) down and slide the image
drum Cartridge into the printer. Press the
cartridge firmly into the printer.
4. Remove and discard the protective strip.
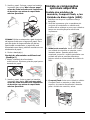
5. Remove the toner cartridge from its packing
and shake it from side to side 8 to 10 times to
distribute the toner.
6. Slide the toner cartridge into the printer and
press it firmly in place.
7. Close the printer covers.
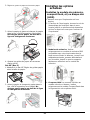
Load Paper
Trays 1 and 2
1.Pull out the tray(s).
2. Adjust the paper guides for the paper you are
using.

5
3. Fan the paper and add it to the tray, print side
up
. Do not exceed the maximum level.
Caution!
Align the right width guide with the
paper width correctly. If the right width guide is
not in place, the paper will not be properly fed
and may cause a paper jam.
4. Close the tray(s).
MP Tray (Tray 5)
1.Lower the MPT tray and adjust the paper
guides.
2. Fan the paper and add it to the tray, print side
down
. Do not exceed the maximum level.
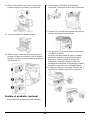
Install the Options You
Purchased
Install the Optional Memory,
Compact Flash, and/or Hard
Disk Drive (HDD)
1.Make sure the printer is turned off.
2. On the back of the printer, loosen the two
screws on the controller assembly cover, then
remove the cover.
3. Memory Modules: Carefully insert the
module in the slot at the lower left, then
gently push down on the module until the side
braces close to the ends of the RAM module.
4. Compact Flash: In a similar manner to the
memory module above, carefully insert the
Compact Flash module in the slot on the upper
right.
5. Hard Disk Drive: Insert the HDD into the
socket, being careful not to damage the fragile
pins.Seat the Hard Drive over the locating
pins and push firmly to secure the unit
6. Reinstall the cover, securing it with the
screws.

6
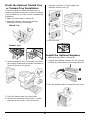
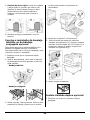
Finish the Optional Tabloid Tray
or Tandem Tray Installation
If you purchased the optional tabloid tray or
tandem tray and mounted the printer on it earlier
in the installation, you now need to complete the
installation.
1.Make sure the printer is turned off.
1.Open each drawer, remove the packing
materials, and close the drawer.
- Tabloid Tray
- Tandem, Tray
2. Remove drawer 3 from the printer. Insert the
two locking screws and turn them clockwise to
secure the tray to the printer.
3. Push the drawer back into the printer.
4. Remove the interface access cover (1) from
the back of the printer, connect the tray
interface connector (2) and replace the
interface access cover (3).
5. Level the unit.
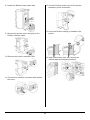
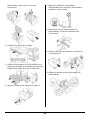
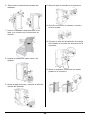
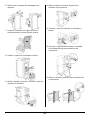
Install the Optional Duplexer
1.Make sure the printer is turned off.
2. Unpack the duplexer (duplex unit [1] and exit
module [2]) and remove cushioning materials.
3. Pull the release button to open the front cover.
1
2
1
2
3

7
4. Remove the cover and save for possible reuse.
5. Slide the duplex exit module into position.
6. Close the front cover.
7. Insert the two hooks on the bottom of the
duplex unit into the printer’s receptors (1).
8. Lift the duplex Unit until the upper hooks are
latched in the printer.
9. Open the duplex unit cover by lifting the latch.
10.Twist the 2 locking screws clockwise to secure
the Duplex Unit to the printer.
11..Close the duplex unit cover
12.Remove the access cover from the back of the
printer (1), connect the duplex unit interface

8
cable (2) and replace the printer access cover
(3).
Install the Optional Finisher
1.Make sure the printer is turned off.
2. Unpack the finisher’s horizontal transport unit
and position it on top of the printer.
3. Insert the two mounting screws to secure the
horizontal transport unit.
4. If the duplexer is installed, the guides from
the printer itself must be moved to the
duplexer exit module.
The guides are two pieces of rubber and plastic
that assist in stacking to the top of the printer.
When installing the horizontal transport this
guide needs to be moved from the body of the
printer up to the exit module.
5. Place the mounting bracket in position and
insert the two mounting screws to secure it.
6. .Remove all the packing materials from the
finisher.
7. Slide the finisher into position engaging the
latching hardware.

9
8. Insert the Stacker Lower catch tray.
9. Remove the access cover and plug in the
finisher interface cable.
10.Remove the printer interface cover.
11.Connect the interface connector and replace
the cover.
12.Connect finisher power cord to the printer
accessory power connection.
13.Level the finisher making it parallel to the
printer.
14.Open the finisher door and remove the
internal tags and shipping brackets.

10
15.Move the catch to the right and insert the
staple module.
16.Unpack the paper punch waste container.
17.Insert the punch waste container and fully
seat it. Close the finisher door.
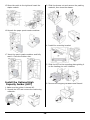
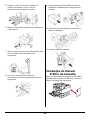
Install the Optional High
Capacity Feeder (HCF)
1.Make sure the printer is turned off,.
2. Unpack the HCF and remove the cushioning
materials.
3. Slide the drawer out and remove the packing
material, then close the drawer.
4. Install the mounting bracket.
5. Slide the HCF to the mounting plate guiding it
on the locating pin until it latches.
6. Remove the shipping hardware and discard.

11
7. Adjust the feet on the feeder assembly to set
the feeder position parallel to the printer.
8. Connect the feeder power cord into the printer
accessory outlet.
9. Slide the drawer out of the feeder and remove
the shipping screws.
10.Adjust the feeder paper size guides.
11.Load the paper tray.
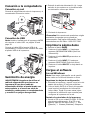
Attach the Handy Reference
Guide ______________
Remove the backing from the Velcro
®
strip on
the back of the Handy Reference Guide and
mount it on the side of the printer.
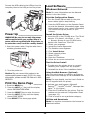
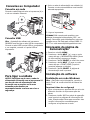
Computer Connection ____
Network Connection
Connect the Ethernet cable between the printer
and the Ethernet hub or router.
USB Connection
Note: Install the printer software BEFORE
connecting the USB cable: see page 12 and page
13.

12
Connect the USB cable to the USB port on the
computer, then to the USB port on the printer.
Power Up ______________
WARNING! Be sure to use only the power
cable supplied with your printer! Use of a
power cord not supplied with this printer, or
an extension cord, could be a safety hazard
.
1.Insert the power cable. Plug the cable into a
suitable grounded outlet.
2. Turn the printer on.
Caution!
Do not connect this product to an
uninterruptible power supply (UPS). For more
information, please contact Oki Data at 1-800-
OKIDATA.
Print the Demo Page _____
1.Press the MENU key.
2. Press the NEXT (
!) key until the display
shows INFORMATION MENU.
3. Press the SELECT key to enter the menu.
4. Press the NEXT (5) key until the display
shows PRINT DEMO.
5. Press SELECT. The demo page prints.
Load Software__________
Windows Network
Note: For more information see the Network
section in the User Guide.
Print the Configuration Sheets
1.Turn the Printer ON and wait for the print
server status light to stop blinking.
2. Press the INFO button on the Operator Panel
to print the Network Information pages. Keep
these sheets handy: they contain information
you need to set up the printer on your
network.
Install the Printer Driver
1.Insert the CD in the CD-ROM drive. The CD will
autorun. If it doesn’t, click Start
→
Run
→
Browse. Browse to your CD-ROM drive,
double-click Install.exe. Click OK.
2. Select your language.
3. Accept the license agreement.
4. The installer screen appears.
5. Click Install Driver.
6. Select network printer.
7. Select TCP/IP.
8. Enter the IP address.
9. Follow the on-screen instructions.
Test the Driver Install
1.To make sure the printer driver is correctly
installed, print a page from any program.
2. Reinstall the driver if the installation failed.
Using the Web Browser (Optional)
Use your web browser to configure print server
and printer menu settings on an embedded web
page.
Note: For more details, see the User’s Guide on
the CD supplied with the printer.
1.Activate your web browser (Microsoft
Explorer
®/™
, Mozilla
®
Firefox
®
, Netscape Nav-
igator
™
4.4 or higher).
2. Enter the IP Address for the printer. Find the
address on the network Configuration Sheet
(see page 12).
3. Click on a tab to see a particular category.
Utilities and Downloads
Note: You must be connected to the internet to
download utilities.

13
1.Select Optional Utilities or Internet Downloads
from the CD installer menu bar.
2. Click on the utilities and downloads you want
to install and follow the instructions.
Windows USB
Install the Printer Driver
Note: Install the driver before connecting the USB
cable to the printer.
1. Turn the printer OFF.
2. Insert the CD, in the CD-ROM drive. The CD will
autorun.
If it doesn’t,
click Start
→
Run
→
Browse. Browse to your CD-
ROM drive, double-click Setup. Click OK.
3. Select your language. Accept the license
agreement.
4. Click Install Driver.
5. Select local printer. Follow the on-screen
instructions.
6. When prompted, select printer emulation (PS or
PCL).
7. When prompted, connect the USB cable and
switch the printer ON.
Test the Driver Install
To make sure the printer driver is correctly
installed, print a page from any program.
Reinstall the driver if the installation failed.
Install the Utilities and Downloads
Note: You must be connected to the internet to
download utilities.
1.Select Optional Utilities or Internet Downloads
from the CD installer menu bar.
2. Click the utilities and downloads you want to
install and follow the instructions.
Windows: Activate the Optional
Accessories You Have Installed
Note: If your printer has a Duplex Unit, Trays or
other accessories installed, they must be activated
in the printer driver.
1.Click Start
→
Settings
→
Printers (and
Faxes) on the Windows taskbar.
2. Right click the printer name, then click
Properties.
3. Click the Device Options tab.
4. Click Get Information From Printer to activate
all the installed options.
5. Click Apply. Click OK.
Macintosh
Install the Printer Driver
1.Turn on the printer, then turn on the computer.
2. Place the CD supplied with the printer in the
CD-ROM drive.
3. Double-click the CD icon that appears on the
desktop.
4. Open the MAC folder.
5. Double-click the Mac B930n Installer icon. The
Installer displays with the driver pre-selected.
6. Select any utilities you want to install. Click
Install.
Add the Printer
1.Run the Print Center or Print Setup Utility. Click
Add.
2. Click More Printers.
3. Select OKI USB, OKI TCP/IP, or Rendezvous/
Bonjour from the drop-down menu.
Note: If you are using USB, select OKI USB and
disregard step 4.
4. Enter the printer’s IP address.
5. Select the printer model. Click Add.
6. Quit the Print Center.
Use the Web Page to Configure the Printer
If you are working in a TCP/IP-enabled
environment, you can use a web browser to
display the printer or job printing status and to
change the settings.
Among the printer settings that are made on the
control panel, settings for the system and
network ports can be configured under [Printer],
[Network] and [Maintenance] on the web page.
Note: The web page facility is only available
when the printer is connected to the network.
Note: Refer to the Network section in the User’s
Guide if the web page does not appear after
carrying out steps 1 and 2:
1.Boot your computer, and start the web
browser.
2. Enter the printer’s IP address or URL in the
address input column on the web browser and
press the <Enter> key.
Service and Support
• Visit our multilingual web site:
www.okiprintingsolutions.com
• Call 1-800-654-3282
Page is loading ...
Page is loading ...
Page is loading ...
Page is loading ...
Page is loading ...
Page is loading ...
Page is loading ...
Page is loading ...
Page is loading ...
Page is loading ...
Page is loading ...
Page is loading ...
Page is loading ...
Page is loading ...
Page is loading ...
Page is loading ...
Page is loading ...
Page is loading ...
Page is loading ...
Page is loading ...
Page is loading ...
Page is loading ...
Page is loading ...
Page is loading ...
Page is loading ...
Page is loading ...
Page is loading ...
Page is loading ...
Page is loading ...
Page is loading ...
Page is loading ...
Page is loading ...
Page is loading ...
Page is loading ...
Page is loading ...
Page is loading ...
Page is loading ...
Page is loading ...
Page is loading ...
-
 1
1
-
 2
2
-
 3
3
-
 4
4
-
 5
5
-
 6
6
-
 7
7
-
 8
8
-
 9
9
-
 10
10
-
 11
11
-
 12
12
-
 13
13
-
 14
14
-
 15
15
-
 16
16
-
 17
17
-
 18
18
-
 19
19
-
 20
20
-
 21
21
-
 22
22
-
 23
23
-
 24
24
-
 25
25
-
 26
26
-
 27
27
-
 28
28
-
 29
29
-
 30
30
-
 31
31
-
 32
32
-
 33
33
-
 34
34
-
 35
35
-
 36
36
-
 37
37
-
 38
38
-
 39
39
-
 40
40
-
 41
41
-
 42
42
-
 43
43
-
 44
44
-
 45
45
-
 46
46
-
 47
47
-
 48
48
-
 49
49
-
 50
50
-
 51
51
-
 52
52


Ask a question and I''ll find the answer in the document
Finding information in a document is now easier with AI
in other languages
- français: OKI B930 Manuel utilisateur
- español: OKI B930 Manual de usuario
- português: OKI B930 Manual do usuário
Related papers
Other documents
-
Lexmark X3430 Owner's manual
-
HP LaserJet M4345 Multifunction Printer series Quick start guide
-
Lexmark 2200 Series User manual
-
Lexmark T620 User manual
-
Dell 1720/dn Mono Laser Printer User guide
-
Epson C11CC24001 Installation guide
-
Samsung ML-1740 - ML 1740 B/W Laser Printer User manual
-
-
HP Deskjet D1400 Printer series User manual
-