
DEWALT Industrial Tool Co., 701 East Joppa Road, Baltimore, MD 21286 (MAR04) Form No. 623852-00 D512385 Copyright © 2004
The following are trademarks for one or more DEWALT power tools: the yellow and black color scheme; the “D” shaped air intake grill; the array of pyramids on the handgrip;
the kit box configuration; and the array of lozenge-shaped humps on the surface of the tool.
D512385 - Adjustable Belt Hook Instructions
FOR USE WITH D51238 BRAD NAILER, D51256 AND D51275
FINISH NAILERS
If you should have difficulty understanding the following instruc-
tions contact a D
E
WALT service center or an authorized D
E
WALT
service person.
Important Safety Instructions
• Read and understand tool instruction manual before attempting
repairs.
• Use only genuine D
E
WALT replacement parts.
• Always wear ANSI compliant eye protection.
• Disconnect air from tool and remove all nails before servicing.
• Always point tool in safe direction when reconnecting air supply.
CAUTION:
• Do not allow dirt, dust or other foreign materials to enter the tool.
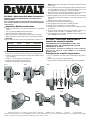
TO INSTALL BELT HOOK
1. Disconnect air from tool before servicing or repairing (Fig. 1).
2. Remove all nails from the magazine and nosepiece before servic-
ing or repairing.
3. Remove 3 screws (A) from end cap (Fig. 2).
4. Separate end cap (B) from frame (Fig. 3).
5. Remove end cap spacer (D) from end cap.
KIT COMPONENT
Part desc. # in kit Part # Ref. Letter
Belt Hook 1 395079-00 G
Spring Plate 1 395080-00 E
Gasket, End Cap 1 395430-00 C
FIG. 1 FIG. 2
FIG. 3
FIG. 4
FIG. 5
FIG. 6
A
B
C
D
E
F
G
C
H
D512385 – Directives concernant le
crochet de courroie réglable
À UTILISER AVEC LE CLOUEUR POUR CLOUS À TÊTE
PERDUE D51238 ET LES CLOUEURS POUR CLOUS DE
FINITION D51256 ET D51275
Si les directives suivantes ne semblent pas claires, communi-
quer avec un centre de service D
E
WALT ou un technicien
D
E
WALT qualifié.
Consignes de sécurité importantes
• Lire et comprendre le manuel avant d’entreprendre des répara-
tions.
• N’utiliser que des pièces d’origine DeWALT.
• Toujours porter des lunettes de protection approuvées par ANSI.
NOTE: If gasket (C) is dislodged, attach it to the machined surface
of the frame.
6. Place the flat face of belt hook spring (E) against machined surface
of end cap. Make sure tabs on the spring match the slots on the
end cap (Detail). The spring fits in only one orientation.
7. With the arrow (F) on end cap pointed down, fit the notch in belt
hook (G) on top of the detent in belt hook spring (Fig. 4).
8. Capture gasket (C) with 3 screws. Ensure that arrow on end cap is
pointing down toward the magazine as end cap and frame meet
(Fig. 5).
9. Tighten screws snugly to prevent leaks.
10. Check belt hook for proper operation (Fig. 6).
11. Ensure trigger and contact trip are working smoothly.
12. Set pressure on compressor or air line at 80 psi.
13. Pointing tool in safe direction, connect tool to air supply. Tool must
not leak air.
14. Check for proper operation of tool. If tool continues to leak air or if
problems persist, take nailer to a D
EWALT service center.
15. If warning labels are missing or damaged, request replacements
from a D
EWALT service center.
Page is loading ...
-
 1
1
-
 2
2


Ask a question and I''ll find the answer in the document
Finding information in a document is now easier with AI
in other languages
- français: DeWalt D512385 Manuel utilisateur
- español: DeWalt D512385 Manual de usuario