Page is loading ...
5
English
(Original instructions)
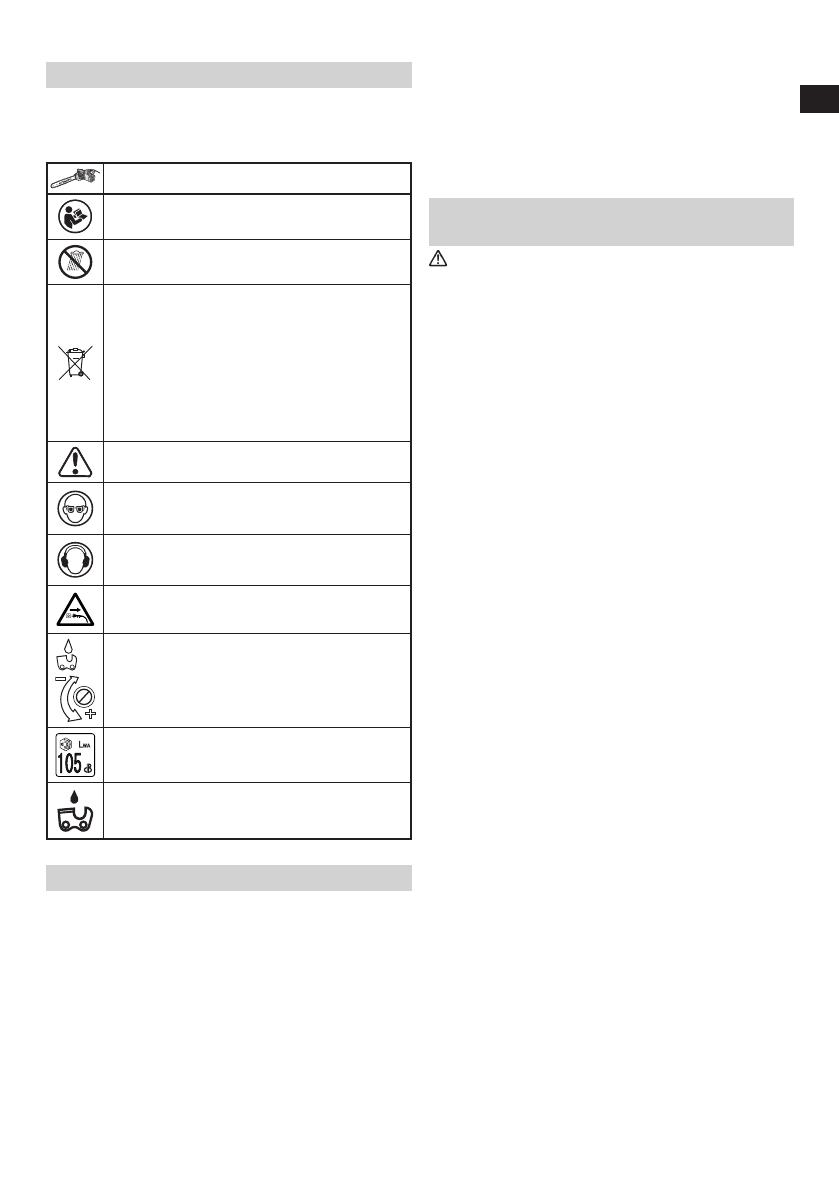
SYMBOLS
WARNING
The following show symbols used for the machine.
Be sure that you understand their meaning before
use.
CS30SB / CS35SB / CS40SB: Chain Saw
Read all safety warnings and all
instructions.
Do not use a power tool in the rain and
moisture or leave it outdoors when it is raining.
Only for EU countries
Do not dispose of electric tools together with
household waste material!
In observance of European Directive 2002/96/
EC on waste electrical and electronic
equipment and its implementation in
accordance with national law, electric tools
that have reached the end of their life must
be collected separately and returned to an
environmentally compatible recycling facility.
Read, understand and follow all warnings and
instructions in this manual and on the unit.
Always wear eye protectors when using this
unit.
Always wear ear protectors when using this
unit.
Pull out the power supply plug if the cable is
damaged.
Oil pump adjustment
Guaranteed Sound power level
Chain oil fi ll
WHAT IS WHAT? (Fig. 1)
A: Lock-off button: Button that prevents the accidental
operation of the trigger.
B: Oil tank cap: Cap for closing the oil tank.
C: Saw chain: Chain, serving as a cutting tool.
D: Guide bar: The part that supports and guides the saw
chain.
E: Spiked bumper: Device for acting as a pivot when in
contact with a tree or log.
F: Oil sight glass: Window to check chain oil amount.
G: Chain brake: Device for stopping or locking the saw
chain.
H: Front handle: Support handle located at or towards the
front of the main body.
I: Rear handle: Support handle located on the top of the
main body.
J: Switch: Device activated by the fi nger.
K: Side cover: Protective cover to the guide bar saw chain,
clutch and sprocket when the chain saw is in use.
L: Tension dial: Device for adjusting tension of saw chain
M: Knob: Knob for securing tension dial and side cover
N: Chain case: Case for covering the guide bar and saw
chain when the unit is not being used.
O: Plug clip: A tool to prevent the power plug from slipping
free of an extension cord's socket.
GENERAL POWER TOOL SAFETY
WARNINGS
WARNING
Read all safety warnings and all instructions.
Failure to follow the warnings and instructions may result in
electric shock, fi re and/or serious injury.
Save all warnings and instructions for future
reference.
The term “power tool” in the warnings refers to your
mains-operated (corded) power tool or battery-operated
(cordless) power tool.
1) Work area safety
a) Keep work area clean and well lit.
Cluttered or dark areas invite accidents.
b) Do not operate power tools in explosive
atmospheres, such as in the presence of
fl ammable liquids, gases or dust.
Power tools create sparks which may ignite the dust
or fumes.
c) Keep children and bystanders away while
operating a power tool.
Distractions can cause you to lose control.
2) Electrical safety
a) Power tool plugs must match the outlet.
Never modify the plug in any way.
Do not use any adapter plugs with earthed
(grounded) power tools.
Unmodifi ed plugs and matching outlets will reduce
risk of electric shock.
b) Avoid body contact with earthed or grounded
surfaces, such as pipes, radiators, ranges and
refrigerators.
There is an increased risk of electric shock if your
body is earthed or grounded.
c) Do not expose power tools to rain or wet
conditions.
Water entering a power tool will increase the risk of
electric shock.
d) Do not abuse the cord. Never use the cord for
carrying, pulling or unplugging the power tool.
Keep cord away from heat, oil, sharp edges or
moving parts.
Damaged or entangled cords increase the risk of
electric shock.
e) When operating a power tool outdoors, use an
extension cord suitable for outdoor use.
Use of a cord suitable for outdoor use reduces the
risk of electric shock.
f) If operating a power tool in a damp location
is unavoidable, use a residual current device
(RCD) protected supply.
Use of an RCD reduces the risk of electric shock.
3) Personal safety
a) Stay alert, watch what you are doing and use
common sense when operating a power tool.
Do not use a power tool while you are tired
or under the infl uence of drugs, alcohol or
medication.

6
English
A moment of inattention while operating power
tools may result in serious personal injury.
b) Use personal protective equipment. Always
wear eye protection.
Protective equipment such as dust mask, non-skid
safety shoes, hard hat, or hearing protection used
for appropriate conditions will reduce personal
injuries.
c) Prevent unintentional starting. Ensure the
switch is in the off position before connecting
to power source and/or battery pack, picking
up or carrying the tool.
Carrying power tools with your fi nger on the switch
or energising power tools that have the switch on
invites accidents.
d) Remove any adjusting key or wrench before
turning the power tool on.
A wrench or a key left attached to a rotating part of
the power tool may result in personal injury.
e) Do not overreach. Keep proper footing and
balance at all times.
This enables better control of the power tool in
unexpected situations.
f) Dress properly. Do not wear loose clothing or
jewellery. Keep your hair, clothing and gloves
away from moving parts.
Loose clothes, jewellery or long hair can be caught
in moving parts.
g) If devices are provided for the connection of
dust extraction and collection facilities, ensure
these are connected and properly used.
Use of dust collection can reduce dust-related
hazards.
4) Power tool use and care
a) Do not force the power tool. Use the correct
power tool for your application.
The correct power tool will do the job better and
safer at the rate for which it was designed.
b) Do not use the power tool if the switch does not
turn it on and off .
Any power tool that cannot be controlled with the
switch is dangerous and must be repaired.
c) Disconnect the plug from the power source
and/or the battery pack from the power tool
before making any adjustments, changing
accessories, or storing power tools.
Such preventive safety measures reduce the risk of
starting the power tool accidentally.
d) Store idle power tools out of the reach of
children and do not allow persons unfamiliar
with the power tool or these instructions to
operate the power tool.
Power tools are dangerous in the hands of untrained
users.
e) Maintain power tools. Check for misalignment
or binding of moving parts, breakage of parts
and any other condition that may aff ect the
power toolʼs operation.
If damaged, have the power tool repaired
before use.
Many accidents are caused by poorly maintained
power tools.
f) Keep cutting tools sharp and clean.
Properly maintained cutting tools with sharp cutting
edges are less likely to bind and are easier to
control.
g) Use the power tool, accessories and tool bits
etc. in accordance with these instructions,
taking into account the working conditions and
the work to be performed.
Use of the power tool for operations diff erent
from those intended could result in a hazardous
situation.
5) Service
a) Have your power tool serviced by a qualifi ed
repair person using only identical replacement
parts.
This will ensure that the safety of the power tool is
maintained.
PRECAUTION
Keep children and infi rm persons away.
When not in use, tools should be stored out of reach
of children and infi rm persons.
CHAIN SAW SAFETY WARNINGS
1. Keep all parts of the body away from the saw chain
when the chain saw is operating. Before you start the
chain saw, make sure the saw chain is not contacting
anything. A moment of inattention while operating
chain saws may cause entanglement of your clothing
or body with the saw chain.
2. Always hold the chain saw with your right hand
on the rear handle and your left hand on the front
handle. Holding the chain saw with a reversed hand
confi guration increases the risk of personal injury and
should never be done.
3. Hold the power tool by insulated gripping surfaces
only, because the saw chain may contact hidden wiring
or its own cord. Saw chains contacting a “live” wire may
make exposed metal parts of the power tool “live” and
could give the operator an electric shock.
4. Wear safety glasses and hearing protection. Further
protective equipment for head, hands, legs and feet
is recommended. Adequate protective clothing will
reduce personal injury by fl ying debris or accidental
contact with the saw chain.
5. Do not operate a chain saw in a tree. Operation of a
chain saw while up in a tree may result in personal injury.
6. Always keep proper footing and operate the chain saw
only when standing on fi xed, secure and level surface.
Slippery or unstable surfaces such as ladders may
cause a loss of balance or control of the chain saw.
7. When cutting a limb that is under tension be alert for
spring back. When the tension in the wood fi bres is
released the spring loaded limb may strike the operator
and/or throw the chain saw out of control.
8. Use extreme caution when cutting brush and saplings.
The slender material may catch the saw chain and be
whipped toward you or pull you off balance.
9. Carry the chain saw by the front handle with the chain
saw switched off and away from your body. When
transporting or storing the chain saw always fi t the
guide bar cover. Proper handling of the chain saw will
reduce the likelihood of accidental contact with the
moving saw chain.
10. Follow instructions for lubricating, chain tensioning
and changing accessories. Improperly tensioned
or lubricated chain may either break or increase the
chance for kickback.
11. Keep handles dry, clean, and free from oil and grease.
Greasy, oily handles are slippery causing loss of
control.
12. Cut wood only. Do not use chain saw for purposes not
intended. For example: do not use chain saw for cutting
plastic, masonry or non-wood building materials. Use
of the chain saw for operations diff erent than intended
could result in a hazardous situation.
Causes and operator prevention of kickback: (Fig. 2)
Kickback may occur when the nose or tip of the guide
bar touches an object, or when the wood closes in and
pinches the saw chain in the cut.
Tip contact in some cases may cause a sudden reverse
reaction, kicking the guide bar up and back towards the
operator.

7
English
Pinching the saw chain along the top of the guide
bar may push the guide bar rapidly back towards the
operator.
Either of these reactions may cause you to lose control
of the saw which could result in serious personal
injury. Do not rely exclusively upon the safety devices
built into your saw. As a chain saw user, you should
take several steps to keep your cutting jobs free from
accident or injury.
Kickback is the result of tool misuse and/or incorrect
operating procedures or conditions and can be avoided
by taking proper precautions as given below:
○ Maintain a fi rm grip, with thumbs and fi ngers encircling
the chain saw handles, with both hands on the saw
and position your body and arm to allow you to resist
kickback forces. Kickback forces can be controlled by
the operator, if proper precautions are taken. Do not let
go of the chain saw.
○ Do not overreach and do not cut above shoulder
height. This helps prevent unintended tip contact and
enables better control of the chain saw in unexpected
situations.
○ Only use replacement bars and chains specifi ed by the
manufacturer. Incorrect replacement bars and chains
may cause chain breakage and/or kickback.
○ Follow the manufacturer’s sharpening and maintenance
instructions for the saw chain. Decreasing the depth
gauge height can lead to increased kickback.
Chain brake operation:
If a chain saw hits a solid object at a high speed it reacts
violently and kicks back. This is diffi cult to control and
could be dangerous, especially with lightweight tools
that tend to be used in all kind of positions. The chain
brake immediately stops the chain from rotating if there
is an unexpected kickback. The chain brake can be
activated by pressing your hand against the handguard
or automatically by the kickback itself.
The chain brake can only be reset after the motor
has stopped completely. Reset the handle to the rear
position (Fig. 3). Check the function of the chain brake
every day.
ADDITIONAL SAFETY WARNINGS
1. Use the electrical voltage listed on the name plate for
the power source.
The use of a voltage that exceeds this may result in
injury.
2. Work without pressure. In addition, always keep your
body warm.
3. Before commencing work, refl ect fully on the work
procedures involved and work to avoid accidents,
otherwise injury may occur.
4. Do not use in the event of bad weather, such as strong
wind, rain, snow, fog, or in areas prone to rockfall or
avalanches.
In bad weather, judgment may be impaired and the
vibration may result in disaster.
5. When visibility is poor, such as during bad weather or
night, do not use the unit. In addition, do not use it in
rain or in a location exposed to rain.
Unstable foothold or loss of balance may result in an
accident.
6. Check the guide bar and saw chain before starting the
unit.
○ If the guide bar or saw chain is cracked, or the product
is scratched or bent, do not use the unit.
○ Check if the guide bar and saw chain are securely
installed. If the guide bar or saw chain is broken or
dislodged, this may result in an accident.
7. Before starting work, check to ensure the switch does
not engage unless the lock-off button is pressed.
If the unit does not working properly, immediately stop
using and request repair from your Hitachi Authorized
Service Center.
8. Install the saw chain properly, in accordance with the
instruction manual.
If installed incorrectly, the saw chain will come off the
guide bar and injury may occur.
9. Never remove any of the safety devices equipped
on the chain saw (brake lever, lock-off button, chain
catcher etc.).
In addition, do not alter or immobilize them.
Injury may occur.
10. In the following cases, switch the unit off and ensure
the saw chain is no longer moving:
○ When not in use or being repaired.
○ When shifting to a new work location.
○ When inspecting, adjusting or replacing the saw chain,
guide bar, chain case and any other part.
○ When refi lling the chain oil.
○ When removing dust etc. from the body.
○ When removing obstacles, trash or sawdust generated
from work from the work area.
○ When you take off the unit, or when you get away from
the unit.
○ Otherwise, if you sense danger or anticipate risk.
If the saw chain is still moving, an accident may occur.
11. Work should generally be performed individually.
When multiple individuals are involved, ensure
suffi cient spacing between them.
In particular, when felling standing trees or working on
a slope, if you anticipate trees falling, rolling or sliding,
ensure there is no danger to other workers.
12. Remain more than 15 m away from other people.
In addition, when working with multiple persons,
remain 15 m or more apart.
○ There is a risk of impact with scatters and other
accidents.
○ Prepare a whistle alert etc. and determine appropriate
contact method for other workers beforehand.
13. Before felling standing trees, ensure the following:
○ Determine a safe evacuation location prior to felling.
○ Remove obstacles (e.g., branches, shrubs) in advance.
○ Based on a comprehensive evaluation of the state
of the tree to be felled (e.g., trunk bend, tension of
branches) and the surrounding situation (e.g., state of
adjacent trees, presence of obstacles, terrain, wind),
decide on the direction in which the standing tree will
fall and then plan the felling procedure.
Careless felling may result in injury.
14. When felling standing trees, ensure the following:
○ During work, be very careful of the direction in which
trees fall.
○ When working on a slope, ensuring the tree will not roll,
always work from the uphill side of the terrain.
○ When the tree starts falling, switch the unit off , alert
the surroundings, and immediately retreat to a safe
location.
○ During work, if the saw chain or guide bar become
entangled in the tree, switch off and use a wedge.
15. During use, if the unit performance deteriorates, or you
notice any abnormal sound or vibration, immediately
switch off and discontinue use, and return to your
Hitachi Authorized Service Center for inspection or
repair.
If you continue using, injury may occur.
16. If the unit is accidentally dropped or exposed to impact,
inspect carefully for damage or cracks and ensure
there is no deformation.
If the unit is damaged, cracked or deformed, injury may
occur.
17. When transporting the unit by car, secure the unit to
prevent it moving.
There is a risk of accident.

8
English
18. Do not switch the unit on while the chain case is
attached.
Injury may occur.
19. Ensure there are no nails and other foreign objects in
the material.
If the saw chain impact on the nail etc., injury may
occur.
20. To avoid the guide bar becoming entangled with the
material when chopping on a verge or when subject to
the weight of material while cutting, install a supporting
platform close to the cutting position.
If the guide bar becomes entangled, injury may occur.
21. If the unit is to be transported or stored after use, either
remove the saw chain, or attach the chain cover.
If the saw chain comes into contact with your body,
injury may occur.
22. Adequately care for the unit.
○ To ensure work can be performed safely and effi ciently,
care for the saw chain to ensure it provides optimal
cutting performance.
○ When replacing the saw chain or guide bar, maintaining
the body, fi lling oil etc., follow the instruction manual.
23. Ask the shop to repair the unit.
○ Do not modify this product, since it already complies
with the applicable safety standards.
○ Always refer to your Hitachi Authorized Service Center
for all repairs.
Attempting to repair the unit yourself may result in an
accident or injury.
24. When not using the unit, ensure it is properly stored.
Drain off the chain oil, and keep in a dry place out of
reach of children or a locked location.
25. If the warning label is no longer visible, peels off or is
otherwise unclear, apply a new warning label.
For the warning label, refer to your Hitachi Authorized
Service Center.
26. When working, if local rules or regulations apply,
comply with the same.
27. Recommendation for the use of a residual current
device with a tripping current of 30 mA or less
28. Statement to position the cord of so that it will not be
caught on branches and the like, during cutting
29. Recommendation that the fi rst-time user should, as
a minimum practice, cutting logs on a saw-horse or
cradle
DESCRIPTION OF NUMBERED ITEMS (Fig. 2 - Fig. 38)
1
Kickback zone
@
Blade direction
e
Oil sight glass
f
1/5 of diameter of fi le
2
Chain brake
#
Chain tensioner hole
r
Oil pump adjuster
g
Depth gage jointer
3
Free
$
Chain tensioner boss
t
Lock-off button
h
Flat fi le
4
Lock
%
Increase the tension
y
Switch
j
Protruding depth gage
head
5
Knob
^
Decrease the tension
u
Plug clip
k
Round off
6
Tension dial
&
Drive link
i
Plug
l
Brake band chamber
7
Side cover
*
Fasten
o
Extension cord
;
Chain oil spout
8
Guide bar
(
Pull
p
Spiked bumper
z
Groove
9
Saw chain
)
Actuation
a
Front handle
x
Oil hole
0
Guide bar tip
q
Release
s
Rear handle
c
Chain catcher
!
Sprocket
w
Chain oil
d
Round fi le
SPECIFICATIONS
Model CS30SB CS35SB CS40SB
Guide bar length (Max. cutting length) 300 mm 350 mm 400 mm
Guide bar Type P012-50CR P014-50CR P016-50CR
Voltage (by areas)*
1
(220 V, 230 V, 240 V)
Power Input*
1
1900 W
No-load chain speed 14.5 m/s
Type of chain 91PX-45 (Oregon) 91PX-52 (Oregon) 91PX-57 (Oregon)
Chain pitch / Gauge 9.53 mm (3/8") / 1.27 mm (0.05")
Sprocket Number of teeth: 6
Oil pump Automatic
Chain oil tank capacity 200 ml
Overload protection Electrical
Chain brake Manually actuated
Weight*
2
4.7 kg 4.8 kg 4.9 kg
*1 Be sure to check the nameplate on product as it is subject to change by areas.
*2 Weight: According to EPTA-Procedure 01/2003

9
English
STANDARD ACCESSORIES
○ Chain case .................................................................. 1
○ Guide bar ..................................................................... 1
○ Chain ........................................................................... 1
○ Plug clip*...................................................................... 1
○ Chain Saw Oil (100 ml) .................................................1
* Not supplied in certain sales areas.
Standard accessories are subject to change without
notice.
OPTIONAL ACCESSORIES
(SOLD SEPARATELY)
○ Chain Saw Oil
○ Round File
○ Depth Gauge Jointer
Round File and Depth Gauge Jointer are to be used
for sharpening of chain blades. As to its application,
please refer to the item titled “Sharpening of the Chain
Blade”.
○ Chain Case
Always keep the chain cover on the chain while
carrying the chain saw or while storing it.
Optional accessories are subject to change without notice.
APPLICATIONS
General wood cutting.
INSTALLING (REPLACING) SAW
CHAIN
WARNING
○ To prevent accidents, always switch the unit off , and
disconnect the plug from the receptacle.
○ Don’t use the saw chain or the guide bar other than
those specifi ed in “SPECIFICATIONS”.
CAUTION
Wear gloves and be careful to avoid injury with the saw
chain.
NOTE
○ When removing the saw chain, remove sawdust from
the oil spout, oil hole, and guide bar groove.
If sawdust accumulates, this may cause the unit to fail.
○ Use the correct type of saw chain in accordance with
the specifi cations.
If you install the wrong type of guide bar, the saw chain
may come off and injury may occur.
1. Removing the side cover (Fig. 4)
1 Rotate the knob once to loosen it.
2 Rotate the tension dial half a turn to loosen it.
3 Turn the knob and remove the side cover.
2. Removing the saw chain and guide bar (Fig. 5)
Remove the saw chain and guide bar in the direction
indicated by the arrow.
3. Engaging the new saw chain in the sprocket
(Figs. 6, 7)
Engage the saw chain at the guide bar tip with attention
to the direction of the saw chain, and then properly
engage the saw chain with the sprocket.
4. Installing the side cover
1 Adjust the tension dial of the side cover so that the
chain tensioner boss is inserted into the guide bar
chain tensioner hole, and attach the side cover. (Fig. 8)
2 Rotate the knob once to temporarily fi x it. (Fig. 9)
5. Adjusting the saw chain tension (Fig. 10)
○ While lifting the guide bar tip, turn the tension dial to
adjust the saw chain tension.
○ Turn the tension dial to the right to increase the saw
chain tension, and to the left to decrease it.
6. Checking the saw chain tension (Fig. 11)
Adjust the saw chain tension so that the gap between
the saw chain drive link and the guide bar is 0.5 to 1 mm
when you lift the saw chain slightly near the center of
the guide bar.
7. Securing the knob (Fig. 12)
1 When adjustment is complete, lift up the guide bar, and
fully tighten the knob.
2 Make sure the bolt is fi rmly tightened.
WARNING
After adjusting the saw chain tension, ensure the knob
is fully tightened.
If it is loose, injury may occur.
INSPECTION AND PREPARATION
PRIOR TO USE
Prior to use, make the following inspection and preparation.
WARNING
○ Ensure that the power source to be utilized conforms
to the power requirements specifi ed on the product
nameplate.
○ To prevent accidents, always perform steps 1 to 5
ensuring the plug is disconnected from the receptacle.
○ Do not secure the lock-off button while it is pressed.
If the switch is accidentally engaged, the unit may
unexpectedly start and injury may occur.
1. Ensuring the switch is off
○ Ensure that the power switch is in the OFF position. If
the plug is connected to a receptacle while the power
switch is in the ON position, the power tool will start
operating immediately, which could cause a serious
accident.
○ When the switch is engaged while pressing the lock-
off button, the unit switches on, and when the switch is
released, the unit switches off .
2. Checking the extension cord
When the work area is remote from the power source,
use an extension cord of suffi cient thickness and rated
capacity. The extension cord should be kept as short
as practicable.
3. Checking the saw chain tension
○ If the saw chain tension is incorrect, there is a risk of
damage to the saw chain or guide bar and malfunction.
Referring to steps 5 to 7 “Installing (replacing) saw
chain,” ensure an appropriate tension is set.
○ While the saw chain is still new, it is particularly
stretchy, so periodically check the tension and adjust
as required.
○ Also check the knob is securely tightened.
4. Checking operation of chain brake (Fig. 13)
WARNING
○ Although the chain brake is an emergency stop device,
this is not completely reliable. Operate carefully to
avoid the risk of kickback.
○ The chain brake is intended for use in emergencies and
when starting up. Do not use it indiscriminately.
○ To avoid impaired movement of the chain brake due to
buildup of sawdust etc., clean regularly.
○ The chain brake is an important component to ensure
safe use.
If you have any concern regarding the brake operation,
request repair from your Hitachi Authorized Service
Center.

10
English
The chain brake is an emergency stop device that stops
the saw chain when the unit is subject to kickback etc., to
reduce risk.
(Refer to “Causes and operator prevention of kickback.”)
When activating the chain brake by pushing the brake lever
forward, the saw chain stops moving.
If you pull the brake lever toward you, the brake is released.
When confi rming the operation of the chain brake, always
switch the unit off , disconnect the plug form the receptacle,
activate the brake lever and pull the saw chain by hand.
If the saw chain does not move, this means the chain brake
is activated.
NOTE
Always wear thick gloves for this task.
Since the saw chain blade is very sharp, pulling it hard
risks injuring your fi ngers.
5. Checking the chain oil
○ This unit is delivered without chain oil inside. Ensure
the oil tank is fi lled with the chain oil provided before
use. (Fig. 14)
○ Periodically check the oil sight glass during work and
replenish oil as required.
○ If the chain oil supplied runs out, use Hitachi chain oil
sold separately or equivalent chain oil on the market.
○ The chain oil lubricates automatically.
The discharge rate for auto lubrication is factory preset
to the maximum.
To reduce the discharge rate, turn the oil pump adjuster
on the rear of the body clockwise. (Fig. 15)
NOTE
○ The oil tank capacity is about 200 ml.
Even if overfi lled, excess oil will escape from the
overfl ow spout.
○ We recommend that you stock up with chain oil.
If you continue working without chain oil, the saw chain
may burn through, or the motor may fail.
○ Be careful to avoid dust or other foreign matter from
entering the oil tank.
If dust and other foreign matter enter the oil tank, the
unit may fail.
○ Chain oil left in the tank may leak due to the structure of
this unit. Although this does not indicate a malfunction,
it may soil the storage location, so be careful.
When storing, empty the oil from the oil tank, and place
an item under the main body which can absorb any
leaks.
6. Connecting the plug to the receptacle
7. Checking brake is engaged
○ When the switch is engaged while pressing the lock-
off button, the unit switches on, and when the switch is
released, the unit switches off .
○ In addition, at the same time as releasing the switch,
the unit applies a brake to stop the rotation of the saw
chain.
○ Before using, check to ensure brake is engaged.
CAUTION
Be careful of the repulsive force when the brake is
engaged.
If you drop the unit, injury may occur.
8. Checking chain oil discharge (Figs. 15, 16)
○ When switching the unit on, chain oil automatically
lubricates the saw chain and guide bar.
○ If oil does not seem to emerge 2 to 3 minutes after
the unit starts, check if any sawdust has accumulated
around the oil spout.
(Refer to “Cleaning the chain oil spout.”)
(Refer to “Checking the chain oil.”)
9. It is recommended to use an earth-leakage circuit
breaker or a residual current device.
Switch operation
When the switch is engaged while pressing the lock-off
button, the saw chain rotates. (Fig. 17)
Unless the lock-off button is pressed, the switch cannot
be engaged.
After the switch is engaged, the saw chain continues
rotating as long as it is pressed down.
When the switch is released, a brake is applied to stop
the saw chain rotation.
WARNING
Do not secure the lock-off button while it is pressed.
If the switch is accidentally engaged, the unit may
unexpectedly start and injury may occur.
Using the plug clip
The cord leading from the power plug is prevented from
being pulled out by the plug clip. (Fig. 18)
CUTTING PROCEDURES
WARNING
○ Prior to operation, ensure that chain brake works.
○ During use, grip the handle securely with both hands.
○ When cutting timber from the bottom, ensure the saw
chain does not impact with the timber.
If the unit is pushed back, injury may occur.
○ During work breaks or after work, always switch the unit
off , and disconnect the plug from the receptacle.
Always monitor the workplace and surrounding area,
ensure there are no objects which could cause injuries,
accidents or failure, and if any are present, remove them
in advance.
In particular, when establishing a foothold for working,
ensure there is no instability or any object which could be
tripped over.
When felling standing trees, always pay careful attention to
the direction in which the tree will fall or roll, and determine
a safe evacuation area and escape route for yourself in
advance.
1 Ensuring the unit is switched off
If the plug is connected to a receptacle while the switch
is unknowingly engaged, the unit may unexpectedly
start, which may result in an accident.
2 Engaging the switch
Ensuring the saw chain is not in contact with the timber,
engage the switch, and start cutting when the saw
chain speed has increased.
CAUTION
○ When switching the unit on, ensure the saw chain does
not contact with material or anything else.
○ During use, be careful to ensure the saw chain does
not contact with other material or object. In particular,
when you have fi nished cutting, be careful to ensure it
does not touch the ground.
NOTE
Refi ll the oil tank early to prevent the unit running out of
oil.
1. General cutting procedures
(1) Switch ON the power while keeping the saw slightly
away from the wood to be cut. Start sawing only after
the unit has reached full speed.
(2) When sawing a slender piece of wood, press the base
section of the guide bar against the wood and saw
downward as shown in Fig. 19.
(3) When sawing a thick piece of wood, press the spike on
the front section of the unit against the wood and cut it
with a lever action while using the spike as a fulcrum as
shown in Fig. 20.

11
English
(4) When cutting wood horizontally, turn the unit body to
the right so that the guide bar is below and hold the
upper side of the front handle with your left hand. Hold
the guide bar horizontally and place the spike that is
on the front of the unit body on the lumbar. Using the
spike as a fulcrum, cut into the wood by turning the rear
handle to the right. (Fig. 21)
(5) When cutting into wood from the bottom, touch the
upper part of the guide bar to the wood lightly. (Fig. 22)
(6) As well as carefully studying the handling instructions,
ensure practical instruction in the operation of the chain
saw prior to use, or at least practice working with the chain
saw by cutting lengths of round timber on a sawing trestle.
(7) When cutting logs or timbers which are not supported,
support them properly by immobilizing them during
cutting using a sawing trestle or other proper method.
CAUTION
○ When cutting wood from the bottom, there is a danger
that the unit body may be pushed back toward the user
if the chain strongly impacts with the wood.
○ Do not cut all the way thorough the wood by starting
from the bottom since there is the danger of the guide
bar fl ying up out of control when the cut is fi nished.
○ Always prevent the operating chain saw from touching
the ground or wire fences.
2. Branch cutting
(1) Cutting branches from a standing tree:
A thick branch should initially be cut off at a point away
from the trunk of the tree.
First cut in about one third of the way from below, and
then cut off the branch from above. Finally, cut off the
remaining portion of the branch even with the trunk of
the tree. (Fig. 23)
CAUTION
○ Always be careful to avoid falling branches.
○ Always be alert for chain saw recoil.
(2) Cutting branches from fallen trees:
First cut off branches that do not touch the ground, then
cut off those which touch the ground. When cutting
thick branches that touch the ground, fi rst cut in about
half of the way from above, then cut the branch off from
below. (Fig. 24)
CAUTION
○ When cutting off branches which touch the ground, be
careful that the guide bar does not become bound by
pressure.
○ During the fi nal cutting stage, beware of the log
suddenly rolling.
3. Log cutting
When cutting a log positioned as shown in Fig. 25, fi rst
cut in about one third of the way from below, then cut
down all the way from above. When cutting a log that
straddles a hollow as shown in Fig. 26, fi rst cut in about
two thirds of the way from above, then cut upward from
below.
CAUTION
○ Ensure the guide bar does not become bound in the log
by pressure.
○ When working on inclined ground, be sure to stand on
the uphill side of the log. If you stand on the downhill
side, the cut-off log may roll toward you.
4. Felling trees
(1) Undercut (
as shown in Fig. 27):
Make undercut facing the direction in which you want
the tree to fall.
The depth of the undercut should be 1/3 of the tree’s
diameter. Never fell trees without proper undercut.
(2) Back cut (
as shown in Fig. 27):
Make a backcut about 5 cm above and parallel to the
horizontal undercut.
If the chain becomes entangled during cutting, stop the
saw and use wedges to free it. Do not cut thorough the
tree.
CAUTION
○ Trees should not be felled in a manner that would
endanger any person, strike any utility line or cause
any property damage.
○ Be sure to stand on the uphill side of the terrain as the
tree is likely to roll or slide downhill after it is felled.
Precaution for cutting work
Gripping/pushing force of chain saw
Always grip the chain saw securely.
In addition, do not force the chain saw more than
necessary. When cutting, additional force exerted on
the chain saw will not accelerate the cutting speed.
This will strain the motor, impair the performance, and
damage or cause malfunction of the motor or guide bar.
Use the unit in the range where the saw chain is at a
reasonable speed.
In particular, when the saw chain stops (becomes
jammed) due to the excessive force, it may cause an
injury or failure of the unit.
Chain catcher
○ The chain catcher is located on the power head just
below the chain to further prevent the possibility of a
broken chain striking the chain saw user.
○ When the saw chain is cut, replace it with a new one
referring to “Installing (replacing) saw chain”.
SHARPENING OF THE CHAIN BLADE
WARNING
To prevent accidents, always turn off the switch and
disconnect the plug from the receptacle.
In addition, when using saw chains, always wear thick
gloves.
NOTE
Sharpen the saw chain and adjust the depth gage at
the central position on the guide bar, with the saw chain
attached to the main body.
When the sharpness of saw chains deteriorates, the motor
and each part of the body are burdened and the effi ciency
declines.
For optimal performance of the unit, frequent maintenance
is necessary to keep the saw chain sharp.
1. Blade sharpening
The accessory round fi le should be held against the
chain blade so that one-fi fth of its diameter extends
above the top of the blade, as shown in Fig. 28.
Sharpen the blades by keeping the round fi le at a 30°
angle in relation to the guide bar, as shown in Fig. 29,
ensuring that the round fi le is held straight, as shown
in Fig. 30. Ensure that all saw blades are fi led at the
same angle, or the cutting effi ciency of the tool will
be impaired. Appropriate angles for sharpening the
blades correctly are shown in Fig. 31.
2. Adjustment of depth gage
WARNING
○ Do not sand the top part of the bumper tie strap and
guard drive link, nor cause the shape of said parts to
deform.
○ Adjustment of depth gages must be in line with the
predetermined dimensions and shapes, otherwise the
risk of kickback may increase, causing an injury.
Bumper tie strap
Guard drive link

12
English
Depth gages shall be all lined up in the same manner
because they are used to adjust depth at the position
where the cutter inlays into the wood.
When sharpening the saw chain, be sure to check the
depth gage every two or three times.
Place a depth gage jointer on the saw chain, leave the
gage visible at the groove, and use a fl at fi le to bevel the
portion out of the depth gage jointer. (Fig. 33) (Depth
gage jointer and fl at fi le are sold separately.)
After fi ling away the depth gage, round off the front side
of the depth gage as it was. (Fig. 34)
After sharpening the saw chain, place it into chain oil to
wash off the fi lings.
If fi lings are not cleaned off , the saw chain and guide
bar will quickly wear while in use.
MAINTENANCE AND INSPECTION
After operation, perform inspection and maintenance of
each part when storing the unit.
WARNING
During maintenance and inspection, always switch off
the unit and disconnect the plug from the receptacle.
1. Inspection of saw chains
○ Occasionally inspect the saw chain. In the event of
any abnormality, replace it with a new one referring to
“Installing (replacing) saw chain” .
○ Inspect the chain tension and check If it is correctly
tightened.
○ Stop using the unit when the saw chain becomes blunt
and sharpen it referring to “Sharpening of the chain
blade”.
○ After use, carefully lubricate the saw chain and guide
bars with oil for rust-proofi ng.
CAUTION
Wear gloves to avoid injury while using a saw chain.
2. Cleaning the side cover (Fig. 35)
Clean and remove any sawdust left inside the parts.
NOTE
When cleaning the side cover, brake band chamber,
chain oil spout, and side bar, see the procedure
“Installing (replacing) saw chain” and remove the saw
chain.
3. Cleaning the chain oil spout (Fig. 36)
Before cleaning the chain oil spout, remove the side
cover and guide bar.
4. Cleaning the guide bar (Figs. 7, 37)
When sawdust and similar become clogged in the
groove of the guide bar or oil spout, the oil may not fl ow,
which may result in the unit failing.
Remove the guide bar and clean any sawdust clogged
in the groove after use and when replacing the saw
chain. (Refer to “Installing (replacing) saw chain.”)
5. Inspect the chain catcher (Fig. 38)
The chain catcher is for preventing the saw chain from
striking the operator as much as possible should the
chain come loose or break.
The chain catcher and side cover are combined into a
single structure.
Inspect the chain catcher to make sure that there are
no damages.
6. Inspecting the mounting screws
Regularly inspect all mounting screws and ensure that
they are properly tightened. Should any of the screws
be loose, retighten them immediately. Failure to do so
could result in serious hazard.
7. Maintenance of the motor
The motor unit winding is the very “heart” of the power
tool.
Exercise due care to ensure the winding does not
become damaged and/or wet with oil or water.
8. Replacing the carbon brushes
For your continued safety and electrical shock
protection, carbon brush inspection and replacement
on this tool should ONLY be performed by a HITACHI
AUTHORIZED SERVICE CENTER.
9. Cleaning of the outside
When the chain saw is stained, wipe with a soft dry
cloth or a cloth moistened with soapy water. Do not use
chloric solvents, gasoline or paint thinner, for they melt
plastics.
10. Storage
When storing the unit, perform cleaning and
maintenance of each part and mount the chain case to
the guide bar.
Store the chain saw in a place where the temperature is
less than 40°C and out of reach of children.
CAUTION
In the operation and maintenance of power tools, the
safety regulations and standards prescribed in each
country must be observed.
SELECTING ACCESSORIES
The accessories of this machine are listed on page 235.
GUARANTEE
We guarantee Hitachi Power Tools in accordance with
statutory/country specifi c regulation. This guarantee does
not cover defects or damage due to misuse, abuse, or
normal wear and tear. In case of complaint, please send
the Power Tool, undismantled, with the GUARANTEE
CERTIFICATE found at the end of this Handling instruction,
to a Hitachi Authorized Service Center.
IMPORTANT
Correct connection of the plug
The wires of the main lead are coloured in accordance
with the following code:
Blue: -- Neutral
Brown: -- Live
As the colours of the wires in the main lead of this tool may
not correspond with the coloured markings identifying the
terminals in your plug proceed as follows:
The wire coloured blue must be connected to the terminal
marked with the letter N or coloured black.
The wire coloured brown must be connected to the terminal
marked with the letter L or coloured red.
Neither core must be connected to the earth terminal.
NOTE
This requirement is provided according to BRITISH
STANDARD 2769: 1984.
Therefore, the letter code and colour code may not be
applicable to other markets except The United Kingdom.

13
English
Information concerning airborne noise and vibration
The measured values were determined according to
EN60745 and declared in accordance with ISO 4871.
Measured A-weighted sound power level: 108 dB (A)
Measured A-weighted sound pressure level: 95 dB (A)
Uncertainty K: 2 dB (A).
Wear hearing protection.
Vibration total values (triax vector sum) determined
according to EN60745.
ah = 4.0 m/s
2
Uncertainty K = 1.5 m/s
2
The declared vibration total value has been measured in
accordance with a standard test method and may be used
for comparing one tool with another.
It may also be used in a preliminary assessment of
exposure.
WARNING
○ The vibration emission during actual use of the power
tool can diff er from the declared total value depending
on the ways in which the tool is used.
○ Identify safety measures to protect the operator that
are based on an estimation of exposure in the actual
conditions of use (taking account of all parts of the
operating cycle such as the times when the tool is
switched off and when it is running idle in addition to
the trigger time).
NOTE
Due to HITACHI’s continuing program of research and
development, the specifi cations herein are subject to
change without prior notice.
237
English Dansk Română
GUARANTEE CERTIFICATE
1 Model No.
2 Serial No.
3 Date of Purchase
4 Customer Name and Address
5 Dealer Name and Address
(Please stamp dealer name and address)
GARANTIBEVIS
1 Modelnummer
2 Serienummer
3 Købsdato
4 Kundes navn og adresse
5 Forhandlers navn og adresse
(Indsæt stempel med forhandlers navn og
adresse)
CERTIFICAT DE GARANŢIE
1 Model nr.
2 Nr. de serie
3 Data cumpărării
4 Numele și adresa clientului
5 Numele și adresa distribuitorului
(Vă rugăm aplicaţi ștampila cu numele și adresa
distribuitorului)
Deutsch Norsk Slovenščina
GARANTIESCHEIN
1 Modell-Nr.
2 Serien-Nr.
3 Kaufdaturn
4 Name und Anschrift des Kunden
5 Name und Anschrift des Händlers
(Bitte mit Namen und Anschrift des Handlers
abstempeln)
GARANTISERTIFIKAT
1 Modellnr.
2 Serienr.
3 Kjøpsdato
4 Kundens navn og adresse
5 Forhandlerens navn og adresse
(Vennligst stemple forhandlerens navn og adresse)
GARANCIJSKO POTRDILO
1 Št. modela
2 Serijska št.
3 Datum nakupa
4 Ime in naslov kupca
5 Ime in naslov prodajalca
(Prosimo vtisnite žig z imenom in naslovom
prodajalca)
Français Suomi Slovenčina
CERTIFICAT DE GARANTIE
1 No. de modèle
2 No de série
3 Date dʼachat
4 Nom et adresse du client
5 Nom et adresse du revendeur
(Cachet portant le nom et lʼadresse du revendeur)
TAKUUTODISTUS
1 Malli nro
2 Sarja nro
3 Ostopäivämäärä
4 Asiakkaan nimi ja osoite
5 Myyjän nimi ja osoite
(Leimaa myyjän nimi ja osoite)
ZÁRUČNÝ LISTA
1 Č. modelu
2 Sériové č.
3 Dátum zakúpenia
4 Meno a adresa zákazníka
5 Názov a adresa predajcu
(Pečiatka s názvom a adresou predajcu)
Italiano Ελληνικά Български
CERTIFICATO DI GARANZIA
1 Modello
2 N° di serie
3 Data di acquisto
4 Nome e indirizzo dellʼacquirente
5 Nome e indirizzo del rivenditore
(Si prega di apporre il timbro con questi dati)
ΠΙΣΤΟΠΟΙΗΤΙΚΟ ΕΓΓΥΗΣΗΣ
1 Αρ. Μοντέλου
2 Αύξων Αρ.
3 Ημερομηνία αγοράς
4 Όνομα και διεύθυνση πελάτη
5 Όνομα και διεύθυνση μεταπωλητή
(Παρακαλούμε να χρησιμοποιηθεί σφραγίδα)
ГАРАНЦИОНЕН СЕРТИФИКАТ
1 Модел №
2 Сериен №
3 Дата за закупуване
4 Име и адрес на клиента
5 Име и адрес на търговеца
(Моля, отпечатайте името и адрес на дилъра)
Nederlands Polski Srpski
GARANTIEBEWIJS
1 Modelnummer
2 Serienummer
3 Datum van aankoop
4 Naam en adres van de gebruiker
5 Naam en adres van de handelaar
(Stempel a.u.b. naam en adres vande de
handelaar)
GWARANCJA
1 Model
2 Numer seryjny
3 Data zakupu
4 Nazwa klienta i adres
5 Nazwa dealera i adres
(Pieczęć punktu sprzedaży)
GARANTNI SERTIFIKAT
1 Br. modela.
2 Serijski br.
3 Datum kupovine
4 Ime i adresa kupca
5 Ime i adresa prodavca
(Molimo da stavite pečat na ime i adresu trgovca)
Español Magyar Hrvatski
CERTIFICADO DE GARANTÍA
1 Número de modelo
2 Número de serie
3 Fecha de adquisición
4 Nombre y dirección del cliente
5 Nombre y dirección del distribudor
(Se ruega poner el sello del distribudor con su
nombre y dirección)
GARANCIA BIZONYLAT
1 Típusszám
2 Sorozatszám
3 A vásárlás dátuma
4 A Vásárló neve és címe
5 A Kereskedő neve és címe
(Kérjük ide elhelyezni a Kereskedő nevének és
címének pecsétjét)
JAMSTVENI CERTIFIKAT
1 Br modela.
2 Serijski br.
3 Datum kupnje
4 Ime i adresa kupca
5 Ime i adresa trgovca
(Molimo stavite pečat na ime i adresu trgovca)
Português Čeština Український
CERTIFICADO DE GARANTIA
1 Número do modelo
2 Número do série
3 Data de compra
4 Nome e morada do cliente
5 Nome e morada do distribuidor
(Por favor, carímbe o nome e morada do
distribuidor)
ZÁRUČNÍ LIST
1 Model č.
2 Série č.
3 Datum nákupu
4 Jméno a adresa zákazníka
5 Jméno a adresa prodejce
(Prosíme o razítko se jménem a adresou prodejce)
ГАРАНТІЙНИЙ СЕРТИФІКАТ
1 № моделі
2 № серії
3 Дата придбання
4 Імʼя і адреса клієнта
5 Імʼя і адреса дилера
(Будь ласка, поставте печатку з іменем і
адресою дилера)
Svenska Türkçe Русский
GARANTICERTIFIKAT
1 Modellnr
2 Serienr
3 Inköpsdatum
4 Kundens namn och adress
5 Försäljarens namn och adress
(Stämpla försäljarens namn och adress)
GARANTİ SERTİFİKASI
1 Model No.
2 Seri No.
3 Satın Alma Tarihi
4 Müşteri Adı ve Adresi
5 Bayi Adı ve Adresi
(Lütfen bayi adını ve adresini kaşe olarak basın)
ГАРАНТИЙНЫЙ СЕРТИФИКАТ
1 Модель №
2 Серийный №
3 Дата покупки
4 Название и адрес заказчика
5 Название и адрес дилера
(Пожалуйста, внесите название и адрес дилера)

239
Hitachi Power Tools Europe GmbH
Siemensring 34, 47877 willich, Germany
Tel: +49 2154 49930
Fax: +49 2154 499350
URL: http://www.hitachi-powertools.de
Hitachi Power Tools Netherlands B. V.
Brabanthaven 11, 3433 PJ Nieuwegein, The Netherlands
Tel: +31 30 6084040
Fax: +31 30 6067266
URL: http://www.hitachi-powertools.nl
Hitachi Power Tools (U. K.) Ltd.
Precedent Drive, Rooksley, Milton Keynes, MK 13, 8PJ,
United Kingdom
Tel: +44 1908 660663
Fax: +44 1908 606642
URL: http://www.hitachi-powertools.co.uk
Hitachi Power Tools France S. A. S.
Parc de l’Eglantier 22, rue des Cerisiers, Lisses-C.E. 1541,
91015 EVRY CEDEX, France
Tel: +33 1 69474949
Fax: +33 1 60861416
URL: http://www.hitachi-powertools.fr
Hitachi Power Tools Belgium N.V. / S.A.
Koningin Astridlaan 51, B-1780 Wemmel, Belgium
Tel: +32 2 460 1720
Fax: +32 2 460 2542
URL http://www.hitachi-powertools.be
Hitachi Fercad Power Tools Italia S.p.A
Via Retrone 49, 36077, Altavilla Vicentina (VI), Italy
Tel: +39 0444 548111
Fax: +39 0444 548110
URL: http://www.hitachi-powertools.it
Hitachi Power Tools lberica, S.A.
Puigbarral, 26-28 Pol. Ind. Can Petit 08227
TERRSSA(Barcelona) Spain
Tel: +34 93 735 6722
Fax: +34 93 735 7442
URL: http://www.hitachi-powertools.es
Hitachi Power Tools Österreich GmbH
Str. 7, Objekt 58/A6, Industriezentrum NÖ –Süd 2355
Wiener Neudorf, Austria
Tel: +43 2236 64673/5
Fax: +43 2236 63373
URL: http://www.hitachi-powertools.at/
Hitachi Power Tools Norway AS
Kjeller Vest 7, N-2007 Kjeller, Norway
Tel: (+47) 6692 6600
Fax: (+47) 6692 6650
URL: http://www.hitachi-powertools.no
Hitachi Power Tools Sweden AB
Rotebergsvagen 2B SE-192 78 Sollentuna, Sweden
Tel: (+46) 8 598 999 00
Fax: (+46) 8 598 999 40
URL: http://www.hitachi-powertools.se
Hitachi Power Tools Denmark A/S
Lillebaeltsvej 90, 6715 Esbjerg N, Denmark
Tel: (+45) 75 14 32 00
Fax: (+45) 75 14 36 66
URL: http://www.hitachi-powertools.dk
Hitachi Power Tools Finland Oy
Tupalankatu 9, 15680 Lahti, Finland
Tel: (+358) 20 7431 530
Fax: (+358) 20 7431 531
URL: http://www.hitachi-powertools.fi
Hitachi Power Tools Hungary Kft.
1106 Bogancsvirag U.5-7, Budapest, Hungary
Tel: +36 1 2643433
Fax: +36 1 2643429
URL: http://www.hitachi-powertools.hu
Hitachi Power Tools Polska Sp.z o.o.
ul. Gierdziejewskiego 1
02-495 Warszawa, Poland
Tel: +48 22 863 33 78
Fax: +48 22 863 33 82
URL: http://www.hitachi-narzedzia.pl/
Hitachi Power Tools Czech s.r.o.
Modricka 205, 664, 48, Moravany, Czech, Republic
Tel: +420 547 422 660
Fax: +420 547 213 588
URL: http://www.hitachi-powertools.cz
Hitachi Power Tools Netherlands B.V.
Moscow Branch
Kashirskoye Shosse Dom 65, 4F
115583 Moscow, Russia
Tel: +7 495 727 4460
Fax: +7 495 727 4461
URL: http://www.hitachi-pt.ru
Hitachi Power Tools Romania S. R. L.
Bld. Biruintei, Nr. 101, Oras Pentelimon, 077145, Judetul
Ilfov, ROMANIA
Tel: +031 805 27 19
Fax: +031 805 25 77

242
English
Nederlands
Object of declaration: Hitachi Chain Saw CS30SB, CS35SB, CS40SB
EC DECLARATION OF CONFORMITY
We declare under our sole responsibility that this product is in conformity
with standards or standardization documents EN60745-1 and EN60745-
2-13, applicable parts of EN55014-1, EN55014-2, EN61000-3-2 and
EN61000-3-3 in accordance with Directives 2004/108/EC, 2000/14/EC and
2006/42/EC. This product also conforms to RoHS Directive 2011/65/EU.
Measured sound power level: 108 dB
Guaranteed sound power level: 110 dB
The European Standards Manager at Hitachi Koki Europe Ltd. is authorized
to compile the technical fi le.
Notifi ed body (2006/42/EC) : 0598 SGS Fimko Ltd. Särkiniementie 3 P.O.Box
30 FI-00211 Helsinki, Finland has carried out a EC type examination and
issued EC type examination certifi cate no. MD 119 according to Annex IX.
This declaration is applicable to the product affi xed CE marking.
Onderwerp van verklaring: Hitachi Kettingzaagmachine CS30SB, CS35SB, CS40SB
EC VERKLARING VAN CONFORMITEIT
Wij verklaren onder eigen verantwoordelijkheid dat dit product conform de
richtlijnen of gestandaardiseerde documenten EN60745-1 en EN60745-2-13, de
van toepassing zijnde gedeelten van EN55014-1, EN55014-2, EN61000-3-2 en
EN61000-3-3 voldoet aan de eisen van bepalingen 2004/108/EC, 2000/14/EC en
2006/42/EC. Dit product voldoet ook aan de RoHS-richtlijn 2011/65/EU.
Gemeten geluidsdruk: 108 dB
Gegarandeerde geluidsdruk: 110 dB
De manager voor Europese normen van Hitachi Koki Europe Ltd. heeft de
bevoegdheid tot het samenstellen van het technische bestand.
Volgens (2006/42/EG): 0598 SGS Fimko Ltd. Särkiniementie 3 P.O.Box 30 FI-
00211 Helsinki, Finland heeft een EG-type onderzoek uitgevoerd en het EG-type
onderzoekcertifi caat nr. MD 119 volgens Aanhangsel IX afgegeven.
Deze verklaring is van toepassing op produkten voorzien van de CE-markeringen.
Deutsch
Español
Gegenstand der Erklärung: Hitachi Kettensäge CS30SB, CS35SB, CS40SB
EG-KONFORMITÄTSERKLÄRUNG
Wir erklären unter unserer Alleinverantwortung, dass dieses Produkt konform zu den Normen bzw.
Normierungsdokumenten EN60745-1 und EN60745-2-13, anwendbaren Teilen von EN55014-1, EN55014-
2, EN61000-3-2 und EN61000-3-3 in Übereinstimmung mit den Richtlinien 2004/108/EG, 2000/14/EG und
2006/42/EG ist. Dieses Produkt stimmt auch mit der RoHS-Richtlinie 2011/65/EU überein.
Gemessener Schallleistungspegel: 108 dB
Garantierter Schallleistungspegel: 110 dB
Der Manager für europäische Standards bei der Hitachi Koki Europe Ltd. ist zum Verfassen der
technischen Datei befugt.
Benannte Stelle (2006/42/EG): 0598 SGS Fimko Ltd. Särkiniementie 3 Postfach 30 FI-00211 Helsinki,
Finnland hat eine EG-konforme Prüfung durchgeführt und das Prüfungszertifi kat vom Typ EG Nr. MD 119
gemäß Anhang IX ausgestellt.
Diese Erklärung gilt für Produkte, die die CE-Markierung tragen.
Objeto de declaración: Hitachi Sierra de cadena CS30SB, CS35SB, CS40SB
DECLARACIÓN DE CONFORMIDAD DE LA CE
Declaramos bajo nuestra única responsabilidad que este producto está de acuerdo con las
normas o con los documentos de normalización EN60745-1 y EN60745-2-13, partes aplicables
de EN55014-1, EN55014-2, EN61000-3-2 y EN61000-3-3, según indican las Directrices
2004/108/CE, 2000/14/CE y 2006/42/CE. Este producto satisface también los requisitos
establecidos por la Directiva 2011/65/EU (RoHS).
Nivel de potencia acústica medida: 108 dB
Nivel de potencia acústica garantizada: 110 dB
El Jefe de Normas Europeas de Hitachi Koki Europe Ltd. está autorizado para recopilar archivos técnicos.
Organismo notifi cado (2006/42/CE) : 0598 SGS Fimko Ltd. Särkiniementie 3 P.O.Box 30 FI-00211
Helsinki, Finlandia, ha realizado un examen tipo CE y emitido un certifi cado de examen tipo CE n°
MD 119 de conformidad con el Anexo IX.
Esta declaración se aplica a los productos con marcas de la CE.
Français Português
Objet de la déclaration: Hitachi Scie à chaîne CS30SB, CS35SB, CS40SB
DECLARATION DE CONFORMITE CE
Nous déclarons sous notre seule et entière responsabilité que ce produit est conforme aux normes
ou documents de normalisation EN60745-1 et EN60745-2-13, les parties applicables des normes
EN55014-1, EN55014-2, EN61000-3-2 et EN61000-3-3 en accord avec les Directives 2004/108/
CE, 2000/14/CE et 2006/42/CE. Ce produit est aussi conforme à la Directive RoHS 2011/65/EU.
Niveau de puissance sonore mesuré: 108 dB
Niveau de puissance sonore garanti: 110 dB
Le responsable des normes européennes d’Hitachi Koki Europe Ltd. est autorisé à compiler les
données techniques.
Organisme notifi é (2006/42/EC) : 0598 SGS Fimko Ltd. Särkiniementie 3 P.O.Box 30 FI-00211
Helsinki, Finlande a réalisé un contrôle CE et émis un certifi cat de contrôle CE n° MD 119
conformément à l’Annexe IX.
Cette déclaration s’applique aux produits désignés CE.
Objeto de declaração: Hitachi Electro - serra CS30SB, CS35SB, CS40SB
DECLARAÇÃO DE CONFORMIDADE CE
Declaramos, sob nossa única e inteira responsabilidade, que este produto está de acordo com as
normas ou documentos normativos EN60745-1 e EN60745-2-13, partes aplicáveis do EN55014-1,
EN55014-2, EN61000-3-2 e EN61000-3-3, em conformidade com as Directrizes 2004/108/CE, 2000/14/
CE e 2006/42/CE. Este produto está também em conformidade com a Directiva RoHS 2011/65/EU.
Nível medido de potência de som: 108 dB
Nível garantido de potência de som: 110 dB
O Gestor de Normas Europeias da Hitachi Koki Europe Ltd. está autorizado a compilar o fi cheiro técnico.
Organismo notifi cado (2006/42/EC): 0598 SGS Fimko Ltd. Särkiniementie 3 P.O.Box 30 FI-00211
Helsínquia, Finlândia efectuou um exame tipo EC e emitiu um certifi cado de exame tipo EC n.° MD 119
de acordo com o Anexo IX.
Esta declaração se aplica aos produtos designados CE.
Italiano Svenska
Oggetto della dichiarazione: Hitachi Elettrosega CS30SB, CS35SB, CS40SB
DICHIARAZIONE DI CONFORMITÀ CE
Dichiariamo sotto nostra responsabilità che questo prodotto è conforme agli standard o ai
documenti sulla standardizzazione EN60745-1 e EN60745-2-13, alle parti applicabili di
EN55014-1, EN55014-2, EN61000-3-2 e EN61000-3-3 in conformità alle Direttive 2004/108/
CE, 2000/14/CE e 2006/42/CE. Il prodotto è inoltre conforme alla direttiva e RoHS 2011/65/EU.
Livello di potenza sonora misurato: 108 dB
Livello di potenza sonora garantito: 110 dB
Il Responsabile delle Norme Europee di Hitachi Koki Ltd. è autorizzato a compilare la scheda
tecnica.
Ente notifi cato (2006/42/CE): 0598 SGS Fimko Ltd. Särkiniementie 3 P.O. Box 30 FI-00211
Helsinki, Finlandia, ha eseguito un esame di tipo CE ed ha emesso un certifi cato di esame di
tipo CE n. MD 119 secondo l’Allegato IX.
Questa dichiarazione è applicabile ai prodotti cui sono applicati i marchi CE.
Objekt för deklaration: Hitachi Kedjesåg CS30SB, CS35SB, CS40SB
EF-DEKLARATION BETRÄFFANDE LIKFORMIGHET
Vi förklarar härmed att denna produkt överensstämmer med följande standarder:
EN60745-1 och EN60745-2-13, gällande delar av EN55014-1, EN55014-2,
EN61000-3-2 och EN61000-3-3 enligt direktivens 2004/108/EF, 2000/14/EF och
2006/42/EF. Denna produkt efterlever även RoHS-direktiv 2011/65/EU.
Uppmätt ljudstyrkenivå: 108 dB
Garanterad ljudstyrkenivå: 110 dB
Den europeiska standardansvarige på Hitachi Koki Europe Ltd. är auktoriserad
att utarbeta den tekniska fi len.
Anmält organ (2006/42/EC) : 0598 SGS Fimko Ltd. Särkiniementie 3 P.O.Box
30 FI-00211 Helsinki, Finland har utfört en EC-typ examen och utfärdat EC-typ
examensbevis nr MD 119 enligt Bilaga IX.
Denna deklaration gäller för CE-märkningen pà produkten.
Hitachi Koki Europe Ltd.
Clonshaugh Business & Technology Park, Dublin 17, lreland
Representative offi ce in Europe
Hitachi Power Tools Europe GmbH
Siemensring 34, 47877 Willich 1, F. R. Germany
Head offi ce in Japan
Hitachi Koki Co., Ltd.
Shinagawa Intercity Tower A, 15-1, Konan 2-chome,
Minato-ku, Tokyo, Japan
31. 3. 2015
Mr. John de Loughry
European Standard Manager
31. 3. 2015
A. Yoshida
Vice-President & Director
/