Page is loading ...

1
®
41428-01 8/1/99
STEP 9 - INSTALLING LIGHT FIXTURE
Figure 9a - Removing Plug Button
and Switch Housing Cap
Lower
Switch
Housing
Plug Button
Your fan may include a light fixture.
Information for wiring and installing
all included Hunter light fixtures fol-
lows.
Note: If you purchased a fan with-
out a light fixture, you may purchase
an accessory light kit separately. For
best performance and beauty, use
only Hunter-brand light kits, Type A-
Z. Hunter light kits are designed,
tested, and UL approved for all
Hunter fans, and are available at
most Hunter dealers. To install the
light kit, follow the instructions in-
cluded with the kit.
If you are not installing a light fix-
ture, turn to OPERATING YOUR
HUNTER FAN for additional instruc-
tions.
Switch
Housing
Cap
continued
WARNING
• To avoid possible electrical
shock, before installing
light fixtures, disconnect
power by turning off the
circuit breakers both to the
outlet box and to its asso-
ciated wall switch location.
If you cannot lock the cir-
cuit breakers in the off po-
sition, securely fasten a
prominent warning device,
such as a tag, to the service
panel.
• Connect house wiring to
the fan before attaching
the light fixture to the fan.
• All wiring must be in accor-
dance with national and lo-
cal electrical codes and
ANSI/NFPA 70-1993. If you
are unfamiliar with wiring,
you should use a qualified
electrician.

2
41428-01 8/1/99
®
INSTALLING INCLUDED SINGLE-
GLOBE LIGHT FIXTURE
1. Remove the plug cap from the
lower switch housing.
Note: Do not discard the plug
cap. You will need this if you re-
move the light fixture in the fu-
ture.
2. Locate the two wires in the lower
switch housing labeled “Connect
Light Here” or “For Light Use”.
One will be white, the other black/
white. Unscrew the wire nuts
counterclockwise to expose the
bare metal leads.
3. Locate the white wire and the
black wire coming from the light
fixture.
4. Thread the two wires from the
light fixture through the center
hole in the lower switch housing.
5. Screw the fixture into the lower
switch housing. Thread the
lockwasher and nut provided over
the wires. Making sure the light
fixture mounting screw holes are
aligned; hold the light fixture and
tighten the nut on the inside of
the lower switch housing. Insert
and tighten the two #6-32 sems
light fixture mounting screws.
6. Connect the black wire from the
light fixture to the black/white
wire from the lower switch hous-
ing. See Figure 9b.
Connect the white wire from the
light fixture to the white wire from
the lower switch housing. See Fig-
ure 9b.
To fasten the wires, twist the two
bare leads together. Place a wire
nut over the intertwined length
of wire and twist clockwise until
tight.
Black/White
Wire from
Switch Housing
White Wire
from Switch
Housing
Wire Nut
White Wire
from Light
Fixture
Black Wire
from Light
Fixture
Light
Fixture
Figure 9b - Wiring Light Fixture to
Fan
CAUTION
Be sure no bare wire or wire
strands are visible after mak-
ing connections.

3
®
41428-01 8/1/99
Figure 9d - Multi-Light Fixture
Cup
Globe
Silencer
Band
Thumb-
screw
7. Connect the upper plug connec-
tor from the motor to the lower
plug connector in the lower
switch housing assembly. See Fig-
ure 8e.
Note: Both plug connectors are
polarized and will only fit together
one way. Make sure that both
connectors are properly aligned
before connecting them together.
Incorrect connection could cause
improper operation and damage
to the product.
8. Place the lower switch housing
assembly over the upper switch
housing. Align the side screw
holes in the upper and lower
switch housings. Attach the lower
switch housing to the upper
switch housing with three #6-32
x 3/8" housing assembly screws.
See Figure 8e.
Globe
Thumbscrew
Bulb
Figure 9c - Single-Globe Fixture
INSTALLING SINGLE-GLOBE
FIXTURE BULB AND GLOBE
Refer to Figure 9c.
1. Install light bulbs.
2. Insert the globe around the bulb
and into the fixture. Install and
tighten thumbscrews manually.
Do not overtighten.
INSTALLING INTEGRATED MULTI-
LIGHT FIXTURE BULBS AND
GLOBES
Refer to Figure 9d.
1. Place silencer band around the
neck of each globe.
2. Insert globe in cup.
3. Install and tighten thumbscrews
manually. Do not overtighten.
4. Install bulbs.
continued

4
41428-01 8/1/99
®
INSTALLING ACCESSORY
LIGHT KITS
To install the light kit, follow the in-
structions included with the kit for
wiring, mounting, and assembly. Af-
ter completing the light kit installa-
tion, follow sub-steps 1 and 2 on
page 20 to reattach the lower switch
housing.
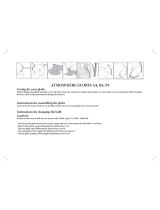
AURORA, TIFFANY, AND
SPOTLIGHT FIXTURES
Note: Sub-step 1 applies to all light
fixtures. Sub-steps 2-7 apply to Tif-
fany and Aurora light fixtures. Refer
to Figure 9e.
1. Install bulbs.
2. Thread the fan switch pull chain
through the hole in the metal disk.
3. Place globe on pipe until flush
against metal disk.
4. Thread the light switch pull chain
through the large center opening
of the globe.
5. Thread the fan switch pull chain
through the small center opening
in the globe.
6. Place the cover plate up against
the underside of the globe. Pass
light and fan switch pull chains
through the appropriate holes.
7. Thread the light switch pull chain
INSTALLING INTEGRATED
MULTIFIXTURE BULBS AND
GLOBES WITH LOCKING RINGS
Refer to Figure 9f.
1. Place globe over threaded
lampholder in cup.
2. Install and hand tighten threaded
locking ring on lampholder.
3. Install bulbs.
Pipe
Globe
Metal Disk
Bulb
Socket
Cover Plate
Finial
Fan Switch
Pull Chain
Light
Switch
Pull Chain
Figure 9e - Aurora Fixtures
Figure 9f - Multifixtures
through the finial and screw the
cap onto the pipe end until tight.
Cup
Threaded
Lamp
Holder
Globe
Threaded
Locking Ring
/