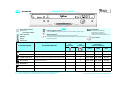
Whirlpool GU180ESJB dishwasher offers various wash cycles to meet your dishwashing needs. The Rapid 40°C cycle provides a quick wash for lightly soiled dishes, while the Crystal/China 40°C cycle is designed for delicate items. For normal loads, the Normal 50°C cycle is suitable, and for heavily soiled dishes, the Intensive 70°C cycle is recommended. Additionally, the Bio Eco 50°C cycle is energy-efficient and uses new generation "enzyme" based detergents.
Whirlpool GU180ESJB dishwasher offers various wash cycles to meet your dishwashing needs. The Rapid 40°C cycle provides a quick wash for lightly soiled dishes, while the Crystal/China 40°C cycle is designed for delicate items. For normal loads, the Normal 50°C cycle is suitable, and for heavily soiled dishes, the Intensive 70°C cycle is recommended. Additionally, the Bio Eco 50°C cycle is energy-efficient and uses new generation "enzyme" based detergents.


-
 1
1
-
 2
2
-
 3
3
-
 4
4


Whirlpool GU180ESJB Program Chart
- Category
- Dishwashers
- Type
- Program Chart
Whirlpool GU180ESJB dishwasher offers various wash cycles to meet your dishwashing needs. The Rapid 40°C cycle provides a quick wash for lightly soiled dishes, while the Crystal/China 40°C cycle is designed for delicate items. For normal loads, the Normal 50°C cycle is suitable, and for heavily soiled dishes, the Intensive 70°C cycle is recommended. Additionally, the Bio Eco 50°C cycle is energy-efficient and uses new generation "enzyme" based detergents.
Ask a question and I''ll find the answer in the document
Finding information in a document is now easier with AI
Related papers
-
Whirlpool ADG 8100 NB User guide
-
-
-
-
-
-
-
-
Whirlpool ADG 8778 WH User guide
-
Other documents
-
Bauknecht GSI 81454 A++ PT User guide
-
-
-
-
-
-
-
-
-