Whirlpool GMF 7522/IXL Program Chart

Type
Program Chart

Whirlpool GMF 7522/IXL is a gas hob that offers a convenient and efficient cooking experience. Equipped with multiple burners, it allows you to cook various dishes simultaneously. The intuitive control knobs provide precise flame adjustment for simmering or boiling, ensuring you have the right heat for every culinary creation. This gas hob is designed to be seamlessly integrated into your kitchen countertop, adding both functionality and style to your cooking space.

Whirlpool GMF 7522/IXL is a gas hob that offers a convenient and efficient cooking experience. Equipped with multiple burners, it allows you to cook various dishes simultaneously. The intuitive control knobs provide precise flame adjustment for simmering or boiling, ensuring you have the right heat for every culinary creation. This gas hob is designed to be seamlessly integrated into your kitchen countertop, adding both functionality and style to your cooking space.

Queste istruzioni sono disponibili anche sul sito web: www.whirlpool.eu
IMPORTANZA DELLA SICUREZZA PER SÉ E PER GLI ALTRI
Nel presente manuale e nell'apparecchio stesso sono fornite importanti avvertenze di sicurezza, da leggere e osservare sempre.
Tutti i messaggi relativi alla sicurezza specificano il potenziale pericolo a cui si riferiscono, indicano come ridurre la possibilità di lesioni e sottolineano ciò che
può succedere in caso di mancato rispetto delle istruzioni.
- Prima di qualsiasi intervento di installazione l'apparecchio deve essere scollegato dalla rete elettrica.
- Le operazioni di installazione e manutenzione devono essere eseguite da un tecnico specializzato, in conformità alle istruzioni del produttore e nel
rispetto delle norme locali vigenti in materia di sicurezza. Non riparare né sostituire alcuna parte dell'apparecchio a meno che ciò non sia
espressamente indicato nel manuale d'uso.
- Non conservare o usare benzina o altri gas e liquidi infiammabili nelle vicinanze dell'apparecchio.
I collegamenti di gas ed elettricità devono essere conformi alle norme locali.
- Quando si installa il piano di cottura, dotarlo di un interruttore multipolare con una distanza di apertura dei contatti di almeno 3 mm che consenta di
scollegare completamente l'apparecchio.
- La messa a terra dell'apparecchio è obbligatoria per legge.
- Il cavo di alimentazione deve essere sufficientemente lungo da collegare l'apparecchio, una volta posizionato nell'ubicazione definitiva, alla presa di
corrente.
- Per l'allacciamento del gas, utilizzare solo un tubo di metallo flessibile o rigido.
- Se necessario, il cavo di alimentazione deve essere sostituito esclusivamente con un cavo di alimentazione avente caratteristiche identiche a quello
originale fornito dal produttore (tipo H05V2V2-F 90°C o H05RR-F). Questa operazione deve essere eseguita da un tecnico qualificato.
- Il fabbricante declina ogni responsabilità per eventuali danni subiti da persone, animali domestici o beni, derivanti dalla mancata osservanza delle
norme sopra indicate.
- Non usare prese multiple o prolunghe.
- Non scollegare l'apparecchio dall'alimentazione tirando il cavo.
- I componenti elettrici non devono essere accessibili all'utente dopo l'installazione.
- Non toccare l'apparecchio con parti del corpo bagnate e non utilizzarlo a piedi scalzi.
- Questo piano di cottura (classe 3) è stato progettato per essere utilizzato esclusivamente per la cottura di cibi in ambienti domestici. Non utilizzare
l'apparecchio per riscaldare l'ambiente. In caso contrario, sussiste il rischio di avvelenamento da monossido di carbonio, nonché di surriscaldamento
del piano di cottura. Il fabbricante declina ogni responsabilità in caso di uso improprio o impostazione errata dei comandi.
- Questo apparecchio non deve essere utilizzato da persone (bambini compresi) con ridotte capacità fisiche, sensoriali o mentali o con esperienza e
conoscenza inadeguate, se non dietro supervisione o istruzione iniziale sull'utilizzo dell'apparecchio da parte di chi è responsabile della loro sicurezza.
- I bambini devono essere tenuti lontani e sorvegliati affinché non giochino con l'apparecchio.
- L'uso di un apparecchio a gas produce calore ed umidità nel locale. Assicurare una buona aerazione o installare una cappa di aspirazione con condotto
di scarico.
- In caso di utilizzo prolungato, può rendersi necessaria un'aerazione supplementare (aprendo una finestra o aumentando la forza di aspirazione della
cappa).
- Dopo l'uso, assicurarsi che le manopole siano in posizione di chiuso e chiudere il rubinetto principale del condotto di alimentazione del gas o quello
della bombola.
- I grassi e gli oli surriscaldati si infiammano facilmente. Non allontanarsi durante la preparazione di pietanze ricche di olio, grassi o alcol (ad esempio
rum, cognac, vino).
- Conservare il materiale di imballaggio dell’apparecchio al di fuori della portata dei bambini.
- Prima di pulirlo o effettuare interventi di manutenzione, attendere che il piano di cottura si sia raffreddato.
- Queste istruzioni sono valide solo per i paesi il cui simbolo è riportato sulla targhetta matricola (sotto il piano cottura).
- Questo apparecchio non deve essere installato e utilizzato all'aperto.
Dopo aver disimballato il piano di cottura, verificare che non si sia danneggiato durante il trasporto. In caso di problemi, contattare il rivenditore o il Servizio
Assistenza.
INFORMAZIONI TECNICHE PER L'INSTALLATORE
Utilizzare guanti protettivi per maneggiare, preparare e installare il prodotto.
Questo prodotto può essere incassato in un top (piano di lavoro) dello spessore di 20–60 mm.
Se sotto il piano di cottura non è previsto un forno, inserire un pannello separatore che abbia una superficie almeno pari all'apertura nel
piano di lavoro. Tale pannello deve essere posizionato a una distanza massima di 150 mm dalla superficie superiore del piano di lavoro e in
nessun caso inferiore a 20 mm dal fondo del piano di cottura. In caso si intenda installare un forno sotto il piano di cottura, assicurarsi che il
forno sia dotato di un sistema di raffreddamento. Il costruttore declina ogni responsabilità nel caso venga installato un forno di marca
diversa.
Prima di eseguire l'installazione, accertarsi che:
- le condizioni locali di erogazione del gas (natura e pressione) siano compatibili con le caratteristiche del piano di cottura (vedere la
targhetta matricola e la tabella iniettori);
- i rivestimenti delle pareti del mobile o degli apparecchi adiacenti al piano di cottura siano resistenti al calore secondo le norme locali;
- l'apparecchio non sia collegato a un dispositivo di scarico dei fumi; l'installazione venga eseguita in conformità alle norme in vigore; Prestare una
particolare attenzione ai requisiti inerenti la ventilazione.
- lo scarico dei fumi della combustione avvenga attraverso apposite cappe aspiranti o tramite elettroventilatori installati a parete e/o su finestre.
COLLEGAMENTO DEL GAS
ISTRUZIONI IMPORTANTI PER LA SICUREZZA
Questo è il simbolo di pericolo, relativo alla sicurezza, il quale avverte dei potenziali rischi per l'utilizzatore e per gli altri.
Tutti i messaggi relativi alla sicurezza saranno preceduti dal simbolo di pericolo per la sicurezza e dai termini:
PERICOLO
Indica una situazione pericolosa che, se non evitata, provoca lesioni gravi.
AVVERTENZA
Indica una situazione pericolosa che, se non evitata, può provocare lesioni gravi.
AVVERTENZA
La mancata osservanza delle informazioni contenute nel presente manuale può provocare un
incendio o un'esplosione con conseguenti danni materiali o lesioni personali.
Cosa fare in caso si avverta odore di gas:
- Non mettere in funzione nessun apparecchio.
- Non toccare interruttori di corrente.
- Non utilizzare telefoni all'interno dell'abitazione.
- Avvertire subito l'ente di erogazione gas utilizzando il telefono di un vicino. Seguire le istruzioni dell'ente di erogazione gas.
- Qualora non sia possibile mettersi in contatto con l'ente di erogazione gas, contattare i vigili del fuoco.
- L'installazione e la manutenzione dell'apparecchio devono essere eseguite da un installatore qualificato, da un centro di assistenza o dall'ente di
erogazione gas.
- Utilizzare l'apparecchio solo in ambienti adeguatamente ventilati.
CONSERVARE LE PRESENTI ISTRUZIONI
INSTALLAZIONE
AVVERTENZA
Questa operazione deve essere eseguita da un tecnico qualificato.
Il sistema di erogazione del gas deve essere conforme alle norme locali.
Per i regolamenti specifici, in vigore in alcuni paesi, consultare il paragrafo "Riferimenti alle normative
nazionali". In caso di assenza di informazioni riguardanti il paese di installazione, richiedere maggiori
dettagli all'installatore.
Il collegamento del piano di cottura alla rete di erogazione del gas o alla bombola del gas deve essere
eseguito mediante un tubo rigido di rame o di acciaio con i raccordi conformi alle norme locali, oppure
mediante un tubo flessibile in acciaio inox con superficie continua conforme alle norme locali. La lunghezza
massima consentita del tubo metallico flessibile è di 2 metri lineari.
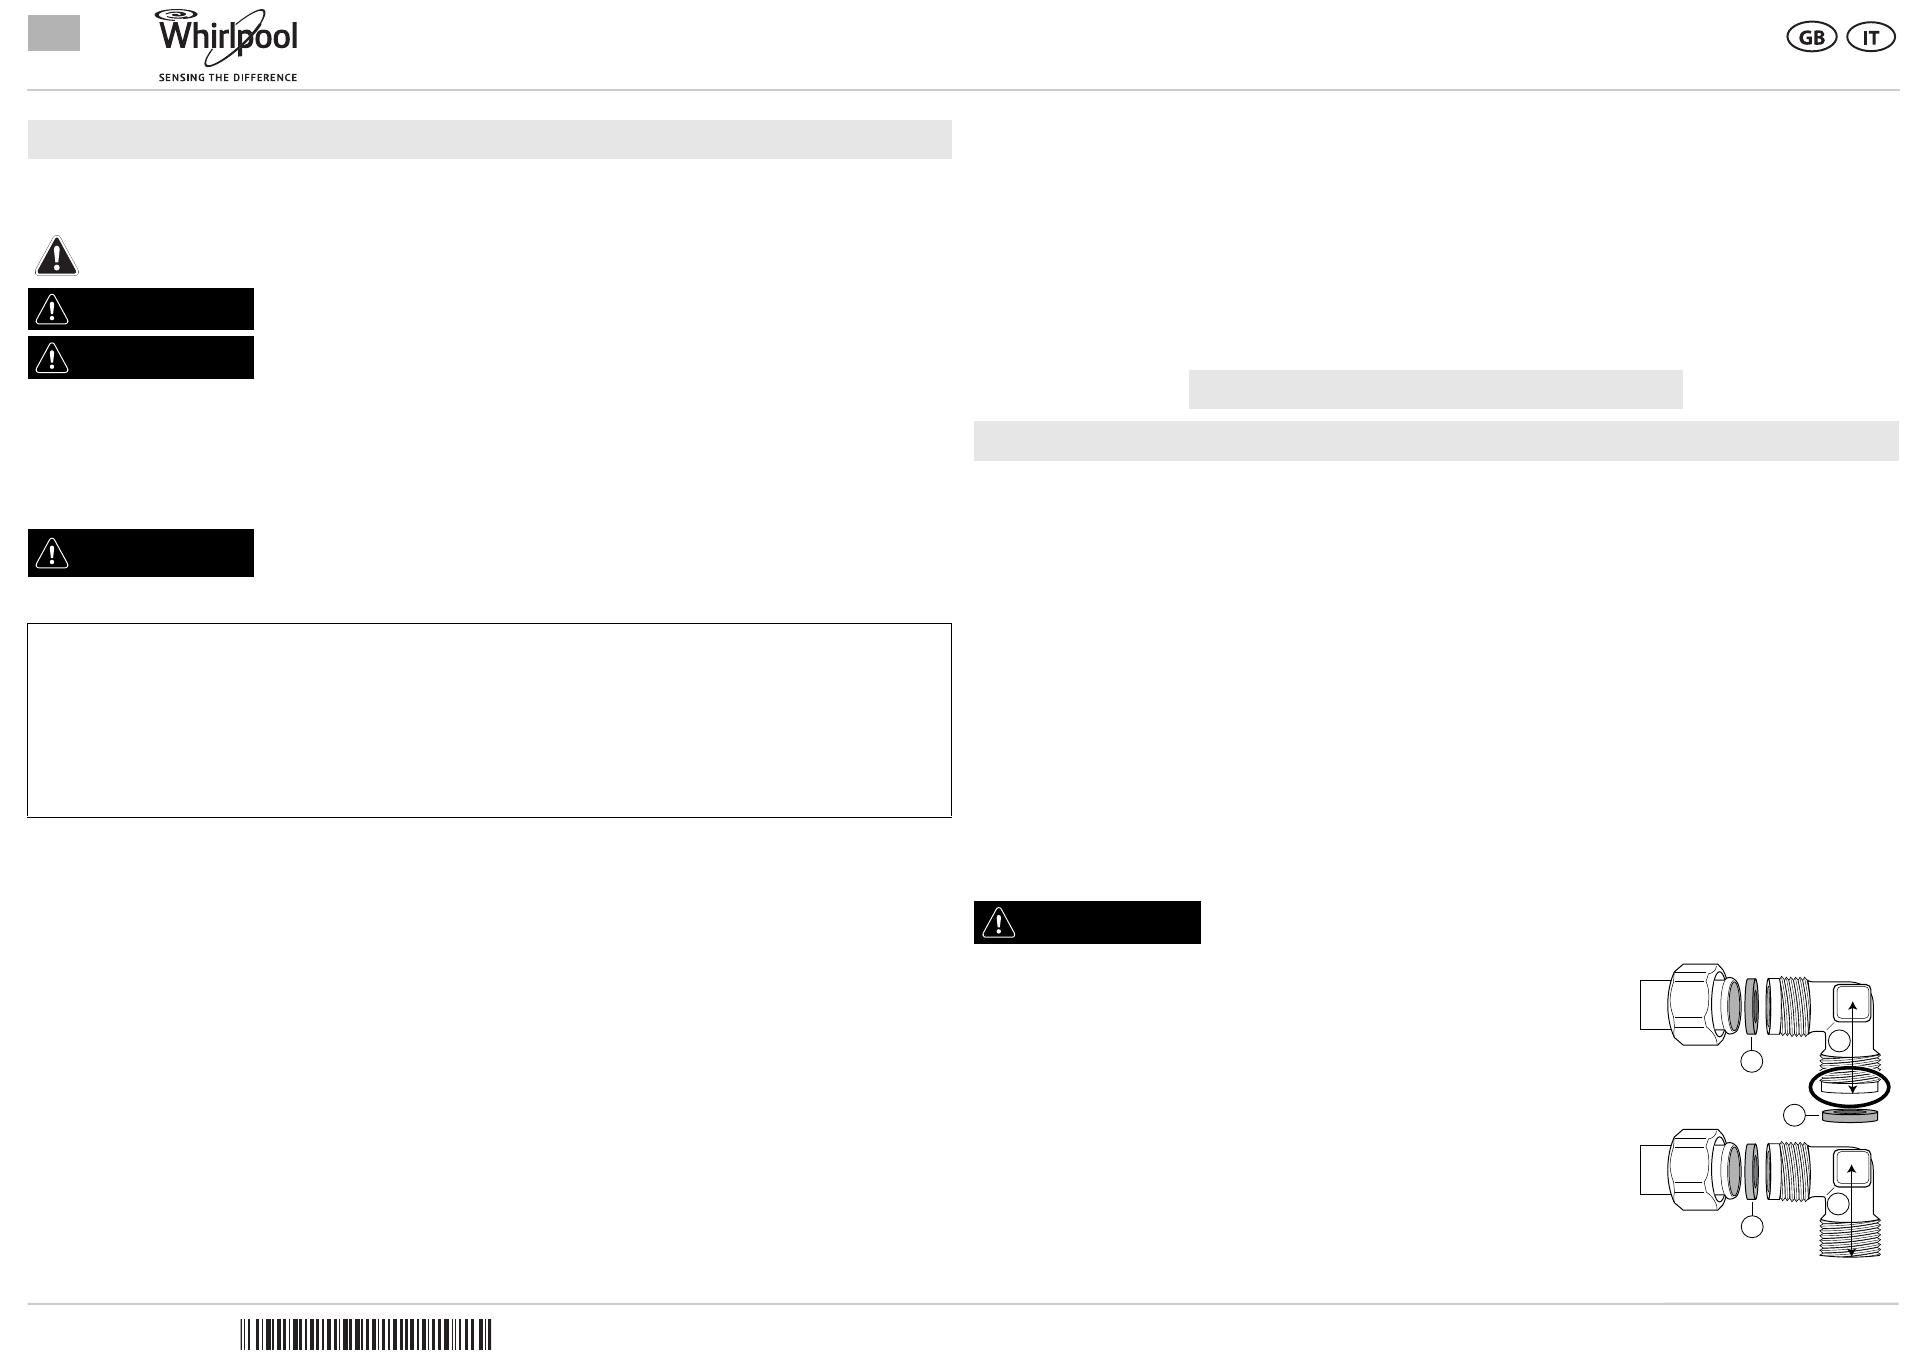
Collegare il raccordo a gomito (
A
)* o (
B
)* fornito insieme al tubo di alimentazione principale del piano
di cottura e interporre la guarnizione (
C
) in dotazione, a norma EN 549.
* Utilizzare il raccordo a gomito (
A
) per la Francia e il raccordo a gomito (
B
) per tutti gli altri paesi.
IMPORTANTE: nel caso si utilizzi un tubo flessibile in acciaio inox, questo dovrà essere installato in
maniera tale che non possa entrare in contatto con una parte mobile del mobilio. Il tubo deve passare
in un punto libero da ingombri e deve essere ispezionabile su tutta la lunghezza.
C
B
C
C
A
IT PIANO DI COTTURA INTEGRATO
400010881582 Fabbricante Whirlpool Europe S.r.l. - Socio Unico - Viale G. Borghi, 27 21025 Comerio (VA) ITALY
COLLEGAMENTO ALLA RETE ELETTRICA
IMPORTANTE: i dati relativi alla tensione e alla potenza assorbita sono riportati sulla targhetta matricola.
MONTAGGIO
ADATTAMENTO AI DIVERSI TIPI DI GAS
In caso di utilizzo con un gas diverso da quello indicato sulla targhetta matricola e sull'etichetta informativa posta sulla parte superiore del piano di cottura,
è necessario sostituire gli iniettori.
L'etichetta informativa va rimossa e conservata insieme al libretto istruzioni.
Utilizzare regolatori di pressione idonei alla pressione del gas indicata nelle istruzioni.
Per la sostituzione degli iniettori, rivolgersi al Servizio Assistenza o a un tecnico qualificato.
Gli iniettori non forniti in dotazione devono essere richiesti al Servizio Assistenza.
Regolare il minimo dei rubinetti.
NOTA: se si utilizza gas di petrolio liquefatto (G30/G31), la vite di regolazione del minimo deve essere avvitata a fondo.
IMPORTANTE: se la rotazione delle manopole dei bruciatori dovesse risultare difficoltosa, contattare il Servizio di assistenza tecnica autorizzato
che provvederà alla sostituzione del rubinetto, se difettoso.
IMPORTANTE: se si utilizza la bombola del gas, questa deve essere posizionata correttamente (orientamento verticale).
SOSTITUZIONE DEGLI INIETTORI (vedere la Tabella iniettori nelle Istruzioni)
REGOLAZIONE DEL MINIMO DEI RUBINETTI
RIFERIMENTI ALLE NORMATIVE NAZIONALI
Collegamento all'alimentazione del gas
Prima di procedere al collegamento dell'apparecchio, accertarsi che l'impianto di alimentazione sia conforme alle norme
UNI-CIG 7129
e
UNI CIG 7131
.
Collegamento gas
Per il collegamento dell'apparecchio alla rete del gas o alla bombola, utilizzare il tubo rigido in rame o acciaio, con relativi raccordi conformi alla norma
UNI-CIG 7129
,
oppure un tubo flessibile in inox con parete continua conforme alla norma
UNI-CIG 9891
.
Il tubo flessibile deve avere una lunghezza massima di 2 metri.
I regolatori di pressione da utilizzare devono essere conformi alla norma
UNI EN 12864
per gas in bombola e
UNI EN 88
per gas metano di rete.
SERVIZIO ASSISTENZA
GUIDA ALLA RICERCA GUASTI
Se il piano cottura non funziona correttamente, prima di chiamare l'assistenza esaminare la Guida alla ricerca guasti per individuare il problema.
1. Il bruciatore non si accende o la fiamma non è uniforme
Controllare che:
Non ci siano interruzioni nella rete di alimentazione del gas ed elettrica e, in particolare, che il rubinetto del gas sia aperto.
La bombola del gas liquido non si sia esaurita.
Le aperture del bruciatore non siano ostruite.
La parte terminale della candelina non sia sporca.
Tutte le parti che compongono il bruciatore siano posizionate correttamente.
Non ci siano correnti d'aria in prossimità del piano.
2. La fiamma non rimane accesa
Controllare che:
La manopola sia stata premuta a fondo durante l'accensione del bruciatore per il tempo sufficiente ad attivare il dispositivo di sicurezza.
Le aperture del bruciatore non siano ostruite in corrispondenza della termocoppia.
Dopo il collegamento all'alimentazione del gas, verificare con una soluzione di acqua saponata che non vi siano perdite. Con i
bruciatori accesi, ruotare le manopole dalla posizione massima alla posizione minima per verificare la stabilità della fiamma.
AVVERTENZA
Questa operazione deve essere eseguita da un tecnico qualificato.
AVVERTENZA
I collegamenti elettrici devono essere
conformi alle norme locali.
La messa a terra dell'apparecchio è
obbligatoria per legge.
Non utilizzare prolunghe.
Utilizzare guanti protettivi per pulire la
superficie perimetrale del prodotto, quindi
applicare al piano la guarnizione in dotazione
come mostrato in figura.
Posizionare il piano all'interno dell'apertura praticata secondo le dimensioni indicate nelle istruzioni.
NOTA: il cavo di alimentazione deve essere sufficientemente lungo da permetterne l'estrazione dall'alto.
Per bloccare il piano di cottura, utilizzare le staffe (
A
) in dotazione. Posizionare le staffe in corrispondenza dei fori evidenziati dalla freccia
e fissarle con le apposite viti in modo da adattarle allo spessore del top (vedere le figure seguenti).
AVVERTENZA
Questa operazione deve essere eseguita da un tecnico qualificato.
L
N
Terra
(giallo/verde)
20
30
60
40
Top 20 mm Top 40 mm
Top 30 mm Top 60 mm
Rimuovere le griglie (
A
).
Estrarre i bruciatori (
B
).
Con una chiave a tubo della dimensione appropriata, svitare
l'iniettore da sostituire (
C
).
Sostituirlo con l'iniettore previsto per il nuovo tipo di gas.
Rimontare l'iniettore in (
D
).
Se si dispone di un bruciatore a corona multipla, utilizzare una
chiave a T per sostituire l'iniettore (
E
).
Prima di installare il piano di cottura, ricordarsi di applicare la
targhetta di taratura gas fornita con gli iniettori di ricambio, in
modo che copra le informazioni già presenti.
Per garantire una corretta regolazione del minimo, rimuovere la manopola e procedere nel modo
seguente:
avvitare la vite per ridurre l'altezza della fiamma (-);
allentare la vite per aumentare l'altezza della fiamma (+).
La regolazione deve essere eseguita con il rubinetto nella posizione di minimo (fiamma piccola) .
Non occorre regolare l'aria primaria dei bruciatori.
Con i bruciatori accesi, ruotare le manopole dalla posizione massima alla posizione
minima per verificare la stabilità della fiamma.
Terminata la regolazione, ripristinare i sigilli con ceralacca o materiale equivalente.
Prima di contattare il Servizio Assistenza, accertarsi di poter fornire le seguenti informazioni:
- tipo di guasto o di inconveniente rilevato;
- modello esatto (riportato sull'etichetta applicata sul libretto istruzioni o sulla garanzia);
- il numero di assistenza che segue la parola SERVICE sulla targhetta matricola, posta
sotto il piano cottura, e sull'etichetta nel libretto istruzioni o sulla garanzia;
- il proprio indirizzo completo e recapito telefonico.
Qualora si renda necessario un intervento di riparazione, rivolgersi a un centro di assistenza
tecnica autorizzato tra quelli indicati sulla garanzia.
La parte terminale del dispositivo di sicurezza non sia sporca.
La regolazione del minimo sia corretta (vedere il paragrafo corrispondente).
3. I recipienti sono instabili
Controllare che:
Il fondo del recipiente sia perfettamente piano.
Il recipiente sia centrato sul bruciatore.
Le griglie non siano state invertite o posizionate in modo errato.
Se dopo le suddette verifiche il problema persiste, contattare il Servizio Assistenza più vicino.
PULIZIA DEL PIANO DI COTTURA
Le parti smaltate e in vetro vanno lavate con acqua calda e detergente neutro.
L'acqua calcarea o detergenti aggressivi potrebbero lasciare macchie sulle superfici in acciaio inox, se rimangono a contatto troppo a lungo. Eliminare
prontamente eventuali residui di cibo (acqua, sugo, caffè, ecc.) prima che si secchino.
Pulire con acqua calda e detergente neutro, quindi asciugare con un panno morbido o una pelle di daino. In caso di sporco difficile, usare
esclusivamente detergenti indicati per le superfici in acciaio inox.
NOTA:
pulire le superfici in acciaio inox solo con un panno morbido o una spugna.
Non utilizzare prodotti abrasivi o corrosivi, prodotti a base di cloro o pagliette.
Non utilizzare pulitrici a getto di vapore.
Non utilizzare prodotti infiammabili.
Evitare di lasciare sul piano sostanze acide o alcaline come aceto, mostarda, sale, zucchero o succo di limone.
I bruciatori neri possono presentare piccoli graffi dopo l'uso e la pulizia o, a volte, già alla consegna, per effetto dell'attrito con i cappellotti prodotto
durante il trasporto. Tali graffi non incidono in alcun modo sulla qualità o sulle prestazioni del prodotto. Per limitare il più possibile la formazione di
graffi, si raccomanda di maneggiare e posizionare i cappellotti senza ruotarli.
Pulire i bruciatori neri come indicato nella sezione PULIZIA DEI COMPONENTI DEL PIANO.
Per la pulizia del piano IXELIUM, attenersi alle seguenti raccomandazioni:
Usare un panno morbido (preferibilmente in microfibra) inumidito con acqua o un comune detergente per vetri.
Si sconsiglia l'utilizzo di tovaglioli di carta, i quali potrebbero lasciare striature sul piano.
PULIZIA DEI COMPONENTI DEL PIANO
Le griglie, i cappellotti e i bruciatori sono rimovibili per facilitarne la pulizia.
Maneggiare con cura i bruciatori neri. Per la pulizia dei bruciatori neri, non usare spugne abrasive o detergenti corrosivi.
Lavarli a mano con acqua calda e detersivo non aggressivo avendo cura di eliminare eventuali incrostazioni e controllando che nessuna delle aperture
del bruciatore sia otturata.
Sciacquare e asciugare.
Dopo la pulizia dei bruciatori neri si potranno notare alterazioni d'aspetto nelle superfici inferiori non rivestite; anche la superficie nera rivestita
potrebbe mostrare alterazioni dopo diversi cicli di pulizia. Queste alterazioni estetiche non incidono in alcun modo sulla qualità o sulle prestazioni del
prodotto.
Rimontare correttamente bruciatori e cappellotti nelle rispettive sedi.
Nel riposizionare le griglie, assicurarsi che la zona di appoggio delle pentole sia allineata con il bruciatore.
Nei modelli dotati di candeline di accensione elettrica e di termocoppie di sicurezza, occorre procedere a un'accurata pulizia della parte terminale della
candelina per assicurarne il buon funzionamento. Controllare questi componenti frequentemente e, se necessario, pulirli con un panno umido.
Eventuali residui di cibo secchi vanno rimossi con uno stuzzicadenti o un ago.
NOTA: per evitare danni all’accensione elettrica, non utilizzarla quando i bruciatori non sono nella loro sede.
Questo apparecchio soddisfa i requisiti di progettazione ecocompatibile del regolamento europeo N. 66/2014, in conformità alla norma europea EN 30-
2-1.
Smaltimento dell'imballaggio
Il materiale di imballaggio è riciclabile al 100% ed è contrassegnato dal simbolo di riciclo ( ). Non disperdere le diverse parti dell'imballaggio nell'ambiente,
ma smaltirle in conformità alle norme stabilite dalle autorità locali.
Smaltimento del prodotto
- Questo apparecchio è contrassegnato in conformità alla Direttiva Europea 2012/19/UE sui rifiuti di apparecchiature elettriche ed elettroniche (RAEE).
- Provvedendo al corretto smaltimento del prodotto si contribuirà ad evitare potenziali effetti negativi sull'ambiente e sulla salute umana.
- Il simbolo sul prodotto o sulla documentazione di accompagnamento indica che questo prodotto non deve essere trattato come rifiuto domestico,
ma deve essere consegnato presso l'idoneo punto di raccolta per il riciclaggio di apparecchiature elettriche ed elettroniche.
Simboli
Rubinetto chiuso
Fiamma massima
Fiamma minima
CONSIGLI PRATICI PER L'USO DEI BRUCIATORI
IMPORTANTE: QUANDO È IN FUNZIONE, TUTTA LA SUPERFICIE DEL PIANO DI COTTURA POTREBBE RISCALDARSI.
Per accendere uno dei bruciatori, ruotare la manopola corrispondente in senso antiorario fino a far coincidere l'indice con il simbolo di fiamma
massima.
Premere la manopola contro la mascherina dei comandi per accendere il bruciatore.
AVVERTENZA
Scollegare l'alimentazione prima di eseguire la manutenzione.
DICHIARAZIONE DI PROGETTAZIONE ECOCOMPATIBILE
CONSIGLI PER LA SALVAGUARDIA DELL'AMBIENTE
DESCRIZIONE DEL PRODOTTO
1. Griglie amovibili
2. Bruciatore ausiliario
3. Bruciatore semirapido PD
4. Bruciatore rapido
5. Bruciatore semirapido AS
6. Bruciatore 2 corone
7. Manopola del bruciatore ausiliario
8. Manopola comando bruciatore
semirapido PD
9. Manopola comando bruciatore rapido
10. Manopola comando bruciatore
semirapido AS
11. Manopola del bruciatore 2 corone
Questo piano di cottura è dotato di bruciatori con diametri diversi. Al fine di ottenere il
massimo rendimento, è utile attenersi alle seguenti regole:
- Utilizzare pentole e tegami di diametro pari o leggermente superiore al diametro
dei bruciatori (vedere la tabella a destra).
- Utilizzare soltanto pentole e tegami con fondi piatti.
- Utilizzare la giusta quantità d'acqua per la cottura dei cibi e usare il coperchio.
- Evitare che le pentole, posizionate sulle griglie, fuoriescano dal perimetro del piano
di cottura.
- Nel caso di recipienti con fondo convesso (WOK), utilizzare la griglia di supporto
(non in dotazione), che va posizionata soltanto in corrispondenza del bruciatore 2
corone.
IMPORTANTE: l'uso improprio delle griglie potrebbe danneggiare il piano; evitare
di appoggiare le griglie capovolte o di trascinarle sul piano.
Non utilizzare:
- bistecchiere in ghisa, supporti in pietra naturale, tegami o pentole in terracotta;
- dissipatori di rete metallica o di altro tipo;
- due bruciatori simultaneamente per la cottura con un solo recipiente (ad esempio
una pesciera).
Bruciatore Ø recipienti
2 corone Da 24 a 30 cm
Rapido Da 24 a 26 cm
Semirapido PD Da 16 a 24 cm
Semirapido AS Da 16 a 22 cm
Ausiliario Da 8 a 14 cm
PD: posteriore destro
AS: anteriore sinistro
UTILIZZO DEL PIANO DI COTTURA
AVVERTENZA
Non lasciare che la fiamma del bruciatore si estenda oltre il bordo della pentola.
1
2
34
5
78
9
10
6
11
Una volta acceso il bruciatore, continuare a tenere premuta la manopola per circa 5–10 secondi per consentire il corretto funzionamento del
dispositivo.
Si tratta di un dispositivo di sicurezza che interrompe la fuoriuscita di gas in caso di spegnimento accidentale della fiamma (dovuto a correnti d'aria,
interruzione momentanea dell'alimentazione del gas, traboccamenti di liquidi, ecc.).
La manopola non deve essere tenuta premuta per più di 15 secondi. Se, trascorso tale tempo, il bruciatore non rimane acceso, attendere
almeno un minuto prima di tentare un'ulteriore accensione.
NOTA:
qualora particolari condizioni del gas erogato localmente rendessero difficoltosa l'accensione del bruciatore, si consiglia di ripetere l'operazione
con la manopola ruotata sulla posizione della fiamma piccola.
Può accadere che il bruciatore si spenga al momento del rilascio della manopola.
Ciò indica che il dispositivo di sicurezza non si è scaldato a sufficienza.
In questo caso, ripetere le operazioni sopra descritte.
DIMENSIONI E DISTANZE DA RISPETTARE (mm)
ADATTATORE PER WOK e COPERCHIO PIANO COTTURA
(accessori non inclusi, acquistabili separatamente presso il Servizio Assistenza Clienti).
NOTA: se la distanza "A" tra i pensili è
compresa tra 600 mm e 730 mm, l'altezza "B" deve essere
di 520 mm minimo.
Se la distanza "A" tra i pensili è superiore
alla larghezza del piano di cottura, l'altezza "B" deve essere
di 400 mm minimo.
Nel caso di installazione di una cappa sul piano di cottura,
fare riferimento alla istruzioni della cappa per la distanza
corretta
TABELLA INIETTORI CATEGORIA II2H3+
Tipo di gas
utilizzato
Tipo di
bruciatore
Marcatura
iniettore
Portata
termica
nominale
Consumo
nominale
Potenza
termica ridotta
Pressione del gas
in mbar
kW kW min. nom. max
GAS NATURALE
(metano) G20
2 corone 160 A 4,80 457 l/h 2,20
17 20 25
Rapido 125 A 3,00 286 l/h 0,60
Semirapido PD 97 A 1,75 167 l/h 0,35
Semirapido AS 88 A 1,40 133 l/h 0,35
Ausiliario 78C 1,00 95 l/h 0,30
GAS DI PETROLIO
LIQUEFATTO
(butano) G30
2 corone 101 4,30 313 l/h 1,90
20 28-30 35
Rapido 85 A 3,00 218 l/h 0,60
Semirapido PD 66 A 1,75 127 l/h 0,35
Semirapido AS 59 1,40 102 l/h 0,35
Ausiliario 50 A 1,00 73 l/h 0,30
GAS DI PETROLIO
LIQUEFATTO
(propano) G31
2 corone 101 4,30 307 g/h 1,90
25 37 45
Rapido 85 A 3,00 214 g/h 0,60
Semirapido PD 66 A 1,75 125 g/h 0,35
Semirapido AS 59 1,40 100 g/h 0,35
Ausiliario 50 A 1,00 71 g/h 0,30
Tipo di gas
utilizzato
Configurazione
modello
Portata termica
nominale (kW)
Consumo totale
nominale
Aria necessaria (m
3
) per la
combustione di 1 m
3
di gas
G20 25 mbar 5 bruciatori 11,95 1138 l/h 9,52
G3028–30 mbar 5 bruciatori 11,45 832 g/h 30,94
G31 37 mbar 5 bruciatori 11,45 818 g/h 23,80
ALIMENTAZIONE ELETTRICA: 220-240 V ~ 50/60 Hz -0,6 W
These instructions are also available on the website: www.whirlpool.eu
YOUR SAFETY AND THE SAFETY OF OTHERS ARE VERY IMPORTANT
This manual and the appliance itself provide important safety messages, to be read and observed at all times.
All Safety messages will tell you what the potential hazard is, tell you how to reduce the chance of injury, and tell you what
can happen if the instructions are not followed.
- The appliance must be disconnected from the power supply before carrying out any installation work.
- Installation and maintenance must be carried out by a qualified technician, in compliance with the manufacturers
instructions and local safety regulations. Do not repair or replace any part of the appliance unless specifically stated in
the user manual.
- Do not store or use gasoline or other flammable vapors and liquids in the vicinity of this appliance.
The electrical and gas connections must comply with local regulations.
- When the hob is installed, provide a multi-pole circuit breaker with a contact separation of at least 3 mm, that provides
full disconnection.
- Regulations require that the appliance is grounded.
- The power cable must be long enough for connecting the appliance, once fitted in its housing, to the power supply.
- Use only flexible or rigid metal hose for gas connection.
- If necessary, the electrical power cable must be replaced exclusively with a power cable having identical characteristics
to the original supplied by manufacturer (type H05V2V2-F 90°C or H05RR-F). This operation must be performed by a
qualified electrician.
- The manufacturer cannot be held responsible for any injury to persons or animals or damage to property arising from
failure to comply with these requirements.
- Do not use multiple plug adapters or extension cords.
- Do not pull the power supply cord in order to unplug the appliance.
- The electrical components must not be accessible to the user after installation.
- Do not touch the appliance with any wet part of the body and do not operate it when barefoot.
- This hob (class 3) is designed solely for private household use for cooking food. Do not use this appliance as a space
heater to heat or warm the room. Doing so may result in carbon monoxide poisoning and overheating of the hob.
The Manufacturer declines all responsibility for inappropriate use or incorrect setting of the controls.
- The appliance is not intended for use by persons (including children) with reduced physical, sensory or mental
capabilities, or with lack of experience and knowledge of the appliance, unless supervised or previously instructed in its
use by those responsible for their safety.
- Young children should be kept away from the appliance and supervised to ensure that they do not play with it.
- The use of a gas appliance produces heat and humidity in the room. Make sure the room is well-ventilated, or install an
extractor hood with exhaust duct.
- In case of prolonged use, additional ventilation may be necessary (by opening a window or increasing the hood extraction speed).
- After use, make sure the knobs are in off position and close the main gas supply cock or the gas cylinder valve.
- Overheated oils and fats catch fire easily. Always remain vigilant when cooking foods rich in fat, oil or alcohol (e.g. rum,
cognac, wine).
- Keep the packaging materials out of the reach of children.
- Before cleaning or maintenance wait for hob to cool down.
- These instructions are valid only for those countries whose symbol is shown on the rating plate (under cooktop).
- This product is not intended to be installed and operated outdoors.
After unpacking the hob, make sure that it has not been damaged during transport. In the event of problems, contact the
dealer or your nearest After-sales Service.
TECHNICAL INFORMATION FOR THE INSTALLER
Use protective gloves for handling, preparing and installing the product.
This product can be embedded in a worktop 20 to 60 mm thick.
If there is no oven beneath the hob, insert a separator panel that has a surface at least equal to the opening in the
work surface. This panel must be positioned at a maximum distance of 150 mm below the upper surface of the
work surface but, in no case less than 20 mm from the bottom of the hob. In the case that you intend to install
an oven beneath the hob, make sure that it is equipped with a cooling system. The manufacturer declines all
liability if another brand oven is installed beneath the hob.
Before installation, make sure that:
- the local gas delivery conditions (nature and pressure) are compatible with the settings of the hob (see the
rating plate and injector table);
- the outer surfaces of the furniture or appliances adjacent to the hob are heat resistant according to local regulations;
- this appliance is not connected to a fume exhaust device. It shall be installed in accordance with current installation
regulations. Particular attention shall be given to the relevant requirements regarding ventilation;
- combustion products are discharged outdoors through specific hoods or wall and/or window mounted electrical fans.
GAS CONNECTION
IMPORTANT SAFETY INSTRUCTIONS
This is the safety alert symbol, pertaining to safety, which alerts users to potential hazards to themselves and others.
All safety messages will follow the safety alert symbol and either the terms:
DANGER
Indicates a hazardous situation which, if not avoided, will cause serious injury.
WARNING
Indicates a hazardous situation which, if not avoided, could cause serious injury.
WARNING
If the information in this manual is not followed exactly, a fire or explosion may result
causing property damage or injury.
What to do if you smell gas:
- Do not try to light any appliance.
- Do not touch any electrical switch.
- Do not use any phone in your building.
- Immediately call your gas supplier from a neighbors phone. Follow the gas suppliers instructions.
- If you cannot reach your gas supplier, call the fire department.
- Installation and service must be performed by a qualified installer, service agency or the gas supplier.
- Use appliance in well ventilated rooms only.
SAVE THESE INSTRUCTIONS
INSTALLATION
WARNING
This operation must be performed by a qualified technician.
The gas supply system must comply with local regulations.
You can find specific local regulations for some countries in the paragraph
“Reference to Local Regulations”. If no information concerning your Country is
given, please ask details to your Installer.
The connection of the hob to the gas pipe network or gas cylinder must be made by
means of a rigid copper or steel pipe with fittings complying with local regulations, or
by means of a continuous-surface stainless steel hose complying with local
regulations. The maximum length of the hose is 2 linear metres.
Connect elbow (A)* or (B)* supplied with to the hob inlet main pipe and interpose
the washer (C) supplied, in compliance with EN 549.
*Use elbow (A) for France and elbow (B) for all other destinations.
IMPORTANT: if a stainless steel hose is used, it must be installed so as not to touch
any mobile part of the furniture. It must pass through an area where there are no
obstructions and where it is possible to inspect it on all its length.
After connection to the gas supply, check for leaks with soapy water. Light up the burners and turn the knobs from max
position to minimum position to check flame stability.
C
B
C
C
A
EN BUILT-IN GAS HOB
400010881582 Manufacturer: Whirlpool Europe S.r.l. - Socio Unico - Viale G. Borghi, 27 21025 Comerio (VA) ITALY
ELECTRICAL CONNECTION
IMPORTANT: the data relevant to the voltage and power absorption are indicated on the rating plate.
ASSEMBLY
ADJUSTMENT TO DIFFERENT TYPES OF GAS
If the appliance is intended to operate with a different gas from the gas type stated on the rating plate and information label
on the top of the hob, change the injectors.
Remove the information label and keep it with the instructions booklet.
Use pressure regulators suitable for the gas pressure indicated in the Instruction.
The gas nozzles must be changed by After Sales Service or a qualified technician.
Nozzles not supplied with the appliance must be ordered from After Sales Service.
Adjust the minimum setting of the taps.
NOTE: when liquid petroleum gas is used (G30/G31), the minimum gas setting screw must be tightened as far as it
will go.
IMPORTANT: should you experience difficulty in turning the burners knobs, please contact the After Sales Service
for the replacement of the burner tap if found to be faulty.
IMPORTANT: when gas cylinder is adopted, the gas cylinder or gas container must be properly settled (vertical
orientation).
REPLACING THE INJECTORS (see the injector table in the Instruction)
ADJUSTING MINIMUM GAS SETTING OF TAPS
REFERENCE TO LOCAL REGULATIONS
Provision for ventilation
The room in which the appliance is installed must have an air supply to current B.S. 5440 - Part 2.
All rooms require a permanent vent in addition to the openable window.
If there are other fuel burning appliances in the same room B.S. 5440 - Part 2 should be consulted to determine the air vent
requirements. If the appliance is installed in a cellar or basement, it is advisable to provide an air vent of 65 cm, irrespective of
the room volume.
Gas Safety Regulations
The law requires that all gas appliances are installed by competent persons in accordance with the current gas safety
regulations. Failure to install appliances correctly may lead to prosecution.
It is in your own interest, and that of safety, to ensure that the law is complied with. The hob should be installed in accordance
with the Gas Safety (Installation and Use) Regulations, the Building Regulations issued by the Department of the
Environment and the Building Standard (Scotland) (Consolidation) Regulations, issued by the Scottish Development
Department. In the G.B., CORGI registered installers work to safe standards of practice.
Connection to gas supply
Before connecting the appliance, make sure that the gas supply system complies with standards UNI-CIG 7129 and UNI CIG 7131.
Gas connection
The connection to the mains gas network or gas cylinder must be made using a rigid copper or steel pipe with fittings complying
with standards UNI-CIG 7129, or using a continuous-surface stainless steel hose complying with standards UNI-CIG 9891.
The maximum length of the hose is 2 m.
The pressure control valves to be used must comply with the UNI EN 12864 standard for gas cylinders and the UNI EN 88
standard for piped methane gas.
AFTER-SALES SERVICE
WARNING
This operation must be performed by a qualified technician.
WARNING
The electrical connections must comply
with local regulations.
The earthing of this appliance is
compulsory by law.
Do not use an extension cord.
Use protective gloves for cleaning the product
perimeter surface, then apply the supplied
gasket to the hob as shown in the figure.
Position the hob in the worktop opening made respecting the dimensions indicated in the Instruction.
NOTE: the power supply cable must be long enough to permit its upward extraction.
To secure the hob, use the brackets (A) provided with it. Fit the brackets into the relevant bores shown by the arrow and
fasten them by means of their screws in accordance with the thickness of the worktop (see the following figures).
WARNING
This operation must be performed by a qualified technician.
L
N
Earth
(yellow/green)
20
30
60
40
Top 20 mm Top 40 mm
Top 30 mm Top 60 mm
Remove grids (A).
•Extract burners (B).
Using a socket spanner of the appropriate size unscrew
the injector (C), unscrew the injector to be replaced.
Replace it with the injector suitable for the new type of
gas.
Re-assemble the injector in (D).
If you have a multiple crown burner use side spanner to
replace the injector (E).
Before installing the hob, remember to affix the gas
calibration plate supplied with the injectors in such a way
that it covers the existing information relating to gas
calibration.
To ensure that the minimum setting is correctly adjusted, remove the knob and proceed
as follows:
tighten screw to reduce the flame height (-);
loosen screw to increase the flame height (+).
The adjustment must be performed with the tap in minimum gas setting position (small
flame) .
The primary air of the burners does not need to be adjusted.
At this stage, light up the burners and turn the knobs from max position to
minimum position to check flame stability.
Upon completion of adjustment, reseal using sealing wax or an equivalent material.
Before calling the After-Sales Service, make sure you can give the following information:
- type of fault or problem;
- exact model (written on the label affixed to the instruction/warranty);
- service number that follows the word SERVICE on the rating plate under the hob and
on the label affixed to instruction/warranty;
- your complete address and phone number.
If any repairs are required, please contact an authorised After-Sales Service, as indicated in the
warranty.
TROUBLESHOOTING GUIDE
If the hob will not operate correctly, before calling the After-Sales Service, refer to the Troubleshooting Guide to determine
the problem.
1. The burner fails to ignite or the flame is not even
Check that:
The gas or electrical supplies are not shut off and especially that the gas supply tap is open.
The gas cylinder (liquid gas) is not empty.
The burner openings are not clogged.
The plug end is not dirty.
All the burner parts have been positioned correctly.
There are no draughts near the hob.
2. The burner does not stay lit
Check that:
When lighting the burner, the knob has been pressed for enough time to activate the protection device.
The burner openings are not clogged near the thermocouple.
The end of the safety device is not dirty.
The minimum gas setting is correct (see relevant paragraph).
3. The containers are not stable
Check that:
The bottom of the container is perfectly flat
The container is centered on the burner.
The grids have not been exchanged or positioned incorrectly.
If after the above checks the fault still occurs, get in touch with the nearest After Sales Service.
CLEANING THE HOB SURFACE
All the enamelled and glass parts should be cleaned with warm water and neutral solution.
Stainless steel surfaces may be stained by calcareous water or aggressive detergents if left in contact for too long.
Any food spills (water, sauce, coffee, etc.) should be wiped away before they dry.
Clean with warm water and neutral detergent, and then dry with a soft cloth or chamois. Remove baked-on dirt with
specific cleaners for stainless steel surfaces.
NOTE: clean stainless steel only with soft cloth or sponge.
Do not use abrasive or corrosive products, chlorine-based cleaners or pan scourers.
Do not use steam cleaning appliances.
Do not use flammable products.
Do not leave acid or alkaline substances, such as vinegar, mustard, salt, sugar or lemon juice on the hob.
Small scratches on black burners could be noticed after use and cleaning, or either since the beginning as a natural effect
of the product transportation and may be due to their friction with burner caps. These scratches though do not impact
product quality neither its performances. We recommend to handle and place burner caps avoiding to twist them in
order to minimize esthetical potential scratches.
Clean black burners following recommendations indicated in CLEANING THE HOB PARTS section.
If you have a IXELIUM hob, observe the following cleaning recommendations:
Use a soft cloth (microfibre is best) dampened with water or with everyday glass cleaning detergent.
Do not use paper kitchen towel, which can leave traces of streaks on the hob.
CLEANING THE HOB PARTS
Grids, burner caps and burners can be removed to be cleaned.
Handle black burners carefully. Do not use abrasive sponge neither corrosive detergents when cleaning black burners.
Clean them by hand with warm water and non-abrasive detergent, removing any food residues and checking that none
of the burner openings is clogged.
•Rinse and dry.
After cleaning black burners, changes in appearance can be noticed in the uncoated bottom surface of the burners or
either, after several cleaning cycles, on the black coated surface. These esthetical changing though do not impact
product quality neither its performances.
Refit burners and burner caps correctly in the respective housings.
When replacing the grids, make sure that the panstand area is aligned with the burner.
Models equipped with electrical ignition plugs and safety device require thorough cleaning of the plug end in order to
ensure correct operation. Check these items frequently, and if necessary, clean them with a damp cloth. Any baked-on
food should be removed with a toothpick or needle.
NOTE: to avoid damaging the electric ignition device, do not use it when the burners are not in their housing.
This appliance meets the eco design requirements of european regulation N. 66/2014, in conformity to the european
standard EN 30-2-1.
Disposal of packing material
The packing material is 100% recyclable and is marked with the recycle symbol ( ). The various parts of the packing must
therefore be disposed of responsibly and in full compliance with local authority regulations governing waste disposal.
Scrapping the product
- This appliance is marked in compliance with European Directive 2012/19/EU, Waste Electrical and Electronic Equipment
(WEEE).
- By ensuring this product is disposed of correctly, you will help prevent potential negative consequences for the
environment and human health, which could otherwise be caused by inappropriate waste handling of this product.
- The symbol on the product or on the accompanying documentation indicates that it should not be treated as
domestic waste but must be taken to an appropriate collection centre for the recycling of electrical and electronic
equipment.
Symbols
Tap closed
Maximum flame
Minimum flame
WARNING
Disconnect power before servicing.
ECO DESIGN DECLARATION
SAFEGUARDING THE ENVIRONMENT
PRODUCT DESCRIPTION
1. Removable panstand grids
2. Auxiliary burner
3. Semi-rapid burner BR
4. Rapid burner
5. Semi-rapid burner FL
6. 2 ring burner
7. Auxiliary burner control knob
8. Semi-rapid burner BR control knob
9. Rapid burner control knob
10. Semi-rapid burner FL control knob
11. 2 ring burner control knob
1
2
34
5
78
9
10
6
11
PRACTICAL ADVICE FOR USING THE BURNERS
IMPORTANT: WHEN THE HOB IS IN USE, THE ENTIRE HOB AREA MAY BECOME HOT.
To ignite one of the burners, turn the relative knob anti-clockwise to the maximum flame setting.
Press the knob against the control panel to ignite the burner.
After the burner has ignited, keep the knob pressed for about 5-10 seconds to allow proper device operation.
This burner safety device shuts off the gas supply to the burner if the flame goes out accidentally (because of sudden
draught, an interruption in the gas delivery, boiling over of liquids, etc.).
The knob must not be pressed for more than 15 sec. If, after that time has elapsed, the burner does not remain lit,
wait at least one minute before trying to light it again.
NOTE: should particular local conditions of the delivered gas make the ignition of burner difficult, it is advisable to repeat
the operation with the knob turned to small flame setting.
The burner might go out when the knob is released. This means that the safety device has not warmed up enough. In this
case, repeat the operations described above.
DIMENSIONS AND DISTANCES TO BE MAINTAINED (mm)
WOK ADAPTER and PRODUCT LID
(not included, these accessories can be purchased separately from the After-sales Service).
This hob has burners of different diameters. For better burner performance,
please stick to the following rules:
- Use pots and pans with bottoms the same width as that of the burners or
slightly larger (see table on the right).
- Only use flat-bottomed pots and pans.
- Use the correct amount of water for cooking foods and keep the pot covered.
- Make sure pots on the grates do not protrude beyond the edge of the hob
- In the case of pans with convex bottoms (WOK), use the support grille (not
included), which should be positioned only on the 2 ring burner.
IMPORTANT: improper use of the grids can result in damage to the hob: do
not position the grids upside down or slide them across the hob.
Do not use:
- Cast iron griddles, ollar stones, terracotta pots and pans.
- Heat diffusers such as metal mesh, or any other types.
- Two burners simultaneously for one receptacle (e.g. fish kettle).
Burner Pot Ø
2 ring From 24 to 30 cm
Rapid From 24 to 26 cm
Semi-rapid BR From 16 to 24 cm
Semi-rapid FL From 16 to 22 cm
Auxiliary From 8 to 14 cm
BR: means Back Right
FL: means Front Left
HOW TO USE THE HOB
WARNING
Do not let the burner flame extend beyond the edge of the pan.
NOTE: if the distance “A” between the wall cabinets is
between 600 mm and 730 mm, the height “B” must be a
minimum of 520 mm.
If the distance “A” between the wall cabinets is greater
than the width of the cooktop, the height “B” must be a
minimum of 400 mm.
In case of installation of a hood above the cooktop, please
refer to the hood instructions for the correct distance
INJECTORS TABLE CATEGORY II2H3+
Type of gas used Type of burner Injector
marking
Rated thermal
flow rate
Rated
consumption
Reduced heat
capacity
Gas pressure
mbar
kW kW min. rat. max.
NATURAL GAS
(Methane) G20
2 ring 160A 4.80 457 l/h 2.20
17 20 25
rapid 125A 3.00 286 l/h 0.60
Semi-rapid BR 97A 1.75 167 l/h 0.35
Semi-rapid FL 88A 1.40 133 l/h 0.35
Auxiliary 78C 1.00 95 l/h 0.30
LIQUEFIED
PETROLEUM GAS
(Butane) G30
2 ring 101 4.30 313 l/h 1.90
20 28-30 35
rapid 85A 3.00 218 l/h 0.60
Semi-rapid BR 66A 1.75 127 l/h 0.35
Semi-rapid FL 59 1.40 102 l/h 0.35
Auxiliary 50A 1.00 73 l/h 0.30
LIQUEFIED
PETROLEUM GAS
(Propane) G31
2 ring 101 4.30 307 g/h 1.90
25 37 45
rapid 85A 3.00 214 g/h 0.60
Semi-rapid BR 66A 1.75 125 g/h 0.35
Semi-rapid FL 59 1.40 100 g/h 0.35
Auxiliary 50A 1.00 71 g/h 0.30
Type of gas used Model
configuration
Rated thermal
flow rate (kW)
Total rated
consumption
Air required (m
3
) for
burning 1 m
3
of gas
G20 25 mbar 5 burners 11.95 1138 l/h 9.52
G30 28-30 mbar 5 burners 11.45 832 g/h 30.94
G31 37 mbar 5 burners 11.45 818 g/h 23.80
ELECTRIC SUPPLY: 220-240 V ~ 50/60 Hz -0.6 W
  • Page 1 1
  • Page 2 2
  • Page 3 3
  • Page 4 4
  • Page 5 5
  • Page 6 6
  • Page 7 7
  • Page 8 8

Whirlpool GMF 7522/IXL Program Chart

Type
Program Chart

Whirlpool GMF 7522/IXL is a gas hob that offers a convenient and efficient cooking experience. Equipped with multiple burners, it allows you to cook various dishes simultaneously. The intuitive control knobs provide precise flame adjustment for simmering or boiling, ensuring you have the right heat for every culinary creation. This gas hob is designed to be seamlessly integrated into your kitchen countertop, adding both functionality and style to your cooking space.

Ask a question and I''ll find the answer in the document

Finding information in a document is now easier with AI

in other languages