
IMPORTANT NOTICE: PLEASE READ
PRIOR TO USING YOUR HANDSET
The provided SIM cards are intended for use with your
handset.
Loss of certain features will result when using a SIM
card from one of the following models: i30sx, i35s,
i50sx, i55sr, i58s, i60c, i80s, i85s, i88s, i90c, i95cl
series, and the i2000 series.
For more information on SIM card compatibility, go to
www.motorola.com/iden.
Defects or damage to your Motorola handset that result
from the use of non-Motorola branded or certified
Accessories, including but not limited to replacement
housings and or other peripheral accessories, are
excluded from warranty coverage. Please refer to the
text of Motorola's Limited One Year warranty located in
this user’s guide for complete details.

DECLARATION OF CONFORMITY
Per FCC CFR 47 Part 2 Section 2.1077(a)
Responsible Party Name: Motorola, Inc.
Address: 8000 West Sunrise Boulevard
Plantation, FL 33322 USA
Phone Number: 1 (800) 453-0920
Hereby declares that the product:
Product Name: r765/r765IS
Model Number:
H06XCN6JS9AN 1W NON-FM,
H05XAN6JS9AN 0.6W FM/IS
Voltage: 7.4 V
Maximum current: 3 A
Conforms to the following regulations:
FCC Part 15, subpart B, section 15.107(a),
15.107(d) and section 15.109(a)
Class B Digital Device
As a personal computer peripheral, this device
complies with Part 15 of the FCC Rules.
Operation is subject to the following two
conditions: (1) this device may not cause
harmful interference, and (2) this device must
accept any interference received, including
interference that may cause undesired
operation.
Note:
This equipment has been tested and found to comply with
the limits for a Class B digital device, pursuant to part 15 of the
FCC Rules. These limits are designed to provide reasonable
protection against harmful interference in a residential
installation. This equipment generates, uses and can radiate radio
frequency energy and, if not installed and used in accordance with
the instructions, may cause harmful interference to radio
communications. However, there is no guarantee that interference
will not occur in a particular installation.
If this equipment does cause harmful interference to
radio or television reception, which can be
determined by turning the equipment off and on, the
user is encouraged to try to correct the interference
by one or more of the following measures:
•
Reorient or relocate the receiving antenna.
•
Increase the separation between the equipment and
receiver.
•
Connect the equipment into an outlet on a circuit different
from that to which the receiver is connected.
•
Consult the dealer or an experienced radio/TV technician
for help.

Motorola, Inc.
Consumer Advocacy Office
600 North US Highway 45
Libertyville, IL 60048
www.hellomoto.com
Note:
Do not ship your phone to the above address. If you need to
return your phone for repairs, replacement, or warranty service,
please contact the Motorola Customer Support Center at:
1-800-453-0920 (United States)
1-877-483-2840 (TTY/TDD United States for hearing impaired)
Certain mobile phone features are dependent on the capabilities
and settings of your service provider’s network. Additionally,
certain features may not be activated by your service provider,
and/or the provider's network settings may limit the feature’s
functionality. Always contact your service provider about feature
availability and functionality. All features, functionality, and other
product specifications, as well as the information contained in this
user's guide are based upon the latest available information and
are believed to be accurate at the time of printing. Motorola
reserves the right to change or modify any information or
specifications without notice or obligation.
MOTOROLA and the Stylized M Logo are registered in the US
Patent & Trademark Office. All other product or service names are
the property of their respective owners. Java and all other
Java-based marks are trademarks or registered trademarks of Sun
Microsystems, Inc. in the U.S. and other countries.
© Motorola, Inc., 2009.
Manual Number: NNTN7655B

iv
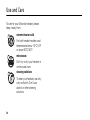
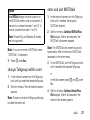
Use and Care
To care for your Motorola handset, please
keep it away from:
extreme heat or cold
For both handset models avoid
temperatures below -10°C/14°F
or above 60°C/140°F.
microwaves
Don’t try to dry your handset in
a microwave oven.
cleaning solutions
To clean your handset, use only
a dry soft cloth. Don’t use
alcohol or other cleaning
solutions.

v
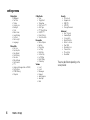
contents
contents
Use and Care . . . . . . . . . iv
introducing your
handset . . . . . . . . . . . . . . 1
menu map. . . . . . . . . . . . 2
handset basics . . . . . . . . 5
about this guide . . . . . . 5
battery and charger. . . . 6
insert the SIM cards. . 10
antenna installation . . . 11
antenna removal. . . . . . 11
turn it on & off . . . . . . . 11
SIM card security . . . . . 11
display . . . . . . . . . . . . 14
main menu . . . . . . . . . 16
text entry . . . . . . . . . . 16
volume . . . . . . . . . . . . 18
shortcut keys . . . . . . . 19
navigation key. . . . . . . 19
handsfree speaker . . . 19
transmitters . . . . . . . . 20
use GPS with map
software . . . . . . . . . . . 20
feature for the vision
impaired . . . . . . . . . . . 22
features for the
hearing impaired. . . . . 22
calls . . . . . . . . . . . . . . . . 25
group calls,
talkgroups,
sets, and hubs . . . . . . 25
emergency group
calls 34
alert notification . . . . . 35
make a phone call. . . . 41
answer a phone call . . 41
make a private call . . . 41
answer a private call. . 42
send call alerts . . . . . . 42
answer a call alert. . . . 43
store a phone number
or private ID . . . . . . . . 44
call a stored phone
number or private ID. . 44
your phone number
and Private ID . . . . . . . 45
turn off a call alert. . . . 45
recent calls . . . . . . . . . 45
redial. . . . . . . . . . . . . . 46
caller ID . . . . . . . . . . . 46
call forward. . . . . . . . . 47
voice names . . . . . . . . 47
emergency calls . . . . . 48
international calls . . . . 49
speed dial . . . . . . . . . . 50
voicemail. . . . . . . . . . . 50
selective dynamic
group (SDG) calls . . . . 51

vi
contents
using your handset as
a modem . . . . . . . . . . . 55
MOSMS messages . . . . 57
text messages. . . . . . . 57
manage memory . . . . . 61
handset features . . . . . . 62
PTV features . . . . . . . . 62
one touch PTT . . . . . . . 70
PT manager . . . . . . . . . 71
MMS . . . . . . . . . . . . . . 72
Bluetooth
®
. . . . . . . . . 86
use dual SIM cards . . . 90
select frequency band . 91
MOTOtalk
TM
. . . . . . . . . . 92
channels and codes. . . 93
talkgroup knob use . . . 93
enter MOTOtalk. . . . . . 93
exit MOTOtalk . . . . . . . 94
set a channel . . . . . . . . 94
set a code . . . . . . . . . . 94
make and receive a
code call . . . . . . . . . . . 95
set to receive all . . . . . 95
private calls . . . . . . . . . 96
emergency calls . . . . . 98
setup options. . . . . . . . 98
customize your
handset . . . . . . . . . . . . 100
ring tones . . . . . . . . . 100
wallpaper . . . . . . . . . . 101
datebook . . . . . . . . . . 101
hide or show location
information . . . . . . . . 102
other handset features 104
advanced calling . . . . 104
contacts. . . . . . . . . . . 105
datebook . . . . . . . . . . 105
GPS . . . . . . . . . . . . . . 106
handsfree . . . . . . . . . 107
my info. . . . . . . . . . . . 108
pc applications. . . . . . 109
personalize . . . . . . . . 109
security . . . . . . . . . . . 110
TTY . . . . . . . . . . . . . . 111
Safety and General
Information . . . . . . . . . 116
Service & Repairs . . . . 122
Specific Absorption
Rate Data . . . . . . . . . . . 123
Limited Warranty
Motorola
Communications
Products
(International) . . . . . . . 125
Information From
the World Health
Organization . . . . . . . . 129
Patent and Trademark
Information . . . . . . . . . 131
Privacy and Data
Security . . . . . . . . . . . . 132
Smart Practices
While Driving . . . . . . . . 133


viii
contents

1
introducing your handset
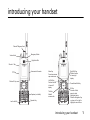
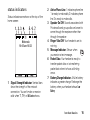
introducing your handset
Accessories Connector
Emergency Button
Speaker Key
High Audio Mic
Low Audio Mic
Speaker (not visible)
Volume Knob
Shortcut 1 Key
PTT Key
Shortcut 2 Key
Channel/Talkgroup Knob
Menu Key
From home screen,
open main menu.
Left Soft Key
Perform function
in lower left
display.
Talk Key
Make &
answer calls.
Right Soft Key
Perform function
in lower right
display.
Power/Home/End Key
OK Key
In menus & lists,
press to select
highlighted option.
Press the Navigation Key
up, down, left, or right to
highlight a menu feature

2
menu map
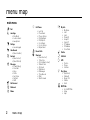
menu map
main menu
1
Net
L
Java Apps
•[Buy More]
• Location Assist
• Java System
u
Settings
• (see next page)
0
VoiceRecord
• [New VoiceRec]
A
Contacts
• [New Contact]
• [New SDG List]
E
Messages
•[Create Mesg]
•Voice Mail
• Inbox
•Drafts
• Sent Items
• Net Alert
•SMS
P
Call Forward
D
Datebook
l
Memo
M
Call Timers
•Last Call
• Phone Reset
• Phone Lifetime
•Prvt/Grp Reset
• Prvt/Grp Life
• Circuit Reset
• Circuit Lifetime
• Kbytes Reset
B
Recent Calls
K
Shortcuts
• [New Shortcurt]
• 1)Shortcuts
• 2)Cntcs[New Contact]
• 3)Recent Calls
•4)Contacts
• 5)Datebook
• 6)Messages
• 7)VoiceRecord
•8)Net
• 9)Call Forward
J
My Info
•My Name
• Line 1
• Line 2
• Private ID
• Group ID
• Carrier IP
• IP1 Address
• IP2 Address
• Circuit Data
o
Profiles
p
Call Alert
c
GPS
• Position
• Privacy
•Interface
t
Ring Tones
•[Buy More]
• Vibrate All
• Ringer 1-12
• Vibrate
• Silent
P
MOTOtalk
•Go To MOTOTalk
• Setup
•Help

3
menu map
main menu (cont.)
O
My Pictures
L
Quick PTT
• PTT: Contacts
N
PT Manager
•Quick PTT
• Send Message
• Send Picture
• Send Event
• Send My Info
• Send Contact
• Configure
'
Location Assist
• Send Alert
• AlertReceptionListener
• Configuration
C
Bluetooth
• Hands Free
• Link to Devices
• Device History
• Setup
• Find Me
This is the standard Main Menu layout.
Your handset’s menu may be a little
different.

4
menu map
settings menu
Display/Info
• Wallpaper
•Text Size
• Theme
• Home Icons
• Backlight
•Clock
• Menu View
• Large Dialing
• Contrast
• Status Light
• Language
Phone Calls
• Set Line
•Any Key Ans
• Auto Redial
• Call Waiting
• Auto Ans
• Minute Beep
• Call Duration
• TTY
• Hearing Aid (supported on r765IS)
• Notifications
• DTMF Dialing
• Prepend
2-Way Radio
•Scan
• Tkgrp Silent
•Tkgrp Area
• One Touch PTT
• Alert Type
• PTT Quick Notes
•On/Off PTT
• Knob Position
• Store Rcvd Info
Personalize
• Menu Options
•Up Key
•Down Key
•Left Key
• Right Key
• Center Key
• Left Sftkey
• Right Sftkey
•Power Up
Volume
• Line 1
• Line 2
• Messages
•Keypad
• Java Earpiece
• Java Spkr
•Data
Security
• Phone Lock
• Keypad Lock
• SIM PIN
•GPS PIN
• Change Passwds
Advanced
• Alert Timeout
• Headset/Spkr
• Connectivity
• Reset Defaults
• Return to Home
•Dual SIM
• Band Selection
• Transmitters
• Phone Only
•Baud Rate
These may be different depending on the
service provider.

5
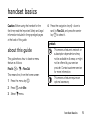
handset basics
handset basics
Caution:
Before using the handset for the
first time, read the Important Safety and Legal
information included in the gray-edged pages
at the back of this guide.
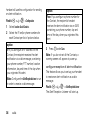
about this guide
This guide shows how to locate a menu
feature as follows:
Find it:
M
>
u
>
Phone Calls
This means that, from the home screen:
1
Press the menu key
M
.
2
Press
-
under
More
.
3
Select
u
menu.
4
Press the navigation key
S
down to
scroll to
Phone Calls
, and press the center
key
r
to select it.
symbols
This means a feature is network or
subscription dependent and may
not be available in all areas, or might
not be offered by your service
provider. Contact customer service
for more information.
This means a feature requires an
optional accessory.

6
handset basics
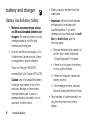
battery and charger
Battery Use & Battery Safety
• Motorola recommends you always
use Motorola-branded batteries and
chargers.
The warranty does not cover
damage caused by non-Motorola
batteries and/or chargers.
•
Use only certified power supply, or UL
(Underwriters Laboratories Inc.) listed
or recognized or specific chargers:
Rapid Unit Charger PMLN5197
Impress Multi-Unit Charger WPLN4187
Caution:
Use of an unqualified battery
or charger may present a risk of fire,
explosion, leakage, or other hazard.
Improper battery use, or use of a
damaged battery, may result in a fire,
explosion, or other hazard.
•
Battery usage by children should be
supervised.
• Important
: Motorola mobile devices
are designed to work best with
qualified batteries. If you see a
message on your display such as
Invalid
Battery
or
Unable to Charge
, take the
following steps:
•
Remove the battery and inspect it to
confirm that it bears a Motorola
“Original Equipment” hologram;
•
If there is no hologram, the battery
is not a qualified battery;
•
If there is a hologram, replace the
battery and retry;
•
If the message remains, contact a
Motorola Authorized Service Center.
•
New batteries or batteries stored for a
long time may take more time to
charge.

7
handset basics
• Charging precautions:
When charging
your battery, keep it near room
temperature. Never expose batteries to
temperatures below 0°C (32°F) or
above 45°C (113°F) when charging.
Always take your mobile device with
you when you leave your vehicle.
•
When storing your battery, keep it in a
cool, dry place.
•
It is normal over time for battery life to
decrease, and for the battery to exhibit
shorter runtime between charges or
require more frequent or longer
charging times.
• Avoid damage to battery and mobile
device.
Do not disassemble, open,
crush, bend, deform, puncture, shred,
or submerge the battery or mobile
device. Avoid dropping the battery or
mobile device, especially on a hard
surface. If your battery or mobile
device has been subjected to such
damage, take it to a Motorola
Authorized Service Center before
using.
Do not
attempt to dry it with an
appliance or heat source, such as a hair
dryer or microwave oven.
• Use care when handling a charged
battery:
Particularly when placing it
inside a pocket, purse, or other
container with metal objects. Contact
with metal objects (e.g., jewelry, keys,
beaded chains) could complete an
electrical circuit (short circuit), causing
the battery to become very hot, which
could cause damage or injury.
Promptly dispose of used batteries in
accordance with local regulations.
Contact your local recycling center for
proper battery disposal.
Warning:
Never dispose of batteries in a fire
because they may explode.

8
handset basics
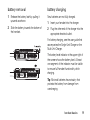
battery installation
1
Place the battery on the back of the
handset as shown.
2
Slide the battery towards the top of the
handset until it snaps into place.

9
handset basics
battery removal
1
Release the battery latch by pulling it
upwards as shown.
2
Slide the battery towards the bottom of
the handset.
battery charging
New batteries are not fully charged.
1
Insert your handset into the charger.
2
Plug the other end of the charger into the
appropriate electrical outlet.
For battery charging, see the user guide that
accompanies the Single-Unit Charger or the
Multi-Unit Charger.
The battery level indicator at the upper right of
the screen shows the battery level. At least
one segment of the indicator must be visible
to ensure full handset functionality while
charging.
Tip:
Motorola batteries have circuitry that
protects the battery from damage from
overcharging.

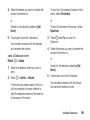
10
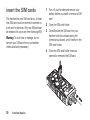
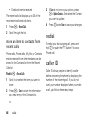
handset basics
insert the SIM cards
This handset has two SIM card slots.
At least
one SIM card must be inserted to connect to
a network for services. Only one SIM card can
be selected for use at any time (see page 90).
Warning:
To avoid loss or damage, do not
remove your SIM card from your handset
unless absolutely necessary.
1
Turn off your handset and remove your
battery before you install or remove a SIM
card.
2
Open the SIM card holder.
3
Carefully slide the SIM card into your
handset (with its contacts facing the
printed circuit board), until it lies flat in the
SIM card holder.
4
Close the SIM card holder once you
inserted or removed the SIM card.

11
handset basics
antenna installation
Note:
Attach the handset antenna before
using your handset.
1
Turn the handset off.
2
Insert the bottom of the antenna into the
screw-in base on the top of the handset.
3
Turn clockwise until it will no longer turn.
antenna removal
1
Turn the handset off.
2
Grip the antenna firmly and turn it counter-
clockwise until it is loose.
3
Remove the antenna from the antenna
socket.
turn it on & off
To turn on your handset, press and
hold
{
for a few seconds or until the
display turns on. If prompted, enter
your four-digit unlock code.
To turn off your handset, press and
hold
{
for two seconds.
Note:
If keypad lock is engaged, you must
unlock the keypad prior to turning off the
handset.
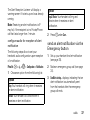
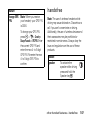
SIM card security
Note:
Except for making emergency phone
calls, your handset will not function without
the SIM card.
To prevent unauthorized use of your handset,
your SIM card is protected by a PIN that you
enter each time the handset is powered on.

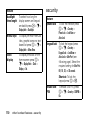
12
handset basics
You can change the PIN or turn off the
requirement that it be entered.
enter the PIN
You may be required to enter a SIM PIN when
you first use your handset.
When you receive your handset, the SIM PIN
is 0000. Change your PIN to prevent
fraudulent use of the SIM card (see “Change
the PIN” below).
Important: If you enter your PIN
incorrectly 3 times, your SIM card is
blocked. To unblock your SIM card, you
must contact your service provider. See
“unblock the PIN” on page 13.
1
When the Enter SIM PIN Code screen
appears, enter your SIM PIN. An asterisk
appears for each character entered.
2
Press
-
under
Ok
.
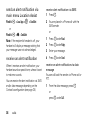
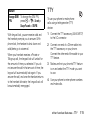
Change the PIN
1
From the main menu, select
u > Security >
Change Password > SIM PIN
.
2
At the
Enter Old SIM PIN Code
screen, enter the
current SIM PIN.
3
Press
-
under
Ok
.
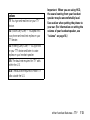
4
At the
Enter New SIM PIN Code
screen, enter
the new 4 to 8-digit SIM PIN.
5
Press
-
under
Ok
.
6
At the
Re-enter New SIM PIN Code
screen,
re-enter the new SIM PIN to confirm.
7
Press
-
under
Ok
.
turn the PIN requirement
On and Off
When the SIM PIN requirement is on, you are
prompted to enter your PIN each time you
turn on your phone.
Page is loading ...
Page is loading ...
Page is loading ...
Page is loading ...
Page is loading ...
Page is loading ...
Page is loading ...
Page is loading ...
Page is loading ...
Page is loading ...
Page is loading ...
Page is loading ...
Page is loading ...
Page is loading ...
Page is loading ...
Page is loading ...
Page is loading ...
Page is loading ...
Page is loading ...
Page is loading ...
Page is loading ...
Page is loading ...
Page is loading ...
Page is loading ...
Page is loading ...
Page is loading ...
Page is loading ...
Page is loading ...
Page is loading ...
Page is loading ...
Page is loading ...
Page is loading ...
Page is loading ...
Page is loading ...
Page is loading ...
Page is loading ...
Page is loading ...
Page is loading ...
Page is loading ...
Page is loading ...
Page is loading ...
Page is loading ...
Page is loading ...
Page is loading ...
Page is loading ...
Page is loading ...
Page is loading ...
Page is loading ...
Page is loading ...
Page is loading ...
Page is loading ...
Page is loading ...
Page is loading ...
Page is loading ...
Page is loading ...
Page is loading ...
Page is loading ...
Page is loading ...
Page is loading ...
Page is loading ...
Page is loading ...
Page is loading ...
Page is loading ...
Page is loading ...
Page is loading ...
Page is loading ...
Page is loading ...
Page is loading ...
Page is loading ...
Page is loading ...
Page is loading ...
Page is loading ...
Page is loading ...
Page is loading ...
Page is loading ...
Page is loading ...
Page is loading ...
Page is loading ...
Page is loading ...
Page is loading ...
Page is loading ...
Page is loading ...
Page is loading ...
Page is loading ...
Page is loading ...
Page is loading ...
Page is loading ...
Page is loading ...
Page is loading ...
Page is loading ...
Page is loading ...
Page is loading ...
Page is loading ...
Page is loading ...
Page is loading ...
Page is loading ...
Page is loading ...
Page is loading ...
Page is loading ...
Page is loading ...
Page is loading ...
Page is loading ...
Page is loading ...
Page is loading ...
Page is loading ...
Page is loading ...
Page is loading ...
Page is loading ...
Page is loading ...
Page is loading ...
Page is loading ...
Page is loading ...
Page is loading ...
Page is loading ...
Page is loading ...
Page is loading ...
Page is loading ...
Page is loading ...
Page is loading ...
Page is loading ...
Page is loading ...
Page is loading ...
Page is loading ...
Page is loading ...
Page is loading ...
Page is loading ...
-
 1
1
-
 2
2
-
 3
3
-
 4
4
-
 5
5
-
 6
6
-
 7
7
-
 8
8
-
 9
9
-
 10
10
-
 11
11
-
 12
12
-
 13
13
-
 14
14
-
 15
15
-
 16
16
-
 17
17
-
 18
18
-
 19
19
-
 20
20
-
 21
21
-
 22
22
-
 23
23
-
 24
24
-
 25
25
-
 26
26
-
 27
27
-
 28
28
-
 29
29
-
 30
30
-
 31
31
-
 32
32
-
 33
33
-
 34
34
-
 35
35
-
 36
36
-
 37
37
-
 38
38
-
 39
39
-
 40
40
-
 41
41
-
 42
42
-
 43
43
-
 44
44
-
 45
45
-
 46
46
-
 47
47
-
 48
48
-
 49
49
-
 50
50
-
 51
51
-
 52
52
-
 53
53
-
 54
54
-
 55
55
-
 56
56
-
 57
57
-
 58
58
-
 59
59
-
 60
60
-
 61
61
-
 62
62
-
 63
63
-
 64
64
-
 65
65
-
 66
66
-
 67
67
-
 68
68
-
 69
69
-
 70
70
-
 71
71
-
 72
72
-
 73
73
-
 74
74
-
 75
75
-
 76
76
-
 77
77
-
 78
78
-
 79
79
-
 80
80
-
 81
81
-
 82
82
-
 83
83
-
 84
84
-
 85
85
-
 86
86
-
 87
87
-
 88
88
-
 89
89
-
 90
90
-
 91
91
-
 92
92
-
 93
93
-
 94
94
-
 95
95
-
 96
96
-
 97
97
-
 98
98
-
 99
99
-
 100
100
-
 101
101
-
 102
102
-
 103
103
-
 104
104
-
 105
105
-
 106
106
-
 107
107
-
 108
108
-
 109
109
-
 110
110
-
 111
111
-
 112
112
-
 113
113
-
 114
114
-
 115
115
-
 116
116
-
 117
117
-
 118
118
-
 119
119
-
 120
120
-
 121
121
-
 122
122
-
 123
123
-
 124
124
-
 125
125
-
 126
126
-
 127
127
-
 128
128
-
 129
129
-
 130
130
-
 131
131
-
 132
132
-
 133
133
-
 134
134
-
 135
135
-
 136
136
-
 137
137
-
 138
138
-
 139
139
-
 140
140
-
 141
141
-
 142
142
-
 143
143
-
 144
144
-
 145
145
-
 146
146


Ask a question and I''ll find the answer in the document
Finding information in a document is now easier with AI
Related papers
-
Motorola r765 User manual
-
-
-
-
-
-
-
Motorola i560 User manual
-
-
Other documents
-
Panasonic GU87 User manual
-
 Telus i335 User manual
-
ZTE R54 User manual
-
Telus i365 User manual
-
Casio G'zOne Ravine User manual
-
AUDIOLINE WT50 User manual
-
-
 Hytera PD562i UL913 Owner's manual
-
Phoenix SELO-B Operating instructions
-
OTTO Multi-Port Hub PTT Owner's manual

