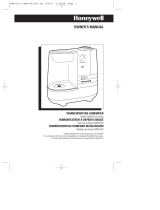
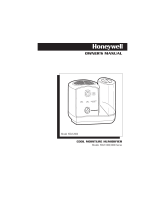
Honeywell HWM255 Owner's manual
- Category
- Humidifiers
- Type
- Owner's manual
This manual is also suitable for

IMPORTANT
SAFETY
INSTRUCTIONS
READ AND SAVE THESE
SAFETY INSTRUCTIONS
BEFORE USING THIS HUMIDI-
FIER
When using electrical appliances, basic precautions
should always be followed to reduce the risk of fire,
electric shock, and injury to persons, including the fol-
lowing:
1. Always place this humidifier on a firm, flat and
level surface. This humidifier may not work prop-
erly on an uneven surface.
2. CAUTION: To reduce the risk of burns, place
this humidifier in an area where it is not accessi-
ble to children.
3. Do not place the humidifier near any heat sources
such as stoves, radiators, and heaters.
4. Before using the humidifier, check the power cord
for any signs of damage. If the cord is found to be
damaged, DO NOT USE and return the humidifier
to the manufacturer under the warranty agree-
ment for repair.
5. This appliance has a polarized plug (one blade is
wider than the other). To reduce the risk of shock,
this plug is intended to fit only one way in a polar-
ized outlet. If the plug does not fit fully in the out-
let, reverse the plug. If it still does not fit, contact a
qualified electrician. DO NOT attempt to defeat
this safety feature.
6. To disconnect the humidifier, first turn controls to
the OFF position, then grip the plug and pull it
from the wall outlet. Never pull by the cord.
7. A loose fit between the AC outlet (receptacle) and
plug may cause overheating and a distortion of
the plug. Contact a qualified electrician to replace
loose or worn outlet.
8. The humidifier should always be unplugged and
emptied when not in operation or while being ser-
viced or cleaned.
9. Never tilt or attempt to move the humidifier while it
is operating or filled with water. UNPLUG the
humidifier before moving.
10. This humidifier requires regular cleaning. Refer
to the CLEANING instructions provided. Never
clean the humidifier in any manner other than as
instructed in this manual.
11. Turn the humidifier OFF if you notice moisture on
the inside of your windows. For proper humidity
reading use a hygrometer, which is available in
many hardware and department stores or by
ordering one from the manufacturer (see
ACCESSORIES).
12. DO NOT touch the steam vapor. Steam can
cause burns.
13. DO NOT block the mist Grill. This will damage
the humidifier.
1
POWER
MODE
%
45
MODE
WARM MOISTURE
HUMIDIFIER
HWM-250, HWM-255, HWM-260,
HWM-270 Series

2
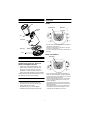
YOUR HUMIDIFIER:
SET-UP:
Note: We recommend that the humidifier be
disinfected prior to first use. Please see
WEEKLY CLEANING instructions.
• Select a firm, level and flat location. For
proper air flow, locate the unit at least six
inches (15 cm) from any wall. Place the
humidifier on a water resistant surface, as
water can damage furniture and some flooring.
Honeywell will not accept responsibility for prop-
erty damage caused by water spillage.
FILLING:
• Remove the Tank from the Power Unit.
• Turn the Tank over and unscrew the Cap.
• Fill the Tank with cool water.
• Reinstall the Cap. Do not overtighten.
• Install the Tank back onto the Power Unit.
OPERATION:
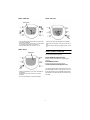
POWER
MODE: SET HUMIDITY
POWER
MODE
45
%
Tank
Water Tray
Base
Power Unit
Medicine
Cup
Cap
High Power
Low Power
Continuous Run
• Press the Power button once to start the humidifier on
High Power, Continuous Run.
• Press the Power button a second time to change to
Low Power, Continuous Run.
• Press the Power button a third time to turn the humid-
ifier
OFF.
Set Humidity
• Press the Mode button until the Set Humidity icon
blinks. The desired Humidity Level will be displayed.
• Use the Up and Down arrow buttons to set a desired
humidity level between 40% to 85%.
• After the desired humidity level is set, the Humidity
Level icon will stop blinking and the current room
humidity will appear.
• The humidifier will turn off shortly after the desired
humidity level is reached and the Power light above
the display will blink.
• The humidifier will turn back on when the humidity
level drops below the desired humidity level. The
Power light will stop blinking and remain lit.

3
MODE: TIMER SET
MODE: RESET
MODE: BACK-LIT
REMOTE CONTROL OPERATION
Two (2) AAA batteries required.
Models HWM-260, HWM-270 Series
Remote Control included when originally pur-
chased.
Model HWM-255 Series
Remote Control may be purchased at
www.honeywellconsumerproducts.com.
The remote control works the same as the corre-
sponding buttons on the Control Panel. The Con-
trol Panel display on the humidifier will show the
appropriate icons when the various functions are
activated.
Timer Function
• Press the Mode button until the Timer icon blinks. The
Hour display will appear
• Use the Up and Down arrow buttons to set the humidi-
fier operation time between 1 and 10 hours.
• The humidifier will turn-off when time runs out.
Refill Symbol
• When the humidifier runs out of water, the Refill sym-
bol will blink.
• Remove the water tank. Refill it as described in
FILLING.
• Press the Reset button to restart the humidifier.
• The Back-Lit feature provides light to the humidifier
display panel and functions in any Power or Mode set-
ting.
• Press the Back-Lit button to toggle this feature on and
off.

4
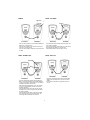
POWER
MODE: HUMIDITY SET
MODE: SET TIMER
MODE: BACK-LIT
Basic Remote
LCD Remote
High Power
Low Power
Power
• Press the Power button once to start the humidifier on
High Power, Continuous Run.
• Press the Power button a second time to change to
Low Power, Continuous Run.
• Press the Power button a third time to turn the humidi-
fier
OFF.
Basic Remote
LCD Remote
Set Humidity
Mode
Adjust Up
or Down
• Press the Mode button until the Set Humidity icon
blinks. The desired Humidity Level will be displayed.
• Use the Up and Down arrow buttons to set a desired
humidity level between 40% to 85%.
• After the desired humidity level is set, the Humidity
Level icon will stop blinking and the current room
humidity will appear.
• The humidifier will turn off shortly after the desired
humidity level is reached and the Power light above
the display will blink.
• The humidifier will turn back on when the humidity
level drops below the desired humidity level. The
Power light will stop blinking and remain lit.
Basic Remote
S
et Timer
LCD Remote
Mode
Adjust Up
or Down
• Press the Mode button until the Timer icon blinks. The
Hour display will appear
• Use the Up and Down arrow buttons to set the humid-
ifier operation time between 1 and 10 hours.
• The humidifier will turn-off when time runs out.
Basic Remote
LCD Remote
Back-Lit
• The Back-Lit feature provides light to the humidifier
display panel and functions in any Power or Mode
setting.
• Press the Back-Lit button to toggle this feature on
and off.

5
MEDICINE CUP:
Medicated vapor can be distributed into the air by
using the Medicine Cup at the top of the unit. To
add medicine to the medicine cup:
1. Turn the humidifier OFF and wait 10 minutes
for the unit to cool.
2. Remove the Medicine Cup from the Power
Unit by pulling firmly upward.
3. Fill the cup halfway with liquid medicine.
4. Carefully reinstall the Medicine Cup back
into the Power Unit.
5. After use, remove and clean the Medicine
Cup with warm water. Reinstall the clean
and dry Medicine Cup in the Power Unit.
Warning: DO NOT use any liquid medicines
other than those specifically recommended
for use with steam vaporizers or warm humid-
ifiers. DO NOT pour medicine through the
grille or add it to the water tank.
Honeywell assumes no responsibility for con-
sequences resulting from the use of medicine
in this humidifier.
WEEKLY CLEANING:
We recommend cleaning the humidifier weekly,
more often if you have hard water, notice a build-
up of impurities, or detect unpleasant odors.
Cleaning is a two step process: scale removal
and disinfecting. Be sure to perform these in
the proper order to avoid harmful chemical
interactions.
• Turn off and unplug the humidifier. Wait at
least 10 minutes for the unit to cool.
• Remove the Tank.
• Pull the latch located under the water tank and
lift off the Power Unit. Check the condition of
the heating element. Follow the CLEANING
THE HEATING ELEMENT instructions if min-
eral build-up is heavy.
• Empty any water from the Base and Water
Tray.
• SCALE REMOVAL - WATER TRAY:
1. Fill the Water Tray with either 1 cup (8 oz.)
of undiluted white vinegar OR DuraRinse
TM
Humidifier Cleaner (AC-816) following the
bottle instructions.
2. Let the solution stand for 20 minutes.
3. With the solution in the Water Tray, remove
scale from all interior surfaces with a soft
cloth or brush.
4. Rinse the Water Tray thoroughly with water
to remove the scale and cleaning solution.
• DISINFECTING - TANK & WATER TRAY:
1. Fill the Water Tank with 1 teaspoon of
household bleach and 1 gallon of water.
Pour some solution into the Water Tray.
2. Let the solution stand for 20 minutes.
3. Rinse with water until the smell of bleach is
gone.
NOTE: THE USE OF OTHER WATER TREAT-
MENT PRODUCTS, CHEMICALS, SOAPS,
DETERGENTS OR ABRASIVE CLEANSERS
NOT RECOMMENDED ON OUR WEBSITE OR
REFERENCED IN THIS MANUAL MAY CAUSE
DAMAGE TO THE HUMIDIFIER OR AFFECT
PERFORMANCE. SEE ACCESSORIES.
CLEANING THE HEATING ELEMENT:
The frequency of performing this special mainte-
nance depends upon the hardness of your water.
To remove minerals built-up on the heating ele-
ment:
• Turn off and unplug the humidifier. Allow at
least 10 minutes for the unit to cool.
• The heating element is located on the bottom
of the Power Unit.
• Use a non-metallic brush or soft, dry cloth to
wipe the outer surfaces of the heating element.
Some deposits may remain, but they should
not interfere with operation.
DO NOT clean the heating element under running
water since it may cause damage or personal
injury.
CARE AND STORAGE:
• Follow WEEKLY CLEANING instruction when
the humidifier will not be used for at least one
week or more.
• Remove all water from the Water Tray, Base
and Tank before storing.
• Pack the unit in its original carton and store in
a cool, dry place.
• Clean the humidifier after prolonged storage.

6
TROUBLESHOOTING:
• The humidifier is not running, but some of
the lights are on.
• The humidity level my be set too low. Set-
ting the humidity level higher should restart
the unit. If the unit has a Refill icon and its
on, then the unit is out of water. Refill and
install the Tank and the unit should start.
• The Moisture level is set according to the
manual, but the humidifier never seems to
turn back on.
• The Moisture Level may be set too low.
Adjust the Moisture Level to the highest set-
ting and the unit should restart. Reset the
Moisture Level following the instructions.
• The Moisture level is set according to the
manual, but the humidifier never seems to
turn off.
• The Moisture Level may be set too high.
Reset the Moisture Level following the
instructions.
• The humidifier is filled with water, but the
Refill icon is still on. What’s wrong?
• First, press down once on the Reset button.
If this doesn’t help, then refer to the CLEAN-
ING THE HEATING ELEMENT instructions.
• When I turn the humidifier from high to low
there is no difference in sound. Is the unit
operating correctly?
• Yes, the unit is operating normally. The
High/Low control varies the temperature of
the heating element and but there will be no
difference in sound.
For more troubleshooting tips, visit our website at:
www.honeywellconsumerproducts.com
NOTE: IF YOU CONTINUE TO EXPERIENCE A
PROBLEM, PLEASE RETURN THE HUMIDI-
FIER TO THE PLACE OF ORIGINAL PUR-
CHASE OR SEE YOUR WARRANTY. DO NOT
ATTEMPT TO OPEN OR REPAIR THE HUMIDI-
FIER YOURSELF. DOING SO WILL VOID THE
WARRANTY AND COULD CAUSE DAMAGE
OR PERSONAL INJURY. IF YOU HAVE QUES-
TIONS REGARDING THIS HUMIDIFIER,
PLEASE CALL OR WRITE:
Honeywell
Consumer Relations Department
250 Turnpike Road
Southborough, MA 01772
Toll Free 1-800-332-1110
E-mail: [email protected]
ACCESSORIES:
Your warm mist humidifier is compatible with both
the Basic and Digital LCD Remote Control. To
upgrade your humidifier or to get a listing of care
and cleaning products for your humidifier, visit our
website at:
www.honeywellcomsumerproducts.com
5 YEAR LIMITED WARRANTY
You should first read all instructions before
attempting to use this product. Register your
product on-line at
www.honeywellconsumerproducts.com or
complete and return the Customer Response
Card within 7 days.
A. This 5 year limited warranty applies to repair or
replacement of product found to be defective in
material or workmanship. This warranty does
not apply to damage resulting from commer-
cial, abusive, unreasonable use or supplemen-
tal damage. Defects that are the result of
normal wear and tear will not be considered
manufacturing defects under this warranty.
• HONEYWELL IS NOT LIABLE FOR INCI-
DENTAL OR CONSEQUENTIAL DAMAGES
OF ANY NATURE. ANY IMPLIED WAR-
RANTY OF MERCHANTABILITY OR FIT-
NESS FOR A PARTICULAR PURPOSE ON
THIS PRODUCT IS LIMITED IN DURATION
TO THE DURATION OF THIS WARRANTY.
Some jurisdictions do not allow the exclusion
or limitation of incidental or consequential
damages or limitations on how long an implied
warranty lasts, so the above limitations or
exclusions may not apply to you. This warranty
gives you specific legal rights, and you also
may have other rights which vary from jurisdic-
tion to jurisdiction. This warranty applies only
to the original purchaser of this product from
the original date of purchase.
B. At its option, Honeywell will repair or replace
this product if it is found to be defective in
material or workmanship. Defective product

7
should be returned to the place of purchase in
accordance with store policy. Thereafter, while
within the warranty period defective product
may be returned to Honeywell.
C. This warranty does not cover damage resulting
from any unauthorized attempts to repair or
from any use not in accordance with the
instruction manual.
D. Return defective product to Honeywell Con-
sumer Products with a brief description of the
problem. Include proof of purchase and a $10
US/$14.50 CAN check or money order for han-
dling, return packing and shipping charges.
Please include your name, address and day-
time phone number. You must prepay shipping
charges. Send to:
In the US:
Honeywell
Attn: Returns Department
4755 Southpoint Drive
Memphis, TN 38118 USA
In Canada:
Honeywell
Attn: Returns Department
510 Bronte Street S.
Milton, ON L9T 2X6 Canada
-
 1
1
-
 2
2
-
 3
3
-
 4
4
-
 5
5
-
 6
6
-
 7
7


Honeywell HWM255 Owner's manual
- Category
- Humidifiers
- Type
- Owner's manual
- This manual is also suitable for
Ask a question and I''ll find the answer in the document
Finding information in a document is now easier with AI
Related papers
-
Honeywell HWM4000 Owner's manual
-
-
 Duracraft HWM910 Owner's manual
-
Vicks HWM-950-Tray Owner's manual
-
-
-
-
-
 Duracraft DH835 Owner's manual
-


Other documents
-
 Hunter Fan 35206 Owner's manual
-
 Duracraft DWM-250 User manual
-
ReliOn RWM975 Owner's manual
-
 Duracraft DH912 Owner's manual
-
Holmes HM8405 Owner's manual
-
 Hunter Fan 35209 Owner's manual
-
 Duracraft DH-722 User manual
-
-
Sunbeam SUL2322 Owner's manual
-
Bionaire BWM5075 - 2 Owner's manual


