Page is loading ...

Manual Horizons 9_30.indb 2 22/04/13 17:41
Page is loading ...

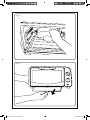
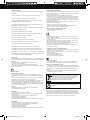
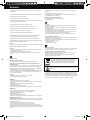
Fig.1
Fig.2
Manual Horizons 9_30.indb 4 22/04/13 17:41

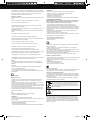
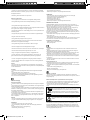
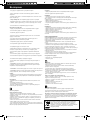
Fig. 3
Fig.4
Manual Horizons 9_30.indb 5 22/04/13 17:41
Page is loading ...
Page is loading ...
Page is loading ...
Page is loading ...

English
Oven
Horizon 9
Horizon 30
Dear customer,
Many thanks for choosing to purchase a TAURUS brand product.
Thanks to its technology, design and operation and the fact that it exceeds the
strictest quality standards, a fully satisfactory use and long product life can be
assured.
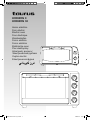
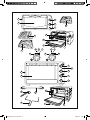
Description
A Body
B Fastening levels
C Heating element
D Glass
E Handle
F Function selector
G Pilot light
H Temperature selector
I Heating element selector
J Timer
K Tray and Grill rack handle
L Rotisserie rod
M Rotisserie rod handle
N Grill rack
O Cooking tray Horizon 9
P Cooking tray Horizon 30
Q Disconnected
R Upper heating element
S Lower heating element
T Upper and lower heating element
U Convection
V Rotisserie
W Rotisserie and convection
- Read these instructions carefully before switching on the appliance and keep
them for future reference. Failure to follow and observe these instructions could
lead to an accident.
- Clean all the parts of the product that will be in contact with food, as indicated
in the cleaning section, before use.
Safety advice and warnings
- This appliance can be used by people
unused to its handling, disabled people
or children aged from 8 years and abo-
ve if they have been given supervision
or instruction concerning use of the
appliance in a safe way and unders-
tand the hazards involved.
- Cleaning and user maintenance shall
not be made by children unless they
are older than 8 and supervised
- Keep the appliance and its cord out
of reach of children less than 8 years of
age.
- This appliance is not a toy. Children
should be supervised to ensure that
they do not play with the appliance.
- The temperature of the door and
other accessible surfaces may be high
when the appliance is in use.
- Do not use the appliance in associa-
tion with a programmer, timer or other
device that automatically switches it on.
- If any of the appliance casings breaks,
immediately disconnect the appliance
from the mains to prevent the possibility
of an electric shock.
- If the connection to the mains has
been damaged, it must be replaced,
take the appliance to an authorised te-
chnical support service. Do not attempt
to disassemble or repair the appliance
yourself as this may be dangerous.
- Ensure that the voltage indicated on the rating label matches the mains
voltage before plugging in the appliance.
- Connect the appliance to a base with an earth socket withstanding a minimum
of 10 amperes.
- The appliance’s plug must t into the mains socket properly. Do not alter the
plug. Do not use plug adaptors
- Do not force the power cord. Never use the power cord to lift up, carry or
unplug the appliance.
- Do not wrap the power cord around the appliance.
- Do not clip or crease the power cord.
- Do not allow the power cord to come into contact with the appliance’s hot
surfaces.
- Check the state of the power cord. Damaged or tangled cables increase the
risk of electric shock.
- Do not use the appliance if it has fallen on the oor with visible signs of
damage, as it may cause electric shock.
- Do not touch the plug with wet hands.
- Do not use the appliance if the cable or plug is damaged.
- The appliance is not suitable for outdoor use.
- The appliance must be used and placed on a at, stable surface.
- Keep the appliance away from ammable material such as textiles, cardboard
or paper, etc.
- CAUTION: In order to prevent overheating do not cover the appliance.
- Ensure that neither the air access nor exit become either totally or partially
covered by drapery, clothing, etc., as this increases the risk of re.
- Do not use or store the appliance outdoors.
Use and care:
- Fully unroll the appliance’s power cable before each use.
- Do not use the appliance if the on/off switch does not work.
- Do not move the appliance while in use.
- Disconnect the appliance from the mains when not in use and before under-
Manual Horizons 9_30.indb 10 22/04/13 17:41

taking any cleaning task.
- This appliance is for household use only, not professional, industrial use.
- This appliance should be stored out of reach of children and/or the disabled.
- Do not store the appliance in a vertical position.
- Do not store or transport the appliance if it is still hot.
- Keep the inside of the oven clean to avoid the carbonising of left over food,
which may damage the appliance.
- Do not use the appliance to dry pets or animals.
- Do not use the appliance to dry textiles of any kind.
- Do not use the inside of the oven for storage purposes.
- Use only utensils appropriate for ovens.
- Don’t place heavy utensils or trays on the open door.
- CAUTION: if the door or the door catch is damaged the oven must not be
used until repaired by a competent technician.
- CAUTION: Do not use the appliance if the glass is cracked or broken.
- CAUTION: Water condensation may appear on the surfaces and objects
around this appliance.
Service:
- Any misuse or failure to follow the instructions for use renders the guarantee
and the manufacturer’s liability null and void.
Installation
- Be sure to remove all packaging material from inside the appliance.
- Do not remove the support feet of the appliance.
- Do not cover or obstruct any of the openings of the appliance.
- The plug must be easily accessible so it can be disconnected in an emer-
gency.
Instructions for use
Before use:
- Make sure that all the product’s packaging has been removed.
- Before using this product for the rst time, it is advisable to test it without food.
- Before using the product for the rst time, clean the parts that will come into
contact with food in the manner described in the cleaning section.
- Some parts of the appliance have been lightly greased. Consequently, the rst
time the appliance is used a light smoke may be detected. After a short time,
this smoke will disappear.
- To eliminate the smell given off by the appliance when used for the rst time, it
is recommended to have it on at full power for 2 hours in a well-ventilated room.
Use:
- Unroll the cable completely before plugging it in.
- Connect the appliance to the mains.
HORIZON 9
- Introduce grid (N) on one of levels (B)
- If you want to cook with cooking tray (O) rst, you must introduce grid (N) as
a support.
- Select the appliance function desired (I).
- Select the desired time (J)
-The pilot light (G) comes on.
- After the selected time the appliance will switch off automatically.
HORIZON 30:
- Introduce grid (N) or cooking tray (P) on one of levels (B) as desired.
- Select the appliance function desired (F, I).
- Select the appliance temperature desired (H)
- Select the desired time (J)
-The pilot light comes on (G).
- After the selected time the appliance will switch off automatically.
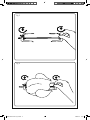
ROTISSERIE FUNCTION:
CAUTION: Always use oven gloves to protect your hands. The metallic parts
can become very hot during use. Take care when touching the rods and the
forks.
- Remove the fork from the rod by loosening the fastening screw (Fig 1).
- Push the rod through the meat and slide it to the centre.
- Put the fork onto the rod again with the prongs facing towards the meat (Fig
2). Chicken should be bound in a string to prevent the chicken legs or wings
touch heating element during roasting, so that rotisserie assemble will rotate
smoothly.
- Slide both forks rmly against the meat and tighten the fork fastening screws
well.
- Place the rod with the meat into the oven (Fig 3)
- After cooking loosen the fork fastening screws and remove the meat by sliding
it to the end of the rod.
Once you have nished using the appliance:
- Unplug the appliance from the mains.
- Clean the appliance.
Cleaning
- Disconnect the appliance from the mains and allow it to cool before underta-
king any cleaning task.
- Clean the equipment with a damp cloth with a few drops of washing-up liquid
and then dry.
- Do not use solvents, or products with an acid or base pH such as bleach, or
abrasive products, for cleaning the appliance.
- Do not let water or any other liquid get into the air vents to avoid damage to
the inner parts of the appliance
- Never submerge the appliance in water or any other liquid or place it under
running water.
Crumb tray Horizon 9:
- This appliance has a tray which allows the crumbs to be caught inside the
appliance.
- Ensure that the appliance is cooled before handling crumb tray.
- Open the lower appliance’s tray (Fig 4)
- Pour away the contents of the tray.
- Replace the tray inside the appliance.
Anomalies and repair
- Take the appliance to an authorised technical support service if product is
damaged or other problems arise. Do not attempt to disassemble or repair the
appliance yourself as this may be dangerous.
For EU product versions and/or in case that it is requested in your country:
Ecology and recyclability of the product
- The materials of which the packaging of this appliance consists are included
in a collection, classication and recycling system. Should you wish to dispose
of them, use the appropriate public recycling bins for each type of material.
- The product does not contain concentrations of substances that could be
considered harmful to the environment.
This symbol means that in case you wish to dispose of the
product once its working life has ended, take it to an authorised
waste agent for the selective collection of Waste from Electric and
Electronic Equipment (WEEE).
This symbol means that surface could get hot during the use
This appliance complies with Directive 2006/95/EC on Low Voltage, Directive
2004/108/EC on Electromagnetic Compatibility, Directive 2011/65/EC on the
restrictions of the use of certain hazardous substances in electrical and electro-
nic equipment and Directive 2009/125/EC on the ecodesign requirements for
energy-related products.
Manual Horizons 9_30.indb 11 22/04/13 17:41
Page is loading ...
Page is loading ...
Page is loading ...
Page is loading ...
Page is loading ...
Page is loading ...
Page is loading ...
Page is loading ...
Page is loading ...
Page is loading ...
Page is loading ...
Page is loading ...
Page is loading ...
Page is loading ...
Page is loading ...
Page is loading ...
Page is loading ...
Page is loading ...
Page is loading ...
Page is loading ...
Page is loading ...
Page is loading ...
Page is loading ...
Page is loading ...
Page is loading ...
-
 1
1
-
 2
2
-
 3
3
-
 4
4
-
 5
5
-
 6
6
-
 7
7
-
 8
8
-
 9
9
-
 10
10
-
 11
11
-
 12
12
-
 13
13
-
 14
14
-
 15
15
-
 16
16
-
 17
17
-
 18
18
-
 19
19
-
 20
20
-
 21
21
-
 22
22
-
 23
23
-
 24
24
-
 25
25
-
 26
26
-
 27
27
-
 28
28
-
 29
29
-
 30
30
-
 31
31
-
 32
32
-
 33
33
-
 34
34
-
 35
35
-
 36
36


Ask a question and I''ll find the answer in the document
Finding information in a document is now easier with AI
in other languages
- italiano: Taurus Oven HORIZON 9 Manuale utente
- français: Taurus Oven HORIZON 9 Manuel utilisateur
- español: Taurus Oven HORIZON 9 Manual de usuario
- Deutsch: Taurus Oven HORIZON 9 Benutzerhandbuch
- русский: Taurus Oven HORIZON 9 Руководство пользователя
- Nederlands: Taurus Oven HORIZON 9 Handleiding
- português: Taurus Oven HORIZON 9 Manual do usuário
- polski: Taurus Oven HORIZON 9 Instrukcja obsługi
- română: Taurus Oven HORIZON 9 Manual de utilizare
Related papers
-
Taurus HORIZON 22 PLUS Owner's manual
-
Taurus Java Owner's manual
-
Taurus 947033000 Owner's manual
-
-
-
Taurus Group Galexia User manual
-
Taurus Pegasus Owner's manual
-
Taurus HORIZON 28 User manual
-
Taurus Maxim's Owner's manual
-
Other documents
-
Black & Decker BXTO1001E User manual
-
 WHITE & BROWN MF 341 B - MF 451 B - MF 601 B Owner's manual
-
Taurus Alpatec SIROCCO 16 OSCILLANT Owner's manual
-
-
-
Minimoka CM-1622 Operating instructions
-
 WHITE & BROWN HORIZON 30 - 45 - 60 Owner's manual
-
Taurus Group Star 3 User manual
-
-

