HOTPOINT/ARISTON MC 057C AX0 Owner's manual
- Type
- Owner's manual
Page is loading ...
Page is loading ...

3
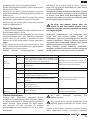
A G
E
F
K
L
M
C
H
Q
O
N
B
I
D
J
P
Page is loading ...
Page is loading ...
Page is loading ...
Page is loading ...
Page is loading ...
Page is loading ...
Page is loading ...
Page is loading ...
Page is loading ...
Page is loading ...
Page is loading ...
Page is loading ...
Page is loading ...
Page is loading ...
Page is loading ...
Page is loading ...

20
iten
Please fully read this manual before you start using this device. Please keep the manual
for future reference.
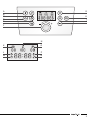
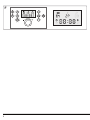
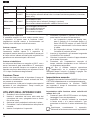
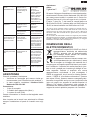
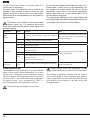
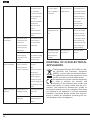
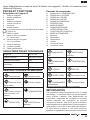
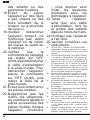
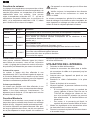
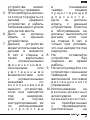
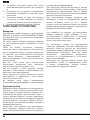
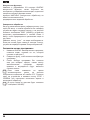
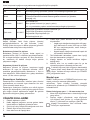
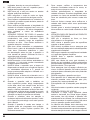
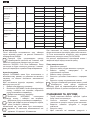
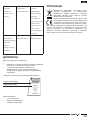
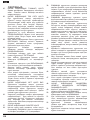
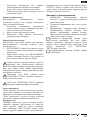
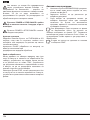
Control panel
N. TEMPERATURE setting
O. SPEED setting
P. TIME setting
Q. TIME setting
R. AUTOMATIC setting
S. KNOB
T. ON/OFF
U. START/PAUSE
V. STOP/CANCEL
W. PULSE FUNCTION
X. Automatic mode
Y. Timer
Z. Delay timer
AA. Temperature
AB. Speed
AC. Closed lid
AD. Open lid
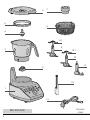
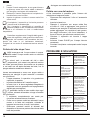
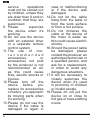
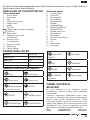
PARTS AND FUNCTIONS
Device description
1. Base of the product
2. Metal ring
3. Container
4. Hexagonal carrier
5. Lid seal
6. Lid
7. Measuring cup
The cap can be used as dispenser (Figure A).
8. Steam basket
9. Stainless steel blade
9.1 Blade cover
10. Ice crusher blade
10.1 Blade cover
11. Mixing blade
12. Palette knife
13. Power cable
TECHNICAL SPECIFICATIONS
MODEL: MC 057 EU
Rating: 220-240V~ 50Hz
Engine power: 70W
Heating elements power: 500W
Total power: 570W
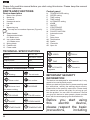
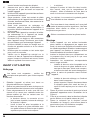
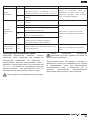
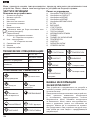
SYMBOLS DESCRIPTION
Warning Do not touch
Steam outlet
Hot surface
Minimum level
for steam cooking
INCREASE
DECREASE
PULSE function
ON/OFF
STOP/CANCEL
START/PAUSE
TEMPERATURE
SPEED
DELAY
TIME
Open lid
AUTOMATIC
programs
Closed lid
IMPORTANT SECURITY
INFORMATION
This device was designed for a household use; it only
needs to be used by adult people.
Before you start using this device, please carefully read
the instructions, namely the warning about security.
Please stick to the security instructions. Please keep
this manual, as well as the guide, for as long as you
own the product. You can use it for reference. Should
you give this device to other people, please provide
them with the accompanying documentation too.
Before you start using
this electric device,
please respect the basic
precautions, including

21
iten
what follows:
1. Please read all
instruction.
2. After taking the device
out of the box, please
check it is intact and
compare it with the
drawing. Please mark
any damages caused
by transport. In case
of doubt, please do
not use the device and
contact an authorised
service center.
3. Before you connect
the device, please
check that the electric
data mentioned in the
plate correspond to
the technical data of
the available national
grid. The rating plate
is on the bottom of the
device.
4. This device must only be
used for the reason why
it was produced, which
is to say as KITCHEN
ROBOT WITH
COOKING FUNCTION
for household use. Any
other use is considered
not in line with the
device and is therefore
considered dangerous.
5. The non-respect of
these instructions or
the abuse of the device
can cause injuries.
6. The device must not
be used by children.
Please keep the device
and its power cable out
of the reach of children.
7. Children must not play
with this device.
8. This device can be used
by children starting
from 8 years and by
adults with limited
physical, sensory or
mental capabilities, or
with limited knowledge
on the use of the
device, only if they are
supervised or informed
about the use of the
device and on condition
that they understood the
risks involved. Children
must not play with this
device. Cleaning and

22
iten
service operations
must not be carried out
by children, unless they
are older than 8 and on
condition that they are
supervised.
9. Please supervise
the device when it’s
working.
10. Do not use the device
with an external timer
or a separate remote
control system.
11. The use of non-
recommended
accessories, or
accessories not sold
by the producer is not
recommended at all,
as this could cause
res, electric shocks or
injuries.
12. Please turn off the
device before you
replace its accessories
or before you approach
its moving parts when
it’s working.
13. Please do not use the
device if the cable is
damaged or again in
case or malfunctioning
or if the device was
damaged.
14. Do not let the cable
hang from the table or
from the work surface
or from a hot surface.
15. Do not immerse the
cable or the device of
the mixer in water, as
this could cause electric
shocks.
16. Should the power cable
be damaged, please
contact the producer, an
authorized technician or
a qualied person, and
ask for a replacement,
in order to avoid any
dangerous situations.
17. It will be necessary to
closely supervise the
device when it’s used
in proximity of children
or invalid people.
18. Please do not put the
device on or close to
hot gas or heat-emitting
ovens.

23
iten
19. Please unplug when the
device is not working,
before inserting or
extracting parts and
before you clean it.
20. Please check that the
control is set on OFF
before you plug the
power cable to the
wall socket. To unplug,
please set the control
on OFF, then take out
the plug from the wall
socket.
21. Please avoid any
contact with moving
parts.
22. Please keep hands,
clothes, palette knives
and other accessories
far from moving parts
when the device is
working: in this way
it will be possible to
reduce injuries to
people and/or damages
to the device itself.
23. Please keep both the
device and the power
cable out of the reach of
children younger than 8
years old.
24. Do not use in the open
air.
25. Please keep these
instructions.
26. ATTENTION! CHOKING HAZARD The packing
material is not a toy for children. Please keep
the plastic bag out of the reach of children.
27. ATTENTION! ELECTRIC SHOCK DANGER
The electric safety of this device is guaranteed
only when the device is connected to an
effective grounding system, as dened in the
current electric safety regulations. Please
check this fundamental safety requirement; in
case of doubts please ask a skilled technician
to carry out an accurate control of the system.
28. Please DO NOT use the device near a sink full
of water. When it is working, the device must
be in a safe position, and it must not fall into
the sink.
29. Please DO NOT turn on the device if the power
cable is damaged. The cable must be replaced
with an original cable provided by an authorised
service centre.
30. Please DO NOT use the device with wet hands,
naked or soaked feet.
31. Please DO NOT pull the power cable or the
device in order to unplug it from the wall socket.
32. Please DO NOT put the power cable on corners
or sharp edges: it could get damaged.
33. DO NOT immerse the engine body in water;
never put it under a running water tap.
34. Please carefully wipe the container contacts,
which are in the lower part, before you put it
back into place.
35. Please periodically check the seal integrity of
the hexagonal insert as well as of the container
connector. Should they be worn out, please
contact the authorised service center.
36. ATTENTION! DANGER OF FIRE The device
must not be used under or near combustible
materials, such as curtains. Please position the
device far from heat-sensitive surfaces. Please
let the device cool down before you put it back.
37. Please do not use extension leads or adapters.
Please fully insert the power cable where it
belongs. Totally unwind the power cable before
you connect the device to the wall socket. Oil
and heated fats could catch re.
38. ATTENTION! BURNS DANGER
39. NEVER exceed the maximum level shown in
the container, 1,5 L, in order to avoid hot water

24
iten
and food overow.
40. NEVER use the device without the dispenser
cap in the lid with the pulse function or speeds
higher than 5, because the hot parts could
be splashed at the user or the surrounding
environment.
41. NEVER use the mixing blade with the pulse
function or speeds higher than 5.
42. When the device is working, its surfaces can
reach very high temperatures; please always
use the suitable oven gloved to handle the
container, the lid, the mixing blade, the jagged
ice crusher blade, the stainless steel blade, the
steam basket and the dispenser cap during use
or after the product was used.
43. During cooking, please pay attention to any
splashes of hot food, to heat or steam which
could come towards your face when opening
the lid.
44. When the device is used without lid, the device
can be compared to any standard pot: very hot
liquids are easily accessible.
45. Please always check the food temperature of
the cooked food before you eat it, or before a
child eats it.
46. Periodically check the integrity of the lid seal.
Should this be worn out, please contact an
authorised service centre. Please replace it at
least every two years.
47. Before you close the lid, please check the seal
is intact as well as correctly positioned.
48. When you put the hexagonal insert back into
place, please check that the seal is there and
that it is intact too.
49. ATTENTION! RISK OF DAMAGE TO
PRODUCTS OR THINGS NEARBY
50. DO NOT put the container in the oven, in the
microwave oven or in the freezer.
51. DO NOT place the device next to heat sources
or in hot areas.
52. DO NOT obstruct air outlets and make sure
there is an adequate ventilation around the
device when it is working.
53. DO NOT expose the device to wet conditions or
to the action of weather agents.
54. NEVER make the device work without food
inside.
55. DO NOT use the jagged ice crusher blade, the
stainless steal blade and the mixing blade to
process hard ingredients in block which are
bigger than 1,5 cm per side.
56. Please make sure there is enough free space
above the device and around it, in order to
prevent any damages caused by the head
produced by the device.
57. NEVER immerse the device in water.
58. This device is not suitable to knead heavy
mixtures such as those for bread, pasta, pizza,
shortcrust pastry, etc.
59. This device is not suitable to fry foods.
60. Please do not lift the device by using the
container handle.
61. ATTENTION! DANGER OF INJURIES
62. Position the body on a stable at and smooth
horizontal surface. Leave a certain space from
the edges, so that the device cannot fall when
it being used. The suction cups must strongly
adhere to the leaning surface. Please do not
move the device when it’s ON.
63. Blades are sharp, please handle with care, in
order to avoid cuts and grazes.
64. When mounting and un-mounting the
hexagonal insert, please pay attention in order
not to get your ngers crushed when turning
the metal ring.
65. Please open the lid only after the jagged ice
crushed blade, the stainless steel blade and
the mixing blade have stopped working.
66. Please pull out the jagged ice crusher blade,
the stainless steal blade and the mixing blade
before you extract the food from the container.
67. Please make sure that the power cable is not
handing from the work surface on which the
device is located.
68. DO NOT use near the cooking surface of the
kitchen.
69. Please pay attention: avoid that the power cable
and the device get in contact with hot surfaces,
free ames, pots and other accessories.
70. Before you start any cleaning of service
operation, please turn off the power button and
unplug from the wall socket.
71. DO NOT turn on the device if the housing is
damaged or if the device fell off. Please contact
an authorised service centre.
72. DO NOT insert ngers or accessories inside
the device when it is working in order to avoid
getting injured or damaging the device.
73. NEVER use the mixing blade with the pulse
function or speeds higher than 5.
74. Do not cover the lid with towels or other objects.
75. Please check that the security device on the
column on the base of the device is clean
enough. When the lid is open, on the display
there must be the symbol of an open lock.

25
iten
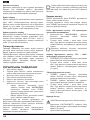
BEFORE USE
Cleaning
Blades are sharp, please handle with care, in
order to avoid cuts and grazes.
1. Unpack the device and extract any inserts or
adhesive labels which might be present on the
device surface.
2. Take out the protection from the jagged ice
crusher blade and from the stainless steel blade.
3. Carefully wash by hand with hot water and soap
for dishes all the moving parts which get in
contact with food:
• the dispenser cap, the lid and its seal, the
palette blade, the mixing blade and the ste-
am basket.
• the stainless steel blade and the jagged ice
crusher blade with a small brush and taking
them from the upper part in order not to get
cut.
• the container.
4. Clean the engine with a wet cloth, well squeezed,
and the container housing; please avoid to have
water in the area where the container connector
is located.
The container, the cover and the measuring
cup can be washed in the dishwasher.
To wash in the dishwasher please put the cup in
higher position, away from direct splashes of
water and use a medium-low temperature cycle.
Please carefully dry all washed parts.
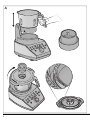
Mounting
1. Position the engine on a horizontal at surface,
leave some distance from the edges, so that
small movements and/or vibrations during the
use do not cause any damage to the device. The
suction cups must strongly adhere to the leaning
surface.
2. Insert the container in its housing pushing down
until you hear a click.
3. Mount the suitable accessory according to what
you need to do:
• the stainless steel blade or the jagged ice
crusher blade by taking them from the top
in order not to get cut, and insert them on
the hexagonal insert.
take out the protection cover before you start
using the device
• the mixing blade, by inserting it on the he-
xagonal insert.
• position the steam basket directly in the
container after pouring water up to the re-
quested level for steam cooking.
4. Position the lid seal so that the protruding edge
appears as it does in Figure A.
5. Mount it on the lid in the direction shown by the
arrows on the external part of the seal.
6. Position the lid on the container as shown in
picture A, then turn clockwise until you come to a
complete closed state.
7. Insert the dispenser tap in the lid.
DEVICE DESCRIPTION
Introduction
This household appliance unites the ROBOT function
to the COOKING function; both functions can be
executed independently or simultaneously.
You can also add the TIMER function, so that the
device can stop at the end of the process.
You can also set step-by-step the different phases of
the recipes, up to the cooked dish. The device also
features 15 programs to automatically execute all the
passages linked to the execution of multiple recipes,
just like they are described in the recipe book.
In order to learn how to fully exploit the potential of
this device, please initially follow all recipes
as they are described in the recipe book, which
includes examples and recommendations for any
type of processing.
In this way you’ll learn the different process techniques
and the limitations in terms of quantity; after this,
you’ll be able to automatically execute different
versions, in a very easy way.
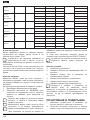
Robot Function
The engine rotation, with regulation from 1 to 10,
allows very slow speeds, which are ideal to
mix during cooking, but also high speeds, which
guarantee the typical features of kitchen robots
/ mixers. Speed setting number 1 enables the
intermittent working of the engine, at minimal speed;
please use this setting to prepare meat, for
example braised meat or stews, or in general
foods which don’t need a continuous mixing.
When you activate pulses in the engine (PULSE
function), this is very useful in order to have a better

26
iten
control of the minced meat or to include more air in
certain types of processes.
For hard foods, the maximum size of foods to be
inserted in the container is about 1,5 cm per side
(almost as big as a stock cube or a sugar cube).
Softer foods (fruit and vegetables) can be inserted in
bigger chunks.
This device is not suitable to mince hard foods
(coffee, cereal, etc.), to pulverize and knead
some our-based recipes (bread, pizza, dough and
shortcrust pastry).
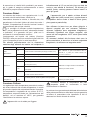
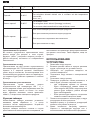
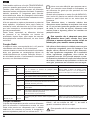
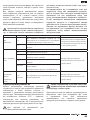
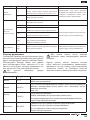
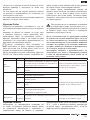
Accessory Speed Function Note
Blade
Mixing
1-3
To gently mix food during cooking without damaging them
or breaking them into bits (rice, mushrooms, vegetables,
etc).
Never use the mixing blade at an higher speed
then 5 or pulse in order to avoid splashes and
excessive vibrations.
4-5 To emulsify and mix sauces and other processes
Inox blade
4-5 To knead soft bases for cakes, batter, etc.
6-8 To mince different foods
Use with the dispenser cap correctly tted in
order to avoid splashes
9-10 In order to roughly mince dried food (parmesan cheese,
biscuits, dried bred)
9-10 To roughly mix/homogenize semi-liquid foods
Pulse
To mice different kinds of food, by keeping under control
the processed food
To give volume to the processing
Jagged blade
Ice crusher
6-10
Pulse
In order to crush ice, frozen fruit or bases for ice-cream
Use with the dispenser cap correctly tted in
order to avoid splashes
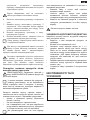
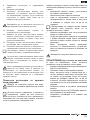
Cooking function
The temperature setting allows you to cook different
types of food at the correct temperature, in a more
precise way if compared to the traditional cooking
method in the pot. The temperature can be set from a
minimum of 37°C - which is the ideal body temperature
for children’s food - up to a maximum of 100°C, in
order to guarantee boiling and steam cooking.
This device was not designed to fry foods.
Please always check the temperature of the
cooked food before you eat it or make a child eat it.
The cooking is generally matched with the rotation
of the mixing blade or of the stainless steel blade in
order to guarantee a mixing which prevents the food
from sticking to the bottom of the pan during the
cooking process.
Do not use the stainless steel blade to crush ice or
frozen foods, in order not to ruin its sharpening: use
the suitable ice crusher blade, do not use frozen
ingredients. If you need to use frozen ingredients,
please take them out of the freezer about 10/15
minutes before using them.
The accessories dedicated to the robot feature are
the mixing blade, the stainless steel blade and the ice
crush blade, which must be used as follows:

27
iten
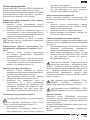
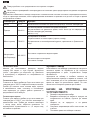
Temperature Degrees Function
Warm 37°C To bring milk or food for children to body-temperature
Hot 50-60°C
To mildly heat milk or food for children
To melt delicate foods which could get damaged at high temperature (chocolate,
butter, etc.)
Very hot 70-80°C
To heat milk
To melt some foods (cheese, sugar)
To cook sauces/creams/puddings made from our or eggs
Piping hot 90-100°C
To fry lightly various types of food
To cook various types of food
To simmer or boil
To steam
beep can be heard:
• if the lid is open, on the display there is a
lock symbol and the SPEED engine key
and the PULSE key cannot be selected; the
engine function is disabled.
• If the lid is closed, on the display the closed
lock symbol will appear.
7. Insert both ingredients and accessories by
following the instructions on the recipe book.
8. Close the lid and insert the dispenser cap if this
is indicated in the recipe.
9. Proceed with the manual setting of time, speed
and temperature or by using an automatic
program.
In case no button is pressed, the device goes in
“energy save” mode after 5 minutes and the
display turns off. To turn it back on, press the POWER
button.
Manual setting
You can set the ROBOT function and the COOKING
function separately or at the same time,
if possible by using the TIMER feature in order to set
the processing time with automatic stop at the end.
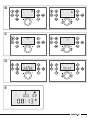
Robot function setting: engine speed from 1 to 10
1. Press the engine SPEED button: on the display
the corresponding icon ashes.
2. Set the speed by turning the knob clockwise +
and anti-clockwise - to increase or decrease the
selected value (Figure B).
Position the lid, otherwise the engine function
cannot be set.
Cooking without lid
You can execute the different types of cooking without
lid: in this case, the “robot” feature (engine speed
setting and pulse working) is disabled for security
reasons.
Steam cooking
Steam cooking must be executed at a temperature
of 100°C with the steam basket and the lid. You must
insert at least as much water as the minimum level
indicated inside the container: this guarantees that
the machine works correctly for 60 minutes.
Cooking by boiling
Cooking by boiling must be executed at a temperature
of 100°C, with or without the mixing blade accessory.
You must insert maximum 1 litre of water; please
pay attention: do not exceed the 1,5 litres limit after
inserting the food.
Timer function
The use of the timer allows you to set the desired
processing time and to be warned at the end. The
device stops automatically.
The timer function is particularly useful for long
cooking periods because it allows you not to go over
correct times for the type of food being cooked. In this
way you don’t burn the food you are cooking.
USE OF THE DEVICE
1. Unwind the power cable
2. Insert the cable connector in the connector
housing of the cable, pushing until the very end.
3. Make sure the product is on a at surface.
4. Connect the power cable to a wall socket.
5. Insert both the container and the lid
6. Turn on the device: the panel will turn on and a

28
iten
Setting of the cooking function: temperatures
from 37°C to 100°C.
1. Press the TEMPERATURE button: on the display
the corresponding icon is ashing.
2. Set the temperature by turning the knob
clockwise + and anti-clockwise - to increase or
decrease the selected value (Figure C).
Setting the timer function
1. Press the TIMER button: on the display the
corresponding icon ashes as well as the area
dedicated to minutes.
2. By pressing again the TIMER button you select
the area dedicated to seconds.
3. Set the time by turning the knob clockwise +
and anti-clockwise - to increase or decrease the
selected value (Figure C). The maximum time
which can be set corresponds to 99 minutes
(Figure D).
Start of processing
Please do not move the device when it’s ON.
Activate the device by pressing the START / PAUSE
button; on the display you will see (Figure E):
• Set speed
• Set temperature: the “C°” symbol ashes until
the temperature is reached
• The elapsed time, unless a specic timer was set
• The residual time before the end of the
processing if the timer was set
Change settings
You can change speed, temperature or set time even
after starting the processing:
1. Press the buttons about engine speed,
temperature or timer: the corresponding icon
ashes.
2. Set the value by turning the knob
3. You can change the set value as long as the icon
keeps ashing.
Temporary stop of the processing
If necessary, please open/close the lid in order to
check the processing status; pause and proceed as
follows:
1. By pressing the START / PAUSE button: the
processing temporarily stops (temperature,
speed and time).
2. To restart immediately, press again the START/
PAUSE button. If this button is not pressed within
20 minutes the device turns off.
If the lid is opened without pausing rst the
device immediately blocks - for safety reasons -
the engine rotation; the cooking and timer functions
remain active in order to allow the continuation of the
process. To restart the processing just close the lid.
The POWER button and the STOP/CANCEL
button must be pressed for about 1 second
in order to be activated.
The POWER and the STOP/CANCEL button
cancel current settings.
Pulse function
Hold pressed the PULSE button for 2/3 seconds, then
release it; repeat this operation several times; on the
display the corresponding icon will light.
The PULSE function (pulse processing) cannot be
used on a previously set processing.
End of the processing
When the timer-set time is over (or after 30 minutes
from the start of the processing without timer) the
device will emit an acoustic signal and on the display
“END” will appear; the device will keep mixing for
2 more minutes in order to prevent the food from
sticking on the bottom of the container.
Press the STOP button when you prefer. Should this
button not be pressed within 3 minutes, the device
switches to “energy save” mode.
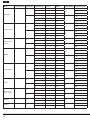
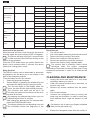
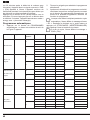
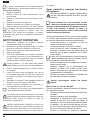
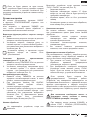
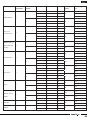
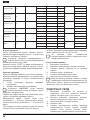
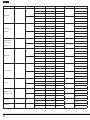
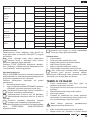
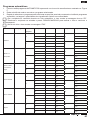
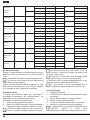
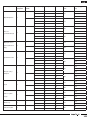
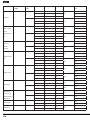
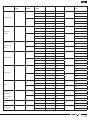
Automatic programs
1. Press the AUTOMATIC programs button: a
screen very similar to the one showed in Figure
F will appear.
2. Turn the knob in order to reach the selected
program.
3. After selecting the program you can select
the portions by pressing again the automatic
programs button; times and ingredients
quantities will vary accordingly.
If the container is removed during an automatic
cycle, the display shows the “E3” error
message. Replace the container on the unit and press
STOP/CANCEL to re-activate the screen and go on
with the processing.
At the end of the cycle the display shows the
“END” message.

29
iten
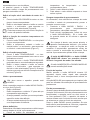
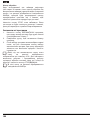
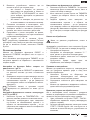
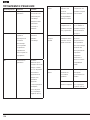
Name Program no. Portions no. Step no. Speed Minutes Total time Temperature (°C)
Browning 1
2
1 1 6
25
100
2 1 6 100
3 1 13 100
4
1 1 9
31
100
2 1 10 100
3 1 12 100
Risottos and
stews
2
2
1 2 6
24
100
2 2 4 100
3 2 14 100
4
1 2 7
26
100
2 2 5 100
3 2 14 100
Boiled meat
and steam
cooking
3
2
1 0 4
14
100
2 0 10 100
4
1 0 4
16
100
2 0 12 100
Braised meat 4
2
1 1 6
46
100
2 1 15 100
3 1 25 100
4
1 1 9
60
100
2 1 19 100
3 1 32 100
Rice-pasta 5
2
1 1 12
44
100
2 1 13 100
3 1 19 100
4
1 1 15
61
100
2 1 20 100
3 1 26 100
Soups 6
2
1 1 18
33
100
2 1 15 100
4
1 1 20
38
100
2 1 18 100
Vegetables
and cereals
creams
7
2
1 1 25
28
100
2 8 3 100
4
1 1 40
43
100
2 8 3 100
Veloutés 8 2
1 1 20
23
100
2 6 3 100
Vegetables 9 2
1 1 10
25
90
2 1 15 90

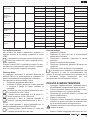
30
iten
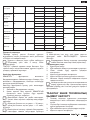
Sweet creams 10 -
1 5 1
7
0
2 2 1 90
3 2 5 90
Low-tempera-
ture cooking
11 -
1 1 5
65
100
2 1 20 80
3 1 40 80
Hot sauces 12 -
1 1 3
15
80
2 3 3 80
3 3 9 80
Cold prepara-
tions
13 -
1 5 2
6
-
2 5 4 -
Mixtures for
cakes
14 -
1 1 3
11
70
2 4 3 -
3 4 5 -
Jellys 15 -
1 - 10
26
90
2 1 14 90
3 8 2 90
At the end of the process
When the timer-set time is over the device will emit an
acoustic signal and on the display “END” will appear.
The device will keep mixing for 2 more minutes
in order to prevent the food from sticking on the
bottom of the container.
Press the STOP button when you prefer. Should this
button not be pressed within 3 minutes, the device
switches to “energy save” mode.
Delay function
The DELAY function can be associated to automatic
programmes; this will allow you to set a delay in the
start of the automatic program.
To set the delay function you have to:
1. Select the automatic program
2. Set the DELAY by pressing the suitable key and
and select the delay time by turning the knob.
The rst two digits on the display show the
hours, the third and the forth indicate minutes.
The minimum time which can be set is 30
minutes; the maximum time which can be set is
15 hours and 30 minutes.
By pressing the delayed start button you can
respectively set hours or minutes.
3. After setting the desired time for delayed start,
press the START/PAUSE button
The display shows the corresponding icon and
the countdown before the beginning of the
cycle.
End of the use
1. Turn off the device
2. Pull out the power cable plug from the wall socket
3. Take out the lid by turning it clock-wise
4. Take out the container from the device
5. Remove the accessory inside the container
6. Remove the food by using a palette blade
The product has a protection device which
intervenes when the engine undergoes
overheating. Please do not execute more than 3 long
consecutive processes in order not to overload the
engine.
CLEANING AND MAINTENANCE
1. Unplug the device and wait for it to cool down
completely before you clean it
2. Clean the external surface with a wet cloth, so
dry with a dry cloth.
3. Remove any excess residues from the power
cable.
4. Pull out the container.
5. Unmount the hexagonal insert by turning the
metal ring anti-clockwise, in order to clean any
food residues which might be present on the
seal.
Pat attention not to have your ngers smashed
when turning the metal ring.
6. Extract the hexagonal insert from the inside of

31
iten
the container.
7. Manually wash the hexagonal insert, its seal and
its metal ring with hot water and dishes soap.
Then, clean carefully.
8. Re-insert the hexagonal insert in the container
by holding it with your hand.
9. Insert the metal ring and turn clockwise until the
end of the stroke.
The container, the cover and the measuring
cup can be washed in the dishwasher.
To wash in the dishwasher please put the cup in
higher position, away from direct splashes of
water and use a medium-low temperature cycle.
Please regularly check the seal and lid integrity,
as well as the integrity of the hexagonal insert
seal, of the contacts and of the container’s connector.
Should they be worn out, please contact an authori-
sed service center.
Clean food residues after use
NEVER immerse the body in water. NEVER put
the engine under running water.
In some cases, depending on food and
preparations, there should be a residual lm on
the bottom; try and remove this with a palette knife. In
case it is still there, try and remove it with a metallic
abrasive sponge.
Carefully wash by hand with hot water and soap for
dishes all the moving parts which get in contact with
food:
• the dispenser cap, the lid, the lid seal and the
palette blade,
• the mixing blade and the steam basket.
• the stainless steel blade and the ice crusher
blade with a small brush and taking them from
the upper part in order not to get cut.
We recommend to wash all blades immediately
after use; please avoid leaving them in contact
with food.
• Wash the container with vinegar to remove any
residual scale traces.
• Clean the engine and the container’s housing
with a well-squeezed wet cloth; please avoid
to get water in the area where the connector is
located.
• Please remove any food residues from the
security device which is located on the column
on the base of the product.
Carefully dry the washed parts.
Cleaning using the engine
At the end of the processing, please clean the inside
of the container as follows:
• Remove from the container the food and the
accessory you’ve used.
• Insert the stainless steel blade.
• Please ll the container with hot water up to 1
litre and add a drop of dishes soap. If you don’t
want to use dishes soap you can add thick salt,
in order to better remove food residues, or lemon
juice, in order to eliminate any smells.
• Close the cover and insert the dispenser cap.
• Activate the PULSE button for the time you
deem necessary.
• Empty the container and wash it under running
water.
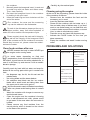
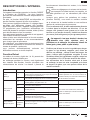
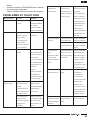
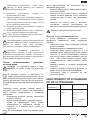
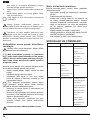
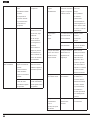
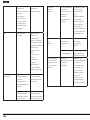
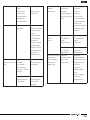
PROBLEMS AND SOLUTIONS
Error/Problem Causes Solutions
E1 Engine overload Reduce the quantity
of food inside the
container.
Pull out any food
residues from the
blades.
E3 The container is not
properly xed to the
base.
The container was
removed during the
processing or during
a program.
Correctly t the
container.

32
iten
E5 Engine abnormality. Let the engine cool
for about 30 minu-
tes, especially
if you’ve done inten-
se and prolonged
processes.
Should the problem
be still there
after the cooling
period,
please contact an
authorised service
center.
The device is
not working.
The device is not
connected to the
wall socket.
Insert the power
cable plug in the
wall socket.
The cable connector
wasn’t properly
connected to the
wall socket.
The cable connector
wasn’t properly
connected to the
device.
Please make sure
the cable is properly
connected to the
product’s plug.
The keys do not
react immediately.
The touch keys
of the commands
panel require the
correct contact time.
Press the keys for
a longer
time.
Should the problem
still be there,
maybe there is an
electromagnetic
interference in the
network: unplug and
plug back the power
cable.
Water is coming out
of the lid.
The lid seal is not
installed correctly.
Correctly mount the
seal of the
lid.
The lid seal is
damaged.
Please contact an
authorised service
center.
The lid is open
but on the display
there is a symbol of
a closed lid.
There are some
food residue in the
safety devices.
Please remove any
food residues from
the security devices.
Should the problem
persist, please do
not use the device
and contact
the authorised
service center.
The program
stopped before the
end.
Momentary black-
out.
Turn the device
back on and check
that the connector
is properly inserted
in the cable; restart
the processing by
referring to the equi-
valent recipe with
manual settings.
The engine function
(engine speed and
pulse) cannot be
activated.
The lid is not pro-
perly closed.
Correctly close
the lid.
DISPOSAL OF OLD ELECTRICAL
APPLIANCES
The European Directive 2012/19/EU on Wa-
ste Electrical and Electronic Equipment
(WEEE), requires that old household electri-
cal appliances must not be disposed of in the
normal unsorted municipal waste stream.
Old appliances must be collected separately
in order to optimise the recovery and
recycling of the materials they contain and
reduce the impact on human health and the envi-
ronment. The crossed out “wheeled bin” symbol on
the product reminds you of your obligation, that when
you dispose of the appliance it must be separately
collected. Consumers should contact their local au-
thority or retailer for information concerning the cor-
rect disposal of their old appliance.
Page is loading ...
Page is loading ...
Page is loading ...
Page is loading ...
Page is loading ...
Page is loading ...
Page is loading ...
Page is loading ...
Page is loading ...
Page is loading ...
Page is loading ...
Page is loading ...
Page is loading ...
Page is loading ...
Page is loading ...
Page is loading ...
Page is loading ...
Page is loading ...
Page is loading ...
Page is loading ...
Page is loading ...
Page is loading ...
Page is loading ...
Page is loading ...
Page is loading ...
Page is loading ...
Page is loading ...
Page is loading ...
Page is loading ...
Page is loading ...
Page is loading ...
Page is loading ...
Page is loading ...
Page is loading ...
Page is loading ...
Page is loading ...
Page is loading ...
Page is loading ...
Page is loading ...
Page is loading ...
Page is loading ...
Page is loading ...
Page is loading ...
Page is loading ...
Page is loading ...
Page is loading ...
Page is loading ...
Page is loading ...
Page is loading ...
Page is loading ...
Page is loading ...
Page is loading ...
Page is loading ...
Page is loading ...
Page is loading ...
Page is loading ...
Page is loading ...
Page is loading ...
Page is loading ...
Page is loading ...
Page is loading ...
Page is loading ...
Page is loading ...
Page is loading ...
Page is loading ...
Page is loading ...
Page is loading ...
Page is loading ...
Page is loading ...
Page is loading ...
Page is loading ...
Page is loading ...
Page is loading ...
Page is loading ...
Page is loading ...
Page is loading ...
Page is loading ...
Page is loading ...
Page is loading ...
Page is loading ...
Page is loading ...
Page is loading ...
Page is loading ...
Page is loading ...
Page is loading ...
Page is loading ...
Page is loading ...
Page is loading ...
Page is loading ...
Page is loading ...
Page is loading ...
Page is loading ...
Page is loading ...
Page is loading ...
Page is loading ...
Page is loading ...
Page is loading ...
Page is loading ...
Page is loading ...
Page is loading ...
Page is loading ...
Page is loading ...
Page is loading ...
Page is loading ...
Page is loading ...
Page is loading ...
Page is loading ...

Indesit Company SpA
Viale Aristide Merloni, 47
60044 Fabriano (AN), Italy
www.indesitcompany.com
ÜLKEYE ÖZGÜ BILGILER KITAPÇIĞIN SON SAYFASINDA BULABILIRSINIZ
MC 057 EU
03/2015 - ver. 1.0
-
 1
1
-
 2
2
-
 3
3
-
 4
4
-
 5
5
-
 6
6
-
 7
7
-
 8
8
-
 9
9
-
 10
10
-
 11
11
-
 12
12
-
 13
13
-
 14
14
-
 15
15
-
 16
16
-
 17
17
-
 18
18
-
 19
19
-
 20
20
-
 21
21
-
 22
22
-
 23
23
-
 24
24
-
 25
25
-
 26
26
-
 27
27
-
 28
28
-
 29
29
-
 30
30
-
 31
31
-
 32
32
-
 33
33
-
 34
34
-
 35
35
-
 36
36
-
 37
37
-
 38
38
-
 39
39
-
 40
40
-
 41
41
-
 42
42
-
 43
43
-
 44
44
-
 45
45
-
 46
46
-
 47
47
-
 48
48
-
 49
49
-
 50
50
-
 51
51
-
 52
52
-
 53
53
-
 54
54
-
 55
55
-
 56
56
-
 57
57
-
 58
58
-
 59
59
-
 60
60
-
 61
61
-
 62
62
-
 63
63
-
 64
64
-
 65
65
-
 66
66
-
 67
67
-
 68
68
-
 69
69
-
 70
70
-
 71
71
-
 72
72
-
 73
73
-
 74
74
-
 75
75
-
 76
76
-
 77
77
-
 78
78
-
 79
79
-
 80
80
-
 81
81
-
 82
82
-
 83
83
-
 84
84
-
 85
85
-
 86
86
-
 87
87
-
 88
88
-
 89
89
-
 90
90
-
 91
91
-
 92
92
-
 93
93
-
 94
94
-
 95
95
-
 96
96
-
 97
97
-
 98
98
-
 99
99
-
 100
100
-
 101
101
-
 102
102
-
 103
103
-
 104
104
-
 105
105
-
 106
106
-
 107
107
-
 108
108
-
 109
109
-
 110
110
-
 111
111
-
 112
112
-
 113
113
-
 114
114
-
 115
115
-
 116
116
-
 117
117
-
 118
118
-
 119
119
-
 120
120
-
 121
121
-
 122
122
-
 123
123
-
 124
124
-
 125
125
-
 126
126
-
 127
127
-
 128
128
-
 129
129
-
 130
130
-
 131
131
-
 132
132
-
 133
133
-
 134
134
-
 135
135
-
 136
136
-
 137
137
-
 138
138
-
 139
139
-
 140
140


HOTPOINT/ARISTON MC 057C AX0 Owner's manual
- Type
- Owner's manual
Ask a question and I''ll find the answer in the document
Finding information in a document is now easier with AI
in other languages
- italiano: HOTPOINT/ARISTON MC 057C AX0 Manuale del proprietario
- français: HOTPOINT/ARISTON MC 057C AX0 Le manuel du propriétaire
- русский: HOTPOINT/ARISTON MC 057C AX0 Инструкция по применению
- português: HOTPOINT/ARISTON MC 057C AX0 Manual do proprietário
- Türkçe: HOTPOINT/ARISTON MC 057C AX0 El kitabı
Related papers
Other documents
-
Carrera 655 User manual
-
Moulinex LM9051B1 User manual
-
Philips HR2092/75 User manual
-
Silvercrest SKMK 1200 A1 Operating Instructions Manual
-
-
Indesit K6C10(W)/R S User guide
-
Silvercrest MONSIEUR CUISINE SKMH 1100 A1 Operating Instructions Manual
-
Moulinex LM90A110 Owner's manual
-
-
Tefal BL908160 User manual