Page is loading ...

COMPACT Jump
Start
& Power Supply
OWNER’S MANUAL

2
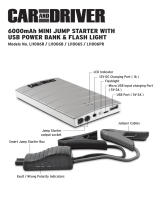
PRODUCT LAYOUT
Welcome
Thank you for choosing an Aerpro product. We are dedicated to providing
products that represent both quality and value. Please read the Owner's
Manual carefully before using this product.
Packing List
• AP90006L COMPACT JUMP STARTER
• Premium Protection Cables
• 12V DC Car Adapter
• Home AC Adapter
• Rubber Case
• Owner’s Manual
Feature Description

3
WARNINGS AND SAFETY GUIDELINES
Please read these safety instructions, operating instructions, and warnings
before charging or using your COMPACT JUMP STARTER.
Explosion Hazard - USE ONLY IN WELL VENTILATED AREAS. The jump
start cable clamps MUST be connected in correct polarity ~ RED clamp to the
battery Positive (+) and BLACK clamp to the battery Negative (-) terminals,
making sure they have a good connection. A reverse polarity connection
(positive to negative) can cause damage to the COMPACT JUMP STARTER
and/or create a sparking/explosion hazard.
Fire Hazard - Do not crush, puncture or damage the COMPACT JUMP
STARTER.
Never allow the jump start clamps to touch each other or another common
metal conductor. This could cause damage to the unit and/or create a fire
hazard. Always disconnect the jump start cables from the COMPACT JUMP
STARTER after each use and store separately.
Burn Hazard - Keep away from children. Do not insert foreign objects into
the jumper cables port/jack, the USB output port, or the DC input jack. Do not
expose this product to water, rain, snow, condensation, or spray. Do not open
the COMPACT JUMP STARTER to replace the internal battery. There are no
user replaceable parts inside the COMPACT JUMP STARTER.
Additional Warnings
1. Keep the unit clear of fire and water.
2. USE ONLY THE AEPRO PREMIUM PROTECTION CABLES. Use of other
cables may result in damage to the COMPACT JUMP STARTER, fire,
personal injury and damage to vehicle or property.
3. If at any time you witness COMPACT JUMP STARTER starting to swell,
smoke, or become hot to the touch, DISCONNECT THE COMPACT JUMP
STARTER AND DISCONTINUE USE IMMEDIATELY. Move COMPACT
JUMP STARTER to a safe place away from combustible materials and
safely observe it for approximately 15 minutes as a battery can still ignite
after 10 minutes.

4
CAUTIONS - PLEASE READ
Cautions
1. The COMPACT JUMP STARTER is intended for use on a discharged, but
otherwise capable battery. It will not work on a battery that has developed a
shorted cell or become damaged. If vehicle cannot be jump started, have
battery tested and/or replaced.
2. Before attempting to start 12V vehicle, please make sure at least 3 LED
lights are illuminated on COMPACT JUMP STARTER when pressing the
power button.
3. Always use COMPACT JUMP STARTER in a well-ventilated area and keep
COMPACT JUMP STARTER away from children, fire, water, explosive gasses,
and combustible materials.
4. DO NOT CRANK IGNITION FOR MORE THAN 3 SECONDS. Cranking for
more than 3 seconds may cause damage to the unit. If vehicle does not
start, wait 1 minute before trying again. The jump-start feature is designed
for short term operation only. Refer to page 8 for additional information.
5. If COMPACT JUMP STARTER becomes warm to the touch during use,
disconnect COMPACT JUMP STARTER from the cables and allow to cool
before reattempting to start the vehicle.
6. When charging COMPACT JUMP STARTER, please place on a hard surface
and keep away from combustible materials. Please don’t leave unattended
while charging.

5
BATTERY PRECAUTIONS
1. Lithium Polymer batteries are volatile. Failure to read and follow the use
and operating instructions may result in fire, personal injury and damage
to property if charged or used improperly. Li-Polymer battery may explode
and cause fire if misused or defective. Please follow our jump starting
Instructions exactly which are listed in the Owner’s Manual, label on the
COMPACT JUMP STARTER, and the information card included.
2. Never allow a metal tool to concurrently touch the positive and negative
cable ends or battery terminals.
3. Be sure someone is close enough to come to your aid when working with
batteries.
4. If you need to remove a vehicle battery, always remove the negative terminal
from the battery first. Make sure all accessories are off so you don’t cause an
arc.
5. When working with lead-acid vehicle batteries, have ample water, soap and
baking soda on hand in case of skin contact with battery acid.
6. The COMPACT JUMP STARTER is supplied with an internal rechargeable Li-
Polymer battery.
This battery is self-contained and not consumer replaceable. Battery must
be disposed of properly when it no longer holds a charge. Proper charging
practices will increase the life of the batteries.

6
CHARGING
Charging the COMPACT JUMP STARTER
1. Plug the home adaptor into a 100-240V AC outlet of the proper plug type.
2. Connect the other end of the home adaptor to the 12V DC IN Charging Port.
-or-
1. Plug the car adaptor into the socket of the vehicle aux power.
2. Connect the other end of the car adaptor to the 12V DC IN Charging Port.
(Refer to NOTE 3 below)
Indicator Lights
Press the power button to check the level of the COMPACT JUMP STARTER
battery. Number of lights ON indicate percentage of charge available.
(1=20%, 2=40%, 3=60%, 4=80%, 5=100%)
NOTES:
1. The COMPACT JUMP STARTER should be charged before initial use. Place
on a hard surface and keep away from combustible materials. Please don’t
leave unattended while charging.
2. A minimum of 3 indicator lights must be illuminated before attempting to
jump start a vehicle.
3. The COMPACT JUMP STARTER will flash all 5 battery indicators
simultaneously and provide an audible beep if the input charging voltage is
too low or too high.
4. Periodic charging every 3-4 months is recommended when COMPACT
JUMP STARTER is being stored for long periods of time.

7
CHARGING
5. When charging, the LED indicator lights will sequentially flash. The
percentage of charge completed is indicated by the number of solid
lights as charging progresses. The COMPACT JUMP STARTER is fully
charged when all lights are solid.
6. If during charging COMPACT JUMP STARTER begins beeping and
stops charging IMMEDIATELY DISCONNECT COMPACT JUMP
STARTER FROM POWER SUPPLY AND DISCONTINUE USE. Refer to
FAQ’s.
For Charging / Powering Devices Using USB Port
1. Plug the USB cable of the device into the USB output port of the COMPACT
JUMP STARTER.
2. Press the COMPACT JUMP STARTER power button to initiate
charging/ power to the attached device.

8
JUMP STARTING
WARNING
Explosion Hazard - USE ONLY IN WELL VENTILATED AREAS. The jump
start cable clamps MUST be connected in correct polarity ~ RED clamp
to the battery Positive (+) and BLACK clamp to the battery Negative (-)
terminals, making sure they have a good connection. A reverse polarity
connection (positive to negative) can cause damage to the COMPACT
JUMP STARTER and/or create a sparking/explosion hazard.
USE ONLY THE AEPRO PREMIUM PROTECTION CABLES. Use of other
cables may result in damage to the COMPACT JUMP STARTER, fire,
personal injury and damage to vehicle or property.
For Jump Starting 12V Vehicle
1. Before attempting to start 12V vehicle, please make sure at least 3 LED lights
are illuminated on the COMPACT JUMP STARTER when pressing the power
button.
2. Connect the Red clamp to the battery Positive (+) and Black clamp to the
battery Negative (-) terminals, making sure they have a good connection.
WARNING: REVERSING THE CONNECTIONS MAY RESULT IN DAMAGE TO
THE COMPACT JUMP STARTER, FIRE OR PERSONAL INJURY.
3. Insert the blue connector firmly into the Jump Start port. (If below 0o C, please
allow a few minutes before starting the vehicle)
4. Start the vehicle. CAUTION: DO NOT CRANK IGNITION FOR MORE THAN 3
SECONDS. If vehicle does not start, wait 1 minute before trying again.
5. Once vehicle is started, unplug the blue connector from COMPACT JUMP
STARTER and then remove the battery clamps.
START

9
JUMP STARTING
CAUTION: The jump start feature is designed for short term operation only.
Turn the ignition key for no more than 3 seconds at a time. Operating the
jump start feature for more than 3 seconds may cause damage to the unit.
Allow the COMPACT JUMP STARTER to cool down for at least 1 minute
after each jump start attempt.
CAUTION: NEVER press the cable RESET button before having the cables
properly connected to the vehicle battery. Failure to follow proper
connection sequence outlined in JUMP STARTING section of this manual
MAY RESULT IN DAMAGE TO COMPACT JUMP STARTER, TO THE VEHICLE,
OR PERSONAL INJURY. Always disconnect the jump start cables from the
COMPACT JUMP STARTER after each use and store separately.
The Premium Protection Cables provided have a built-in feature that prevents
cranking for more than 3 seconds and will automatically enter a 60 second rest
period between cranking attempts (indicated by cable LED blinking GREEN).
After 5 consecutive starting attempts, the protection cables must be reset by
pressing the RESET button before another starting attempt can be made. If
COMPACT JUMP STARTER becomes warm to the touch, disconnect COMPACT
JUMP STARTER from the cables and allow it to cool before reattempting to
start the vehicle. Please refer to Protection Cable Operation on pages 10 & 11
for additional information.

COMPACT JUMP STARTER Premium Protection Cable Operation
LED Status Condition Description Action
GREEN Solid
COMPACT JUMP STARTER voltage
above 11V, vehicle battery above
low limit threshold, and cable
polarity correct. NOTE: If no
starting attempt is made within 2
mins of connection to vehicle
battery: a) light will remain GREEN.
b) light will change to fast blinking
AMBER (see below). c) light will
change to solid AMBER (see below).
Vehicle may now attempt to
be started.
GREEN blinking
Starting current detected for
maximum 3 se
conds, then ent
ers
60 second rest period, with no
current output allowed.
After 60 seconds, LED will
indicate status. NOTE: If no
starting attempt was made,
cables detected a heavy load
from vehicle system
indicating a
defective/damaged vehicle
battery or vehicle system
issue which must be resolved
befo
re using
COMPACT JUMP
STARTER. Have vehicle
battery tested and/or
replaced.
GREEN fast
blinking
After 5 consecutive starting
attempts of 3 sec cranking/60 sec
rest cycle, no current output
allowed.
Press RESET button to
initiate another
5 starting attempt cycles.

COMPACT JUMP STARTER Premium Protection Cable Operation
AMBER
solid
COMPACT JUMP STARTER
voltage is lower than 11V (
3
bars or less on COMPACT
JUMP STARTER). No current
output allowed and RESE
T
button disabled.
Fully charge COMPACT JUMP
STARTER before attempting to
start vehicle.
AMBER
fast
blinking
COMPACT JUMP STARTER
voltage is above 11V (3
bars or more on
COMPACT
JUMP STARTER), vehicle
battery not detected. No
current output allowed.
NOTE: Clamps are not
connected to vehicle batter
y
or vehicle battery is below
low limit threshold.
Check for secure battery
cable/clamp connections to
vehicle battery. If AMBER light
continues to fast blink, press
RESET button for vehicle battery
“system check”. NOTE: A vehicle
battery below low limit threshold
may need to be recharged or
replaced.
AMBER
/GREEN
alt
ernating
blinking
Indicates 3 second vehicle
battery “system check” in
progress after pressing
RESET button when
properly connected to a
vehicle battery.
After “system check”, LED will
return with system status
confirmation. Refer to listed LED
Status for further actions.
RED fast
blinking
COMPACT JUMP STARTER
voltage is above 11V,
cables connected in
reverse polarity or vehicle
battery short detected.
No
current output allowed an
d
RESET button disabled.
Disconnect cables from
COMPACT JUMP STARTER and
remove clamps from vehicle
battery. Connect clamps to
vehicle battery in correct polarity
(positive-to- positive/negative-
to-negative) and then reconnect
cables to COMPACT JUMP
STARTER to reset. NOTE: Source of
problem must be resolved before
reattempting to start vehicle using
COMPACT JUMP STARTER.

FLASHLIGHT FUNCTION
12
Flashlight LED Illumination
Press and hold the power button for 3 seconds to initiate the flashlight. Once
the flashlight is on, a press and release of the power button will change to an
alternate mode of operation in the order listed below. To shut the flashlight off,
you must cycle through the selections.
FLASHLIGHT BEACON STROBE SOS OFF

13
FREQUENTLY ASKED QUESTIONS
Frequently Asked Questions
Q: What may the COMPACT JUMP STARTER be used to jump start?
A: The COMPACT JUMP STARTER is for use on single battery 12V systems
like GARDEN TRACTORS, ATV’s, BOATS, MOTORCYCLES and PASSENGER
VEHICLES (Up to 6 litres, Diesels up to 4.5 litres.)
Q: How to turn off the COMPACT JUMP STARTER?
A: The COMPACT JUMP STARTER will power off automatically when no
load or charging is detected
Q: How many times can the COMPACT JUMP STARTER charge my mobile
phone?
A: Approximately 7 times depending on phone
Q: How long will the COMPACT JUMP STARTER take to fully charge my mobile
phone?
A: 1-2 hours depending on phone
Q: How many times can a fully charged COMPACT JUMP STARTER start the
vehicle?
A: 10 times or more depending on vehicle
Q: How long will the COMPACT JUMP STARTER hold a charge?
A: The COMPACT JUMP STARTER will hold a charge up to 1 year (refer to
Charging Section in manual)

14
FREQUENTLY ASKED QUESTIONS
Q: Why does the COMPACT JUMP STARTER stop charging and begin
beeping?
A: The COMPACT JUMP STARTER has detected a problem with charging and
has discontinued charging as a safety precaution. Press and hold the power
button for 10-30 seconds to force the continuation of charging and possibly
correct the detected charging issue. After pressing and holding the power
button, disconnect the charger from the wall and the COMPACT JUMP
STARTER to reset. Reconnect charger to allow the unit to begin charging
normally – HOWEVER – if after this process the unit again discontinues
charging and begins to beep, IMMEDIATELY DISCONNECT COMPACT
JUMP STARTER FROM POWER SUPPLY AND DISCONTINUE USE.
NOTE: Pressing and holding the power button will cause the flashlight to
turn ON which is normal. After disconnecting charger, the flashlight may be
turned OFF before reconnecting
Q: Why does the COMPACT JUMP STARTER not indicate charging when
using a vehicle power port adapter?
A: Start the vehicle to provide adequate voltage for charging (refer to page 6)
Q: How do I dispose of the COMPACT JUMP STARTER when it reaches end of
service life?
A: The COMPACT JUMP STARTER contains a rechargeable Lithium Polymer (LiPo)
battery pack.
This battery pack is self-contained and is not replaceable. Refer to page 5
for battery disposal information

15
SPECIFICATIONS
SPECIFICATIONS
SIZE: 130mm x 78mm x 24mm (5.1” x 3.0” x 0.9”)
WEIGHT: <1 lb. with silicone cover
BATTERY CAPACITY: 33300 mWh
OUTPUT: 5V=2.4A; 12V=HIGH CURRENT*
INPUT: 14V < 1A
FULL CHARGING TIME: 3-4 hours
*STARTING CURRENT: 200A (< or = 3 second)
*PEAK CURRENT: 400A (inrush current)
OPERATING TEMP (Charge):
0°~ 40°
C
(32°~ 104°
F)
OPERATING TEMP (Discharge):
-20°~ 60°
C
(-4°~ 140°
F)
STORAGE TEMP:
-10°
~
30°
C
(14°~ 86°
F)
LIFETIME: >1000 Cycles depending on usage

Technical Assistance
If you need assistance setting up or using your
Aepro product now or in the future, call Aepro
Support.
Australia
TEL: 03 – 8587 8898
FAX: 03 – 8587 8866
Mon-Fri 9am – 5pm AEST
Please retain this user guide for future reference
1/16