
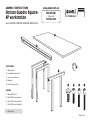
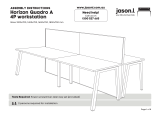
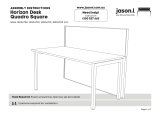
ASSEMBLY INSTRUCTIONS
Horizon Quadro Square
4P workstation
Sizes: 1200x700, 1400x700, 1600x700, 1800x700 mm
Page 1 of 8
Need help!
Call us on
1300 527 665
www.jasonl.com.au
Tools Required: Power screwdriver; Allen key set (provided)
2 persons required for installation

ASSEMBLY INSTRUCTIONS
Horizon Quadro Square
4P workstation
Sizes: 1200x700, 1400x700, 1600x700, 1800x700 mm
Table top x4
Leg Quadro Square x4
Connector frame x2
Beam x4
Plastic bracket x16
A
B
C
D
E
Allen key x2J
M8x20MM CSK x8
M8x20MM Socket head x8
M6x20MM Socket head x16
M6x30MM Socket head x16
F
G
H
I
COMPONENTS
SCREWS
Page 2 of 8
Need help!
Call us on
1300 527 665
www.jasonl.com.au
D
E
F G H I
A
B
C

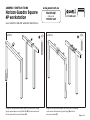
ASSEMBLY INSTRUCTIONS
Horizon Quadro Square
4P workstation
Sizes: 1200x700, 1400x700, 1600x700, 1800x700 mm
Using Allen Key provided, attach 2 plastic brackets per leg (E)
(as per picture above) using M6x20MM (H) Socket head screw.
Do the same with Connector frame (C).
Using Allen Key provided, attach M8x20MM Socket head (G)-
screw socket half way into leg for all legs (B) and into
Connector frame (C).Page 3 of 8
Need help!
Call us on
1300 527 665
www.jasonl.com.au
G
H
STEP 01 STEP 02

ASSEMBLY INSTRUCTIONS
Horizon Quadro Square
4P workstation
Sizes: 1200x700, 1400x700, 1600x700, 1800x700 mm
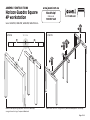
STEP 03
Adjust extendable beam (D) to desired
length using markers and secure beam
at that length using screws provided
Page 4 of 8
Need help!
Call us on
1300 527 665
www.jasonl.com.au
50
1200
1300
1400
1500
1600
1700
1800
1900
2000
50

ASSEMBLY INSTRUCTIONS
Horizon Quadro Square
4P workstation
Sizes: 1200x700, 1400x700, 1600x700, 1800x700 mm
Attach beam (D) to legs (B) and Connector frame (C)
using nut insert in legs. See point attached
Frame looks like this. Using Allen Key, attach beam (D) with Socket (F)
Page 5 of 8
Need help!
Call us on
1300 527 665
www.jasonl.com.au
STEP 04
TOP VIEW
STEP 05
F
F
F
F

ASSEMBLY INSTRUCTIONS
Horizon Quadro Square
4P workstation
Sizes: 1200x700, 1400x700, 1600x700, 1800x700 mm
Page 6 of 8
Need help!
Call us on
1300 527 665
www.jasonl.com.au
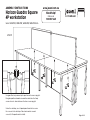
I
STEP 06
Place desktops ontop of frame. Nut inserts in top will align with plastic
joiner brackets using M6x30MM (I) sockets attach tops to frame.
TABLE TOP
BOTTOM VIEW

ASSEMBLY INSTRUCTIONS
Horizon Quadro Square
4P workstation
Sizes: 1200x700, 1400x700, 1600x700, 1800x700 mm
Need help!
Call us on
1300 527 665
www.jasonl.com.au
Page 7 of 8
TABLE TOPS
BOTTOM VIEW
The following nut inserts should be used for this specific desk / workstation
nut insertnut insert nut insertnut insert
nut insertnut insert nut insertnut insert

ASSEMBLY INSTRUCTIONS
Horizon Quadro Square
4P workstation
Sizes: 1200x700, 1400x700, 1600x700, 1800x700 mm
Need help!
Call us on
1300 527 665
www.jasonl.com.au
STEP 07
Page 8 of 8
Under the desktops, use l-shaped panel brackets to secure
the screens to the desktops. Place two brackets in each
screen (4 L-Shaped bracket in total).
Using an Allen key remove top 2 caps from all screens uprights.
Bring two partition towards one another and slide the 2 way
connector rod - down between the two screen uprights.
-
 1
1
-
 2
2
-
 3
3
-
 4
4
-
 5
5
-
 6
6
-
 7
7
-
 8
8


Jason.L HQSB4147.B.WT.AB Operating instructions
- Type
- Operating instructions
- This manual is also suitable for
Ask a question and I''ll find the answer in the document
Finding information in a document is now easier with AI
Related papers


Other documents
-
 JasonL HQAB4127.W.WT.GS Operating instructions
-
 JasonL DBQS1010.W Operating instructions
-
 JasonL HQSR2167.W.WT.GS Operating instructions
-
 JasonL HQA1807.W.WT.GS Operating instructions
-
 JasonL HQS1807.W.WT.GS Operating instructions
-
 JasonL QDPR3167.W.WT Operating instructions
-
 JasonL QDSR3147.W.WT Operating instructions
-
 JasonL HQSR3127.W.WT.GS Operating instructions
-
 JasonL QDA1807.W.ME Operating instructions
-
 JasonL QDS1607.W.ME Operating instructions


