Astell & Kern Astell & Kern SP1000 User manual
- Category
- Headphone amplifiers
- Type
- User manual
This manual is also suitable for

INSTRUCTION BOOK
SP1000
User Guide

Package Contents
Description of Each Part
Power Management
Charging
Connections
Firmware Upgrade
02
03
05
06
07
12
Getting Started
_01
Basic Operations
Home Screen
Notification Bar
Music Store
AK CONNECT
Listening to Music
Manage Playlist
USB DAC Installation
How to Use USB Audio
Automatic CD Ripping
Settings
Connecting to Wi-Fi
Using Bluetooth
Equalizer Setup
13
17
19
22
23
29
32
35
36
37
39
44
45
47
Using the Device
_02
Safety cautions
Troubleshooting
Copyright
Certifications
Registered Trademarks
Disclaimers
Specifications
50
52
53
54
55
56
57
Miscellaneous
_03
CONTENTS

User Guide
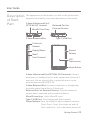
Protective Film: Protects the product’s screen.
Type-C USB Cable: For charging and data transfer.
Quick Start Guide: It describes the basic method of using
the product.
Warranty Card: The warranty card is required for customer
support. Keep the warranty card for technical support.
User Guide: The User Guide can be downloaded from the
Astell&Kern website.
[http://www.astellnkern.com/ > Support > Download].
MicroSD card tray: Holds MicroSD card. Tray is installed on
the product by default.
Pin for the tray: Open the tray by inserting the pin provided
into the MicroSD card tray hole.
Contents may be changed without prior notice to improve the
performance or quality of the product.
Package
Contents
Pin for the trayQuick Start Guide
& Warranty Card
MicroSD
card tray
Type-C USB CableProtective FilmSP1000
Getting Started
02

3.5mm Unbalanced Port/OPTICAL OUT terminal: Connect
earphones or headphones for audio output that utilize a 3.5
mm jack. Use an optical cable to play back music on an
external device with S/PDIF-IN.
2.5mm Balanced Port: Connect earphones or headphones
for audio output that utilize a 2.5mm jack.
Balanced Port for External Devices: Provides balanced
output when connected with an external device.
MicroSD card tray: Holds MicroSD card.
Type-C USB Port: For charging and data transfer.
Power/Volume: Turn the wheel to adjust playback volume.
Short Press: Turns the screen on and off.
Press and Hold - Turns the device on and off.
Getting Started
03
User Guide
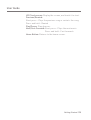
The appearance of the product, as well as the printed and
engraved information, may vary depending on the model.
Description
of Each
Part
LCD
Touchscreen
Home Button
Power/
Volume
Previous/
Rewind
Next/
Fast-Forward
Replay/Pause
3.5mm Unbalanced Port/
OPTICAL OUT terminal
MicroSD Card Tray
2.5mm Balanced Port
Balanced Port for
External Devices
Type-C USB Port

User Guide
Getting Started
04
LCD Touchscreen: Display the screen, and touch it to start.
Previous/Rewind:
Short press - Plays the previous song or restarts the song.
Press and hold - Rewind
Play/Pause: Plays/pauses.
Next/Fast-Forward: Short press - Plays the next music.
Press and hold - Fast-forwards.
Home Button: Returns to the home screen.

Getting Started
05
User Guide
Resetting the device will not affect stored data or time settings. Do
not use the reset function while the product is in use. Doing so may
corrupt the data on the device.
This device has an automatic timeout feature to save battery power.
The screen will turn off if there is no user input during the period
defined in [Menu - Settings - Power - Screen Timeout]. (See Page 42.)
Reset Function
1. In case of an unexpected device failure or freeze, press and
hold [Power] for 7 seconds to force a shutdown. The device
can then be restarted after the shutdown is complete.
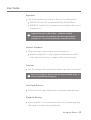
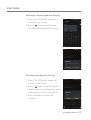
Turn the Screen On/Off
1. While the screen is on, press the [Power/Volume] to turn
off the screen.
2. Press [Power/Volume] again to turn it on.
This device has an automatic shutdown feature to save battery
power. The device will turn off if there is no user input during the
period defined in [Menu - Settings - Power - Automatic Shutdown]
(See Page 42.)
Turning on/off Power
1. Press and hold the [Power/Volume button] to turn on the
device.
2. While the device is on, press and hold the [Power/Volume
button] to shut down the device. A confirmation message
will appear.
3. Press [Confirm] to turn off the device.
Power
Manage-
ment

User Guide
Getting Started
06
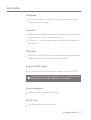
Computer may need to be turned on to start charging depending on
computer specifications.
When charging via computer connection, the charging time may
vary depending on whether the device is turned on or off.
Some computers in power-saving mode may not charge the device.
The built-in battery will gradually lose capacity over time with
repeated charging/running-down.
Do not use cables other than USB Type C cables. Using other cables
may cause malfunctions.
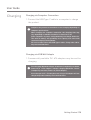
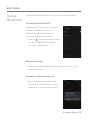
Charging via Computer Connection
1. Connect the USB Type-C cable to a computer to charge
the product.
Fast charging: Maximum 2 hours 20 minutes (Completely run-down,
Power-off,9V 1.67A adapter) / Normal charging: Maximum 5 hours
(Completely run-down, Power-off, 5V 2A adapter)
A fast charger of 9V 1.67A may be used. Using a 12V adapter will not
charge the product and may cause malfunctions.
Charging via USB Wall Adapte
1. Commercially available 9V 1.67A adapters may be used for
charging.
Charging

Getting Started
07
User Guide
Connec-
tions
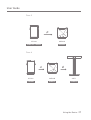
3.5mm Unbalanced Port
1. Connect earphones or headphones to the 3.5mm
unbalanced port.
Connect to the 2.5mm Balanced Port
1.
Connect earphones and headphones to the 2.5mm balanced port.
OR
OR
Balanced Audio Device
1. Connect to an external audio device by using the 3.5mm
Unbalanced Port and 2.5mm Balanced Port.
Earphones
Port (Ground)
Balanced Port (LR)

Getting Started
08
User Guide
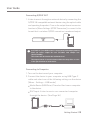
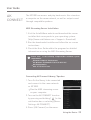
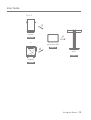
Connecting to Computer
1. Turn on the device and your computer.
2. Connect the device to your computer using USB Type-C
cable and select one of the following settings on the device
[Menu - Settings - USB mode]
Media Device (USB Drive): Transfer files from a computer
to the device.
DAC Input: Listen to music on a connected computer
through the device. (See Page 36.)
Connecting S/PDIF OUT
At S/PDIF OUT, the DSD format is converted to PCM and played back.
PCM can select output bit rate (16/24bit) and sample rate
(48/96/192kHz).
The volume will be fixed at the maximum level.
The output format of connected external devices may differ so refer
to the specifications of each device.
1. Listen to music through an external device by connecting the
S/PDIF-IN-compatible external device using the optical cable
and operating the product. Turn on the output format conversion
function in [Menu-Settings-S/PDIF Conversion], to convert to the
format that is set when S/PDIF connection is made and output.

Getting Started
09
User Guide
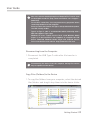
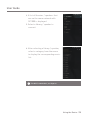
Copy Files (Folders) to the Device
1. To copy files/folders from your computer, select the desired
files/folders and drag & drop them into the device folder.
Disconnecting from the Computer
1. Disconnect the USB Type-C cable after file transfer is
completed.
Disconnecting the device from the computer during file transfer
may corrupt data on the device.
Mac users need to download and install Android File Transfer from
the Astell&Kern website. [http://www.astellnkern.com > Support >
Download]
For the best connection, close any unnecessary programs before
connecting the device to the computer.
Do not use cables other than the USB Type-C cable provided with the product.
Use USB 2.0 only on Mac.
Type-C-to-Type-C cable is recommended when connecting with a
MAC that supports Type C port
Windows XP users require Service Pack 2 and Windows Media
Player 10 to be installed for the computer to recognize the USB
device. Download Windows Media Player and required Service
Packs from the Microsoft website. http://www.microsoft.com

Getting Started
10
User Guide
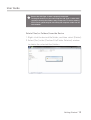
Delete Files (or Folders) from the Device
1. Right-click the desired file/folder, and then select [Delete].
2. Select [Yes] in the [Confirm File/Folder Deletion] window
to delete the selected files/folders.
Ensure the USB Type-C cable is properly connected.
Turning off the device or disconnecting the USB Type-C cable while
copying or moving files/folders may corrupt files or device memory.
File transfer speeds may be affected by the computer and/or the OS
environment.

Getting Started
11
User Guide
Maximum Capacity: 256GB
Notes on Inserting MicroSD Card
When inserting the MicroSD card, do not use excessive force.
This may cause damage to the device and the card.
Do not repeatedly insert/remove the MicroSD card.
If the card is improperly inserted, it may become stuck or cause
damage to the device.
Notes on removing a MicroSD card
Be sure to safely dismount and remove the MicroSD card from the
device. Not dismounting the MicroSD card before removal may
corrupt data on the MicroSD card and device.
Do not disconnect the MicroSD card during use. Doing so may
damage the MicroSD card, corrupt or delete data and cause the
device to malfunction.
Recommended MicroSD Cards
SanDisk, Transcend
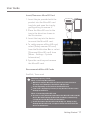
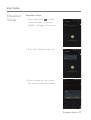
Insert/Remove a MicroSD Card
1. Insert the pin provided with the
product into the MicroSD card
tray hole and open the tray by
gently pulling to remove it.
2. Place the MicroSD card in the
tray in the direction shown in
the illustration.
3. Insert the tray into the device
to mount the MicroSD card.
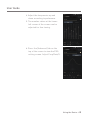
4. To safely remove a MicroSD card,
select [Safely remove SD card]
from the Notification Bar or select
[Dismount MicroSD card] from
[Menu - Settings - System
Information].
5. Open the card tray and remove
the MicroSD card.

Getting Started
12
User Guide
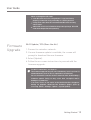
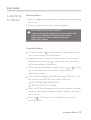
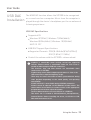
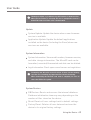
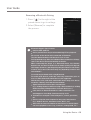
For Wi-Fi connections, see Page 44.
The firmware upgrade may not start if the battery level is too low. (A
minimum battery level of 20% is required for installation.)
Do not disconnect from the wireless network while downloading a
firmware update. Doing so may cause data corruption and/or
damage to system files.
If an error occurs or the notice in the Notification Bar disappears
during an upgrade, download the firmware update again by
accessing [Menu - Settings - Update - System Update].
Wi-Fi Update / OTA (Over-the-Air)
1. Connect to a wireless network.
2. If a new firmware update is available, the screen will
prompt to download the new firmware.
3. Select [Update].
4. Follow the on-screen instructions to proceed with the
firmware upgrade.
Firmware
Upgrade
Notes on Using MicroSD Cards
If the MicroSD card is not recognized or is not functioning
properly, format the card, preferably as a FAT32 partition.
Using cards other than the recommended MicroSD card may
cause issues.
A MicroSD card is not included in the product package. MicroSD
cards must be purchased separately.

User Guide
Using the Device
13
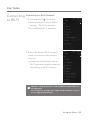
Basic
Operations
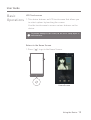
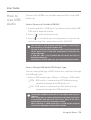
LCD Touchscreen
1. This device features an LCD touchscreen that allows you
to select options by touching the screen.
Use the touchscreen to access various features on the
device.
To prevent damage to the screen, do not use a sharp object or
excessive force.
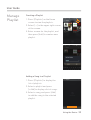
Return to the Home Screen
Home Screen
1. Press [ ] to go to the Home Screen.

Using the Device
14
User Guide
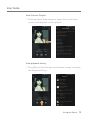
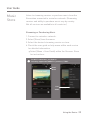
Menus
1. Touch and hold, then drag your finger to the right or left in
the home screen to display menus.
Notification Bar
1. Touch and hold, then drag your finger down on the home
screen to display the notification bar.
The CD library menu is displayed when music files are extracted
with AK CD-RIPPER and songs are stored in the Ripping folder.

Using the Device
15
User Guide
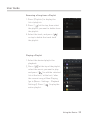
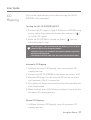
View Current Playlist
1. Touch and hold, then drag your finger left on the home
screen to display the current playlist.
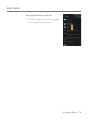
View playback history
1. Drag [Down / Up] direction on the Home screen to display
the playback history.

Using the Device
16
User Guide
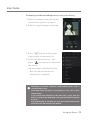
Moving Up/Down on the List
1. Scroll through the list by dragging
your finger up and down.

Using the Device
17
User Guide
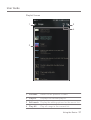
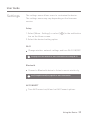
Displays the menu.
Displays current song information.
Indicates the song’s total duration.
Go to the last displayed list.
Add the selected song to the playlist.
Song title information.
File name is displayed when ID3Tag
is unavailable.
Menus
Details
Song Duration
Current Album
Add to Playlist
Title
1
2
3
4
5
6
Home
Screen
9
1
4
6
7
8
3
11
14
13
17
5
2
15
16
12
10

Using the Device
18
User Guide
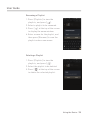
Displays the artist and album info.
Short press: Plays the previous song.
Press and hold: Rewinds the
current song.
Display current playlist.
Displays the bit rate and sampling
frequency data.
Display album covers. Press the
album cover to view the lyrics.
Shows the playback progress bar.
Drag the indicator to move to the
desired track time.
Indicates the song’s total duration.
Press to switch from elapsed time
to remaining time.
Set the playing sequence by pressing
[ ].
:Sets random replaying.
:Sets sequential replaying.
Press [ ] to set the Repeat mode.
: Repeat entire playlist.
: Repeat current music.
: Undo repeat function.
Plays or pauses the current song.
Short press: Plays the next song.
Press and hold: Fast-forwards the
current song.
Artist/Album
Previous/
Rewind
Playlist
Format
information
Album Cover
Progress Bar
Song Duration
Play Mode
Repeat Mode
Play/Pause
Next/FF
7
8
9
10
11
12
13
14
15
16
17

Using the Device
19
User Guide
Notifi-
cation
Bar
11
12
1 2 3 4 5 6 7 8 9 10
13
Page is loading ...
Page is loading ...
Page is loading ...
Page is loading ...
Page is loading ...
Page is loading ...
Page is loading ...
Page is loading ...
Page is loading ...
Page is loading ...
Page is loading ...
Page is loading ...
Page is loading ...
Page is loading ...
Page is loading ...
Page is loading ...
Page is loading ...
Page is loading ...
Page is loading ...
Page is loading ...
Page is loading ...
Page is loading ...
Page is loading ...
Page is loading ...
Page is loading ...
Page is loading ...
Page is loading ...
Page is loading ...
Page is loading ...
Page is loading ...
Page is loading ...
Page is loading ...
Page is loading ...
Page is loading ...
Page is loading ...
Page is loading ...
Page is loading ...
Page is loading ...
-
 1
1
-
 2
2
-
 3
3
-
 4
4
-
 5
5
-
 6
6
-
 7
7
-
 8
8
-
 9
9
-
 10
10
-
 11
11
-
 12
12
-
 13
13
-
 14
14
-
 15
15
-
 16
16
-
 17
17
-
 18
18
-
 19
19
-
 20
20
-
 21
21
-
 22
22
-
 23
23
-
 24
24
-
 25
25
-
 26
26
-
 27
27
-
 28
28
-
 29
29
-
 30
30
-
 31
31
-
 32
32
-
 33
33
-
 34
34
-
 35
35
-
 36
36
-
 37
37
-
 38
38
-
 39
39
-
 40
40
-
 41
41
-
 42
42
-
 43
43
-
 44
44
-
 45
45
-
 46
46
-
 47
47
-
 48
48
-
 49
49
-
 50
50
-
 51
51
-
 52
52
-
 53
53
-
 54
54
-
 55
55
-
 56
56
-
 57
57
-
 58
58


Astell & Kern Astell & Kern SP1000 User manual
- Category
- Headphone amplifiers
- Type
- User manual
- This manual is also suitable for
Ask a question and I''ll find the answer in the document
Finding information in a document is now easier with AI
Related papers
-
Astell & Kern QDMPPE11 User manual
-
-
-
Astell & Kern Astell & Kern SE100 User manual
-
-
Astell & Kern AK300 User manual
-
Astell & Kern AK120 II User manual
-
-
-
Other documents
-
iRiver SP1000 User manual
-
-
Pyle PLBSK30S Operating instructions
-
V7 V7AUDJADPT35F25M-BK Datasheet
-
-
-
Uncategorized SE200 Prtable High Resolution Audio Player User manual
-
Sungale SBK002 User manual
-
-