Page is loading ...


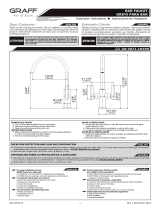
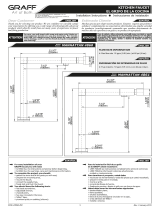
8-15/16” (227mm)
8-15/16” (227mm)
1”
( 225mm)
9-3/16” (234mm)
1”
( 225mm)
9-3/16” (234mm)
Rev. 12 February 2021

Install the switch in a way that keeps it accessible for
easy cleaning or replacement.
Be careful to prevent dirt or cleaning agents from entering
inside of the switch, otherwise it may result in seizure or
Se debe instalar el selector de modo que sea posible el acceso al
mismo para su limpieza o sustitución.
Evitar que las impurezas y detergentes entren en el interior
del selector, dado que podrán causar su bloqueo o deterioro.
Rev. 12 February 2021
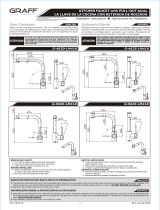
18 INSERT RELLENO

Check for any leaks and
missing parts.
Compruebe la estanquidad
de la instalación completa
Rev. 12 February 2021
www.graff-designs.com

Rev. 12 February 2021
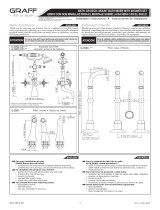
and
check valve (17) is positioned correctly. Screw the other end
of the hose (2) into the casing of the valve (14), keeping in
mind the positioning of the flat seal.
la manguera (2), tome cuidado si la posición de la valvula de
retención y limitación (7) y de la empaquetadura plana esta
colocada bien. Otra boquilla de la manguera (2) ponga en el
cuerpo de la valvula (14), recuerde poner la empaquetadura plana.
Turn on the water supply lines to the valve, and check
for leaks. Cap or plug outlets and test setup for leaks. Abrir las líneas de suministro del agua para la válvula y
controlar si no hay fugas. Tape o conecte las solidas y
verifique que no existan fugas.
6)
6)
/