Page is loading ...

NOVASCALE
NovaScale 4040
Quick Start Guide
October 2006
BULL CEDOC
357 AVENUE PATTON
B.P.20845
49008 ANGERS CEDEX 01
FRANCE
REFERENCE
86 A1 25EG 03
Hardware

The following copyright notice protects this book under Copyright laws which prohibit such actions as, but not
limited to, copying, distributing, modifying, and making derivative works.
Copyright
Bull SAS 1992, 2006
Printed in France
Suggestions and criticisms concerning the form, content, and presentation of this
book are invited. A form is provided at the end of this book for this purpose.
To order additional copies of this book or other Bull Technical Publications, you
are invited to use the Ordering Form also provided at the end of this book.
Trademarks and Acknowledgements
We acknowledge the right of proprietors of trademarks mentioned in this book.
Intel
and Itanium are registered trademarks of Intel Corporation.
Windows
and Microsoft software are registered trademarks of Microsoft Corporation.
UNIX
is a registered trademark in the United States of America and other countries licensed exclusively through
the Open Group.
Linux
is a registered trademark of Linus Torvalds.
The information in this document is subject to change without notice. Bull will not be liable for errors contained
herein, or for incidental or consequential damages in connection with the use of this material.

3
NovaScale 4040 Quick Start Guide
Table of Contents
Regulatory Specifications and Disclaimers 5. . . . . . . . . . . . . . . . . . . . . . . . . . . . . . . . . .
Declaration of the Manufacturer or Importer 5. . . . . . . . . . . . . . . . . . . . . . . . . . . . . . .
Safety Compliance Statement 5. . . . . . . . . . . . . . . . . . . . . . . . . . . . . . . . . . . . . . . . . . .
European Community (EC) Council Directives 5. . . . . . . . . . . . . . . . . . . . . . . . . . . . .
Electromagnetic Compatibility 5. . . . . . . . . . . . . . . . . . . . . . . . . . . . . . . . . . . . . .
Low Voltage 5. . . . . . . . . . . . . . . . . . . . . . . . . . . . . . . . . . . . . . . . . . . . . . . . . . . . . .
EC Conformity 5. . . . . . . . . . . . . . . . . . . . . . . . . . . . . . . . . . . . . . . . . . . . . . . . . . .
Telecommunications Terminal Equipment 5. . . . . . . . . . . . . . . . . . . . . . . . . . . .
Federal Communications Commission (FCC) Statement 6. . . . . . . . . . . . . . . . . . . .
FCC Declaration of Conformity 6. . . . . . . . . . . . . . . . . . . . . . . . . . . . . . . . . . . . . . . . . .
Canadian Compliance Statement (Industry Canada) 6. . . . . . . . . . . . . . . . . . . . . . .
Electromagnetic Compatibility 6. . . . . . . . . . . . . . . . . . . . . . . . . . . . . . . . . . . . . .
Laser Compliance Notice 6. . . . . . . . . . . . . . . . . . . . . . . . . . . . . . . . . . . . . . . . . . . . . . .
Definition of Safety Notices 7. . . . . . . . . . . . . . . . . . . . . . . . . . . . . . . . . . . . . . . . . . . . . . . .
Electrical Safety 7. . . . . . . . . . . . . . . . . . . . . . . . . . . . . . . . . . . . . . . . . . . . . . . . . . . . . . . . .
Laser Safety Information 8. . . . . . . . . . . . . . . . . . . . . . . . . . . . . . . . . . . . . . . . . . . . . . . . . .
Data Integrity and Verification 8. . . . . . . . . . . . . . . . . . . . . . . . . . . . . . . . . . . . . . . . . . . . .
Presentation 9. . . . . . . . . . . . . . . . . . . . . . . . . . . . . . . . . . . . . . . . . . . . . . . . . . . . . . . . . . . .
Configuration Examples 10. . . . . . . . . . . . . . . . . . . . . . . . . . . . . . . . . . . . . . . . . . . . . . . . . .
Important Safety Instructions 11. . . . . . . . . . . . . . . . . . . . . . . . . . . . . . . . . . . . . . . . . . . . . .
Checking Power Cords 12. . . . . . . . . . . . . . . . . . . . . . . . . . . . . . . . . . . . . . . . . . . . . . . . . . .
Delivery 13. . . . . . . . . . . . . . . . . . . . . . . . . . . . . . . . . . . . . . . . . . . . . . . . . . . . . . . . . . . . . . . .
Connections and Controls 14. . . . . . . . . . . . . . . . . . . . . . . . . . . . . . . . . . . . . . . . . . . . . . . . .
Connecting the Monitor, Keyboard, and Mouse 16. . . . . . . . . . . . . . . . . . . . . . . . . . . . . .
Powering On the Server for the First Time 17. . . . . . . . . . . . . . . . . . . . . . . . . . . . . . . . . . .
Mounting the DVD/CD–RW Device 18. . . . . . . . . . . . . . . . . . . . . . . . . . . . . . . . . . . . . . . . .
The NovaScale 4040 Resource CD 18. . . . . . . . . . . . . . . . . . . . . . . . . . . . . . . . . . . . . . . .
The NovasScale 4040 User’s Guide 18. . . . . . . . . . . . . . . . . . . . . . . . . . . . . . . . . . . . . . . .
AZERTY/QWERTY Keyboard Lookup Table 19. . . . . . . . . . . . . . . . . . . . . . . . . . . . . . . . .
NovaScale 4040 Server Cabinet Specifications 20. . . . . . . . . . . . . . . . . . . . . . . . . . . . . .
NovaScale 4040 Server CPU Drawer Specifications 22. . . . . . . . . . . . . . . . . . . . . . . . . .
Warnings 23. . . . . . . . . . . . . . . . . . . . . . . . . . . . . . . . . . . . . . . . . . . . . . . . . . . . . . . . . . . . . . .
WARNING: English (USA) 23. . . . . . . . . . . . . . . . . . . . . . . . . . . . . . . . . . . . . . . . . . . . .
AVERTISSEMENTS : Français 25. . . . . . . . . . . . . . . . . . . . . . . . . . . . . . . . . . . . . . . . .
WARNUNG: Deutsch 27. . . . . . . . . . . . . . . . . . . . . . . . . . . . . . . . . . . . . . . . . . . . . . . . . .
AVVERTENZA: Italiano 29. . . . . . . . . . . . . . . . . . . . . . . . . . . . . . . . . . . . . . . . . . . . . . . .
ADVERTENCIA: Español 31. . . . . . . . . . . . . . . . . . . . . . . . . . . . . . . . . . . . . . . . . . . . . . .

4
NovaScale 4040 Quick Start Guide
List of Figures
Figure 1. 19” / 19U and 19” / 36U cabinets 9. . . . . . . . . . . . . . . . . . . . . . . . . . . . . . . . . .
Figure 2. 36U cabinet configuration (example) 10. . . . . . . . . . . . . . . . . . . . . . . . . . . . . . .
Figure 3. 19U cabinet configuration (example) 10. . . . . . . . . . . . . . . . . . . . . . . . . . . . . . .
Figure 4. NovaScale 4040 Server Front View 14. . . . . . . . . . . . . . . . . . . . . . . . . . . . . . . .
Figure 5. NovaScale 4040 Server Peripheral Bay Module 14. . . . . . . . . . . . . . . . . . . . .
Figure 6. NovaScale 4040 Server Control Panel Status Lights 15. . . . . . . . . . . . . . . . .
Figure 7. NovaScale 4040 Server Rear Panel 16. . . . . . . . . . . . . . . . . . . . . . . . . . . . . . .
Figure 8. AZERTY keyboard 19. . . . . . . . . . . . . . . . . . . . . . . . . . . . . . . . . . . . . . . . . . . . . .
Figure 9. QWERTY keyboard 19. . . . . . . . . . . . . . . . . . . . . . . . . . . . . . . . . . . . . . . . . . . . . .
List of Tables
Table 1. NovaScale 4040 Server Control Panel Status Lights 15. . . . . . . . . . . . . . . . . .
Table 2. NovaScale 4040 Server cabinet specifications 21. . . . . . . . . . . . . . . . . . . . . . .
Table 3. NovaScale 4040 Server CPU drawer specifications 22. . . . . . . . . . . . . . . . . . .

5
NovaScale 4040 Quick Start Guide

6
NovaScale 4040 Quick Start Guide
Regulatory Specifications and Disclaimers
Declaration of the Manufacturer or Importer
We hereby certify that this product is in compliance with European Union EMC Directive
89/336/EEC, using standards EN55022 (Class A) and EN55024 and Low Voltage Directive
73/23/EEC, using standard EN60950. The product has been marked with the CE Mark to
illustrate its compliance.
Safety Compliance Statement
• UL 60950 (USA)
• IEC 60950 (International)
• CSA 60950 (Canada)
European Community (EC) Council Directives
This product is in conformity with the protection requirements of the following EC Council
Directives:
Electromagnetic Compatibility
• 89/336/EEC
Low Voltage
• 73/23/EEC
EC Conformity
• 93/68/EEC
Telecommunications Terminal Equipment
• 199/5/EC
Neither the provider nor the manufacturer can accept responsibility for any failure to satisfy
the protection requirements resulting from a non-recommended modification of the product.
Compliance with these directives requires:
• an EC declaration of conformity from the manufacturer
• an EC label on the product
• technical documentation

7
NovaScale 4040 Quick Start Guide
Federal Communications Commission (FCC) Statement
Note:
This equipment has been tested and found to comply with the limits for a Class A digital
device, pursuant to Part 15 of the FCC Rules. These limits are designed to provide
reasonable protection against harmful interference when the equipment is operated in a
commercial environment. This equipment generates, uses, and can radiate radio frequency
energy and, if not installed and used in accordance with the instruction manual, may cause
harmful interference to radio communications. Operation of this equipment in a residential
area is likely to cause harmful interference in which case the user will be required to correct
the interference at his own expense.
Properly shielded and grounded cables and connectors must be used in order to meet FCC
emission limits. Neither the provider nor the manufacturer are responsible for any radio or
television interference caused by using other than recommended cables and connectors or
by unauthorized changes or modifications to this equipment. Unauthorized changes or
modifications could void the user’s authority to operate the equipment.
Any changes or modifications not expressly approved by the grantee of this device could
void the user’s authority to operate the equipment. The customer is responsible for ensuring
compliance of the modified product.
FCC Declaration of Conformity
This device complies with Part 15 of the FCC Rules. Operation is subject to the following
two conditions: (1) this device may not cause harmful interference, and (2) this device must
accept any interference received, including interference that may cause undesired
operation.
Canadian Compliance Statement (Industry Canada)
This Class A digital apparatus meets all requirements of the Canadian Interference Causing
Equipment Regulations.
Cet appareil numérique de la classe A est conforme à la norme NMB–003 du Canada.
This product is in conformity with the protection requirements of the following standards:
Electromagnetic Compatibility
• ICES–003
• NMB–003
Laser Compliance Notice
This product that uses laser technology complies with Class 1 laser requirements.
A CLASS 1 LASER PRODUCT label is located on the laser device.
Class 1 Laser Product
Luokan 1 Laserlaite
Klasse 1 Laser Apparat
Laser Klasse 1

8
NovaScale 4040 Quick Start Guide
Definition of Safety Notices
DANGER
A Danger notice indicates the presence of a hazard that has the potential of causing
death or serious personal injury.
CAUTION:
A Caution notice indicates the presence of a hazard that has the potential of causing
moderate or minor personal injury.
Warning:
A Warning notice indicates an action that could cause damage to a program, device,
system, or data.
Electrical Safety
The following safety instructions shall be observed when connecting or disconnecting
devices to the system.
DANGER
The Customer is responsible for ensuring that the AC electricity supply is compliant
with national and local recommendations, regulations, standards and codes of
practice.
An incorrectly wired and grounded electrical outlet may place hazardous voltage on
metal parts of the system or the devices that attach to the system and result in an
electrical shock.
It is mandatory to remove power cables from electrical outlets before relocating the
system.
CAUTION:
This unit has more than one power supply cable. Follow procedures for removal of
power from the system when directed.

9
NovaScale 4040 Quick Start Guide
Laser Safety Information
The optical drive in this system unit is a classified as a Class 1 level Laser product. The
optical drive has a label that identifies its classification.
The optical drive in this system unit is certified in the U.S. to conform to the requirements of
the Department of Health and Human Services 21 Code of Federal Regulations (DHHS 21
CFR) Subchapter J for Class 1 laser products. Elsewhere, the drive is certified to conform to
the requirements of the International Electrotechnical Commission (IEC) 60825–1: 2001 and
CENELEC EN 60825–1: 1994 for Class 1 laser products.
CAUTION:
Invisible laser radiation when open. Do not stare into beam or view directly with
optical instruments.
Class 1 Laser products are not considered to be hazardous. The optical drive contains
internally a Class 3B gallium–arsenide laser that is nominally 30 milliwatts at 830
nanometers. The design incorporates a combination of enclosures, electronics, and
redundant interlocks such that there is no exposure to laser radiation above a Class 1 level
during normal operation, user maintenance, or servicing conditions.
Data Integrity and Verification
Warning:
Bull NovaScale Servers are designed to reduce the risk of undetected data corruption
or loss. However, if unplanned outages or system failures occur, users are strongly
advised to check the accuracy of the operations performed and the data saved or
transmitted by the system at the time of outage or failure.

10
NovaScale 4040 Quick Start Guide
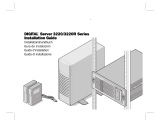
Presentation
The server is delivered rack–mounted, pre–cabled and pre–configured in one 19”/19U or
19”/36U cabinet, according to the version chosen.
Figure 1. 19” / 19U and 19” / 36U cabinets

11
NovaScale 4040 Quick Start Guide
Configuration Examples
NovaScale 4020 servers
NovaScale 4040 server
NovaScale 4040 server
NovaScale 4040 server
KVM switch
8–slot SCSI RAID
Console drawer
Keyboard, Video, Mouse
disk rack drawers
14–slot SCSI RAID
disk rack drawer
Figure 2. 36U cabinet configuration (example)
KVM switch
Console drawer
Keyboard, Video, Mouse
NovaScale 4040 server
NovaScale 4020 servers
8–slot SCSI RAID
disk rack drawers
14–slot SCSI RAID
disk rack drawer
Figure 3. 19U cabinet configuration (example)

12
NovaScale 4040 Quick Start Guide
Important Safety Instructions
Before proceeding to install the server, read all caution and safety statements at the end of
this document.
CAUTION:
Electrostatic discharge (ESD) can damage disk drives, add–in cards, and other parts.
This server can withstand normal levels of environmental ESD. Wear an anti–static
wrist strap attached to chassis ground of the server (i.e. any unpainted metal surface)
when handling components.
CAUTION:
Grounded outlet:
Ensure that the power service connection is through a properly grounded outlet.
Warning:
The following instructions are to be complied with for all rack–mounted servers:
Main AC power disconnects:
You are responsible for installing an AC power disconnect for the entire cabinet.
This main disconnect must be readily accessible, and it must be labeled as
controlling power to the entire cabinet and not just to the server(s).
Grounding the cabinet:
To avoid the potential for an electrical shock hazard, you must provide three–wire
safety–grounding for the cabinet and its contents.
Overcurrent protection:
Each server is designed for an AC line voltage source with up to 20 amperes of
overcurrent protection. If the power system for the cabinet is installed on a branch
circuit with more than 20 amperes of protection, you must provide supplemental
protection for the server.

13
NovaScale 4040 Quick Start Guide
Checking Power Cords
Warning:
The Power button on the server control panel does not completely remove AC power.
To completely remove AC power from the server, you must unplug all AC power
cords from the server or from the wall outlet.
Warning:
Do not attempt to modify or use an AC power cord that is not the exact type required.
Rack–mounted servers:
1. Server power units must be connected to the PDU(s) (Power Distribution Unit(s))
located inside the cabinet. Connect server power cords to the outlets at the front
of the PDU(s). Do NOT use the outlets at the rear of the PDU(s).
2. Connect the PDU(s) to the site power supply with the power cord(s) provided with
the PDU(s).
Desktop servers:
1. U.S. / Canada:
Cords must be UL Listed/CSA Certified, 16/3, 75C type, VW–1, SJT/SVT, with NEMA
5–15P or NEMA 6–15P attachment plug and IEC 320 C13 input power connector
rated 15 amps.
Outside U.S. / Canada:
Cords must be flexible harmonized (<HAR>) rated 250V, 1.0 mm minimum
conductor size with IEC 320 C13 input power connector and rated for no less than
10 amps.
2. AC attachment connector:
The AC wall attachment plug should be a three conductor grounding type in
compliance with the national and regional standards in force :
– Nominal voltage: 125 V / 250 V
– Nominal amperage: 15 A
The AC wall attachment plug must bear an accepted safety agency certification
mark for the specific country or country.
3. Input power connector, server end:
The connectors that plug into the AC receptacles on the server must be an IEC
320, sheet C13 type female connectors :
– Nominal voltage: 125 V / 250 V
– Nominal amperage: 15 A
Note:
Surge Suppressor Recommendations:
In geographic regions that are susceptible to electrical storms, we highly recommend that
you plug the server into a surge suppressor.
EMI Information:
For information about complying with electromagnetic interference regulations, see
“Electromagnetic Compatibility” in the NovaScale User’s Guide.

14
NovaScale 4040 Quick Start Guide
Delivery
Site preparation must be completed by the pre–arranged delivery date. Any delay due to
non–completion of the site by the pre–arranged date will be considered as the Customer’s
responsibility. See the NovaScale Series Site Preparation Guide.
The server is delivered 24 hours in advance of the scheduled installation date. On arrival,
the server must be placed, in its packing, in the Computer Room so that it reaches room
temperature before powering up (optimum operating temperature = 22° C +
3° C,
hygrometry = 50% +
5%).
CAUTION:
It is mandatory for the server to be transported vertically. The server cabinet is
extremely heavy and requires the use of an elevator. The Data Processing Site
manager must allocate enough personnel to ensure safe handling.

15
NovaScale 4040 Quick Start Guide
Connections and Controls
Figures 4 and 5 show the NovaScale 4040 Server and peripheral bay module.
OM12885
A
B
C
A Bezel
B Front Panel
C Peripheral Bay Module
Figure 4. NovaScale 4040 Server Front View
OM12905
A
B
C
A Hot swap SCSI hard disk drives
B DVD/CD–ROM drive
C LS–240 floppy diskette drive
Figure 5. NovaScale 4040 Server Peripheral Bay Module

16
NovaScale 4040 Quick Start Guide
Figure 6 shows server drawer control panel status lights for fans, hard drives and power
supplies.
A
B
C
D
F
G
H
I
OM12886
E
Figure 6. NovaScale 4040 Server Control Panel Status Lights
Item
Feature Description
Switches
A System ID Switch Toggle switch for blue System ID LEDs (the front panel
system ID LED is located inside the system ID switch).
See E below for description of LED operation.
B Assert SDINT (System Diag-
nostic Interrupt) Switch
Asserts SDINT. This switch is accessible through a
small opening and requires a narrow tool to activate.
C Reset switch Resets the system.
D Power switch Toggles system power.
LED Indicators
E System ID (Blinking or Solid
Blue). The system ID LEDs
are located inside the system
ID switch on the front panel,
and on the back panel.
Identifies the system. The system ID is activated either
by the system ID switch or through server management
software.
Pressing the system ID switch once turns on the LEDs
solid blue
Press the system ID switch again, the solid blue LEDs
turn off
Remove activation – LEDs turn on blinking for 4 min-
utes (max). LEDs cannot be turned off by pressing the
switch.
F Main Power (Solid Green,
Blinking Green indicates the
system is in sleep mode.)
A continuously lit LED indicates the presence of DC
power in the system. The LED goes out when the pow-
er is turned off or the power source is disrupted. Off
indicates power off.
G Power Fault (Solid Amber) Indicates any system power faults. Off indicates power
is OK.
H Cooling Fault (Solid Amber) Indicates any system cooling faults. Off indicates sys-
tem cooling is OK.
I General Fault (Solid amber) Indicates a system failure. Off indicates system is OK.
Table 1. NovaScale 4040 Server Control Panel Status Lights

17
NovaScale 4040 Quick Start Guide
Figure 7 shows the features found on the server drawer rear panel including the I/O module,
the power supply modules, and user–accessible connectors.
A C D E
FGH
I
B
OM12888
J
A AC input power connectors
B PCI Slots (All slots support hot plug PCI add–in cards)
1
Slots 1 through 4 100–MHz, 64–bit PCI–X slot, half length
Slot 5 100–MHz, 64–bit PCI–X slot, full length
Slots 6 through 8 133–MHz, 64–bit PCI–X slot, full length
C Video port, standard VGA compatible, 15–pin connector
D External SCSI connector
2
E Serial port, 9–pin RS–232 connector
3
F Ethernet port, RJ45 connector
G Four USB ports, 4–pin connectors
H ICMB connectors in/out (optional)
ICMB port 1, SEMCONN 6–pin connector
ICMB port 2, SEMCONN 6–pin connector
I Power supply 2
J Power supply 1
Notes: 1. PCI slots support 3.3–V signal adapter cards only.
2. External SCSI bus supports both LVDS and SE signals via the external SCSI connector.
3. Emergency Management Port (EMP) access is provided via the shared serial port.
Figure 7. NovaScale 4040 Server Rear Panel
Connecting the Monitor, Keyboard, and Mouse
CAUTION:
Unplug server before connecting external devices, make sure the server is not plugged in or
equipment could be damaged.
Before powering on the server, you must connect these devices to the back of the
NovaScale 4040 Server.
1. Video monitor to the video port (C in Figure 7.)
2. Keyboard to a USB port (G in Figure 7.)
3. Mouse to a USB port (G in Figure 7.)

18
NovaScale 4040 Quick Start Guide
Powering On the Server for the First Time
The first time you power on the server, you need to enter the BIOS Setup Utility and set the
correct date and time values. The server then executes its Power–On Self Test (POST)
sequence and passes control to the Boot Manager. From the Boot Manager, you can mount
the DVD/CD–RW device to block zero and then load the operating system.
For further information about the Boot Manager, the EFI Shell, and the BIOS Setup Utility,
refer to the NovaScale 4040 User’s Guide.
Warning:
The EFI shell can only manage QWERTY keyboards. If you have an AZERTY
keyboard, please refer to the AZERTY/QWERTY keyboard lookup table on page 20.
Follow these steps to power on the NovaScale 4040 Server for the first time:
1. Ensure that all external devices are connected (monitor, keyboard, mouse, disk racks,
printers, etc).
2. Connect the server power supply cable(s) to the power supply outlet.
3. Power on the video monitor.
4. Press the Power button on the server drawer control panels (F in Figure 6. Server Draw
Control Panel). The server fans start up and POST begins.
5. When POST displays the message:
“Hit <F2> if you want to run SETUP,”
enter <F2>. The system will enter the BIOS Setup Utility.
If you see a prompt asking for a system password, press the <ENTER> key for direct
access to the BIOS Setup Utility.
6. From the BIOS Setup Utility Main menu, use the arrow keys to move the cursor down to
system date and time selections. Position the cursor over the date and time values and
enter appropriate values. Use the <tab> key to move within the date and time fields.
7. Use the arrow key to access the Exit menu and select Save changes and exit the
BIOS Setup Utility. After you exit the utility, the boot procedure resumes. You can
monitor the remainder of the boot progress on the video display.
Note:
POST checks the processors, memory, keyboard, and most installed peripheral devices.
During the memory test, POST displays the amount of memory it is able to access and test.
The length of time needed to test memory depends on the amount of memory installed.
POST is stored in flash memory.
8. The AMI* BIOS banner displays the loaded versions of the BIOS, PAL, SAL, and EFI.
9. The LSI* banner appears and indicates the recognized drives. Note that a Platform
Configuration EFI based configuration utility is required to enter the LSI SCSI utility. The
LSI* SCSI utility enables you to manage and configure the server’s SCSI devices.
10.POST concludes and passes control to the Boot Manager.
11.From the Boot Manager, you can use the arrow keys to highlight and select the option
that invokes the EFI Shell or the Boot Maintenance Menu. Booting to the EFI Shell
causes the following prompt to appear:
Shell>
12.Mount the DVD/CD–RW device as block zero. See “Mounting the DVD/CD–RW Device”
below.

19
NovaScale 4040 Quick Start Guide
13.Boot the operating system that you want to run on the server.
Mounting the DVD/CD–RW Device
You must mount the DVD–CD–RW drive before you can use it to read media:
1. Ensure that you are in the EFI Shell. You should see the following prompt:
Shell>
2. For the mount command in the next step to work, the drive must be loaded with media.
3. At the shell prompt, enter the following command:
mount –r
The media in the DVD/CD–RW drive is mapped to one of the file systems, i.e., FS0:, FS1:,
FS2. Change to the appropriate file system and enter the following command:
ls
The NovaScale 4040 Resource CD
The NovaScale 4040 Resource CD has the following contents: Utilities (SDRViewert,
SELViewert, FRUSDR Loadert, System Maintenance Utility (SMU), EFI Platform
Diagnostics), the NovaScale 4040 Quick Start Guide (this guide), the NovaScale 4040
User’s Guide and Adobet Acrobat Reader.
The Resource CD comes with a menu driven program that can be used for the following:
1. Create a removable media containing utilities, service partition and diagnostics.
2. Install EFI* Service Partition. The EFI service partition supports remote access to the
NovaScale 4040 Server, via modem or LAN, for the purpose of executing
configuration/setup utilities and diagnostics.
3. Run EFI–based utilities.
How to invoke the Resource CD menu.
1. Insert the Resource CD into the DVD/CD–RW drive before booting to EFI Shell.
2. Boot the system into EFI Shell; the EFI CD Menu program will launch automatically. If
the EFI CD Menu program does not launch in the EFI Shell, mount and map to the CD
drive, type ‘startup’ and press <Enter> to launch the EFI CD Menu.
3. Arrow key over to the Utilities and select the utility you want to run.
The NovasScale 4040 User’s Guide
The NovaScale 4040 User’s Guide comes as a single .PDF file shipped on the resource
CD. You can use Adobet Acrobat Reader to view the guide.

20
NovaScale 4040 Quick Start Guide
AZERTY/QWERTY Keyboard Lookup Table
1
&
2
é ~
3
” #
4
’ {
5
( [
6
– |
7
è ‘
8
_ \
9
ç ^
0
à @
°
) ]
+
= }
A Z E R T Y U I O P ¨
^
£
$ ¤
Q S D F G H J K L M %
ù
µ
*
>
<
W
X C V B N ?
,
.
;
/
:
§
!
Figure 8. AZERTY keyboard
~
‘
!
1
@
2
#
3
$
4
%
5
^
6
&
7
*
8
(
9
)
0
_
–
+
=
Q W E R T Y U I O P {
[
}
]
|
\
A S D F G H J K L :
;
”
’
Z X C V B N M <
,
>
.
?
/
Figure 9. QWERTY keyboard
/