Page is loading ...

Place the point of the center punch directly on the center of the
4 small mounting holes and the large cylinder hole marked on
the installation template and strike with a hammer to transfer
the marks onto the surface of the door and the door trim.
Coloque la punta del punzón directamente sobre el centro de
los 4 orificios pequeños de montaje y del orificio grande para
el cilindro marcados en la plantilla de instalación y golpee el
punzón con un martillo para transferir las marcas a la superfi-
cie de la puerta.
Placez la pointe du pointeau directement sur le centre des 4
trous de montage et sur le grand trou du cylindre marqués sur
le gabarit d’installation et frappez sur le pointeau pour transfér-
er les marques sur la surface de la porte et sur le fini de porte.
2.
Drill the 1-3/8" diameter hole through the door. Take care to
ensure that the drill is level and the hole is straight through the
door. (TIP: Bore the hole to the point of the tip, breaking
through the opposite side and finish boring out the hole from
the opposite side to reduce splintering the door.)
Taladre un orificio de 35mm (1-3/8’) de diámetro en la hoja de
la puerta asegurándose que el taladro esté nivelado y que el
orificio atraviese la puerta en forma recta. (Consejo: Para
reducir el astillado, taladre sólo hasta que broca piloto de la
sierra cilíndrica aparezca por el otro lado y complete el taladra-
do desde la otra cara de la puerta.)
Percez un orifice de 35 mm (1 3/8 po) de diamètre à travers la
porte. Assurez-vous que la perceuse soit tenue à niveau et que
le trou soit en droite ligne à travers la porte. (CONSEIL: Percez
le trou jusqu’au point d’émergence de la mèche sur l’autre côté
et complétez le perçage à partir de l’autre côté pour réduire l’é-
clatement du bois sur la surface de la porte.)
3.
Carefully drill the 4 smaller mounting holes (1/8" drill bit) in
the inside of the door to a depth of 3/4". (CAUTION: Use care
to limit the depth of the hole to 3/4" to avoid drilling completely
through the door.)
Taladre cuidadosamente los 4 orificios más pequeños de 3mm
(1/8”) para montaje en la cara interior de la puerta hasta
19mm (3/4”) profundidad. (PRECAUCIÓN: Tenga cuidado de
limitar la profundidad de los orificios a 19mm (3/4”) para no
atravesar la puerta completamente.)
Percez soigneusement les 4 trous de montage plus petits
(mèche de 8 mm - 1/8 po) sur l’intérieur de la porte à une pro-
fondeur de 19 mm (3/4 po). (MISE EN GARDE : Prenez soin
de limiter la profondeur des trous à 19 mm -3/4 po, pour
éviter de percer complètement la porte.)
4.
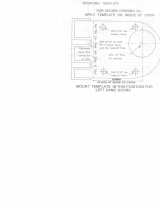
Cut out the appropriate installation template and tape it to the
inside of the door at the desired height of the lock. The tem-
plate will attach to the edge of the door. Take care to position
the template properly, aligned to the edge of the door (not the
frame) and use a straightedge and level to ensure it is placed
perfectly level on the door. (TIP: Use care when taping to
ensure that the tape doesn't damage the finish of the door.)
Corte la plantilla apropiada para la instalación y péguela con
cinta adhesiva al interior de la puerta a la altura que deseada. La
plantilla se adherirá al canto de la puerta. Asegúrese que esté
en la posición apropiada y bien alineada con el canto de la hoja
(no con la jamba). Asegúrese que quede perfectamente nivela-
da en la puerta con una regla y un nivel (CONSEJO: Cuide de
no dañar el acabado de la puerta al pegar la cinta adhesiva.)
Découpez le gabarit d’installation approprié et collez-le sur la
porte avec un ruban gommé à la hauteur désirez pour le ver-
rou. Le gabarit doit être collé sur le rebord de la porte. Prenez
soins pour positionner correctement le gabarit, aligné avec le
rebord de la porte (et non avec le châssis). Utilisez une règle
droite et un niveau pour vous assurer qu’il soit placé parfaite-
ment à niveau sur la porte. (CONSEIL: Soyez prudent pour
éviter de causer des dommages au fini de la porte par le ruban
gommé.)
1.
What you will need / Artículos que va a necesitar / Items requis pour l’installation
Lock operating instructions and maintenance:
S
egal Jimmy-proof deadbolts lock by twisting the thumbturn to the locked
p
osition. Unlocking is the inverse.
L
ock Lubrication: If the lock operation becomes "sticky" place the lock into
the unlocked position and spray with lithium grease into the opening below
e
xposed by the unlocked bolt. Operate several times to distribute the
l
ubricant. With minimal care, your SEGAL
®
l
ock will provide you with a
lifetime of security. Once each year, apply a small amount of graphite into
t
he exterior cylinder for proper lubrication.
I
nstrucciones de operación y mantenimiento de la cerradura:
El cerrojo de las cerraduras Segal a prueba de palanqueo se acciona girando
l
a perilla a la posición de cierre y se abren a la inversa.
Lubricación de la cerradura: Si el funcionamiento de la cerradura ofrece
r
esistencia, póngala posición abra el cerrojo y rocíe lubricante de litio
debajo del cerrojo expuesto. Accione la cerradura varias veces para
d
istribuir el lubricante. La cerradura SEGAL
®
l
e proveerá seguridad por toda
la vida con un mínimo de mantenimiento. Para una buena lubricación, una
vez al año aplíquele una pequeña cantidad de grafito dentro de cilindro
e
xterior.
I
nstructions d’utilisation et d’entretien du verrou:
Les pênes dormant anti pince monseigneur Segal sont verrouillés en
p
ivotant le poucier à la position verrouillée. Le déverrouillage est à l’inverse.
Lubrification du verrou: Si le fonctionnement du verrou offre une
r
ésistance, placez le verrou à la position déverrouillée et vaporisez une
graisse de lithium dans l’ouverture du dessous exposée par le pêne
d
éverrouillé. Le faire fonctionner à plusieurs reprises pour assurer une
bonne distribution de la graisse. Avec des soins minimes, votre verrou
S
EGAL
®
v
ous fournira la sécurité à vie. Une fois l’an, appliquez une petite
quantité de graphite sur l’extérieur du cylindre pour la lubrification appro-
priée.
Door Thickness Tailpiece Screw
Espesor de la puerta Cola Tornillo
Épaisseur de porte Queue de pêne Vis
1
" / 25 mm Cut to 0.75''* / Corte a 19 mm / Rupture à 19 mm Break X / Quiebre X / Rupture X
1.125" / 28 mm Cut to 0.875''* / Corte a 22 mm / Rupture à 22 mm Break X / Quiebre X / Rupture X
1.25" / 31 mm Cut to 1''* / Corte a 25 mm / Rupture à 25 mm Break X / Quiebre X / Rupture X
1
.375" / 35 mm Cut to 1.125''* / Corte a 28 mm / Rupture à 28 mm Break X / Quiebre X / Rupture X
1.5" / 38 mm Break A / Quiebre A / Rupture A Break X / Quiebre X / Rupture X
1.625" / 41 mm Break A / Quiebre A / Rupture A Break Y / Quiebre Y / Rupture Y
1
.75" / 44 mm Break B / Quiebre B / Rupture B Break Y / Quiebre Y / Rupture Y
1
.875" / 47 mm Break B / Quiebre B / Rupture B Break Y / Quiebre Y / Rupture Y
2" / 50 mm Break C / Quiebre C / Rupture C No Break / No Quiebre / Aucune Rupture
2.125" / 53 mm Break C / Quiebre C / Rupture C No Break / No Quiebre / Aucune Rupture
2
.25" / 56 mm Cut to 2''* / Corte a 50 mm / Rupture à 50 mm No Break / No Quiebre / Aucune Rupture
2.375" / 60 mm Cut to 2.125''* / Corte a 53 mm/ Rupture à 53 mm No Break / No Quiebre / Aucune Rupture
*Measure from back of cylinder (see illustration A) / * Mida desde atrás del cilindro (vea la ilustración A) / *Mesurer de l’arrière du cylindre (voir l’illustration A)
Tools / Herramientas / Outils
1. Center Punch / Punzón / Pointeau
2. Hammer / Martillo / Marteau
3. 1-3/8'' Hole Saw / Sierra cilíndrica de 35mm (1-3/8") / Scie cylindrique de 35 mm (1-3/8 po)
4. Electric Drill / Taladro eléctrico / Perceuse électrique
5. 1/8'' Drill Bit / Broca de 3mm (1/8") para taladro / Mèche de perceuse de 3 mm (1/8 po)
6. Slot-head Screwdriver / Atornillador de punta plana / Tournevis à fente
7. Pliers and/or Hacksaw / Alicate y/o segueta / Pinces et/ou scie à métaux
8. Straight Edge and Level / Regla y nivel / Règle droite et niveau
9. Masking Tape / Cinta para enmascarar / Ruban masque
Break-off Tailpiece Table
Cylinder
Cilindro
Cylindre
Tailpiece Break Points
Puntos de quiebre de la cola
Points de rupture de la queue de pêne
Screw Break Points
Puntos de quiebre del tornillo
Points de rupture de vis
The cutting is required, measure carefully from
the back of the cylinder plug.
Se requiere cortar, mida cuidadosamente desde
atrás del cilindro.
La coupure est requise, mesurez de la partie
arrière du barillet de cylindre.
Directions for installing the SEGAL
®
Jimmy-Proof Deadbolt doors opening inward:
Instrucciones para instalar cerraduras antipalanqueo SEGAL
®
en puertas que abren hacia adentro:
Directions pour installer le SEGAL
®
Le Preuve-La force sur portes qui ouvrent vers l'intérieur:
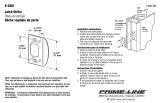
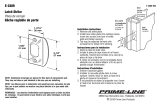
26950 San Bernardino Ave., Redlands, CA 92374
Toll Free Phone: 800.437.7405
L I F E T I M E S E C U R I T Y
NOTE: Installation drawings are typical for this style of replacement part. They may not
show a part identical to the one you are installing.
NOTA: Los dibujos para la instalación son genéricos para repuestos de este tipo; por lo que
podrían no mostrar una pieza idéntica a la que usted esté instalando.
REMARQUE : Les dessins d'installation sont typiques pour ce style de pièce de rechange.
Ils pourraient ne pas illustrer une pièce identique à celle que vous installez.
INS-SE 14326
LIFETIME SECURITY / SEGURIDAD DE POR VIDA / SÉCURITÉ À VIE

Jamb
Chambranle
Marco
Door
Porte
Puerta
Cylinder Hole
Orifice pour cylindre
Orificio para cilindro
Lock
Serrure
Cerradura
Strike
Gâche
Placa del marco
Holding the lock in place, operate the lock from both the inside
and outside to ensure smooth operation. If binding is encoun-
tered, recheck the thickness of the door and the length of the
tailpiece. Re-trim the tailpiece if necessary.
Sosteniendo la cerradura en posición, pruebe si funciona
suavemente accionándola desde adentro y desde afuera. Si la
operación ofrece resistencia, revise el espesor de la hoja de la
puerta y el largo de la cola. Recorte la cola si fuese necesario.
En tenant le verrou en position, activez-le de l’intérieur et de
l’extérieur pour vérifier le bon fonctionnement. Si un coinçage
se produit, vérifiez l’épaisseur de la porte de nouveau et la
longueur de la queue de pêne. Coupez la queue de pêne de
nouveau si nécessaire.
Using the 4-2'' mounting screws and a screwdriver, attach the
deadbolt to the inside of the door using the 4 small mounting
holes drilled earlier.
Instale la cerradura en la cara interior de la puerta con los 4
tornillos de montaje de 5cm (2”) en los 4 orificios pequeños
taladrados anteriormente con un atornillador.
En utilisant les 4 vis de montage de 5,1 cm (2 po) dans les
trous percés antérieurement et un tournevis, fixez le pêne dor-
mant sur l’intérieur de la porte.
Set the lock strike in place and set the lock in the locked posi-
tion. If angle strike is being used it must be mortised into jamb.
Allign the strike on the door jamb with the lock strike centered
on the bolt. Make sure there is no interference between the bolt
and the strike when operating the lock. Mark the position of the
strike, and then unlock the door and open it. Mark the center of
the mounting holes for the strike and drill 1/8'' holes where
marked. It may be necessary to shim the door frame or to
mortise out the frame for proper strike alignment.
Con el cerrojo proyectado, presente la hembra en la jamba de la
puerta y alinéela con el centro del cerrojo. Si utilliza la hembra en
un ángulo debe ser asegurada junto a la jamba Asegúrese que
la hembra no interfiera con el cerrojo el accionar la cerradura.
Marque la posición de la hembra en la jamba, quítele el seguro a
la cerradura y abra la puerta. Marque el centro de los orificios de
montaje de la hembra y taladre orificios de 3mm (1/8”) en las
marcas. Para alinear el cerrojo con la hembra, podría ser nece-
sario aumentarle láminas a la hembra en la jamba o rebajarla.
Placez la gâche du verrou en position et réglez le verrou en
position verrouillée. Si le coup de l'angle est utilisé il doit être
mortaisé dans chambranle. Alignez la gâche sur le montant de
porte avec la gâche centrée sur le pêne. Assurez-vous qu’il n’y
ait pas d’interférence entre le pêne et la gâche durant le fonc-
tionnement du verrou. Marquez la position de la gâche, déver-
rouillez la porte et ouvrez-la. Marquez le centre des trous de
montage de la gâche et percez des trous de 8 mm (1/8 po) sur
les marques. Il pourrait être nécessaire d’utiliser des cales sur
le cadre de porte ou de mortaiser le châssis pour obtenir
l’alignement correct de la gâche.
10.
11.
Place the strike over the holes on the frame. Operate the lock
again to ensure that the bolt and strike are in alignment. Attach
the strike to the frame using the supplied 3/4'' screws and a
screwdriver. For common wood jambs, use 3” (7.62 cm)
security screws provided.
Coloque la hembra sobre los orificios en la jamba. Vuelva a
accionar la cerradura para asegurase que el cerrojo y la hem-
bra estén alineados. Fije la hembra a la jamba con los tornillos
de 19mm (3/4”) provistos y un atornillador. Para jambas
comunes de madera, use los tornillos de anclaje de 7,62 cm
(3
″
) provistos
Placez la gâche sur les trous percés dans le châssis. Activez le
verrou de nouveau pour vérifier que le pêne et la gâche soient
correctement alignés. Fixez la gâche sur le châssis en utilisant
un tournevis et les vis de 19 mm (¾ po) fournies. Pour les
montants en bois communs, utilisez les vis de sécurité de 7,62
cm (3 po) fournies.
12.
✃
Measure the thickness of the door, and using pliers, break off
t
he 2 connecting screws and the tailpiece on the back of the
cylinder to the appropriate length. [see table] (CAUTION:
M
easure the door and cut the screws and tailpiece carefully.
C
utting them too short or allowing them to be too long will
result in improper installation/operation of the lock.)
Mida el espesor de la puerta y quiebre los dos tornillos conec-
t
ores y la cola atrás del cilindro al largo apropiado. [Vea la
tabla]. (CONSEJO: Mida el espesor de la hoja de la puerta y
c
orte la cola y los tornillos cuidadosamente. Si quedan demasi-
ado cortos o largos resultará en una mala instalación una mala
instalación u operación de la cerradura.)
M
esurez l’épaisseur de la porte et en utilisant des pinces, casser
les 2 vis de raccordement et la queue de pêne à l’arrière du
c
ylindre à la longueur appropriée (voir le tableau). (MISE EN
GARDE : Mesurez la porte et coupez les vis et la queue de pêne
avec soins. Si elles sont coupées trop courtes ou trop longues,
l’installation et / ou le fonctionnement inapproprié du verrou en
résultera.)
5.
S
lip the cylinder collar over the cylinder and insert the cylinder
i
nto the door from the exterior. Position the keyhole at the bot-
t
om of the lock with the SEGAL
®
t
rademark at the top. Hold
c
ylinder in place.
Deslice el collar en el cilindro y luego éste dentro de la puerta
d
esde el exterior, con el orificio para la llave abajo con la
m
arca SEGAL
®
a
rriba. Sujete el cilindro en posición.
Glissez le collet du cylindre sur le cylindre et insérez-le dans la
p
orte à l’extérieur. Positionnez le trou de clé au bas de la ser-
rure avec la marque de commerce SEGAL
®
en haut. Tenez le
cylindre en position.
6.
Position the steel back-plate on the inside of the door. Insert the
2
connecting screws into the holes adjacent to the large hole in
the center of the back-plate and thread them into the holes in
the back of the cylinder. Using a screwdriver, tighten the
screws, making sure the back-plate is positioned 1/8" from the
edge of the door and the 4 small mounting holes are accessible.
C
oloque la placa de acero de respaldo en el lado interior de la
p
uerta. Inserte los 2 tornillos conectores en los orificios adya-
centes al orificio grande en el centro de la placa de respaldo y
enrósquelos atrás del cilindro. Ajuste los tornillos con un
atornillador asegurándose que la placa de respaldo quede a
3
mm (1/8”) del borde de la puerta y que los 4 orificios
pequeños para montaje queden accesibles.
Positionnez la plaque arrière en acier sur l’intérieur de la porte.
Insérez les vis de raccordement dans les trous adjacents au
grand trou au centre de la plaque arrière et vissez-les dans les
trous de l’arrière du cylindre. En utilisant un tournevis, resser-
r
ez les vis en vous assurant que la plaque arrière soit position-
née à 8 mm (1/8 po) du rebord de la porte avec les 4 petits
t
rous de montage accessibles.
W
ith the deadbolt in the unlocked position, push and hold in
t
he shutter guard and place the lock case over the back-plate
(on the inside of the door.) Make sure the tailpiece goes into the
h
ole on the back of the lock (as exposed by the shutter guard.)
Con el cerrojo retraído/abierto, presione y sujete el obturador de
seguridad y coloque la cerradura sobre la placa de respaldo (en
l
a cara interior de la puerta). Cerciórese que la cola entre en el
orificio atrás de la cerradura (que el obturador de seguridad
expone).
A
vec le pêne dormant en position déverrouillée, poussez et
tenez le volet de sécurité à l’intérieur et placez le boîtier du ver-
rou sur la plaque arrière (sur l’intérieur de la porte). Assurez-
v
ous que la queue de pêne soit dans le trou à l’arrière du verrou
(
exposé par le volet de sécurité).
8.
7.
9.
Warranty claims:
Return improperly operating locks to the original place of purchase or to SEGAL
®
Lock Company with your original sales receipt for
repair or replacement. If returning to SEGAL
®
please include $5.00 for shipping and handling. SEGAL
®
locks are guaranteed to operate
free of manufacturer defects. SEGAL
®
will determine, at its sole discretion, if neglect or abuse has caused malfunction on any returned
lock and may charge for repair or replacement upon notification of the owner.
Reclamos bajo la garantía:
Devuelva las cerraduras que no funcionen bien al establecimiento donde se compraron o a SEGAL
®
Lock Company,
incluyendo $5.00 para el flete y despacho. SEGAL
®
garantiza la operación de las cerraduras contra defectos de materiales
y de fabricación. A su sola discreción, SEGAL
®
determinará si el mal funcionamiento de las cerraduras devueltas se debe
a negligencia o maltrato, y notificará al propietario sobre su costo de reparación o reemplazo.
Réclamations de garantie:
Retournez les verrous défectueux au magasin de l’achat original ou chez SEGAL
®
Locke Compagnie, accompagnés de
votre reçu de caisse original pour la réparation ou le remplacement. Pour tout retour chez SEGAL
®
, s’il vous plaît inclure
la somme de 5,00 $ pour les frais d’expédition et de manutention. Le fonctionnement des verrous SEGAL
®
est garanti
contre toutes défectuosités de fabrication. SEGAL
®
déterminera, à sa seule discrétion, si la négligence ou l’abus ont causé
la défectuosité de tout verrou retourné et pourrait charger des frais pour la réparation ou le remplacement sur avis au
propriétaire.
Directions for installing the SEGAL
®
Jimmy-Proof Deadbolt doors opening inward:
Instrucciones para instalar cerraduras antipalanqueo SEGAL
®
en puertas que abren hacia adentro:
Directions pour installer le SEGAL
®
Le Preuve-La force sur portes qui ouvrent vers l'intérieur:
INS-SE 14326
Cylinder
Cylindre
Cilindro
LIFETIME SECURITY / SEGURIDAD DE POR VIDA / SÉCURITÉ À VIE
/