
38219-1-0220 Page 1Empire Comfort Systems Inc. • Belleville, IL
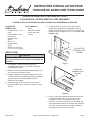
DVP72LKR-1 - BLACK GLASS LINER KIT
FOR USE ON: DVLL72BP SERIES FIREPLACES ONLY
LEAVE INSTRUCTIONS WITH THE APPLIANCE FOR FUTURE REFERENCE.
INSTALLATION
CAUTION
Sharp edges! To avoid injury, wear safety gloves and
glasses to install liner.
1. Refertothereplaceinstallationmanualforremoval
oftheBarrierandGlassDoorassembliespriorto
installationoftheporcelainlinerkit.
2.
RemovedecorativemediafromHearthandburnercover.
3. Carefullyunpacktheblackglassliners,verifythat
allcomponentsareincluded,andinspectforhidden
damage,priortoinstallation.
4. Removethefrontglassretainer(HearthLedge)by
liftingitupandout,thensetitaside.
5. InstallthetwoSideGlassPanelBracketsatthefront
leftandrightsideopeningsofthereboxwithtwo
5/16X1/2"screwseach.Thesebracketsmustbe
installedsothe“U”shapebreaksarefacingforward.
See Figures 1 and 2.
SIDE GLASS
PANEL BRACKET
Figure 1
CARTON CONTENTS:
• RearPanel-BlackGlass
• SidePanel-BlackGlass
(Qty.2)
• Bracket,Rear
GlassPanel(2)
• ScrewPackage
• SideGlassPanel
Bracket(Qty.2)
• Insulation
14-1/2"X22-1/2"(Qty.2)
TOOLS NEEDED:
• Gloves
• EyeProtection
• 5/16"HexDriver
REAR GLASS
PANEL BRACKET
Figure 2
6.
PlaceoneofthelongRearGlassPanelBracketsat
thebackofthereboxandontopofthestainlesssteel
burnercoverscreen,thencenteritlefttoright.Placethe
bracketagainsttherearwallwiththelongange(with
holes)extendingdownbehindtheburnercoverscreen.
NOTICE:Thetwohandbendtabslocatedateachend
shouldbepointingupwardatabout90degrees.
7. Placeonepieceofinsulationagainsttherightsideof
therebox.Foldthe14-1/2"highpieceofinsulation
overonitselfsothecutedgesaretowardthefrontof
thereplace.Whenoverlapped,leaveapproximately
a5to6"differencebetweenthefrontedges.Propthe
insulationagainstthesidewallsothefrontedgeis2to
3"fromthefrontfaceoftherebox.See Figure 3.
Figure 3
INSTALLATION INSTRUCTIONS
BLACK GLASS LINER KIT
REAR
GLASS
PANEL
BRACKET
SIDE
GLASS
PANEL
BRACKET

38219-1-0220Page 2 Empire Comfort Systems Inc. • Belleville, IL
8.
InstalloneoftheSideGlassPanelsagainsttheside
insulationwiththeglossysidefacingyou.Raisethe
bottomedgeabovetheRearGlassPanelBracketand
insertthefrontedgeoftheglassintotherightside
bracket(installedinstep5).Gentlypivotthebackedge
oftheSideGlassPaneloutwarduntilitcontactsthe
endtabontheRearGlassPanelBracket,thenlower
theglasspaneltoretaintheglasspanel.See Figure 4.
Figure 4
9. Repeatsteps7and8toinstalltheleftinsulationand
leftglasspanel.
10.ToinstalltheRearGlassPanel,placethebottomedge
ofthepanelintotheRearGlassPanelBracket,and
betweenthesideglasspanels.Thebottomedgeofthe
glasswillnestbetweenthefrontedgeoftheretainer
andtwosmalltabsabout9"fromeachendofthe
retainer.
11. SlowlypivottheRearGlassPanelupwardand
betweentheRightandLeftSideGlassPanels.Some
shiftinglefttorightmaybeneededtocenterallthree
glasspanelswiththerearretainer.
12.OncetheRearGlassPanelisvertical,installtheother
RearBracketoverthetopoftheRearGlassPanel.
TheRearBracketwillbeinstalledsothelongange
(withholes)arevisibleabovetheglasspanelandline
upwiththepilotholesintherearoftherebox.See
Figures 5 and 6.
REAR GLASS
PANEL BRACKET
REAR GLASS PANEL
Figure 5
REAR GLASS
PANELBRACKET
REAR GLASS PANEL
5/16 X 1/2"
HEX SCREW
Figure 6
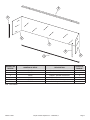
13.Install(4)#10X1/2"ScrewstosecuretheTopRear
GlassBracket.Refertothepartsillustrationonpage3
toidentifytheorientationoftheindividualparts.
14.Checktoseethatallexposedinsulationistucked
behindthesidepanels.Ifnecessary,trimtheexcess
insulationaway,usingautilityknife.
15.ReplacetheGlassRetainerremovedinstep4.
16.Cleantheglasslinerswithasoftclothtoremovedirtor
ngerprints.Donotuseabrasivecleanersonglass.
17.Adddecorativecrushedglassmediaasrequired.
18.ReplacetheGlassDoorandBarrierScreen
assemblies.

38219-1-0220 Page 3Empire Comfort Systems Inc. • Belleville, IL
1
2
2
4
4
3
3
INDEX
NUMBER
PART NUMBER DESCRIPTION
QUANTITY
SUPPLIED
1 R12472 RearLiner,BlackGlass 1
2 R12473 SideLiner,BlackGlass 2
3 38216 Bracket,RearGlassPanel 2
4 38215 Bracket,SideGlassPanel 2
N/S R2737 Screw,#10X1/2" 8
N/S R11285 Insulation-SidePanel 2
N/S-NotShown

38219-1-0220Page 4
www.empirecomfort.com
Empire Comfort Systems Inc.
Belleville, IL
Ifyouhaveageneralquestion
aboutourproducts,pleasee-mail
usat[email protected].
Ifyouhaveaserviceorrepair
question,pleasecontactyourdealer.

38219-1-0220 Page 1Empire Comfort Systems Inc. • Belleville, IL
TROUSSE DE GARNITURE VITRE NOIRE DVP72LKR-1
À UTILISER SUR : FOYERS SÉRIE DVLL72BP SEULEMENT
LAISSER LE FEUILLET D’INSTRUCTION SUR L’APPAREIL POUR RÉFÉRENCE ULTÉRIEURE.
INSTALLATION
ATTENTION
Bords tranchants! Pour éviter les blessures, porter
des gants et lunettes de sécurité lors du montage des
garnitures.
1. Pourdéposerl’écranetlaportevitréepour
l’installationdesgarnitures,seréféreraumanuel
d’assemblagedufoyer.
2. Déposeretsortirlespiècesdécoratives(bûches,etc.)
etlecouvercledubrûleurdel’âtre.
3. Déballersoigneusementlesgarnituresdeverrenoir
etvérierquetoutlematérielestprésentetconrmer
qu’aucunepiècen’estendommagéeavantde
commencerlemontage.
4. Déposerlespincesderetenuedelavitre(surla
borduredel’âtre)enlessoulevantetpuislesmettre
decôté.
CONTENU DE
L’EMBALLAGE :
• Panneauarrière-vitre
noire
• Panneaulatéral-vitre
noire(qté2)
• Supportarrière
(qté2)
• Sacdevis
• Supportlatéral
(qté2)
• Isolant14,5X22,5po
(37cmX57cm)(qté2)
OUTILS REQUIS :
• Gants
• Protectionoculaire
• Tourne-écrouhex.
5/16po
5. Àl’aidededeuxvis5/16X1/2po,xerlesdeux
supportspourpanneauxvitréslatérauxdepartet
d’autreàl’avantdel’âtre.Positionnercessupportsen
plaçantleursbordsrepliésen«U»surledevant.Voir
Figures 1 et 2.
SUPPORT DE
PANNEAU VITRÉ
LATÉRAL
Figure 1
SUPPORTDÉ
PANNEAUVITRE
ARRIÈRE
SUPPORT DE
PANNEAU VITRÉ
ARRIÈRE
Figure 2
6.
Insérerundeslongssupportsdupanneauvitréarrière
aucentredufonddel’âtre,surlecouvercled’acier
inoxydabledubrûleurenplaçantsabridetrouée
derrièrelecouverclelelongdumurarrière.AVIS :Les
deuxlanguettesderetenuedupanneauvitré(repliables
àlamain),àchaqueextrémitédusupport,devraient
êtredirigéesverslehaut(àlaverticale).
INSTRUCTION D’INSTALLATION POUR
TROUSSE DE GARNITURE VITRE NOIRE

38219-1-0220Page 2 Empire Comfort Systems Inc. • Belleville, IL
7. Installerunepièced’isolantde14,5po(37cm)de
hautcontrelemurgauchedel’âtreaprèsl’avoir
repliéesurelle-mêmedepuislemurarrièrepourcréer
deuxépaisseursdebordureavantàenviron5-6po
(13-15cm)dedifférence.Poserl’isolantrepliécontre
lemurenlaissantundégagementd’environ5à2à
3po(7,5cm)delafaçadedel’âtre.Voir Figure 3.
Figure 3
8.
Installerunpanneauvitrélatéralcontrel’isolant(face
reluisanteversl’intérieurdel’âtre)ensoulevantsa
bordureinférieurepardessuslesupportdupanneau
vitréarrièreetinsérerlebordverticaldelavitredans
lesupportlatéralposéàl’étape5.Pivoterdélicatement
l’arrièredelavitreversl’intérieurjusqu’àcequ’elle
fassecontactaveclalanguetted’extrémitédusupport
dupanneauvitréarrièreetpuisabaisserlepanneau
latéralenposition.Voir Figure 4.
Figure 4
9. Répéterlesétapes7et8pourl’autrecôté.
10.Pourlemontagedupanneauvitréarrière,placersa
bordureinférieuredanslesupportarrièreentreles
panneauxvitréslatéraux.Lerebordinférieurdelavitre
selogeentrelebordavantdusupportderetenueet
lesdeuxpetiteslanguettesà9po(23cm)environde
sesextrémités.
11. Releverlentementlavitrearrièreentrelespanneaux
vitréslatéraux.Unlégerdéplacementverslagauche
ouladroitepeutêtrenécessairepourcentrerlestrois
panneauxvitréssurlesupportarrière.
12.Aprèsquelavitrearrièresoitverticale,poserl’autre
supportdupanneauvitrésurledessusdelavitre.Les
trousdusupportdevrontêtrevisiblesau-dessusdela
vitreetalignéssurlestrousdumurarrièredel’âtre.
Voir Figures 5 et 6.
SUPPORT DE PANNEAU
VITRÉ ARRIÈRE
PANNEAU VITRÉ
ARRIÈRE
Figure 5
VIS HEX. 5/16 X 1/2 po
SUPPORT DE
PANNEAU VITRÉ
ARRIÈRE
PANNEAU VITRÉ
ARRIÈRE
Figure 6
13.Visserquatre(4)visnº10X1/2popourxer
l’ensemble.Pouridentierl’orientationdespièces
individuelles,seréférerauschémadespiècesàla
page3.
14.S’assurerqu’iln’yapasd’isolantdemeurantexposé.
Aubesoin,couperl’excédantàl’aided’unelame
utilitaire.
15.Remettreenplacelaborduredel’âtredéposéeà
l’étape4.
16.Polirlespanneauxvitrésàl’aided’unlingedouxpour
nettoyertoutesaletéouempreintesdigitales.Nepas
utiliserdenettoyantabrasifsurlesvitres.
17.Reposerlespiècesdécorativesdufoyercomme
désiré(verreconcassé,bûches,etc.)etlecouvercle
dubrûleur.
18.Reposerlaportevitréeavecécranprotecteursurle
foyer.

38219-1-0220 Page 3Empire Comfort Systems Inc. • Belleville, IL
1
2
2
4
4
3
3
NUMÉRO DE
REPÈRE
NUMÉRO DE PIÈCE DESCRIPTION
QUANTITÉ
FOURNIE
1 R12472 Garniturearrière-vitrenoire 1
2 R12473 Garniturelatérale-vitrenoire 2
3 38216 Support-panneauvitréarrière 2
4 38215 Support-panneauvitrélatéral 2
N.M. R2737 Vis,nº10X1/2po 8
N.M. R11285 Isolant-panneaulatéral 2
N.M.-Nonmontré

38219-1-0220Page 4
www.empirecomfort.com
Empire Comfort Systems Inc.
Belleville, IL
Pourtoutequestiongénéraleconcernantnos
produits,veuilleznousenvoyeruncourrielà
Pourtoutequestiond’entretienouderéparation,
veuillezcontactervotreconcessionnaire.
-
 1
1
-
 2
2
-
 3
3
-
 4
4
-
 5
5
-
 6
6
-
 7
7
-
 8
8


Boulevard DVP72LKR Owner's manual
- Type
- Owner's manual
- This manual is also suitable for
Ask a question and I''ll find the answer in the document
Finding information in a document is now easier with AI
in other languages
Related papers
Other documents
-
White Mountain Hearth Rushmore DVCT50 White Herringbone Brick Liner Owner's manual
-
-
-
-
-
-
American Hearth Cottage Brick Liner for DVCT50 (DVP50PMB) & Traditional Stone Liner (DVP50PTS) Owner's manual
-
-
-