
87154-00
3/15
© ClosetMaid Corporation 2015 | Ocala, FL 34471 | 1-800-874-0008 | www.closetmaid.com | www.closetmaid.ca
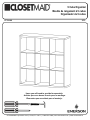
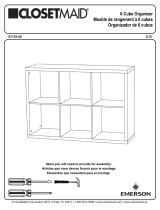
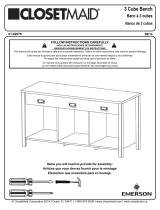
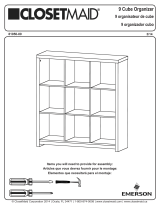
Items you will need to provide for assembly:
Articles que vous devrez fournir pour le montage:
Elementos que necesitará para el montaje:
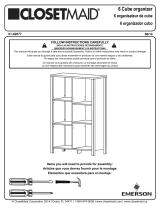
9 Cube Organizer
Meuble de rangement à 9 cubes
Organizador de 9 cubos
Page is loading ...

SAFETY PRECAUTIONS | CONSIGNES DE SÉCURITÉ | PRECAUCIONES DE SEGURIDAD
3
© ClosetMaid Corporation 2015 | Ocala, FL 34471 | 1-800-874-0008 | www.closetmaid.com | www.closetmaid.ca
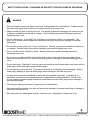
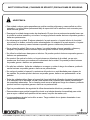
WARNING
• This unit contains small parts which could be a choking hazard for small children. Children should
be under adult supervision at all times or serious bodily injury could occur.
• Always unload unit prior to moving the unit. The weight of personal belongings can cause the unit
to become unstable and either tip or collapse. Serious bodily injury and/or damage to personal
belongings may occur.
• Do not overload unit. If any shelf, top, or bottom of unit bows or bends, it is overloaded. The
shelf, top, or bottom could collapse and cause serious bodily injury and/or damage to personal
belongings.
• Do not climb or step on the unit. This is not a bench. The unit may become unstable and either tip
or collapse. Serious bodily injury and/or damage to personal belongings may occur.
• Do not use this unit as a television stand. Serious bodily injury and/or damage to personal
belongings may occur.
• Do not mount or attach anything to the sides, rear or front of the unit as this can create a force
which can cause the unit to tip. Serious bodily injury and/or damage to personal belongings may
occur.
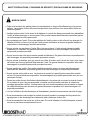
• Do not stack units. Stacking of units can cause an unsafe tip-over hazard which may cause serious
bodily injury and/or damage to personal belongings.
• Do not hang this unit on the wall. The product structure is not designed for wall hanging. Serious
bodily injury, damage to personal belongings, and/or damage to the wall may occur.
• All units must be secured individually to wall stud using hardware provided. If wall stud is not
accessible, consult your local hardware store for appropriate mounting hardware. Failure to do
so may create an unsafe tipping hazard that could lead to serious bodily injury and/or damage to
personal belongings.
• Follow proper safety procedures if using power tools and ladders.
• We recommend you protect your work surface during assembly to prevent scratching or damage to
table tops, wood oors, etc.
• We recommend you hand-tighten screws. Use care not to overtighten if using power tools.
Page is loading ...
Page is loading ...

6
© ClosetMaid Corporation 2015 | Ocala, FL 34471 | 1-800-874-0008 | www.closetmaid.com | www.closetmaid.ca
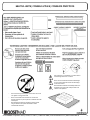
HELPFUL HINTS | CONSEILS UTILES | CONSEJOS PRÁCTICOS
• We recommend you hand tighten screws.Use care not to
over tighten if using power tools!
• Nous recommandons de resserrer les vis à la main.
Prendre garde de ne pas trop serrer en utilisant des outils
mécaniques.
• Recomendamos ajustar los tornillos de forma manual.
Tenga cuidado de no ajustar demasiado si utiliza
herramientas eléctricas.
We recommend you assemble on a soft surface to
avoid damage to the unit or surface.
Nous vous recommandons de faire l’assemblage
sur une surface lisse an d’éviter d’endommager
l’unité ou la surface.
Recomendamos realizar el ensamblaje sobre una
supercie suave para evitar cualquier daño a la
unidad o a la supercie.

© ClosetMaid Corporation 2015 | Ocala, FL 34471 | 1-800-874-0008 | www.closetmaid.com | www.closetmaid.ca
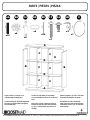
PARTS | PIÈCES | PIEZAS
7
AA BB CC
DD EE FF
GG
HH II
A
A
B
B
D
D
E
C
C
C
C
C
C
x32
x8
x8
x8
x1
x28
x1
x2
x1
50543
50510
50516
50529
95584
51483
72497
72496
Locate a sticker or a “stamp” on an
unnished edge to identify parts.
To ease assembly, all unnished edges/sides
are shown as a shaded pattern throughout
each assembly step.
Localiser un autocollant ou une estampe
servant à identier les pièces sur une bordure
brute.
Pour encore une fois le montage, toutes les
bordures et surfaces brutes sont présentées
en « gris » à chaque étape du processus de
montage.
Ubique la pegatina o el “sello” en el borde
sin acabar para identicar las piezas.
Para facilitar aún más el ensamblaje,
todos los bordes / lados sin acabar están
sombreados de color “gris” en cada paso
del ensamblaje.

8
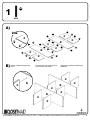
1
D
D
C
C
C
C
C
C
D
D
C
C
C
C
C
C
24x
A)
B)
x24
AA
AA
AA
AA
AA
AA
AA
AA
AA
AA
AA
AA
AA
AA
AA
AA
AA
AA
AA
AA
AA
AA
AA
AA
AA
AA
C
D
C
AA
© ClosetMaid Corporation 2015 | Ocala, FL 34471 | 1-800-874-0008 | www.closetmaid.com | www.closetmaid.ca
Ensure unnished edges face
down.
S’assurer que les bords non nis
sont orientés vers le bas.
Asegure boca abajo los bordes sin
acabados.

9
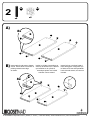
2
AA BB
x8
8x
8x
B
B
B
B
B
B
BB
AA
AA
AA
AA
AA
AA
AA
AA
AA
BB
BB
BB
BB
BB
BB
BB
BB
x8
A)
B)
© ClosetMaid Corporation 2015 | Ocala, FL 34471 | 1-800-874-0008 | www.closetmaid.com | www.closetmaid.ca
Insert camlock and press to bottom
of hole. Ensure arrow on camlock is
pointing towards outer edge
as shown.
Insérer le cylindre à excentrique et
enfoncer au fond du trou. S’assurer
que la èche sur le cylindre à
excentrique pointe vers le bord
extérieur comme montré.
Inserte la leva y presione hasta el
fondo del agujero. Asegúrese que
la echa en la leva esté apuntando
hacia el borde externo, tal como se
muestra.

10
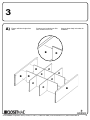
3
B
B
B
C
C
C
C
C
C
D
D
D
© ClosetMaid Corporation 2015 | Ocala, FL 34471 | 1-800-874-0008 | www.closetmaid.com | www.closetmaid.ca
A)
Ensure unnished edges face
down.
S’assurer que les bords non nis
sont orientés vers le bas.
Asegure boca abajo los bordes sin
acabados.

11
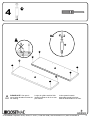
4
A
A
x8
CC
CC
CC
CC
CC
CC
CC
CC
CC
CC
8x
© ClosetMaid Corporation 2015 | Ocala, FL 34471 | 1-800-874-0008 | www.closetmaid.com | www.closetmaid.ca
PLEASE NOTE: Cam post is
secure when threads on screw are
not showing.
La tige du cylindre est bien xée
lorsque les lets sur la vis ne sont
plus visibles.
La leva posterior estará
asegurada cuando las hebras
sobre el destornillador no se vean.

A
A
B
B
C
C
C
C
C
C
D
D
12
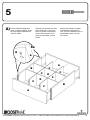
5
8x
© ClosetMaid Corporation 2015 | Ocala, FL 34471 | 1-800-874-0008 | www.closetmaid.com | www.closetmaid.ca
A)
B
A
Ensure unnished edges face
down. To tighten camlock, turn to
the right using a athead screw
driver as shown.
S’assurer que les bords non nis
sont orientés vers le bas. Pour
serrer le cylindre à excentrique,
tourner vers la droite avec un
tournevis à tête plate, comme
montré.
Asegure boca abajo los bordes
sin acabados. Para ajustar la
leva, gire hacia la derecha con un
destornillador plano, tal como
se muestra.

B
A
13
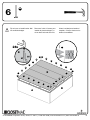
6
x28
EE
E
28x
EE
EE
EE
EE
EE
EE
EE
EE
EE
EE
EE
EE
EE
EE
EE
EE
EE
EE
EE
EE
EE
EE
EE
EE EE
EE
EE
EE
EE
EE
E
© ClosetMaid Corporation 2015 | Ocala, FL 34471 | 1-800-874-0008 | www.closetmaid.com | www.closetmaid.ca
Flip unit over to install backer. Nail
into unnished edges.
Retourner l’unité à l’envers pour
installer la planche d’appui. La
clouer dans les bords non nis.
Voltee la unidad para instalar el
respaldo. Coloque clavos en los
bordes sin acabados.

14
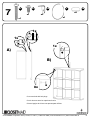
7
FF
GG HH
II DD
8x
1x
DD
II
HH
GG
x1
x1
x2
x1
A)
B)
Wall Stud
Colombage
Poste de
pared
1x
1x
x8
FF
HH
© ClosetMaid Corporation 2015 | Ocala, FL 34471 | 1-800-874-0008 | www.closetmaid.com | www.closetmaid.ca
Cover cam hole with hole plugs.
Couvrir les trous avec les capuchons fournis.
Cubra el agujero de la leva con tapones para oricios.
Page is loading ...
Page is loading ...
-
 1
1
-
 2
2
-
 3
3
-
 4
4
-
 5
5
-
 6
6
-
 7
7
-
 8
8
-
 9
9
-
 10
10
-
 11
11
-
 12
12
-
 13
13
-
 14
14
-
 15
15
-
 16
16


ClosetMaid 9 Cube Organizer Operating instructions
- Type
- Operating instructions
Ask a question and I''ll find the answer in the document
Finding information in a document is now easier with AI
in other languages
Related papers
-
ClosetMaid 1109 Operating instructions
-
 ClosetMaid 6 Cube Organizer Installation guide
-
 ClosetMaid Adjustable 9-cube Organizer Installation guide
-
 ClosetMaid Adjustable 6-cube Organizer Installation guide
-
 ClosetMaid 3-cube Bench Installation guide
-
ClosetMaid 13503 Operating instructions
-
-
 ClosetMaid 3 - Shelf Bookcase Installation guide
-
 ClosetMaid 13502 Operating instructions
-
 ClosetMaid 9-cube Organizer Installation guide


