Page is loading ...

Iron Balusters
Installation Instructions
IMPORTANT: Please read instructions thoroughly before beginning.
The following instructions are designed to be used for the installation of our Iron Balusters. Before proceeding with the following steps, the hand rail height should already be
determined, the baluster locations should already be marked on the hand rail, treads and balcony, and the newel posts should already be installed.
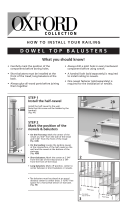
STEP 1 - DRILL THE HAND RAIL AND TREADS:
1. Drill a 9/16" diameter hole, 1" deep on the bottom of the hand rail at
each pre-marked baluster location (Drawing 1a).
2. Drill an 11/16" diameter hole, 3/4" deep on each tread at each marked
baluster location (Drawing 1b).
STEP 2 - TRIM THE BALUSTERS:
1. Temporarily attach the hand rail to the newel posts in order to determine
the required length for each baluster.
2. At each baluster location, measure the length between the tread and the
lower side of the respective drilled hole in the hand rail (Drawing 2a).
Add 1" to the measurement for insertion into the hand rail and 3/4" to the
measurement for insertion into the tread. Transfer the measurements to
each respective baluster. Remove the hand rail from the newels.
3. Trim each baluster from the bottom using a metal cutting chop saw with
a 14" abrasive blade or a portable band saw (Drawing 2b). Be sure to
seclude your work area as hot sparks from a metal cutting chop saw can
GDPDJHQHDUE\ZLQGRZVÀRRULQJZDOOVHWF
STEP 3 - DRILL THE BALUSTERS:
1. It is recommended that every 8th baluster be screwed to the tread and
hand rail, for a more secure stairway. Determine which balusters will be
installed with screws for #2 below.
2. For rake balusters, drill a hole perpendicular through the top pin on
HYHU\RWKHUEDOXVWHUWRDFFHSWDÀDWKHDGVFUHZ)RUEDOFRQ\EDOXVWHUV
GULOOWKHKROHDWDQDQJOHWRDFFHSWDÀDWKHDGVFUHZ'UDZLQJD'ULOOD
second hole at an angle through the bottom of the balusters to accept a
ÀDWKHDGVFUHZ
3. Countersink each hole to accept the screw head (Drawing 3b).
NOTE: For interior use only
Drawing 1a Drawing 1b
Drawing 3a
Rake Balusters
Balcony Balusters
Drawing 2a
Drawing 2b
Countersink
Countersink
Drawing 3b
Rake Balusters
Balcony Balusters
1

Iron Balusters
Installation Instructions
STEP 4 - SECURE THE BALUSTERS TO THE
TREADS:
1. Fill the drilled tread holes half full with two-part epoxy
or construction adhesive may be used (Drawing 4a).
2. With a bottom base on each baluster, place all balusters in position
on the treads. Fill any void around the bottom of the balusters with
two-part epoxy or construction adhesive. Rotate each baluster
slightly to even the adhesive coverage. Use a combination square to
straighten each baluster (Drawing 4b).
6HFXUHHYHU\WKEDOXVWHUZLWKDÀDWKHDGVFUHZ'UDZLQJF
STEP 5 - SECURE THE BALUSTERS TO THE
HAND RAIL:
1. If top baluster collars are being used, place one on each baluster
(Drawing 5a). (Note: The angle of the rake top baluster collars can
be adjusted to the proper angle by using a hand held grinder).
2. Fill the holes in the hand rail half full with construction adhesive
(Drawing 5b). (Note: masking tape may be applied over the holes if
the construction adhesive has a runny consistency).
3. Position the hand rail on top of the balusters and permanently secure
the hand rail to the newel posts. If masking tape was used over the
holes in the hand rail, the balusters will push through the tape when
the hand rail is installed. Then, remove the remainder of the tape on
the bottom of the hand rail (Drawing 5c).
6HFXUHHYHU\WKEDOXVWHUWRWKHKDQGUDLOZLWKDÀDWKHDGVFUHZ
(Drawing 5d).
STEP 6 - TIGHTEN THE BALUSTER COLLARS:
1. Any protruding epoxy or adhesive should be left to dry
(about 24 hours) and can then be removed with a utility knife.
2. Using an allen wrench, secure each top collar against the hand rail
and each bottom collar against the tread (Drawing 6).
INSTALLING ADJUSTABLE KNUCKLES
Adjustable Knuckles can be used on S4S balusters to create a unique
baluster design.
1. After installing the balusters into the tread, but before placing the top
baluster collars or hand rail on top of the balusters, slide the desired
number of Adjustable Knuckles over each baluster.
2. After placing the hand rail on top of the balusters, slide each
adjustable knuckle to the desired location and tighten the set screw
using an allen wrench (Drawing 7).
Baluster
Collars
Allen
Wrench
Allen
Wrench
Drawing 4a
Drawing 4b
Drawing 4c
Drawing 5a
Drawing 5c
Drawing 6
Drawing 7
Drawing 5d
Drawing 5b
NOTE: For interior use only
2
/