
820459604
©2006-2007 Dometic Corporation
LaGrange, IN 46761
INSTALLATION AND
OPERATING INSTRUCTIONS
REFRIGERATOR FOR LP-GAS
& ELECTRIC OPERATION
RM2410
RM2510
®
USA Corporate Ofce CANADA
Service Ofce 2320 Industrial Parkway Elkhart, IN 46515 Dometic Corporation
Dometic Corporation 46 Zatonski, Unit 3
2320 Industrial Pkwy. Brantford, ON N3T 5L8
Elkhart, IN 46516 For Service Center Assistance CANADA
Phone: 574-294-2511 Call: 800-544-4881 Phone: 519-720-9578
®
MO-M 0728
FOR YOUR SAFETY
If you smell gas:
1. Open windows.
2. Don’t touch electrical switches.
3. Extinguish any open ame.
4. Immediately call your gas supplier.
POUR VOTRE SÉCURITÉ
Si vous sentez une odeur de gaz:
1. Ouvrez les fenêtres.
2. Ne touchez à aucun interrupteur.
3. Éteignez toute amme nue.
4. Avertissez immédiatement votre
fournisseur de gaz.
FOR YOUR SAFETY
Do not store or use gasoline or other
ammable vapors and liquids in the
vicinity of this or any other appliance.
POUR VOTRE SÉCURITÉ
Ne pas entreposer ni utiliser de l’essence
ni d’autres vapeurs ou liquides inamma-
bles à proximité de cet appareil ou de tout
autre appareil.
Improper installation, adjustment, altera-
tion, service or maintenance can cause
injury or property damage. Refer to this
manual. For assistance or additional infor-
mation consult a qualied installer, serv-
ice agency or the gas
supplier.
Une installation, un réglage, une modi-
cation, une réparation ou un entretien non
conforme aux normes peut entraîner des
blessures ou des dommages matériels.
Lisez attentivement le mode d’emploi
fourni avec l’appareil. Pour obtenir de
l’aide ou des renseignements supplémen-
taires, consultez un installateur ou un
service d’entretien qualié ou le fournis-
seur de gaz.
WARNING
!
AVERTISSEMENT
!


- 3 -
INTRODUCTION
Thank you for entrusting us to supply your new quality-guaranteed refrigerator which is designed for storage of foods, frozen
foods and for making ice.
The manual should be kept and stay with the refrigerator if it is ever moved or change owners. Installation and service should be
and correctly. Be aware of possible safety hazards when seeing alert symbols on the refrigerator as well as in this manual.
CONTENTS
SYMBOLS
The following symbols are used throughout the manual:
Indicates a potentially hazardous situation, which, if not avoided, could result
in death or serious injury.
Indicates a potentially hazardous situation, which, if not avoided, may result in
minor or moderate injury.
Used without the safety alert symbol indicates, a potentially hazardous situation which, if not avoided
may result in property damage.
Information
Step-by-step instructions
CAUTION
!
WARNING
!
CAUTION
CERTIFICATION AND CODE REQUIREMENTS . . . . . . .4
MOUNTING INSTRUCTIONS . . . . . . . . . . . . . . . . . . . . . .
9
REFRIGERATOR OVERVIEW . . . . . . . . . . . . . . . . . . . .10
OPERATING INSTRUCTIONS . . . . . . . . . . . . . . . . . . . .11
STORAGE COMPARTMENTS . . . . . . . . . . . . . . . . . . . .
12
MAINTENANCE & SERVICE . . . . . . . . . . . . . . . . . . . . .
13
TROUBLESHOOTING . . . . . . . . . . . . . . . . . . . . . . . . . .14
APPENDIX A - SPARE PARTS . . . . . . . . . . . . . . . . . . . .
15
APPENDIX B - REARVIEW EQUIPMENT . . . . . . . . . . .
16
APPENDIX C - WIRING DIAGRAM . . . . . . . . . . . . . . . .
17
APPENDIX D - CONSUMER SUPPORT . . . . . . . . . . . .
18
APPENDIX E - DOMETIC WARRANTY &
MAINTENANCE SCHEDULE . . . . . . . . . . . . . . . . . . . . . .19

- 4 -
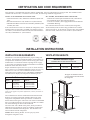
conform with local codes, or in absence of local codes, the following standards as applicable.
CERTIFICATION AND CODE REQUIREMENTS
In the U.S. the installation must conform with:
-
If an external electrical source is utilized, the refrigerator, when
installed, must be electrically grounded in accordance with lo-
-
In CANADA, the installation must conform with:
and Mobile Housing.
If an external electrical source is utilized, the refrigerator,
when installed, must be electrically grounded in accordance
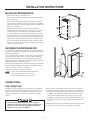
VENTILATION HEIGHTS
Minimum ventilation heights
Installation with roof vent and lower side vent
Minimum
ventilation
height
Condenser
The upper vent should be centered
over the condenser coil at the back of
the refrigerator.
INSTALLATION INSTRUCTIONS
VENTILATION REQUIREMENTS
operation. The installation should be made in such a manner as
to separate the combustion system from the living space of the
mobile home or recreational vehicle. Openings for air supply
or for venting of combustion products should have a minimum
lower fresh air intake and one
upper exhaust ventroof vent
and one lower side vent. The ventilation kits shown in this
The table below displays the components and their part no.
* Replace “XXX” with the color code numbers. For color codes,
contact your supplier. For further information, contact your dealer or
distributor.
The ventilation kits must be installed and used without modi-
refrigerator compartment has be provided for ventilation of
heavier-than-air fuel gases. The lower vent of the recommended
-
tion and ventilating air must not be obstructed.
adequate access opening for ready serviceability of the burner
and control manifold of the refrigerator. This should be cen-
tered on the back of the refrigerator.
NOTE!
through the refrigerator vents.
Certied vent system kits
Kit no. Components Part no.

- 5 -
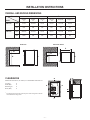
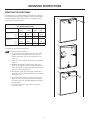
INSTALLATION INSTRUCTIONS
Dimensions
Model
Overall Recess
Height
Width
B
Depth
Height
H
Width W Depth D
RM2410
inches
mm
RM2510
inches
mm
Side view View from above
D
H A
D
W
C
B
OVERALL AND RECESS DIMENSIONS
CLEARANCES
G
K
L
M
The distance between the rearmost part of the refrigerator and the
wall behind the refrigerator.
G
K K
L
M

- 6 -
INSTALLATION INSTRUCTIONS
INSTALLING REFRIGERATOR
The refrigerator must be installed in a substantial enclosure
and must be level.
-
ing must be removed or protected by a metal or wood panel
beneath the appliance, which extends at least full width and
depth of the appliance.
installed must be sealed. Make sure that there is a complete
seal between the front frame of the refrigerator and the
strip is applied to the rear surface of the front frame for this
the enclosure. The sealing should provide a complete isola-
tion of the appliance’s combustion system from the vehicle
interior. Be careful not to damage the sealing strip when the
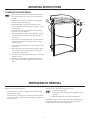
SECURING THE REFRIGERATOR
It is important to follow the sequence in securing refrigerator in
enclosure since failure in doing that can cause leakage between
The heat produced at the rear of the refrigerator will become
trapped in this space, making the top of the refrigerator hot and
Install the six screws in the following order:
Two screws installed through the front base.
Two screws installed in the top frame.
Two screws installed in the rear base.
CONNECTIONS
GAS CONNECTION
Hook up to the gas supply line is accomplished at the manual
checked for leaks with a non-corrosive commercial bubble
solution
2.
3 rd.
2 nd.
1 st.
The gas supply system must incorporate a pressure regulator
column. When testing the gas supply system at test pressures:
> 1/2 psi - the refrigerator and its individual shutoff valve
must be disconnected from the gas supply piping system.
- the appliance must be isolated from the gas sup-
ply piping system by closing its individual manual shutoff
valve.
If detailed instructions on the installation and connection to the
gas supply are required, contact your dealer or distributor.
•
•
EXPLOSION HAZARD. Never use an open
warning could cause an explosion resulting in
death or severe personal injury.
WARNING
!

- 7 -
ELECTRICAL CONNECTION
120 V AC CONNECTION
plug for your protection against shock hazards and should be
plugged directly into a properly grounded threeprong recep-
tacle. Do not cut or remove the grounding prong from this
plug.
The free length of the cord is 2 feet and
it is recommended that the receptacle is
located to the left of the refrigerator
access through the vent door. The cord
should be routed to avoid direct contact
other components that could damage the
cord insulation.
12 V DC CONNECTION (RM2510)
power for operation of the automatic reigniter. The connection
NOTE!
Do not use the chassis or vehicle frame as one of the
120 Volt AC
receptacle
6”
INSTALLATION INSTRUCTIONS
TESTING LP GAS SAFETY SHUTOFF
The gas safety shutoff must be tested after the refrigerator is
RM2410
To test the gas safety shutoff, proceed as follows:
Turn on the refrigerator.
-
to the burner jet. Be careful not to damage the burner
jet.
burner jet. Bubbles indicate a defective gas safety
shutoff and service is required.
If no bubbles were present at the burner jet, rinse the
-
.
RM2510
To test the gas safety shutoff, proceed as follows:
Turn on the refrigerator.
out.
-
should not be sparking.
to the burner jet. Be careful not to damage the burner
jet.
burner jet. Bubbles indicate a defective gas safety
shutoff and service is required.
If no bubbles were present at the burner jet, rinse the
2.
6.
7.
8.
2.
6.
7.
8.

- 8 -
MOUNTING THE DOOR PANEL
The refrigerator is normally delivered without door panel. Be-
fore mounting the door panel, read this instruction thoroughly
and check that the panel dimensions are in compliance with
those given in the table below.
Panel dimensions
max. thickness 5/32" (4 mm)
Model Height
max min
Width
max min
mm
inch
mm
inch
To mount the panel, follow these steps:
On new refrigerators, the decoration strip is taped
inside the door; if installed on the door, remove
Insert one vertical edges into the groove of the door
Bend the panel gently so that the free side of the
panel can be slipped into the corresponding groove
Between the upper edge of the panel and the door
frame there is a gap which should be covered by the
decoration strip.
the door frame.
Secure the decoration strip with the two screws
2.
6.
MOUNTING INSTRUCTIONS
1
1
2
3
4
5
6
1
1

- 9 -
MOUNTING INSTRUCTIONS
CHANGING THE DOOR SWING
Open the door and remove the two screws holding
the top decoration. The screws are accessible from
beneath.
Unscrew the bottom hinge pin.
lower hinge pin.
Screw the lower hinge pin in the hole from which
the plastic cap was removed.
Before replacing the door on the refrigerator, remove
the catches and move them to the opposite side of
the cabinet.
The holes are covered with plastic caps that must be
removed and inserted in the holes that previously
held the catches.
Unscrew the handle and move it to the opposite side
of the door.
Insert the plastic caps into the holes left open on the
of their removal.
door closes easily and the gasket seals well on all
sides.
2.
6.
7.
8.
REFRIGERATOR REMOVAL
To remove the refrigerator, follow these steps:
Loosen the screws anchoring the refrigerator to the
enclosure.
Slide the refrigerator out of the compartment.
refrigerator, make sure the sealing strips are properly posi-
2.
Before removing the refrigerator:
Shut off the gas supply.
Disconnect the gas supply line at the rear of the refrigerator.
-
ing connections.

- 10 -
REFRIGERATOR OVERVIEW
ABSORPTION COOLING SYSTEM
-
gen gas, which causes the ammonia to evaporate, creating a
cold condition in the freezer.
When starting this refrigerator for the very
first time, the cooling cycle may require up to
four hours of running time before the cooling
unit is fully operational.
downward by gravity through this section.
Sodium chromate is used for corrosion protection less than
2 weight % of the coolant.
LEVELING THE REFRIGERATOR
Leveling is one of the requirements for proper operation with
absorption refrigerators. To ensure proper leveling the vehicle
-
erator operating, the vehicle should be leveled to prevent this
loss of cooling.
If the refrigerator is operated when it is not level and the vehi-
cle is not moving, liquid ammonia will accumulate in sections
of the evaporator tubing. This will slow the circulation of hy-
drogen and ammonia gas, or in severe cases, completely block
it, resulting in a loss of cooling.
When the vehicle is moving, the leveling is not critical, as the
rolling and pitching movement of the vehicle will pass to either
side of level, keeping the liquid ammonia from accumulating in
the evaporator tubing.
D ABCE
Safety push-button
A�
B�
C�
D�
E�
RM2410
CONTROL PANEL
E C B A
Safety push-button
A�
B�
C�
E�
RM2510
-
eling or parked near gasoline pumps, shut off all
or severe personal injury.
WARNING
!

- 11 -
RM2510
again, repeat the procedure.
NOTE!
the lighting procedure several times to purge the air out of the
gas lines.
ELECTRIC OPERATION
-
nected to the power supply.
THERMOSTAT
The refrigerator is equipped with a thermostat which can be ad-
justed by turning the thermostat knob to MAX
the desired cabinet temperature.
In gas operation, the thermostat closes its main valve
and the burner runs continuously at the bypass rate or pilot.
In electric operation, the contacts in the thermostat are open
and the heating element is off.
MAX: In gas operation, the thermostat allows the burner to
When the thermostat reaches the set temperature, it will cut the
burner back to bypass or, in electric operation, shut off the heat-
ing element.
The setting of the thermostat is not critical, but we recommend
it gets warmer outside, adjust the thermostat knob closer to
MAX.
SHUTOFF
refrigerator will not be in operation for a period of weeks, you
should empty, defrost and clean it; and leave the doors ajar. Dry
the ice tray and keep it outside the cabinet.
2.
6.
7.
2.
•
•
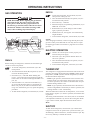
OPERATING INSTRUCTIONS
RM2410
Before starting the refrigerator, check that all the manual gas
-
not go out. If the burner goes out, repeat the lighting
procedure.
2.
after that the RV has not been used for some
time, please check that the gas path between
the burner jet and the burner tube has not been
WARNING
!
GAS OPERATION
Pressure test port
Burner jet
Burner tube
Spark electrode
Burner mounting screw
Thermocouple
Spring
Thermocouple
connectio
n

- 12 -
REFRIGERATOR VOLUME
Total refrigerated volume:
FOOD STORAGE COMPARTMENT
The food storage compartment is completely closed and
unventilated, which is necessary to maintain the required low
strong odor or those that absorb odors easily should be cov-
crispness. The coldest positions in the refrigerator are under the
areas are on the upper door shelves. This should be considered
when
placing different types of food in the refrigerator. One half of
designed to prevent large containers half-gallon of milk or
FROZEN FOOD STORAGE COMPARTMENT
This compartment is not designed for deep or quick freezing of
food.
Quick frozen soft fruits and ice cream should be placed in
the coldest part of the compartment, which is at the bottom
of the aluminum liner.
compartment.
frozen food storage compartment provided they are pre-
cooled in the refrigerator. They can be stored about three
times longer in the frozen food compartment as compared
to the fresh food compartment. To prevent food from drying
out, keep it in covered dishes, containers, plastic bags or
wrapped in aluminum foil.
ICE MAKING
place the tray in direct contact with the freezer shelf. To release
the ice cubes, hold the tray with both hands and twist the tray.
the tray with water and place the tray on the freezer shelf.
require ice. Be sure to turn the thermostat back to normal set-
ting when the ice is formed; the refrigerator might otherwise
become too cold.
STORAGE COMPARTMENTS
DEFROSTING
Leave the cabinet and freezer doors open. Defrosting
water and placing it on the freezer shelf.
When all the frost has melted, empty the drip tray
and dry the interior of the refrigerator with a clean
cloth.
Then, reset the thermostat to its normal position.
2.
PRODUCT CARE
CLEANING
usually done after it is defrosted or put into storage. To clean
the interior lining of the refrigerator, use lukewarm, weak soda
lower vent, upper vent and area between these openings for any
the coils on the back of the refrigerator. Use a soft bristled
brush to dust off the coils. It is important to keep the refrigera-
tor area free from combustible material, gasoline and other
EXPLOSION HAZARD. Never store explosive
substances in the refrigerator, such as cigarette
to heed this warning could cause an explosion
resulting in death or severe personal injury.
WARNING
!
Do not use:
A knife or an ice pick, or other sharp tools to
remove frost from the freezer shelves. It can
create a leak in the ammonia system.
A hot air blower. Permanent damage could result
from warping the metal or plastic parts.
•
•
CAUTION

- 13 -
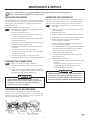
REPLACING THE HEATER
The heat necessary for the operation of an absorption cooling
unit is supplied by an electric heater mounted in a pocket of the
boiler system. The refrigerator is equipped with one electric
To replace the heater, follow these steps:
-
ture by loosening the two screws.
Disconnect the heater leads from the terminal block.
With a pair of pliers, unfold the lug holding the lid of
the boiler casing and open the lid.
accessible.
Turn and lift the heater out of its pocket.
hose around the leads.
CHECKING THE CONNECTIONS
leaks.
connections. The appearance of bubbles indicates a
leak and should be repaired immediately
CHECKING THE LP GAS PRESSURE
the test port just ahead of the burner jet.
2.
6.
7.
8.
2.
INSPECTING THE FLUE BAFFLE
It should be reasonably clean and free of soot. Heavy soot for-
and burner both require cleaning in the following manner:
to the refrigerator.
Shut off the gas valve.
Disconnect the wire from the high voltage electrode.
remove the burner assembly.
-
with compressed air.
Before removing burner jet:
alcohol and blow it out with compressed air.
2.
6.
7.
8.
-
-
-
MAINTENANCE & SERVICE
Service must be done on a regular schedule to keep the refrigerator operating properly.
Pressure test port
Burner jet
Burner tube
Spark electrode
Burner mounting screw
Thermocouple
Spring
Thermocouple
connection
EXPLOSION HAZARD. Never use an open
warning could cause an explosion resulting in
death or severe personal injury.
WARNING
!
Do not use a wire or pin when
cleaning the burner jet as damage can occur to
the precision opening. -
WARNING
!

- 14 -
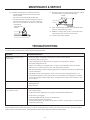
MAINTENANCE & SERVICE
burner bracket.
The color of the flame is clear blue over the slots
of the burner.
-
-
-
-
Clear blue color
of flame
If you run into a problem, refer to the troubleshooting table below.
TROUBLESHOOTING
the electrode for proper location and gap.
-
tings for leaks with soapy water.
Electrode
Burner tube
1/8” to 3/16
(3-5 mm)
Symptom Check/Remedial action
Refrigerator or freezer is not
cold enough
an authorized
air circulation.
Odors from fumes Dislocated burner
Damaged burner
The refrigerator does not work in
gas operation mode.
column at pressure tap.
model, product- and serial-number. These details are stated on the data label inside the compartment.

- 15 -
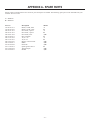
APPENDIX A - SPARE PARTS
A
=
Part no. Description Model
A
A
A

- 16 -
Inlet fitting
Flexible cord
Burner jet
Screw for protection cover
Protection cover
Flue baffle
Heater
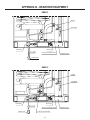
APPENDIX B - REARVIEW EQUIPMENT
Inlett fitting
Flexible cord 12 volt DC terminal block
Burner jet
Screw
for protection cover
Protection cover
Flue baffle
Heater
RM2410
RM2510

- 17 -
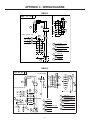
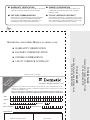
APPENDIX C - WIRING DIAGRAM
F
2
1
6
2
G
4
B
C
2
5
1
1
A
C
E
2
A
N
L
B
D
D
3
1
2
N
L
1
2
3
4
5
6
A
B
C
D
E
F
G
A
F
G
293 00 92 2
100/120 VOLTS AC
12 VOLTS DC
100/120 VOLTS AC 12 VOLTS DC
WHITE
BLACK
GREEN
GREEN/YELL
OW
RED
GREY
SWITCH
THERMOSTAT
JUNCTION BLOCK
HE
ATER
TERMINAL BLOCK
REIGNITER
PIL
OT LAMP
5
RM2410
RM2510
385 13 76
3
1
2
D
C
1
1
A
2
120 VOLTS AC
L
N
C
B
N
L
A
B
D
120 VOLTS AC
WHITE
BLACK
GREEN
1
2
3
HEATER
D
C
JUNCTION BLOCK
THERMOSTAT
B
SWITCH
A
1
2
3
4L
5N 5a
4a
3a
2a
1a
5N 5a
4a4L
3 3a
2a2
1 1a

- 18 -
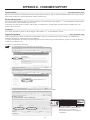
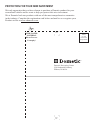
. These should be available from your
Timely registration will allow for enhanced communication and service under the terms of the warranty, see
website www.edometic.com.
To register on-line, follow these steps:
.
.
button.
2.
Service and spare parts
Dometic website www.dometicusa.com
Contact us
Register the appliance www.edometic.com
stated on the data label in the refrigerator
compartment.
APPENDIX D - CONSUMER SUPPORT

- 19 -
APPENDIX E - DOMETIC WARRANTY & MAINTENANCE SCHEDULE
IMPORTANT!
Valuable Dometic Refrigerator Warranty
&
Maintenance Schedule
moments and familiarize yourself with the program. We at

- 20 -
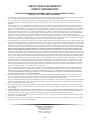
THE SELLER NAMED BELOW MAKES THE FOLLOWING WARRANTY WITH
RESPECT TO THE DOMETIC PRODUCT:
This warranty will be in effect for three years on parts and freight and two years on labor from the date of purchase by the
purchase.
This warranty does not cover conditions unrelated to the material and workmanship of the product. Such unrelated conditions
any accident to or misuse of any part of this product and any alteration by anyone other than the Seller or its authorized repre-
-
-
compressor, second absorption loop, display escutcheon, lower toe plate, humidity switch, frame heater mullion, icemaker mul-
This warranty requires the Original Purchaser to provide preventative maintenance on a yearly basis, starting at the
anniversary of his date of purchase.
-
an inspection, cleaning and full diagnostics performed on the entire electronic system, burner assembly, wiring and cooling unit.
The Seller does not authorize any person or company to create any warranty obligations or liability on their behalf. This war-
provided under the terms of this warranty shall carry only the non-expired portion of this warranty.
In no event shall either seller be liable for incidental or consequential damages. This includes any damage to another product or
products resulting from such a defect. Some states do not allow the exclusion or limitation of incidental or consequential dam-
ages, so the above limitations may not apply.
of this limited warranty. Some states do not allow limitations on how long an implied warranty can last, so the above limitation
may not apply.
The Seller reserves the right to change the design of any product without notice and with no obligation to make corresponding
changes in products previously manufactured.
2.
5.
6.
7.
8.
DOMETIC CORPORATION
Warranty Department
LIMITED THREE-YEAR WARRANTY
DOMETIC REFRIGERATORS
Page is loading ...
Page is loading ...
Page is loading ...
Page is loading ...
-
 1
1
-
 2
2
-
 3
3
-
 4
4
-
 5
5
-
 6
6
-
 7
7
-
 8
8
-
 9
9
-
 10
10
-
 11
11
-
 12
12
-
 13
13
-
 14
14
-
 15
15
-
 16
16
-
 17
17
-
 18
18
-
 19
19
-
 20
20
-
 21
21
-
 22
22
-
 23
23
-
 24
24


Ask a question and I''ll find the answer in the document
Finding information in a document is now easier with AI
Related papers
-
Dometic RGE400 User manual
-
-
Dometic Electronic Water Valve Replacement Owner's manual
-
-
-
Dometic RM2350 User manual
-
-
-
-
Other documents
-
Design House 519298 Operating instructions
-
Hasbro Koosh Bubble Whistle Operating instructions
-
Unbranded HVD-SGTCV-S User manual
-
Electrolux RA1302 User manual
-
 Unique Gas Products Unique 8 UGP 7.8 Owner's manual
-
-
Unique UGP-6C SM W User manual
-
Unique UGP-10C SM B Installation guide
-
Norcold N1095 Installation guide
-
