1
WARNING: To ensure that drive is not unexpectedly started,
turn off and lock out or tag power source before proceeding.
Failure to observe these precautions could result in bodily
injury.
INSTALLATION:
1. Make sure that take-up bearing corresponds to the frame
that is to be used.
2. Bolt frame to mounting supports using adequate bolts.
If pull force exceeds the friction force due to clamping, a
stop bar should be welded to the mounting support in the
direction of load.
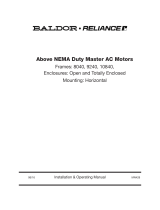
3. Remove bolt (A) Fig. 1, and pivot upper frame assembly to
the full open position.
WARNING: Care should be taken that upper frame assembly
is adequately supported and in a position where it will not
close accidently. Failure to observe these precautions could
result in bodily injury.
4. Place square retaining nut into slot of take-up bearing,
then place adjusting screw through hole in end of takeup
bearing. Thread adjusting screw into square retaining nut
until locking pin hole lines up. Support bearing housing and
drive locking pin (packaged with frame) into retaining nut
and through adjusting screw. Install adjusting nut on other
end of adjusting screw.
WARNING: Because of the possible danger to persons(s) or
property from accidents which may result from the improper
use of products, it is important that correct procedures be
followed. Products must be used in accordance with the
engineering information specified in the catalog. Proper
installation, maintenance and operation procedures must be
observed. The instructions in the instruction manuals must
be followed. Inspections should be made as necessary to
assure safe operation under prevailing conditions. Proper
guards and other suitable safety devices or procedures as
may be desirable or as may be specified in safety codes
should be provided, and are neither provided by Baldor
Electric nor are the responsibility of Baldor Electric. This unit
and its associated equipment must be installed, adjusted
and maintained by qualified personnel who are familiar
with the construction and operation of all equipment in
the system and the potential hazards involved. When risk
to persons or property may be involved, a holding device
must be an integral part of the driven equipment beyond the
speed reducer output shaft.
Installation Manual for DODGE
®
Center-Pull
Take-Up Frame Assemblies
These instructions must be read thoroughly before installing or operating this product.
5. Install take-up bearing and adjusting screw assembly on
shaft so that the collar faces outward. This allows easy
locking of bearing to shaft and ample access to the lube
tting after installation.
WARNING: Take necessary steps to insure that take-up
bearing does not slip off shaft while installing bearing and
shaft assembly into take-up frame base. Failure to observe
these precautions could result in equipment damage.
6. Lower take-up bearing and shaft assembly into lower
half of frame, placing adjustment nut into the U portion of
the take-up frame end plate. With the bearing and shaft
assembly still supported, position bearing on shaft so
bearing housing slots line up with frame guide rails. Tighten
setscrew once bearing is positioned.
7. Pivot top frame assembly into position capturing the
take-up bearing between the frame guide rails. Install bolt
and nut (A). If possible, load should be parallel to take-up
screw.
8. If two take-up frames are used to support a shaft, make
sure that the guide rails are parallel to each other to prevent
blinding and preloading of the bearings. When tensioning
using the take-up frames, it is imperative that both frames
be tightened either simultaneously, or if individually, the
amount of incremental travel should be small to prevent
excessive misalignment of one frame relative to the other.

P.O. Box 2400, Fort Smith, AR 72902-2400 U.S.A., Ph: (1) 479.646.4711, Fax (1) 479.648.5792, International Fax (1) 479.648.5895
Dodge Product Support
6040 Ponders Court, Greenville, SC 29615-4617 U.S.A., Ph: (1) 864.297.4800, Fax: (1) 864.281.2433
www.baldor.com
© Baldor Electric Company
MN3068 (Replaces 499932)
All Rights Reserved. Printed in USA.
3/14 Web only
*3068-0314*
Square Nut
Pin
Frame
Adjusting
Nut
Screw
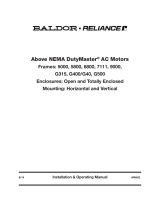
Center Pull Take-Up Frame Part Numbers
Frame Assembly Size Nominal Travel Frame Part Number Adjusting Nut Screw Assembly *
CP308 x
12
18
24
30
36
019200
019201
019202
019203
019204
019704
019704
019704
019704
019704
389850
389851
389852
389853
389854
CP400 x
12
18
24
30
36
019210
019211
019212
019213
019214
019705
019705
019705
019705
019705
389855
389856
389857
389858
389859
CP408 x
12
18
24
30
36
019220
019221
019222
019223
019224
019706
019706
019706
019706
019706
389860
389861
389862
389863
389864
CP502x
12
18
24
30
36
019230
019231
019232
019233
019234
019707
019707
019707
019707
019707
389865
389866
389867
389868
389869
CP515x
12
18
24
30
36
019240
019241
019242
019243
019244
019708
019708
019708
019708
019708
389870
389871
389872
389875
389874
CP613x
12
18
24
30
36
019250
019251
019252
019253
019254
019709
019709
019709
019709
019709
389875
389876
389877
389878
389879
CP810x
12
18
24
30
36
019260
019261
019262
019263
019264
019710
019710
019710
019710
019710
389880
389881
389882
389883
389884
CP908x
12
18
24
30
36
019270
019271
019272
019273
019274
019710
019710
019710
019710
019710
389885
389886
389887
389888
380889
CP1004x
12
18
24
30
36
019280
019281
019282
019283
019284
019712
019712
019712
019712
019712
389890
389891
389892
389893
389894
* Includes screw, pin and square nut.
/